
What are the core differences between a drive-hold hand release action (DH-hand release action) and a non-drive-hold hand release action (non-DH-hand release action)?
Click here if you want to go back to the video project's index page.
I first became very interested in the concept of a DH-hand release action when I viewed capture images derived from a video taken with a Phantom camera showing that the clubface remains relatively square to the clubhead for many inches through impact.
Kelvin Miyahira owns a Phantom camera and he posted a number of capture images of the clubhead passing through impact at Phantom camera capture frame rates of up to 100,000 frames/second.
Here is an example-:
Video - https://www.youtube.com/watch?v=-bj2sWHW1Mg
Here are capture images from the video.
Note that the clubhead appears to be traveling a distance of ~5" between image 1
and image 3, and the clubface appears to be relatively square to the target
during this entire time period.
I never previously thought that professional golfers could keep their clubface so stable, and relatively square to the target, for so many inches through impact, and I started to think about this issue with greater intensity. I subequently spent many, many hours thinking about the underlying golf biomechanics that would allow a golfer to maintain such a stable clubface through impact, and I believe that I now understand, and can explain, the underlying golf biomechanics.
Consider, as another example, these capture images (taken at a slower videocamera frame rate) of the clubhead moving through impact from an Adam Scott swing video ( https://www.youtube.com/watch?v=nxOOuhMW0kA )

Note that the clubhead moves slightly upwards through impact, which is fully expected if Adam Scott places his tee at low point. Low point is the lowest point in the clubhead arc and one would naturally expect the clubhead to start to move in an upwards direction after low point. However, what really interested me was the fact that the clubface was so stable through impact. Image 1 is at impact and image 4 is approximately 8" post-impact, and yet the clubface still appears to be roughly facing the target with very little counterclockwise roll of the clubface happening between image 1 and image 4.
The question that particularly intrigued me was the question regarding what biomechanical method(s) Adam Scott was using to keep the clubface so stable through impact.
Here are capture images of Adam Scott swinging through impact - from that same swing video.
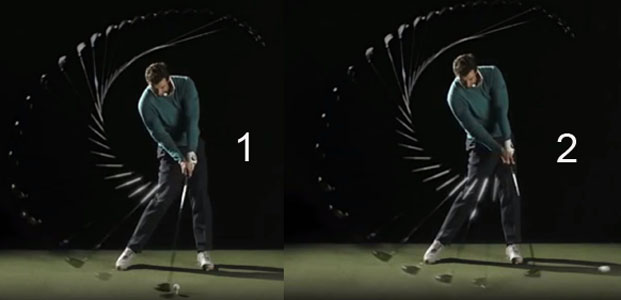
Image 1 is at impact and image 2 is at P7.2 (which I arbitrarily define as the
end of the immediate impact zone, which is the peri-impact zone of clubhead
travel between impact and P7.2). Note that Adam Scott has kept his clubface very
stable between impact (image 1) and P7.2 (image 2) even though the clubhead has
traveled a distance of approximately 12" and he appears to be keeping the
clubface square to the clubhead arc - but obviously not square to the target
because that would require an artificial "straight line" clubhead travel pattern
called "steering" by Homer Kelley - during this entire time period. How does
Adam Scott achieve the desirable goal of maintaining such a high level of
clubface stability through impact?
I knew, as a result of having previously studied Adam Scott's golf swing, that he used the intact LAFW/GFLW swing technique throughout his backswing and downswing action, and I also noted that he still had an intact LAFW at P7.2 (image 2). Note that the clubshaft is still straight-in-line with his straight left arm and note that he still has a GFLW. I then realised that if a golfer used the intact LAFW/GFLW swing technique during his downswing action, that he should deliberately (intentionally) maintain his intact LAFW/GFLW alignment to well beyond impact (while simultaneously avoiding any excessive counterclockwise roll motion of his intact LAFW) if he wanted to optimally maintain a stable clubface throughout the entire immediate impact zone between P7 and P7.2.
Kelvin Miyahira coined the term "drive-hold" to describe how a golfer could maintain a stable clubface through impact, and I have also adopted his "drive-hold" term to describe a golfer's ability to keep the clubface square to the clubhead arc between impact and P7.2, which means that he is minimising the amount of clubface roll happening during that time period of clubhead travel through the immediate impact zone. What do I mean by the term "minimise"?
It is important to realise that the clubface must always be rolling (rotating) as the clubhead moves through the immediate impact zone, and it would be "artificial" and biomechanically unnatural to keep the clubface constantly facing the target during that entire time period. If a golfer minimised the amount of clubface roll during that time period to the smallest amount practically possible, then he would very likely be keeping the clubface square to the clubhead arc during the entire P7 => P7.2 time period.
Here is a diagram showing the pattern of clubface roll that would happen immediately post-impact if a golfer uses a DH-hand release action.
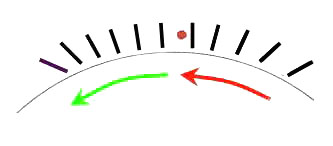
The red arrow phase represents the pre-impact phase and the green arrow phase
represents the post-impact phase of the golf swing. The thin curved black line
represents the clubhead arc, which is symmetrical to the ball-target line, and
that means that the clubhead will be traveling "in-to-square-to-in" through
impact and the clubhead path will only be perfectly square to the target at the
exact moment of impact with the ball (colored in red). During the late
downswing, the clubface (represented by the short black lines) will be closing
secondary to the release of PA#3, and if a golfer's PA#3 release timing is
perfected, then the clubface should be square to the target at impact, and also
square to the clubhead arc because the clubhead arc is square to the target at
impact.
Note that the clubface remains square to the clubhead arc in the first two drawn clubface lines post-impact, and they represent the clubface's travel time through the immediate impact zone between P7 and P7.2. A clubface that only rolls the smallest amount necessary to keep the clubface square to the clubhead arc between impact and P7.2 can be considered to be a stable clubface that has a low ROC (rate of closure) and if a golfer achieves that goal, then he is likely using a DH-hand release action through impact.
I believe that there are two biomechanical factors that would it make it very unlikely that a golfer can achieve a stable clubface with a very low ROC between P7 and P7.2, and those two biomechanical factors are i) left wrist flipping (left wrist extension) combined with an element of left wrist circumduction and/or ii) excessive left forearm supination happening through impact. Those two biomechanical elements will likely lead to a non-DH hand release action through impact where the ROC of the clubface is significantly greater than the amount needed to keep the clubface square to the clubhead arc between P7 and P7.2.
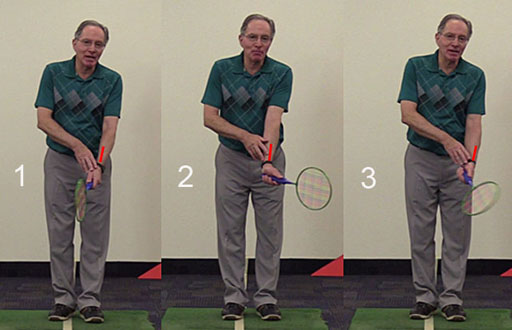
In my part 7 video, I used a badminton racquet to demonstrate what happens to the rate of clubface roll during a DH-hand release action and during a non-DH hand release action.
Capture images showing the author demonstrating a DH-hand release action.
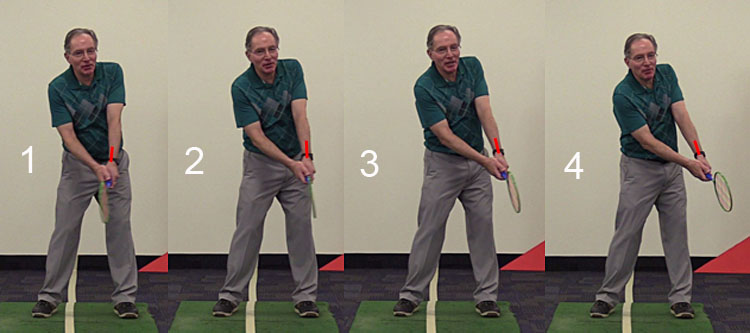
I have drawn a short red line over my left radial bone (at the level of my left
lower forearm) and studying the angular rotational relationship of that short redline relative to
the left antecubital fossa (elbow pit in front of the left elbow joint) allows
one to determine if a golfer is supinating the left forearm between P7 and P7.2.
If the short red line rotates counterclockwise faster than the left antecubital
fossa, then that means that left forearm supination is happening.
Image 1 is at impact, where the racquetface is square to the target. Note that I have a GFLW and an intact LAFW (racquet's shaft is straight-in-line with my straight left arm) and the racquetface is also straight-in-line with watchface area of my left lower forearm.
Image 2 is at P7.2, image 3 is at P7.3 and image 4 is at P7.4. Note that I have a GFLW and intact LAFW at all those post-impact positions and I never allow my left wrist to flip (extend). Note that the red line doesn't change its angular rotational relationship relative to my left antecubital fossa during the entire P7 => P7.4 time period, which means that I am not supinating my left forearm.
Note that I am keeping the racquetface square to the racquethead's arc path (equivalent to the clubhead arc) of my swing between P7 and P7.4, and that represents a DH-hand release action. Note that I am swinging my intact LAFW/GFLW unchanged between impact and P7.4 and I controlling the rate of racquetface closure by controlling the rate of counterclockwise rotation of the entire intact LAFW at the level of my left shoulder socket complex (which is the fulcrum point of my intact LAFW swing action) by i) controlling how much my left shoulder socket moves inside-left during the P7 => P7.4 time period, and by ii) simultaneously controlling the rate of external rotation of my left humeral head that is happening within the left shoulder socket during that same time period. In other words, a DHer ( = golfer who uses a DH-hand release action) biomechanically controls the rate of clubface closure through the immediate impact zone via biomechanical motions happening at the level of the left shoulder complex, and he avoids any biomechanical motions happening below the level of the left elbow that can cause the clubface's ROC to be excessive eg. left wrist flipping motion and/or any left forearm supinatory motion.
Another way of conceptually understanding how a golfer (who uses the intact LAFW/GFLW technique) ensures that he maintains an intact LAFW/GFLW during the P7 => P7.2 time period is understanding the mental concept that he is matching the angular rotational velocity of his left arm to the angular rotational velocity of the clubshaft.
Consider this Kelli Oride swing video - https://www.youtube.com/watch?v=p7hBadAiMcA
Here are capture images from the swing video.
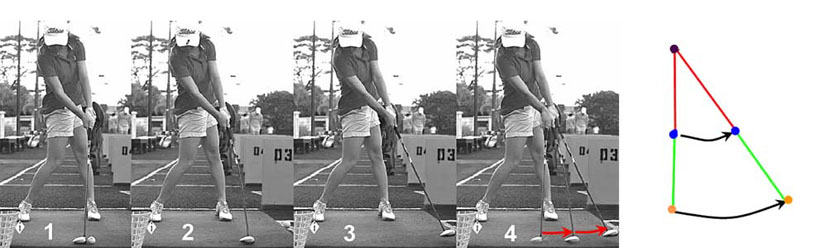
Image 1 is at impact. Image 2 is at P7.2. Image 3 is at P7.4.
Kellie Oride is an excellent DHer and she not only maintains an intact LAFW/GFLW throughout her entire downswing, but she also maintains an intact LAFW/GFLW to well beyond the end of the immediate impact zone, so that she even has an intact LAFW/GFLW at P7.4 (image 3).
Image 4 is a composite image constructed from images 1, 2 and 3. The red arrows show the distance traveled by the clubhead during the P7 => P7.4 time period, and one can readily discern that her clubhead is traveling at a faster linear speed per unit time between P7 and P7.4 than her hands. However, if you think of her left arm-clubshaft motion from an angular rotational perspective, you can discern from the diagram that they are perfectly matched - the blue dots represent her hands and the orange dots represent the clubhead - and they are both traveling at the same angular rotational velocity, which allows her to maintain an intact LAFW/GFLW during the entire P7 => P7.4 time period. Matching the angular velocity of the left arm to the angular velocity of the clubshaft is dependent on a very good sense of rhythm, and a golfer (who uses the intact LAFW/GFLW technique) has to master that "rhythmic element" if he wants to consistently maintain an intact LAFW/GFLW throughout the entire immediate impact zone.
Another biomechanical characteristic of a DH-hand release action in a golfer who maintains an intact LAFW/GFLW through impact to at least the P7.2 position, or even further to the P7.4 position, is that he has to limit the counterclockwise roll motion of the entire intact LAFW/GFLW (at the level of the left shoulder complex) during that time period in order to minimise the ROC of the intact LAFW, and therefore clubface, to only the amount needed to keep the clubface square to the clubhead arc, and to avoid a greater amount of counterclockwise rotation of the intact LAFW/GFLW, which could inevitably result in a non-DH hand release action.
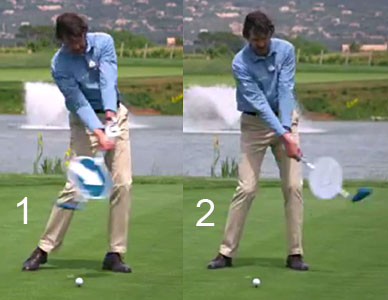
As I previously stated, the two major causes of a non-DH hand release action are i) left wrist flipping and/or ii) left forearm supination - as demonstrated in these capture images from my part 7 video where I used a badminton racquet for demonstration purposes.
I have drawn a short red line over my left radial bone (at the level of my left
lower forearm) and studying the angular rotational relationship of that short redline relative to
the left antecubital fossa (elbow pit in front of the left elbow joint) allows
one to determine if a golfer is supinating the left forearm between P7 and P7.2.
If the short red line rotates counterclockwise faster than the left antecubital
fossa, then that means that left forearm supination is happening.
Image 1 is at impact, where the racquetface is square to the target. Note that I have a GFLW and an intact LAFW (racquet's shaft is straight-in-line with my straight left arm) and the racquetface is also straight-in-line with watchface area of my left lower forearm.
Image 2 shows left wrist flipping (increased left wrist extension). During a left wrist flipping motion, the fulcrum point of the flipping action is at the level of the left wrist and it is very unlikely that the racquetface (equivalent to the clubface) will remain stable and square to a desirable racquethead (clubhead) arc during the P7 => P7.2 time period because the distance between the left wrist and the sweetspot of the racquetface (clubface) is so short and the speed of left wrist flipping may be too fast. The problem of excessive ROC of the racquetface (clubface) due to a left wrist flipping motion will be compounded if the left wrist radially deviates during the left wrist flipping action secondary to the biomechanical phenomenon of left wrist circumduction. Left wrist flipping through impact will likely produce a flipper subtype of non-DH-hand release action.
Image 3 shows left forearm supination causing excessive counterclockwise rotation of the racquetface (clubface) to a degree that is far greater than the amount needed to keep the clubface stable and square to the racquethead (clubhead) arc between P7 and P7.2. This will very likely produce a roller sub-type of non-DH hand release action.
Many amateur golfers have an excessive degree of non-DH hand release action through impact because they combine the two swing faults of left wrist flipping and left wrist supination, and they have a flip-rolling subtype of non-DH hand release action.
What amazes me is that many golf instructors deliberately teach their student-golfers to intentionally use a non-DH hand release action through impact!
Consider an example of a golf instructor - Robert Baker - who deliberately teaches golfers to use the left wrist flipper sub-type of non-DH hand release action.
Robert Baker golf instructional video - https://www.youtube.com/watch?v=CDVu0M-8ipo
Here are capture images from the video.
Robert Baker uses a specially designed club that has a flat disc attached to the
clubshaft at mid-shaft level, and that flat disc is colored in blue on the one
side and colored in white on the other side.
Image 1 shows Robert Baker coming into impact with the blue-colored side of the disc facing the camera. Note that he has a flat left wrist and slightly bent right wrist.
Image 2 is soon after impact - after he deliberately flipped his left wrist (which he calls "breaking" the left wrist) and after he simultaneously straightened his right wrist, so that the white-colored side of the flat disc faces the camera. Note how his hands have hardly moved forward in a targetwards direction during that post-impact time period, and note how his clubshaft has bypassed his stalled left arm by a huge amount.
Robert Baker is demonstrating how to deliberately (intentionally) perform a flipper sub-type of non-DH hand release action.
In his video, Robert Baker states that he intentionally tries to minimise the targetwards motion of his hands through impact so that he can get the clubhead to whip through impact at a faster speed, and he wrongheadedly claims that this type of active flicking (whipping) motion of the clubshaft through impact can increase "speed and power". I believe that swing power (maximum clubhead speed) through impact is generated by the sequential release of PA#4 => PA#2 in a PGA tour golfer (who routinely uses a standard TGM swinging action) and I think that it is irrational to believe that he can increase clubhead speed through impact by adding an active flicking motion of the left wrist through impact. What will more likely happen as a result of that superadded active left wrist flicking action is a non-stable clubface that has a large ROC through impact (between P7 and P7.2).
I am flabbergasted that so many other golf instructors (like Brian Manzella and Richard Franklin) also teach their student-golfers to intentionally perform a flipper sub-type of non-DH hand release action!
I have also noted that other golf instructors wrongheadedly teach their student-golfers to actively supinate their left forearm through impact, so that their left palm faces skywards at P7.2 (in order to "catch raindrops").
AJ Bonar is an example of a golf instructor who teaches golfers to intentionally perform a roller sub-type of non-DH hand release action.
Here is a capture image from an article where AJ Bonar promoted his hand cross-over release action through impact.
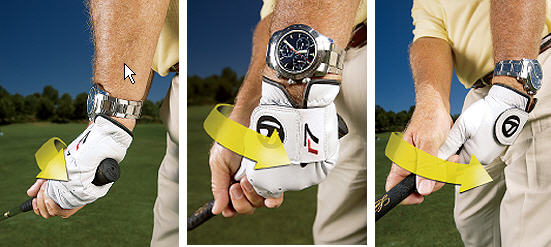
In his article, AJ Bonar stated-: ""Now the fun part! About
two or three feet before your hands reach impact, assertively rotate them toward
the target. Imagine you're gripping a screwdriver and turning it
counterclockwise. This closes the clubface, generating big-time power."
His active "screwdriver hand motion" through impact where the left wrist actively supinates through impact, while the right forearm simultaneously pronates the right hand over the left hand producing a hand-crossover release action through impact, will definitely produce an undesirable roller sub-type of non-DH hand release action through impact.
The problem with either a flipper sub-type (as described by Robert Baker), or a roller sub-type (as described by AJ Bonar), of non-DH hand release action is that they are very timing-dependent, and it would require perfect timing to even get a square clubface at impact, and it would be even more difficult to ensure that the golfer maintains a stable clubface (that has a low ROC) throughout the entire immediate impact zone between impact and P7.2.
Many golf instructors, who recommend either the flipper sub-type of non-DH hand release action or the roller sub-type of non-DH hand release action, believe that a DH-hand release action (where the clubshaft doesn't bypass the left arm between P7 and P7.2) is robbing the golfer of swing power because they believe that it slows down the free (unrestricted) motion of the clubhead through impact. I believe that their criticism is unfounded, and I have noted that many PGA tour golfers (who use a DH-hand release action) are among the subgroup of PGA tour golfers who are the longest drivers on the PGA tour. Consider three examples - Henrik Stenson, Justin Thomas and Dustin Johnson.
Henrik Stenson is one of the longest drivers on the PGA tour and he often drives the ball >300 yards (even though he uses a 3-wood, and not a driver, off the tee).
Consider Henrik Stenson's 3-wood driver swing - https://www.youtube.com/watch?v=adGkU1dAJkU
Here are capture images showing Henrik Stenson's DH-hand release action through impact.
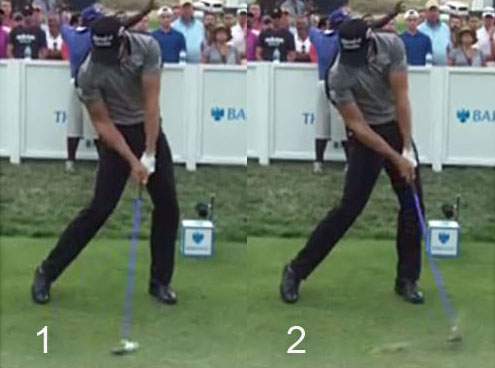
Image 1 is at impact and image 2 is at P7.2.
Note how he maintains a stable clubface with a very low ROC during the clubhead's travel time through the immediate impact zone between P7 and P7.2.
Note how he maintains an intact LAFW/GFLW during that time period, and note that is very little counterclockwise rotation of his entire intact LAFW/GFLW during that time period. Note that there is no evidence of left wrist flipping or left wrist supination happening between impact and P7.2.
Justin Thomas is another PGA tour golfer who is a long driver of the ball.
Justin Thomas driver swing video - https://www.youtube.com/watch?v=ddoBE9Ftyx0
Here are capture images from the swing video.
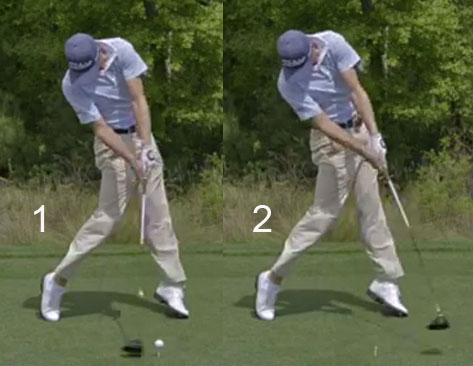
Image 1 is at impact. Note that he has an intact LAFW/GFLW.
Image 2 is at P7.2. Note that he still has an intact LAFW/GFLW and note that there has been very little counterclockwise rotation of his intact LAFW between impact and P7.2. Note how he maintains a stable clubface with a very low ROC between impact and P7.2. Note that there is no evidence of left wrist flipping or left wrist supination happening between impact and P7.2.
Dustin Johnson is not only one of the longest drivers on the PGA tour, he is also one of the straightest drivers of the ball.
Dustin Johnson swing video - https://www.youtube.com/watch?v=pOtgNIYGPQU
Here are capture images from the swing video.
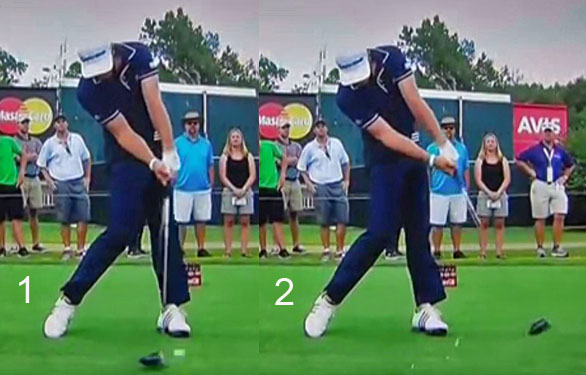
Image 1 is at impact. Note that he has a bowed left wrist, which causes his left
hand to be slightly ahead of his clubshaft.
Image 2 is at P7.3. Note how he maintains a stable clubface with a very low ROC between impact and P7.3. Note that the clubshaft has not bypassed his left arm and that there is no evidence of left wrist flipping or left wrist supination happening between impact and P7.3.
By choosing to present the golf swings of 4 PGA tour golfers - Adam Scott, Henrik Stenson, Justin Thomas, and Dustin Johnson - who can drive the ball a long way despite using a DH-hand release action where the clubshaft doesn't bypass their left arm, I have demonstrated that a PGA tour golfer doesn't have to flip his left wrist through impact in order to drive the ball the long way. What is even more important is that those 4 PGA tour golfers drive the ball very straight as well as far, and I strongly suspect that their DH-hand release action, where they maintain a stable clubface with a low ROC all the way between impact and P7.2, is a major factor that contributes to their ball striking accuracy.
Jeffrey Mann.
January 2017.