Swingplane
Click here to go to the index page.
Introduction:
In this review paper, I will be discussing the swingplane. The swingplane is a frequently misunderstood, and frequently misused, term that has entered the golf intructional world's lexicon in recent years, and there are endless debates in golf discussion forums on what represents the "correct" swingplane. In this paper, I hope to clear up the isssue for beginner golfers, so that they can clearly view the subject in an appropriate way - a way that is firmly based on a sound knowledge of golf swing geometry/mechanics/biomechanics.
Swingplane
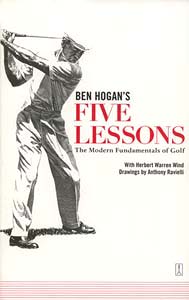
The idea of a swingplane apparently originated when Ben Hogan introduced the idea of a plane of glass extending from the ball to his shoulders in his golf intructional book "Five Lessons: The Modern Fundamentals of Golf, which was first published in the late 1950s.
Glass plane resting on Ben Hogan's shoulders - from reference number [2]
One can see the glass plane resting on Ben Hogan's shoulders. Many golfers have misinterpreted this photo and they have thought that it means that Ben Hogan recommended that a golfer should swing his clubshaft on the plane repesented by the glass plane during the backswing. However, that idea is incorrect and it doesn't represent what Ben Hogan stated in his book. Ben Hogan wasn't referring to the clubshaft when he envisaged this glass plane idea - he was thinking of his left arm. In his book [1], he stated that a golfer should perform a backswing action that would keep the left arm below the glass plane throughout the entire backswing, and he didn't want the left arm to break through the glass pane during the backswing. In other words, Ben Hogan wanted golfers to avoid a steep left arm movement during the backswing, and he believed that the left arm should get across the shoulder turn angle at the end of the backswing, and that the hands should end up in a position behind the right shoulder. Ben Hogan didn't want golfers to get their hands above the right shoulder and close to the back of the neck as a result of a too-steep arm lifting movement. Ben Hogan stated that one should feel the back of the left forearm brush against the undersurface of the imaginary glass pane in the late backswing as the arms finally reach their end-backswing position.Many golf instructors have misinterpreted Ben Hogan's glass pane idea to imply that it relates to the clubshaft and some people have even redrawn his diagram to represent their personal idea of the correct swingplane.
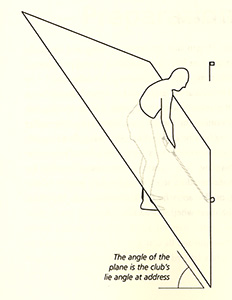
Glass plane concept - from reference number [3]
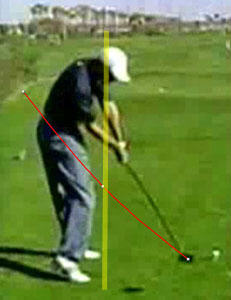
Note that the glass pane passes through the mid-section of the golfer's torso and that the angle of the glass pane is roughly equal to the clubshaft's address angle at address. This plane angle is called the clubshaft-at-address plane. Many beginner golfers, who look at this diagram, may think that they should swing their clubshaft along this plane during the backswing and downswing. There are two major problems with this swing thought - i) it is physically/biomechanically impossible to swing the club back on that shallow clubshaft-at-address plane during the entire backswing - unless one has a very short backswing that doesn't go higher than waist level; and ii) virtually all professional golfers swing their clubshaft on a slightly steeper plane during the upper half of the backswing/downswing.Consider a photo demonstrating the impact position of most professional golfers.
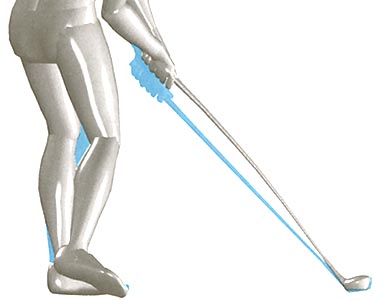
Hand and clubshaft position at impact - from reference number [4]
Note that the hands, and therefore clubshaft, are slightly higher at impact (grey color) compared to the address position (blue color). The downward bowing of the clubshaft is a natural phenomenon due to the physical forces acting on the clubshaft as it passes through the impact zone at a very fast speed.So, the question becomes - on what plane should a golfer swing his clubshaft during the backswing and downswing?
To answer that question - a beginner golfer needs to clearly understand the difference between a path and a plane.
A path is the path that a body-part, or clubshaft-part, traces in 3-D space during the golf swing. For example, one can trace the path that the clubhead (peripheral end of the clubshaft) traces in 3-D space during the golf swing.
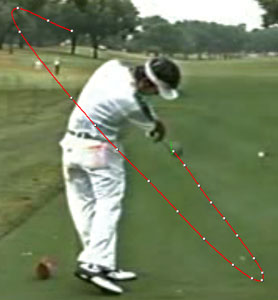
Here is an example of a traced clubhead path showing the path that the clubhead traces in space during the downswing and early followthrough.
Clubhead path - from a swing video [5]
Note that the clubhead traces a 3-D path in space and that the clubhead path is curvilinear (circular/elliptical) and never straight, and that the clubhead path is an arced path that has a certain level of angled inclination relative to the ground (when viewed from down-the-line). The level of angled inclination of the arced path relative to the ground gives rise to the idea of an inclined plane.A plane is drawn on a down-the-line photo as a straight line, and that straight line represents an inclined plane along which the clubshaft travels in its arced/circular in-to-square-to-in path. In the above photo, it is impossible to accurately represent the clubshaft/clubhead's entire arced path using a single plane line for two major reasons. First of all, the camera angle is not perfect in that above photo, because the downswing and followthrough clubhead paths in the impact zone should be very symmetrical, and they should therefore be superimposed on each other if the camera angle is perfectly established with reference to the clubshaft plane at impact (perfectly down-the-line). Secondly, the clubshaft/clubhead path is often slightly steeper in the upper half of the downswing path (relative to the lower half) and a single plane line therefore cannot always represent the entire downswing clubshaft/clubhead path. However, a beginer golfer should be able to appreciate the fact that if one considers the lower half of the clubshaft/clubhead's arced path (from right mid-thigh to left mid-thigh) that it can be perceived to be lying against a plane that is at a certain angle to the ground.
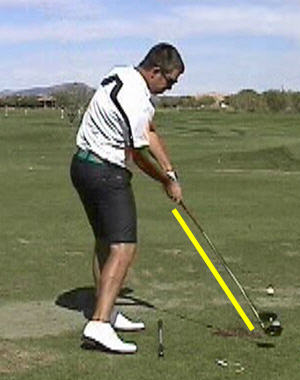
Consider a down-the-line view of a golfer at impact.
Aaron Baddeley at impact - capture images from a swing video
This image of Aaron Baddeley at impact is actually a composite photograph of two capture images - one image taken when the clubhead is nearly at impact, and the second image is taken just after impact. You can see that the clubhead in moving along an in-to-square-to-in path and that the clubhead is only going to be perfectly square to the ball-target line at impact. Note that the clubshaft at the moment of impact (or near impact, or immediately post-impact) is roughly perpendicular to the ball-target line, and one can draw a straight line representing the clubshaft's planar position at impact (or near impact) - yellow line.A beginner golfer should therefore understand the concept of a plane as being equivalent to a straight glass pane where the base of the glass plane lies on the ground - like a sheet of glass pane being placed on the ball-target line so that the base of of the glass pane lies along the length of the ball-target line. The glass pane can then be lowered, or elevated, to lie at a certain angle relative to the ground. If the glass pane lies at the same angle as the clubshaft-at-address (see glass plane concept diagram above) then it will usually lie at a slightly lower angle than the yellow line in the above photo of Aaron Baddeley.
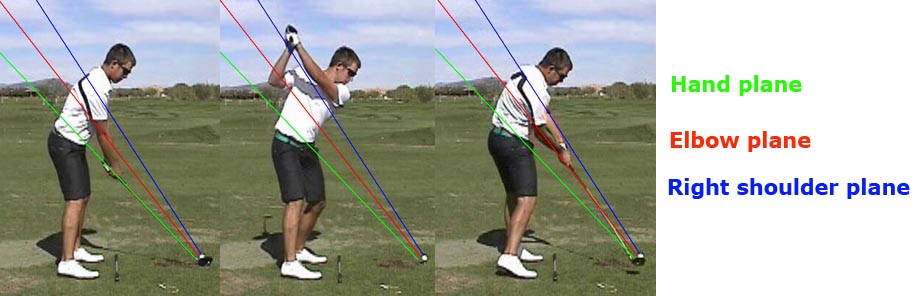
To understand some common planes that are frequently used to describe the clubshaft plane when the golfer is at address, or at impact, see the following photo-diagram.
Clubshaft planes - using Aaron Baddeley as a model golfer
Note that I have drawn three plane lines - the hand plane, the elbow plane and the right shoulder plane (RSP).The hand plane is essentially the clubshaft-at-address plane (image 1). A line is drawn along the length of the clubshaft at address and extended through the hands. This line often hits the golfer's body at the level of the belt buckle and exits the back just above the pelvis.
The elbow plane is a line drawn from the ball through the right elbow (image 1). Note that the elbow plane line usually exits the back at the level of the mid-back.
The right shoulder plane (more frequently called the turned shoulder plane) is a line drawn from the ball to the right shoulder at the end-backswing position (image 2). Many professional golfers shift their hands from the hand plane to the right shoulder plane during the backswing and this represents a plane shift swing. Aaron Baddeley has a double plane shift swing - during the backswing he shifts his hands/clubshaft from the hand plane to a position just above the right shoulder plane (TSP), and during the downswing he shifts his hands/clubshaft from the right shoulder plane (TSP) to the elbow plane. This is the most frequent type of plane shift seen in professional golfers (hand plane => TSP during the backswing, and TSP => elbow plane during the downswing).
Theoretically, it is geometrically possible to have a zero-plane shift swing where the hands/clubshaft stay on the same plane during the entire backswing/downswing. For example, if a golfer placed his hands/clubshaft on the TSP line at address and then took his hands up the TSP line during the backswing, and then down the TSP line during the downswing, that would represent a zero-shift swing. However, I have ony seen one professional golfer use a near zero-plane shift swing - and that golfer is the late Moe Norman (who has the reputation of being a straightest driver of a golf ball in the history of the game).
Moe Norman's zero-shift swing - capture images from a swing video
Note that Moe Norman bends a lot at the level of the hips at address, and that he has significantly outstretched arms. The green line represents the clubshaft-at-address plane and that planar line passes through his mid-back - it is therefore higher than the hand plane (which usually passes through the belt buckle) and it is closer to the elbow plane. Moe Norman has a short backswing action, and the composite image (image 4) shows that his clubshaft stays on that same clubshaft-at-address plane during the backswing. If I plotted the clubshaft movement during the downswing, it would nearly be a duplicate (mirror image) of his backswing clubshaft movement - it would track down that same green line. Moe Norman therefore has close to a zero-plane shift swing, where his clubshaft always moves on a single plane.Most professional golfers usually stand like Aaron Baddeley at address - they let their arms hang down naturally (near-vertically) from their shoulder sockets so that the hands are under their chin, and they do not extend their arms outwards (like Moe Norman) thereby creating a near-straight line relationship between the left forearm and the clubshaft. Here is an example of another professional golfer adopting a traditional/conventional address hand position.
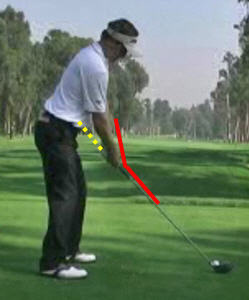
Luke Donald at address - capture image from a swing video
Note that Luke Donald lets his upper arms hang down vertically from the shoulders and his hands are below his chin (usually just in front of the chin when hitting a driver, and just below the chin when hitting mid-irons, and just inside the chin when hitting short-irons). Note the angle between the forearms and the clubshaft (red lines) - it's not a straight line. Note that the hand plane line (yellow dotted line) passes through his belt buckle. The reason why most professional golfers adopt that type of hand position is that it allows the wrists to hinge/cock easily, and biomechanically naturally, during the backswing. It is biomechanically more difficult for the wrists to hinge/cock easily during the backswing if the arms are stretched out at address and the arms/clubshaft form a straight line.There is a large variation in the degree of plane shift among professional golfers. Consider an example of two professional golfers.
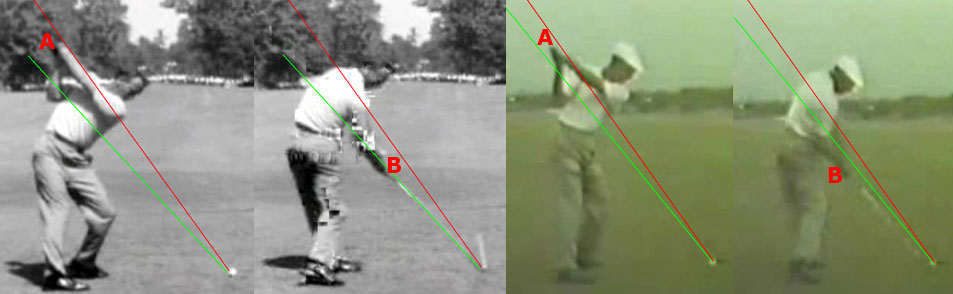
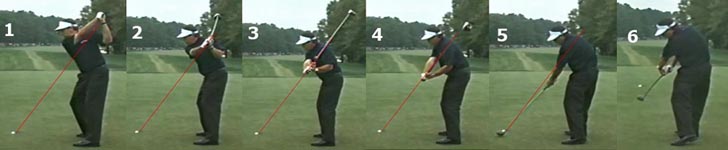
Comparison between Arnold Palmer and Ben Hogan - capture images from swing videos
The green line represents the elbow plane line drawn at address (and not impact) and the red line represents the TSP line. I have not drawn the hand plane line (which is a line drawn from the ball through the clubshaft-at-address and that line usually points at the belt buckle) in this composite photo. Note that Arnold Palmer has a steep shoulder turn in the backswing and he gets his left arm and hands to nearly lie along the TSP line at the end-backswing position. He then drops his hands down to the elbow plane during the downswing. By contrast, Ben Hogan turns his shoulders along a less steep turn angle during the backswing and his left arm is more horizontal to the ground than the TSP line at the end-backswing position. His hands are below the TSP line at the end-backswing position. Note that Ben Hogan drops his hands/clubshaft below the elbow plane line during the downswing and his hands/clubshaft are close to the hand plane line (clubshaft-at-address plane line) at impact. The angular difference between point A (hand position at the end-backswing) and point B (hand position at impact) represents the degree of downswing planar shift. Both golfers (Arnold Palmer and Ben Hogan) have very little plane shift (in terms of angular difference between point A and point B) during the downswing, but there is obviously still a plane shift. Jim Hardy labels golfers having a a swing where the left arm lies along the shoulder turn angle at the end-backswing position as having an one plane swing. However, that arbitrary "one plane swing" definition is obviously incorrect in terms of swingplane shifts - both Arnold Palmer and Ben Hogan have their left arm along their shoulder turn angle at the end-backswing, and they obviously do not swing on a single plane throughout the backswing and downswing. The same phenomenon applies to all golfers who use the Hardy one-plane swing - they all have a plane shift as their hands move from point A to point B during the downswing.Here is a photo series of capture images of Jeff Ritter' swing - from this swing video.
http://www.youtube.com/watch?v=Pu-wDdY8-g4
Jeff Ritter is a quintessential Hardy OPS golfer, and he has a prototypical Hardy OPS-style swing.
Jeff Ritter's plane shift swing - capture images from a swing video
The red line is the clusbhaft-at-address plane (hand plane) and the blue line is the right shoulder plane (turned shoulder plane) and the faint yellow line is the elbow plane. Note that Jeff Ritter has the typical Hardy OPS look at the end-backswing position - his left arm lies along his shoulder turn angle (image 1). Note how his hands/clubshaft are just below the turned shoulder plane at the end-backswing position. Note how his clubshaft shifts to a lower plane during the downswing (image 2) and reaches the elbow plane (just above the hand plane) by impact (image 3). Jeff Ritter has a double plane shift swing - hand plane => turned shoulder plane during the backswing; and turned shoulder plane => elbow plane during the downswing.There is no standard rule defining the degree of plane shift that should occur during the backswing or downswing, and it depends on many factors eg. body shape/size, degree of bent-over spine angle, arm length, body flexibility and swing style pattern. In general, a beginner golfer should minimise the degree of plane shift if he wants to develop a more consistent swing that follows the same general downswing path from swing-to-swing. The idea of swinging along a "single" swingplane has very little utility in a "real world" golf swing and I think that beginner golfer should adopt a different approach when thinking of swinging "on plane" during the backswing and downswing. A beginner golfer must first accept the reality that it is biomechanically natural/comfortable to shift planes during the downswing swing action and he must think of the optimum method of getting his hands from point A to point B in the downswing. I think that both Arnold Palmer and Ben Hogan are excellent role models for a beginner golfer, and a beginner golfer needs to consider how to accurately mimic their swing plane shifts. I will now describe a more practical way of thinking about how to be "on plane" during the backswing and downswing.
A practical method of learning how to swing "on plane"
Note that I placed the phrase "on plane" between inverted commas - the reason is that I am going to use the term being "on plane" in a specific way that has no necessary connection with any single plane line previously described (hand plane line, elbow plane line, TSP line). I think that it is very helpful if a beginner golfer first thinks of being "on plane" according to Homer Kelley's plane theory of being "on plane".
Homer Kelley stated in his TGM book [5] that a clubshaft is "on plane" when the peripheral end of the club (the end of the clubshaft nearest the ground) always points at the baseline of the inclined plane whenever the clubshaft is not parallel to the ground and parallel to the baseline of the inclined plane - at all time-points during the swing. Usually, the baseline of the inclined plane is situated on the ball-target line (when the golfer is aligned square to the ball-target line).
Anthony Kim swinging "on plane" - capture images from a swing video
Image 1 shows Anthony Kim at the end-backswing position. At this point, his clubshaft is parallel to the ground, and parallel to the baseline of the inclined plane, which is situated on the ball-target line. Because of the imperfect camera angle, you should realise that the ball-target line (and base of the inclined plane) is parallel to his toe line, but at a slight angle to the vertical edge of the photographic image. During his downswing, Anthony Kim's clubshaft is only parallel to the ground and parallel to the baseline of the inclined plane, at one position - image 5. At all other time-points during the downswing, the peripheral end of his clubshaft (end of the clubshaft nearest the ground) is pointing at the ball-target line (or an extension of the ball-target line - as seen in image 2 if you use your imagination to mentally envisage where the dotted yellow line drawn from the butt end of the clubshaft will hit the ground). That means that Anthony Kim's clubshaft is always "on plane" during the downswing - even though the clubshaft is constantly changing planes during its downswing travel (from the turned shoulder plane at the end-backswing position [image 1] to the elbow plane at impact [image7]). While his clubshaft is changing planes during the downswing - going from the turned shoulder plane (at the end-backswing) to the elbow plane (at impact) - the clubshaft is moving progessively along a shallower inclined plane angle relative to the ground. Therefore, the concept of being "on plane" incorporates the progressively shallowing clubshaft movement that usually occurs as the clubshaft shifts planes during the downswing.Here is my recommended method of acquiring an "on plane" golf swing that also naturally shallows out during the early/mid downswing.
Backswing
At address, the hands are on the hand plane. At the end of the backswing, a beginner golfer should think of getting his hands to end up behind the right shoulder with his left arm lying along the shoulder turn angle (or close to the shoulder turn angle) - like Arnold Palmer and Ben Hogan. In other words, the hands are going to have to move from the hand plane (at address) to a position on, or close to, the turned shoulder plane (at the end of the backswing).
Consider another good example of a professional golfer's swing - Tiger Woods and Adam Scott - where the clubshaft is "on plane" during both the backswing and downswing.
Tiger Woods and Adam Scott video - http://youtube.com/watch?v=ZecViQxUwss
I am going to use capture images from that swing video to demonstrate the appropriate checkpoints that a beginner golfer's clubshaft needs to pass through to be "on plane" during the backswing and downswing. I will start with the backswing.
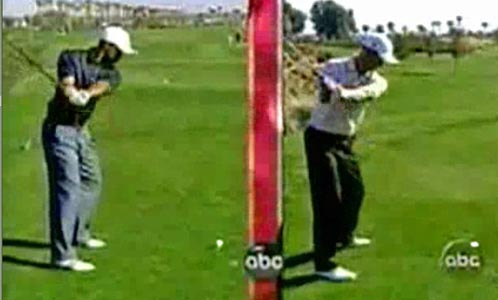
Tiger Woods and Adam Scott at address - capture images from a swing video
Note that both Tiger Woods and Adam Scott have their clubshaft on the hand plane at address - where the butt end of the clubshaft points at the belt-buckle. The hands are also on the hand plane and you will note that their hands are going to end up on the turned shoulder plane at the end-backswing position - which signifies a significant amount of plane shift.Now consider the movement of their hands and clubshaft during the takeaway.
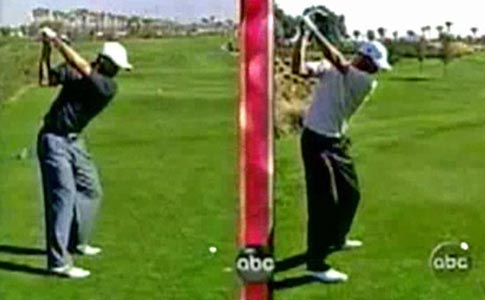
Tiger Woods and Adam Scott at the end-takeaway position - capture images from a swing video
Note that both golfers have their clubshaft along the toe line at the end of the takeaway and that the clubshaft is roughly parallel to the ground and parallel to the ball-target line. To get to that "on plane" end-takeaway position, a beginner golfer has to learn how to complete two different body movements simultaneously - i) an one-piece takeway movement involving the arms/shoulders and ii) a torso pivoting action. I have described how to perform the one-piece takeaway in great detail in my backswing chapter and I have described how to perform the backswing pivot action in my review paper on the backswing pivot action and in my swing video lesson on the "causes and cure of the OTT move". Note that the hands are still close to an imaginary line between the ball and the belt buckle, and that indicates that the arms have not lifted up much during the takeaway.
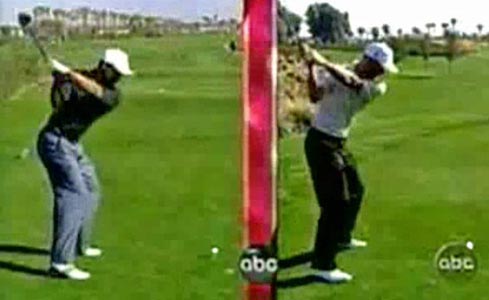
Tiger Woods and Adam Scott in the mid-backswing position - capture images from a swing video
Note that the butt end of the clubshaft is pointing at the ball-target line when the left arm is parallel to the ground. To get to this "on plane" position, a beginner golfer has to master many different body movements that occur simultaneously - i) a pelvic pivot-rotation movement over the right femoral head; ii) a rotation of the shoulders perpendicularly around the bent-over spine; iii) a lifting of the left arm upwards so that the left hand/forearm moves in the direction of the right shoulder; iv) a folding movement of the right elbow; v) and correct right wrist hinging and left wrist upcocking actions. A beginner golfer has to clearly understand how to hinge the right wrist and upcock the left wrist correctly during the backswing to get to this position. To learn how to accomplish that goal, a beginner golfer should fully understand Martin Hall's video lesson on the correct wrist movements in the backswing.
Martin Hall's video lesson on wrist movements - http://www.youtube.com/watch?v=44fev4wqC6U
If a beginner golfer has mimiced the "on plane" movements of Tiger Woods and Adam Scott correctly during the backswing, then he should end up in an "on plane" end-backswing position where the clubshaft is parallel to the ball-target line - as demonstrated in the next composite photo.
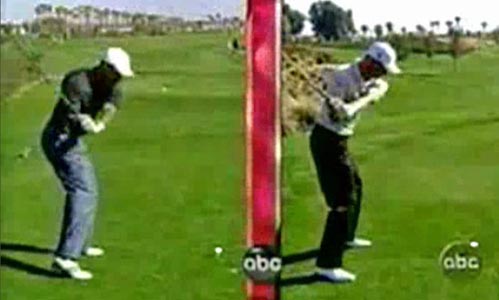
Tiger Woods and Adam Scott at the end-backswing position - capture images from a swing video
Note that both Tiger Woods and Adam Scott have their hands close to the turned shoulder plane (straight line drawn from the ball through the right shoulder) at the end-backswing position, and their left arm lies across the shoulder turn angle (Adam Scott's left arm is slightly steeper than the shoulder turn angle). Note that both golfers have a pelvic turn of approximately 45 degrees and a shoulder rotation of >90 degrees. Note that their clubshafts are parallel to the ground and also parallel to the ball-target line at the end-backswing position - which means that their clubshafts are "on plane".Although it may seem simple to learn to pass through those checkpoint positions in the backswing, most beginner golfers don't pass through those positions. The major reason is a failure to perfectly integrate the three-dimensional movement of many different moving body parts - the pelvis pivoting 45 degrees in a horizontal plane, the shoulders turning >90 degrees around a constant spine angle, the arms lifting up to their end-backswing position while the left arm rotates clockwise and the right elbow folds, and the appropriate wrist movements that allow the left wrist to upcock and the right wrist to back-hinge at the correct time and correct speed. To learn the optimum way of integrating all these movements, a beginner golfer should repeatedly study the swing videos of professional golfers, and read my backswing chapter and my How to Move the Arms, Wrists and Hands in the Golf Swing review paper.
The following video of the Blobman golfer may help a beginner golfer mentally picture the three-dimensional movement of a golfer in space.
Blobman video - http://golfresearch.com/blobtest/front2.html
Click on "all together" to see the Blobman in action. His body is divided into segments, which allows one to see how each segment is moving in space at different time points in the backswing. Note the thighs, pelvis, torso, shoulders, arms and wrists moving at the same time - but in different directions along different rotational axes or paths. That's why the golf swing is so difficult for a beginner golfer to master - all these different body parts have to move correctly in space at the correct time, and each body part must move in perfect coordination with all the other body parts. To learn how to achieve the goal of mastering the golf swing, a beginner golfer must have sufficient knowledge of how all the different body parts move in space at all time-points during the swing, and my website's many chapters, review papers (especially the How to Move the Arms, Wrists and Hands in the Golf Swing review paper) and swing videos have a wealth of useful information to help a beginner golfer acquire the necessary knowledge.
Downswing
During an optimised downswing, the hands/clubshaft are frequently going to shift from the TSP line (at the end-backswing) to the elbow plane line (by impact), and that shallowing action will allow the clubshaft to approach the ball along a shallower attack angle. Getting the clubshaft to progressively shallow-out during the downswing is a frequent feature of many professional golfers' swings and beginner golfers must learn to have a clear idea of the optimum position of the clubshaft at all time-points during the downswing - if they want to progressively shallow-out their clubshaft while still swinging "on-plane".Consider how Tiger Woods and Adam Scott swing "on plane" during the downswing.
Tiger Woods and Adam Scott at the start of the downswing - capture images from a swing video
The downswing should start with a hip squaring action (shift-rotation movement of the pelvis) that causes the clubshaft to shallow out and the clubhead to move backwards (away from the ball-target line). This initial shallowing movement of the clubshaft and clubhead signifies that a golfer has started the downswing's kinetic sequence correctly from the bottom-up - starting with a lower body move before an upper body move.
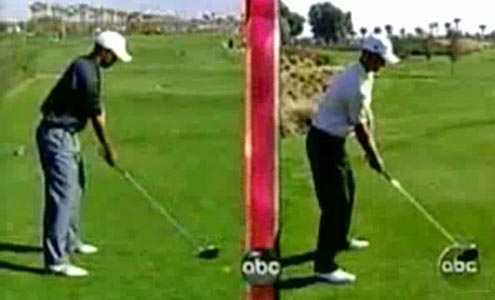
Many beginner golfers get this initial downswing body-movement sequence wrong and start the downswing with an upper body move - rotating the right shoulder outwards towards the ball-target line while simultaneously pulling the grip end of the club over the right shoulder.
Anonymous golfer performing an incorrect downswing action - capture images from a swing video
The anonymous golfer has started the downswing with an upper body action - pulling the club's grip down-and-out in the direction of the ball-target line, while simultaneously rotating the right shoulder outwards towards the ball-target line in a roundhousing OTT move. That upper body action (see image 1) steepens the clubshaft (instead of shallowing the clubshaft) and causes the clubshaft to approach the ball along a very steep planar path (steeper than the TSP) that causes the clubhead to move along an out-to-in swingpath through the impact zone (image 3). Image 1 shows the anonymous golfer pulling the club steeply down the turned shoulder plane at the start of the downswing, and his clubshaft doesn't move along a shallower plane at any time-point during the downswing.If one starts the downswing correctly with a lower body move that shallows the clubshaft in the early downswing then the clubshaft should be in the "correct" position at the next checkpoint - "end of the early downswing" checkpoint.
Tiger Woods and Adam Scott at the end of the early downswing - capture images from a swing video
The "end of the early downswing" is defined as the point when the lead arm is parallel to the ground. At this point, the butt end of the clubshaft should be pointing at the ball-target line (thereby indicating that it is "on plane" according to Homer Kelley's "on plane" definition). Note that Tiger Woods/Adam Scott's clubshaft cuts across their lower-mid right upper arm indicating that the clubshaft has shifted planes to lie along a shallower plane at this time-point in the downswing. Compare this composite photograph to the image of the anonymous golfer above - image 1 shows that the anonymous golfer's lead arm is parallel to the ground, and that the butt end of the club is pointing at the ball-target line (which indicates that he is "on plane" per Homer Kelley's definition), but note that the clubshaft is cutting across the right upper arm in the region of the right shoulder. The anonymous golfer's hands and clubshaft are therefore on a steeper plane at this same time-point even though they are "on plane" (per Homer Kelley's "on plane "definition).If a beginner golfer learns to start the downswing with a correct downswing pivot action that gets his hands and clubshaft "on plane", but on a shallower plane, at the end of the early downswing, then he should be able to pass through the next mid-downswing checkpoint correctly.
Tiger Woods and Adam Scott in the mid-downswing - capture images from a swing video
Note that the clubshaft lies along the right forearm. This is an excellent visual sign that the clubshaft is both "on plane", and on a shallower plane, during the mid-downswsing. Note how the clubshaft has shallowed out and it is more "behind the hands" instead of being "above the hands" (as can be seen in the anonymous golfer's swing - image 2 shows the clubshaft dropping steeply down to the ball from above the hands).If a golfer has successfully brought the clubshaft down "on plane" in the early-mid downswing, then the clubshaft should be in a perfect "on plane" position at the delivery position.
Tiger Woods and Adam Scott at the delivery position - capture images from a swing video
At the delivery position, the hands i) should be above the toe line and ii) roughly at mid-thigh level, while the clubshaft iii) should be parallel to the ground and iv) parallel to the ball-target line. If the clubshaft is parallel to the ball-target line at this point in the downswing, then the clubshaft is perfectly "on plane" and it should result in the clubhead approaching the ball along an inside path. If the golfer's release action timing is also perfect, then the clubface should become square to the ball at impact.
Tiger Woods' clubhead path in the mid downswing - capture image from a swing video
In this photo, I used a spline tool to trace the path of Tiger Woods' clubhead through the mid-downswing (red curved line). Imagine a vertical glass wall placed just in front of Tiger's toes - represented by the yellow line. Note that the clubhead would crash through the glass wall at the level of Tiger's right knee. That is a perfect sign of a shallow clubshaft attack angle. If the clubshaft crashes through that imaginary glass wall above waist level, then the clubshaft is too far off the "correct" plane and the clubshaft attack angle is too steep - frequently due to starting the downswing with an OTT upper body dive move. The key element that gets the clubshaft crashing through the imaginary glass wall at knee level is starting the downswing with a left-lateral pelvic shift movement (while actively adducting the right arm so that the right elbow reaches its pitch position near the right hip area by the early phase of the mid-downswing) - a critical move that shallows the clubshaft attack angle.
Tiger Woods and Adam Scott at impact - capture images from a swing video
Note that both golfers have their hands and clubshaft on the elbow plane line (not hand plane line) at impact. Note that the right forearm is also on the elbow plane line and straight-in line with the clubshaft at impact.To learn how to pass through these downswing checkpoints correctly, a beginner golfer should first learn how perform a good downswing pivot action by learning how to do the pump-it drill correctly - as demonstrated by Ben Hogan in the following video lesson.
Ben Hogan's pump-it drill.
http://www.youtube.com/watch?v=QL_6M_xZvq0
The pump-it drill is performed as a lower body shift-rotation movement that drops the right elbow to the right hip area while the right arm comes close to the right side of the torso. During this lower body action, the clubshaft should automatically undergo a shallowing phenomenon that is primarily due to the i) shift of the pelvis left-laterally towards the target and ii) simultaneously an active adduction movement of the right arm towards the right side of the torso.
Here is another example of a golf instructor demonstrating the pump-it drill.
http://www.network54.com/Forum/72052/thread/1086577967/There+is+a+secret+to+golf
Note that when she performs the pump-it drill, she is essentially performing a hip squaring action that shifts weight onto the left foot while the pelvis squares. At the same time, she brings the right elbow down to the right hip area by actively adducting her right arm. From this down-the-line view, one can see her clubshaft shallowing out and passing through the three checkpoints previously described-: i) At the end of the early downswing (lead arm parallel to the ground) the butt end of the clubshaft points at the ball-target line and the upper clubshaft cuts across the lower-mid right upper arm; ii) during the mid-downswing, the clubshaft bisects the right forearm; and iii) at the delivery position, the clubshaft is parallel to the ball-target line and roughly at mid-thigh level.
As a beginner golfer, one should perform this drill in front of a mirror. The mirror should be behind you (away from the target) so that you can watch yourself from the down-the-line view. While performing the pump-it drill, you should watch the clubshaft pass through those three downswing checkpoints while you perform the correct lower body movements. While you perform the body movements, you should also try and get a "feeling" of your right forearm and right hand tracking along a specific path towards the ball. That's a critical learning experience - the "feeling" of your right forearm and right hand moving along a specific path that allows the pressure point #3 of your right hand to trace a straight plane line. I have described the methodology of tracing a straight plane line in my review paper on "How to Hit the Ball Straight" and a beginner golfer needs to learn how to use the right hand to trace a straight plane line. When a beginner golfer learns how to trace a straight plane line with his right forearm/right hand working as an unit, then he will have developed "educated hands". It is very important to have "educated hands" because one's mind needs to be in one's hands when swinging on plane. Swinging "on plane" obviously requires an "educated body". However, it also requires "educated hands" and a beginner golfer needs to learn how to have both an "educated body and "educated hands" if he wants to swing "on plane" and hit the ball consistently straight.
I have used Tiger Woods and Adam Scott as role models for a golfer who progressively/steadily shallows-out his clubshaft during the early-mid downswing while still remaining "on-plane". Some professional golfers prefer not to shift planes during the early-mid downswing, and that's a perfectly acceptable option.
Consider Phil Mickelson's downswing - http://www.youtube.com/watch?v=BrJjTJcIMhY .
Phil Mickelson's downswing - capture images from his swing video
Note that Phil Mickelson has his clubshaft on the TSP at the end-backswing position - image 1. Note that he doesn't shallow his clubshaft during the early-mid downswing, and that his clubshaft remains on (or very close to) the TSP during the entire downswing - images 2, 3, 4 and 5.
Jeff Mann.
February-March 2008.
References:
1. Five Lessons: The Modern Fundamentals of Golf. Ben Hogan.
2. The Fundamentals of Hogan. David Leadbetter.
3. The Scientific Truth of the Golf Swing. Steen Winther.
4. Swing like a Pro. Ralph Mann and Fred Griffin.
5. The Golfing Machine. Homer Kelley.