Here are capture images
showing Shaun Webb's backswing action using only a lead arm-only golf swing
action.

Image 0 is at P2, image 1 is at P3 and image 2 is
at P4.
Shaun Webb (SW) performs a swinging motion of the
club between P1 => P2 where he wants the clubshaft to pass over his hands -
note that in image 0 he has pronated his lead forearm by a small amount
while maintaining an intact LFFW alignment (where the clubshaft is
straight-in-line with his lead lower forearm) and he is starting to upcock
his lead wrist. Between P2 => P3 he continues to pronate his lead forearm so
that he can swivel the clubshaft onto a swingplane as seen in image 1..
Note that he still has an intact LFFW alignment
(where the clubshaft is straight-in-line with his lead lower forearm) at P3
and where his lead wrist has upcocked to a a 90 degree angle between the
lead arm and clubshaft; and note that the clubshaft is "on-plane" (where an
imaginary line drawn outwards from the butt end of the club points at the
ball-target line).
Image 2 is at P4 where he still has an intact LFFW
alignment (where the clubshaft is straight-in-line with his lead lower
forearm) and where his clubshaft is still "on-plane".
Most importantly, note that his lead wrist is
slightly cupped to the same degree in all those images and that he has a
GFLW alignment (and intact LFFW alignment)
continuously all the way between P1 => P4.
Now, consider his downswing action using a lead
arm-only golf swing action.

Image 1 is at P5+,
image 2 is at P6, image 3 is at P6.5 and image 4 is at P7.
Note that he is shallowing his clubshaft
between P4 => P5+ while maintaining a clubhead lag angle of ~90 degrees
plus
while maintaining a GFLW/intact LFFW alignment where his clubshaft is
continuously "on-plane" (even while shallowing his clubshaft from one
swingplane to progressively shallower swingplanes).
Note that has has shallowed his clubshaft down
to his functional swingplane (FSP) by P6. Note that he still has an
intact LFFW/GFLW alignment and he is not performing any artificial lead
wrist motion (eg. the reverse motorcyle move) to close his clubface
relative to his clubhead path. At P6, his clubface is still open
relative to his clubhead path and the toe of his club is pointing nearly
straight up. His clubface is minimally closed relative to the back of
his GFLW and the watchface area of his lead lower forearm, but that is
only due to the fact that he adopts a slightly strong lead hand grip at
address.
Image 2 is at P6.5. Note that he he is
starting to release the club (= release of PA#2) along a path that is
parallel to his FSP while maintaining an intact LFFW/GFLW alignment.
Note that the back of his GFLW is facing the ball-target line and that
he has not yet started to perform a PA#3 release action (which is
biomechanically secondary to a lead forearm supinatory motion) in order
to square his clubface relative to his clubhead path by impact.
Image 4 is at P7. Note that he has completed
his release of PA#2, and also completed his release of PA#3, by P7; and
note that the back of his GFLW is facing the target at impact. Note that
his clubface is also facing the target at impact.
Most importantly, note
that he has maintained the same degree of lead wrist cupping all the way
between P1 => P7 while he has maintained an intact LFFW/GFLW alignment
all the way between P1 => P7. Note that
he has no need to use a Hack Motion device to measure his degree of lead
wrist flexion/extension during his P4 => P7 time period if he
continuously maintains an intact LFFW/GFLW alignment all the way between
P4 => P7. I think that the Hack Motion
device is a worthless device if one performs the golf swing in the
optimal way as demonstrated by SW, and it offers a golfer no additional
information that is useful if the golfer
perfectly
maintains an intact LFFW/GFLW
continuously between P4 => P7 in the
optimum manner demonstrated by SW.
The 2nd part of the drill is to place the open
trail palm against the aft side of the club handle with the fingers
outstretched. SW talks about a "ghost" trail arm as signifying a trail
arm that does not interfere with the lead arm's motion during the golf
swing action. Unfortunately, MG/SW do not explain what the trail arm can
potentially do during the downswing that synergistically helps SW to
better perform his one-arm swing action (= lead arm swing action) in the
optimum manner.
Here are capture images of SW's two-armed
swing action.
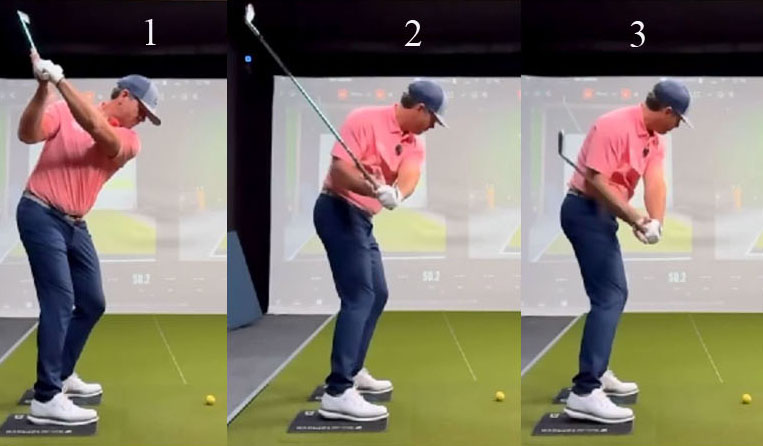
Image 1 is at P4, image 2 is at P5+ and image
3 is at P5.5.
Note that SW has altered the way that he
performs his lead arm swing action to a small degree by having his lead
wrist slightly bowed. I do not know why he did not maintain the same
lead wrist alignment (= slightly cupped lead wrist) that he used when
performing his lead arm-only golf swing action. However, because his
degree of lead wrist bowing is very small, his clubshaft is still
(more-or-less) straight-line-aligned with his lead lower forearm, so he
still can be deemed to have an intact LFFW alignment.
Note that he performs his downswing action
between P4 => P5.5 in the same way that he did when performing a lead
arm-only golf swing action - he shallows the clubshaft down towards his
FSP while i) maintaining an intact LFFW where ii) his clubshaft is
continuously "on-plane". Note that he also maintains a clubhead lag
angle of ~90 degrees until P5+.
How can the presence of his trail upper arm be
potentially helpful in achieving those goals?
The first way that the trail arm can be
helpful is at P4 when the trail palm is positioned under the club handle
and parallel to his intact LFFW (lead arm + clubshaft) at P4. That can
help support the weight of his "on-plane" intact LFFW at his P4
position. To achieve that goal, he has optimally positioned his trail
arm at P4 so that his trail forearm is roughly at a ~90 degree angle
relative to the intact LFFW (lead arm + clubshaft) and his trail wrist
is well extended so that his trail palm can be positioned parallel to
his "on-plane" intact LFFW at P4. The second way that his trail arm can
be helpful is to help him maintain his clubhead lag angle between P4 =>
P5+ by adducting his trail upper arm very rapidly towards his trail
shirt seam between P4 => P5+ while maintaining an unchanged trail elbow
bend angle. The third way that his trail arm can be helpful is to help
him shallow his clubshaft down towards his desired FSP by ~P5.5. That
requirement means that his trail palm must become progressively more
horizontally-aligned between P4 => P5.5 so that it can remain
continuously
parallel to his shallowing clubshaft, which means that his trail forearm
must become increasingly supinated during his trail upper arm adduction
maneuver. Note that SW achieves all those desirable goals and he does an
excellent job moving his trail arm/forearm in the optimum manner between
P4 => P5.5.
Now, let's consider how the presence of his
trail arm can be helpful during the P6 => P7 time period.

Image 1 is at P6, image 2 is at P6.5 and image 3
is at P7.
I have drawn a blue line down the middle of his
trail antecubital fossa/ventral aspect of his upper trail forearm and a red
line along his trail lower forearm's radial bone. Note that his trail
forearm is supinated at P6, slightly more supinated at P6.5, before becoming
slightly less supinated by P7 where the degree of supination is similar to
the amount that existed at P6. Note that his trail palm is partially under
the club handle, and partially behind the club handle, at P6 where it is
facing towards the ball-target line. By P6.5 his trail palm is still
partially under the club handle and partially behind the club handle but it
is facing ~45 to the right. By P7, his trail palm is still partially under
his club handle and partially behind his club handle but it is now facing
the target at impact. Note that his trail palm never faces the ground
between P6 => P7. The only part of his trail palm that faces groundwards is
the thenar area of his trail palm, which only represents the thumb
metacarpal area. His "true" trail palm area (interdigital area and
hypothenar area) never faces the ground during his entire downswing action.
By slightly increasing his degree of trail forearm
supination between P5.5 => P6.5 SW avoids the problem of the clubshaft
"tumbling" in an over-the-plane manner between P5.5 (when the club is behind
the hands) and P6.5 (when his club is in front of his hands) amd he
correctly ensures that his clubshaft travels parallel to his FSP. If he used
his trail arm incorrectly - by either internally rotating his trail humerus
or pronating his trail forearm during that critical time period - it could
induce his clubshaft to "tumble" over-the-plane thereby producing an
out-to-in clubhead path between P6 => P7 where his trail palm will
increasingly face towards the ground. Instead, SW does an excellent job of
keeping his clubshaft continuously on his FSP between P6 => P7 and he never
allows his trail palm to face the ground.
Note that he performs his PA#3 release action
between P6.5 => P7 in the same way as he did when performing a lead arm-only
golf swing action by actively
supinating his lead forearm by the amount necessary to close his clubface
relative to his clubhead path so that it becomes squared by impact. His
trail palm has to rotate the same amount as his lead palm during this
clubface-closing phenomenon and that happens when he
passively allows
his trail wrist to straighten and simultaneously roll counterclockwise
secondary to a circumductory roll motion happening at the level of his trail
wrist - and note that the counterclockwise roll motion must not happen via a
trail forearm pronatory motion.
In conclusion, SW does a superb job of showing how
the two arms should move during a professional quality golf swing action.
The most important point that a student golfer must realise is that it is
predominantly a lead arm-only golf swing action where a golfer maintains an
intact LFFW/GFLW during the entire downswing while keeping the clubshaft
continuously "on-plane". Secondly, a student golfer must realise that the
trail arm, if used correctly, can synergistically help the lead arm perform
its motions in the optimum way (as demonstrated by SW). I think that the AMG
instructors should do follow-up videos on this Scott Hamilton drill where
they provide more information on how SW is superbly maintaining an intact
LFFW/GFLW alignment all the way between P4 => P7 and how he never
bows-or-bends his lead wrist in such a manner that it causes his clubshaft
to lose its straight-line alignment relative to his lead lower forearm
(thereby disrupting his intact LFFW alignment). I also think that the AMG
instructors should provide much more information on how the trail arm can
work synergistically with the lead arm by precisely explaining what role it
plays during every moment of the P4 => P7 downswing time period.
Jeffrey Mann.
https://newtongolfinstitute.proboards.com/thread/1227/best-amg-video-produced