In this thread I am going to
analyse Sam Burns' golf swing action.
I wrote most of my review papers for my golf website
many years ago and I used the golf swings of pro golfers who were playing
regularly at that time for my commentary on golf swing biomechanics.
I am not familiar with the golf swings of many
contemporary pro golfers who are playing on the PGA tour and I have never
previously studied Sam Burns' golf swing action. However, I was watching him win
the WGC-Dell Match Play competition this past weekend and I was very impressed
with his ball striking prowess. I therefore decided to analyse his full golf
swing action using my V1Home Swing Analsyer program. I discovered that he is
probably the best exemplar of many of my favorite golf swing principles - the
intact LFFW/GFLW concept combined with an on-plane golf swing action, a DH-hand
release action and a superb pivot motion. So, I will now present a detailed
analysis of his golf swing action and I will explain why I think that it is
truly superb!
Here is a swing video of his driver golf swing action.
Here are capture images of his
backswing action
Image 1 is at address. Note that he adopts a
moderately strong lead hand grip at address and a strongish trail hand grip. He
adopts a wide stance, that is wider than his shoulder width.
Image 2 shows his P2 position. Note that he uses the
Right Forearm Takeaway (RFT) technique where he starts upcocking his lead wrist
from the very start of his backswing action. He extends his trail wrist and that
allows his lead wrist to straighten between P1 => P2 while he simultaneously
pronates his lead forearm so that the back of his trail hand will become
parallel to the ball-target line by P2.
Image 3 is at P3. Note that he already has a 90 degree
angle between his lead arm and the clubshaft as a result of his RFT technique.
His clubshaft is also "on-plane" at P3 where an imaginary line extended out from
the butt end of his club points at the ball-target line. Note that he keeps his
lead arm very straight by ensuring that he has the correct amount of trail arm
straightening action happening during his mid-backswing.
Image 4 is at P4. Note that his lead arm is at the
11:30 o'clock position with a ~100 degrees of shoulder (upper torso) rotation.
Note that he manifests a centralised pelvic loading action and a
rightwards-centralised upper torso loading action at P4. Note that he maintains
a flexed trail knee and he does not allow his trail leg to fully straighten.
Note that his trail hip joint is in a condition of internal rotation, which
means that he has efficiently pre-loaded his trail-sided lateral pelvic rotator
muscles by P4.
Image 1 is address. Note that
he has a good address posture with a finite amount of knee flex and hip joint
flex. He prefers to straighten his lumbar lordosis and only have a small degree
of thoracic spine kyphosis (like Adam Scott).
Image 2 is at his P2 position. The clubshaft is
parallel to the ball-target line, but not quite parallel to the ground because
he has upcocked his lead wrist slightly more than usual for a RFT golfer who
uses the intact LFFW swing technique. Note that the toe of his club is pointing
upwards and he makes no attempt to "artificially" keep the clubface more shut
during his P1 => P2 takeaway action.
Image 3 is at his P3 position - note that his
clubshaft is "on-plane" and that he has an intact LFFW alignment where it is
parallel to his swingplane.
Image 4 is at his P4 position. Note that he has
maintained his trail knee flex and trail hip joint flex unchanged during his P1
=> P4 backswing action. Note that his lead arm is angled slightly steeper than
his shoulder turn angle. Note that his RFFW is perfectly aligned relative to his
intact LFFW at P4. Note that he minimally palmar flexed his lead wrist during
his backswing action so he manifests an anatomically flat lead wrist at P4, but
the amount of lead wrist palmar flexion is so small that it does not disrupt his
intact LFFW alignment.
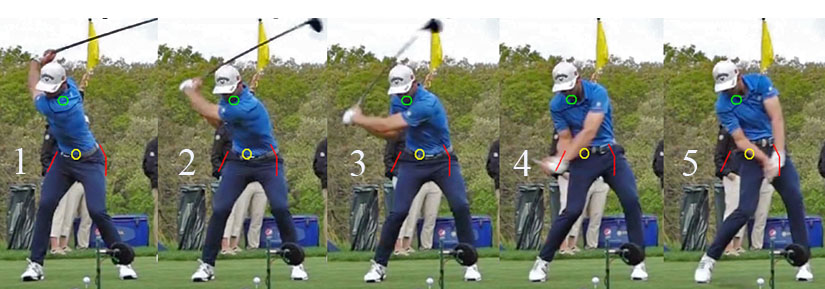
Now, consider his downswing action.
Image 1 is at P4. I have drawn red lines alongside
the outer border of his pelvis. I have drawn a green circular marker over his
upper swing center and a yellow circular marker over his lower swing center.
Note that his upper swing center is positioned further away from the target than
his lower swing center due to the fact that his spine is rightwards-tilted
secondary to his rightwards-centralised upper torso loading action. Note that
his head is positioned over a point on the ground that is just inside his trail
foot.
Image 2 is at P4.5 and image 3 is at P5. Note that he
is squaring his pelvis during his early downswing with very little left-lateral
pelvic shift and he manifests the "Sam Snead sit-down look" at P5. Note that his
lower swing center (belt-buckle area) has moved targetwards to a very small
degree, while his upper swing center has remained stationary, between P4 => P5.
That means that he is not using the "re-centering sway move" taught by Dr. Kwon
and that is also used by many pro golfers. I think that he is simply rotating
his pelvis counterclockwise by activating his trail-sided lateral pelvic rotator
muscles without performing a preliminary swaying type of re-centering move that
is often simultaneously associated with a squat move (unweighting move). Note
that he manifests very little squat motion during his early downswing action.
Image 4 is at P5.5. Note that his pelvis is now
slightly open due to a very efficient counterclockwise rotation of his pelvis.
Note that he does not straighten his lead knee much and there is only a small
degree of elevation of his lead hip joint by P5.5. Note that his upper swing
center is still at roughly the same position at P5.5 and it does not drop down
due to a lot of secondary axis tilt combined with a lot of right lateral bend
(that some pro golfers - like Joaquin Niemann - manifest).
Image 5 is at impact. Note that he has elevated his
lead shoulder socket by his desired amount while keeping it vertically
positioned over low point (which is just ahead of the ball and well inside his
lead foot). Note that he still has a small degree of lead knee flex at impact
and that the outer border of his lead pelvis is still well inside his lead foot,
so he obviously manifested a good "braking action" of his pelvic motion during
his downswing action. Note that he manifests a desirable amount of secondary
axis tilt and right lateral bend at impact and that his upper swing center has
remained nearly stationary throughout his entire downswing between P4 => P7.
Note that he has a bent trail arm and bent-back trail wrist at impact.
Image 1 is at his P4 position. I have drawn a red
line along the back of his trail buttock, and that represents the tush line.
Image 2 is at P4.5. Note how efficiently he is
squaring his pelvis by rotating his pelvis counterclockwise away from his
"stabilised" trail leg while keeping his trail buttock close to the tush line -
presumably by contracting his trail-sided lateral pelvic rotator muscles. He has
nearly completed the hip-squaring phase by P4.5.
Image 3 is at P5. Note how efficiently he is adducting
his trail upper arm between P4 => P5 so that his trail elbow becomes lower than
his lead elbow, and that allows him to start to shallow his clubshaft and avoid
an OTT clubshaft motion.
Image 4 is at P5.5. Note that he has fully adducted
his trail upper arm while performing a pitch elbow motion of his trail elbow
while increasingly supinating his trail forearm, and that allows him to continue
to shallow his clubshaft very efficiently between P5 => P5.5. Note that he has
maintained an intact LFFW all the way between P4 => P5.5 and that his clubface
is only closed relative to the watchface area of his lead lower forearm to a
small (unchanged) degree between P4 => P5.5. There is no evidence that he is
using the "reverse motorcycle move" in order to close the clubface relative to
his clubhead path during his early-mid downswing action, which I perceive to be
a sub-optimum move that has no real value if a golfer uses the intact LFFW swing
technique.
Image 5 is at impact. Note that he continued to rotate
his pelvis counterclockwise between P5 => P7 and that his pelvis is well open at
impact by ~ 45+ degrees. Note that his upper torso is also open by ~20+ degrees
at impact. Note that he gets his trail shoulder socket well downplane, so that
he does not "run-out-of-trail arm" and that he therefore can have a bent trail
arm and bent trail wrist at impact.
Note how well he has maintained his spinal bend
inclination angle between P4 => P7 with no "early extension" phenomenon
happening.
Here is another swing video of his driver and iron
golf swing action.
Here are capture images of his DH-hand release action -
from his driver golf swing action featured in that swing video.
Image 1 is at P7, image 2 is at
P7.2 and image 3 is at P7.4.
Note that he does not allow the clubshaft to bypass
his lead arm (from an angular rotational perspective) between P7 => P7.4 and
that allows him to keep the clubface square to his clubhead path all the way
between P7 => P7.4. What makes it possible is that he does not stall his lead
arm's forward motion at impact, and he also does not allow his lead wrist to
bend through impact. He still has approximately the same degree of lead wrist
palmar flexion at P7.4 that he had during his entire downswing between P4 => P7.
Note that the back of his lead hand is angled about 45 degrees to the right at
impact and that it is rotating counterclockwise between P7 => P7.4. Most of the
counterclockwise rotation of his lead hand is due to a continued
counterclockwise rotation of his pelvis/upper torso between P7 => P7.4 that
angles the anterior aspect of his lead shoulder socket more leftwards, which is
combined with an increased degree of external rotation of his lead humerus, and
there is very little lead forearm supination happening during that P7 => P7.4
time period.
Note that he maintains a bent trail arm and bent-back
trail wrist all the way to P7.4, which is very conducive to the efficient
execution of a DH-hand release action.
Finally, let's consider his PA#3 release action.
Image 1 is at P6.5, image 2 is
at P6.8 and image 3 is at impact.
Note that his lead lower forearm's radial bone is
angled to the right by ~70+ degrees at P6.5 and by ~45 degrees at impact and
that the difference is primarily due to lead forearm supination, which is
causally responsible for the release of PA#3.
Note that he acquires his desired amount of forward
shaft lean at impact by controlling the degree of lead forearm supination that
happens between P6.5 => P7 and not by bowing his lead wrist more as he
approaches impact.
In summary, I think that Sam Burns has a perfect golf
swing action involving the super-efficient performance of many optimum golf
swing biomechanical movements involving both his body and his arms!!!