What effect does lead wrist bowing have on the clubface and clubshaft?
Click here to go back to the index page.
Introduction:
Many golf instructors, and golfers, believe that bowing the lead wrist at any time during the backswing or downswing always closes the clubface relative to the clubhead arc, and they often believe that it will therefore allow a golfer to square the clubface by impact by simply rotating the body during the downswing without requiring any lead forearm rotation, or they alternatively believe that it will diminish the usual amount of lead forearm supination required in the later downswing (that is routinely required to square the clubface by impact). The amount of lead forearm supination required in the late downswing to square the clubface by impact is inversely proportional to lead hand grip strength, and many golfers believe that if one bows the lead wrist during the backswing, or early downswing, that it will decrease the amount of lead forearm supination required in the later downswing in order to get a square clubface by impact. In this review paper, I will thoroughly analyse what effect lead wrist bowing has on the clubface and also on the clubshaft in terms of its degree of angulation. I previously produced a short video on this topic, which I posted to my you-tube channel, but I have since removed that video because of a number of gross errors that I made in my video presentation. In this review paper, I will be correcting all those errors, and this review paper should accurately reflect my revised opinions on this topic. I will start off by describing what effect lead wrist bowing will have on the clubface and clubshaft from a biomechanical/mechanical perspective, and I will then secondly show what effect it has with respect to the "real life" golf swing action of a number of pro golfers, who use the bowed lead wrist technique.
Analysing the effect of lead wrist bowing on the clubface and clubshaft:
Jon Sinclair demonstrated what effect lead wrist bowing has on the clubface in a video called "Wrist Angle Video", which can be purchased from his golf website's online shop at https://www.sinclairgolf.com/ProShop/Product/tabid/33192/rvdsfpid/video-club-membership-546/Default.aspx
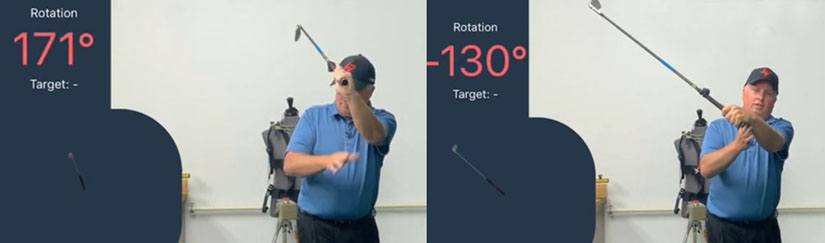
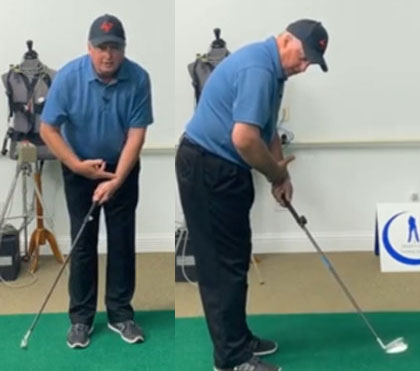
Here are capture images of Jon Sinclair demonstrating what effect lead wrist bowing at a simulated end-backswing position has on the clubface.
Jon Sinclair has attached a device to his clubshaft that allows him to measure the amount of clubshaft rotation happening (due to the clubshaft rotating about its longitudinal axis) when he bows his lead wrist at a simulated P4 position.
In image 1, Jon Sinclair has a slightly cupped (scooped) lead wrist and he obtains a measurement of 171 degrees. Most importantly, note that his lead wrist is in a state of radial deviation where the clubshaft is at a ~90 degree angle relative to the lead arm. In image 2, he is bowing his lead wrist while using the 2nd/3rd fingers of his right hand to prevent any lead forearm rotation from happening at the same time. Note that the measurement changes by 41 degrees, and that his clubshaft is rotating counterclockwise in a clubface closing direction. Note that the clubshaft does not angle away from the lead forearm and that it is still roughly straight-in-line with his lead forearm during his lead wrist bowing maneuver.
I have personally repeated his demonstration to confirm that bowing the lead wrist rotates the clubface counterclockwise in a clubface-closing direction when the lead wrist is radially deviated and that it does not significantly angle the clubshaft away from its straight-line relationship with respect to the lead forearm.
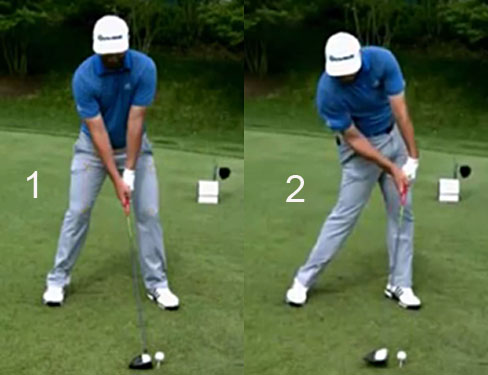
Here are capture images of me (author) performing a lead wrist bowing maneuver when the lead wrist is radially deviated.
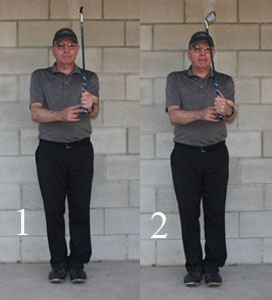
In image 1, I am holding my lead forearm parallel to the ground and the clubshaft is roughly vertical to the ground because I have radially deviated my lead wrist so that there is a ~90 degree angle between my lead forearm and the clubshaft. I have adopted a weak lead hand grip so that the clubface is straight-in-line (parallel) to the back of my lead hand and also the watchface area of my lower lead forearm (because my lead wrist is in a neutral position relative to the horizontal plane of lead wrist hinging).
In image 2, I am bowing my lead wrist while using the 2nd/3rd fingers of my right hand to prevent any forearm rotation from happening during my lead wrist bowing maneuver. Note that the clubface rotates *counterclockwise as the clubshaft rotates counterclockwise around its longitudinal axis and that there is no significant clubshaft angulation happening with respect to my lead forearm.
(* a counterclockwise rotation depends on one's viewing perspective, and I am using a viewing perspective where one looks up at the butt end of the club)
Here is another personal demonstration where I held the clubshaft horizontal to the ground so that one can visually see the amount of clubshaft rotation happening during my lead wrist bowing maneuver.
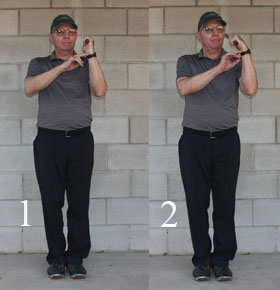
Note that I have bent my lead elbow so that my lead forearm is roughly vertical to the ground, and note that my lead wrist is radially deviated so that the clubshaft is roughly horizontal to the ground.
In image 1, I am simply holding the club handle using a weak lead hand grip strength, and in image 2, I am bowing my lead wrist, which causes the clubface to close in a clubface-closing direction. Note that I am using the 2nd/3rd fingers of my right hand to prevent any forearm rotation from happening during my lead wrist bowing maneuver.
Here is a close-up view of that same demonstration.
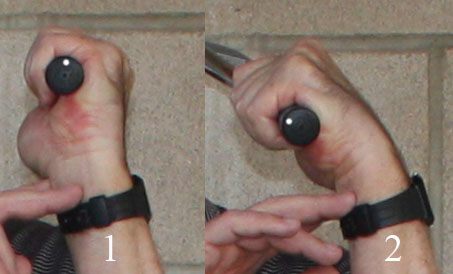
Image 1 shows the neutral (non-bowed) lead wrist position. Note that I have placed a white dot on the butt end of the club handle. One cannot see the clubface because it is hidden by my lead hand, but it is roughly vertical and parallel to the back of my lead hand and also parallel to the watchface area of my lead forearm.
In image 2, I am bowing my lead wrist which causes the club handle, and therefore the clubshaft/clubface, to rotate counterclockwise in a clubface-closing direction. The approximate amount of club handle rotation can be discerned by looking at the change in position of the white dot. Note that the clubshaft does not angle away from my lead forearm very much during my lead wrist bowing maneuver.
I would recommend that any reader of this review paper repeat my demonstration at home to personally confirm the following facts.
Lead wrist bowing causes the clubface to rotate counterclockwise in a clubface-closing direction with very little (if any) clubshaft angulation - if the lead wrist is radially deviated so that there is a ~90 degree angle between the lead forearm and the clubshaft.
Now, let's consider what happens when the lead wrist is actively bowed when the lead wrist is in a condition of ulnar deviation.
Here are capture images from Jon Sinclair's video on wrist angles.
Note that Jon Sinclair is holding his lead arm in a simulated impact location where the lead wrist is ulnar-deviated and he then bows his lead wrist while using the 2nd finger of his right hand to prevent any lead forearm rotation.
The face-on image (image 1) shows that lead wrist bowing causes the clubshaft to angle back in an away-from-the-target direction.
Note that the clubface is only closing by a very small amount and Jon Sinclair measured 13 degrees of counterclockwise rotation of the clubshaft in a clubface-closing direction.
Now, consider what happened when I repeated the demonstration of bowing the lead wrist when the lead wrist is in a condition of ulnar deviation.
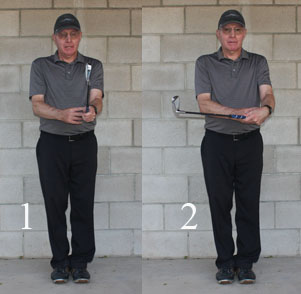
Note that I am holding the clubshaft at waist level with my lead wrist in a condition of ulnar-deviation in image 1. I am using a weak lead hand grip and my lead thumb is placed on top of the grip. Note that the clubface is roughly vertical and parallel to the back of my lead hand and also the watchface area of the back of my lower lead forearm.
In image 2, I am bowing my lead wrist while using the 2nd/3rd fingers of my right hand to prevent any lead forearm rotation. Note that the clubshaft angles backwards in an away-from-the-target direction, but the clubface remains vertical and it does not rotate counterclockwise in a clubface-closing direction.
In other words, I get roughly the same degree of clubshaft angulation as seen in Jon Sinclair's demonstration, but I do not get the 13 degrees of clubface-closing obtained by Jon Sinclair.
Why?
Here are DTL view capture images of my demonstration.
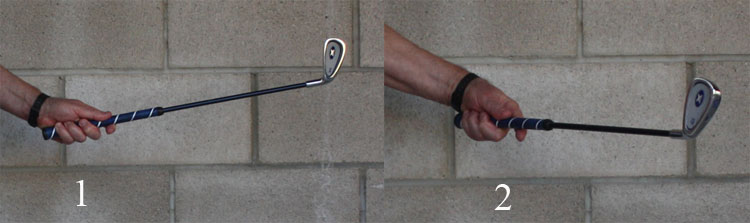
Image 1 shows my starting (non-bowed) position. Note that my lead wrist is significantly ulnar deviated, but not in full ulnar deviation (note that a straight line drawn along the radial side of my lower lead forearm is angled more downwards relative to my second metacarpal bone).
Image 2 shows what happens when I bow my lead wrist. It causes the clubshaft to angle backwards in an away-from-the-target direction and also slighly groundward because I am letting my lead wrist become even more ulnar-deviated. Note that the clubface is not closing while the clubshaft is angling backwards. The reason why the clubface is not closing is because i) I am deliberately not twisting the club handle counterclockwise with the 4th and 5th fingers of my lead hand and ii) I am deliberately avoiding any left wrist circumductory roll motion due to the biomechanical combination of increased lead wrist bowing + increased radial deviation of the wrist (which can cause the clubshaft to rotate in a counterclockwise rotary direction).
I strongly suspect that Jon Sinclair is allowing his lead wrist to undergo a small amount of lead wrist circumductory roll motion during his personal demonstration, while I am demonstrating the effect of "pure" lead wrist bowing in the absence of any lead wrist circumductory roll motion.
I highly recommend that each reader of this review paper personally repeat this demonstration at home, which should show that "pure" lead wrist bowing (in the absence of any lead wrist circumductory roll motion) angles the clubshaft backwards in an away-from-the-target direction without inducing any clubface-closing phenomenon - if the lead wrist is ulnar-deviated.
Most importantly, it is essential to realize that the demonstration performed by Jon Sinclair and myself is somewhat artificial because we are starting in a simulated impact location before we start to bow the lead wrist and we are angling the clubshaft backwards in an away-from-the-target direction. However, that is not what happens in a "real life" pro golfer's late downswing. If a pro golfer uses a bowed lead wrist technique, then his lead wrist is already bowed by the P6 position. Then, if he maintains a bowed lead wrist all the way between P6 => P7, thereby reaching impact with forward shaft lean (= backwards angulation of the clubshaft relative to the lead forearm due to lead wrist bowing), that means that the forces acting on the club handle by the lead hand are acting in a targetwards direction. What often happens in many pro golfers, who use the bowed lead wrist technique, is that their lead wrist moves in the direction of "lead wrist extending" in the later downswing between P6 => P7. Consider an example - according to second-hand reporting of Jordan Spieth's 3D data, he has 23 degrees of lead wrist bowing at the P6 position and 9 degrees of lead wrist bowing at impact. That means that although he still has 9 degrees of lead wrist bowing at impact, his lead wrist is moving in the direction of "lead wrist extending" by an amount of 14 degrees between P6 => impact. If the lead wrist is moving towards being less bowed between P6 => P7, then the lead hand's finger clenching forces are acting in a less clenched rotary direction (rather than a more clenched rotary direction) during that P6 => P7 time period and if it has any causal effect with respect to rotating the club handle about its longitudinal axis, then it will likely be working to rotate the clubshaft in a clockwise, clubface-opening rotary direction (and not a counterclockwise, clubface-closing rotary direction).
Another issue that needs explanation is the twistaway phenomonon.
Brian Manzella, a golf instructor, first used the term "twistaway" to describe a clubface-closing maneuver that a golfer can perform during the downswing.
Here are capture images from his vimeo video, called "Science of Smash", where he demonstrates a twistaway maneuver.
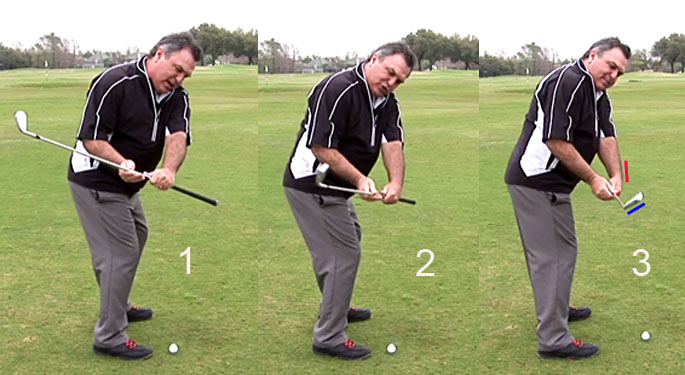
In image 1, note that Brian Manzella has a cupped lead wrist. Note that the clubface is parallel to the back of his lead wrist and also the watchface area of his lead lower forearm because he is using a neutral lead hand grip. Note that his lead wrist in a condition of radial deviation so that there is a ~90 degree angle between the lead forearm and the clubshaft.
In image 2 and image 3, note that he is bowing his lead wrist and one can see that his clubface is closing, but that his clubshaft is not angling significantly backwards relative to his lead forearm. Most importantly, note that the clubface appears to be closed relative to the radial half of the back of his lead hand, and that is due to the fact that he is twisting the club handle primarily with the 4th and 5th fingers of his lead hand. An important visual clue that signifies that a twistaway maneuver is being performed is the fact that the 4th and 5th knuckles are more curled-in compared to the 2nd knuckle. What causes the 4th and 5th knuckles to be so exaggerately curled-in? I believe that it is due to increased activation of the flexor digitorum profundus muscles (finger flexor muscles) to the lead hand's 4th and 5th fingers that torque the club handle counterclockwise within his lead hand's grip. That allows Brian Manzella to close the clubface (relative to the clubhead arc) by an even greater amount than could be obtained by a "pure" lead wrist bowing maneuver where all of the lead hand's 4 fingers only torque the club handle counterclockwise in direct proportion to the degree of lead wrist bowing. However, from a practical perspective, the twistaway maneuver is not going to decrease the total amount of lead forearm supination routinely required in the later downswing between P6 => P7 to get a square clubface by impact - because it is physically impossible to maintain excessively contracted flexor digitorum muscles to the 4th/5th fingers in the later downswing when the club is releasing and where there is a large outward pull (centrifugal pull) due to the club release phenomenon that stretches the lead forearm's flexor digitorum profundus muscles. In other words, a golfer can optionally choose to perform a twistaway maneuver during the early-mid downswing to temporarily close the clubface (relative to the clubhead arc), but it is not going to decrease the amount of lead forearm supination routinely needed to close the clubface in the later downswing (and where the amount of required lead forearm supination is inversely proportional to lead hand grip strength).
Analysing the clubface closing and clubshaft angling effects of lead wrist bowing in a number of professional golfers.
I am now going to analyse the "real life" effects of lead wrist bowing on clubface closing and clubshaft angulation by examining the driver golf swings of a number of pro golfers.
To make the analysis more meaningful from a golf instructional perspective, I am going to first analyse the golf swing of a pro golfer (Henrik Stenson) who does not use a bowed lead wrist technique.
Henrik Stenson uses a non-bowed lead wrist technique where he adopts a neutral lead hand grip at address and where he maintains an intact LFFW/GFLW alignment throughout his entire downswing action, and where he has an intact LAFW alignment at the P4 position and just after impact (~P7.1 position).
The term LAFW is an abbreviation used for the TGM concept of the "Left Arm Flying Wedge", which is a TGM concept first introduced by Homer Kelley in his book called "The Golfing Machine". Homer Kelley only briefly discussed the Left Arm Flying Wedge concept in his TGM book, and he implied that a golfer should maintain an intact LAFW throughout the downswing. I believe that it is impossible to maintain an intact LAFW throughout the downswing, but I do believe that it is possible to maintain an intact LFFW and GFLW throughout the downswing and early followthrough.
The abbreviation LFFW refers to a "Left Forearm Flying Wedge" and the term GFLW refers to a "Geometrically Flat Left Wrist". I have coined those two terms, and they are not TGM terms introduced by Homer Kelley.
To better understand those two terms, consider this capture image of me (author) holding a short golf club.
Note that I have taped a 3" length of black tape over the lower radial bone area of my lower left forearm.
Note that in image 1, the clubshaft is straight-in-line with the black-taped area of my lower left forearm (lower 3" of the left forearm just above the wrist crease), which means that I have an intact LFFW. However, the clubshaft is not straight-in-line with my left upper arm because my left forearm is pronated slightly and that causes the clubshaft to angle slightly towards the right. Therefore, I do not have an intact LAFW. However, because the clubshaft is angled to the right to the same degree as my left lower forearm as a result of a slight clockwise rotation of my left hand due to the biomechanical phenomenon of left forearm pronation, I can still maintain an intact LFFW if my wrist angle (in the plane of left wrist extension/flexion) does not change from its neutral alignment. The wrist angle (in the plane of left wrist extension/flexion) that allows me to have the clubshaft straight-line-aligned with the lower 3" of my left lower radial bone is a geometrically neutral wrist angle, which I label as being a GFLW. A geometrically neutral left wrist angle is by definition a geometrically non-extended left wrist angle (even if the left wrist visually appears to be dorsiflexed) and also a geometrically non-flexed left wrist angle (even if the left wrist visually appears to be slightly palmar flexed), and it allows the clubshaft to be straight-line-aligned with my lower left forearm (black taped area of my lower left forearm).
In image 2, note that I have supinated my lead forearm slightly (while maintaining a GFLW) to get the clubshaft to be straight-in-line with both my lower left forearm and my left upper arm, which means that I not only have an intact LFFW, but I now also have an intact LAFW (where the clubshaft is straight-line-aligned with both my left forearm and left upper arm).
A key biomechanical element that allows me to have an intact LFFW alignment, where the clubshaft is straight-in-line with my lower lead forearm, is the fact that I have a GFLW. A GFLW refers to a neutral left wrist alignment, which allows the clubshaft to be straight-line-aligned with the lower 3-4" of the left lower forearm. The left wrist does not have to anatomically flat to be a GFLW, and it can visually appear to be cupped to a variable degree.
In image 3, I have bowed my lead wrist and that angles the clubshaft to the right, and in image 4, I have extended (bent) my lead wrist and that angles the clubshaft to the left. Because the clubshaft is not straight-in-line with the lower 3-4" of my left lower forearm, I do not have a GFLW, which means that I cannot have either an intact LFFW or an intact LAFW. In other words, left wrist bowing or extending (bending) disrupts a GFLW and causes the LFFW alignment to become non-intact.
The following side-view capture image shows a wedge-shaped piece of red cardboard placed between my clubshaft and my lower left forearm (over the radial bone area). Theoretically, the piece of red cardboard should fit perfectly between the clubshaft and the lower 3-4" of my left lower forearm while remaining perfectly straight-in-line with the black-taped area of my lower left forearm, but this piece of cardboard is too large so I am holding it against the ventral aspect of my left forearm with the fingertips of my left hand. Nonetheless, the flat piece of red cardboard helps one to mentally imagine a wedge-shaped area between the clubshaft and the lower 3-4" of my left lower forearm that is planar in nature and where the clubshaft can be aligned in the same plane as the black-taped lower 3-4" area of my left lower forearm.
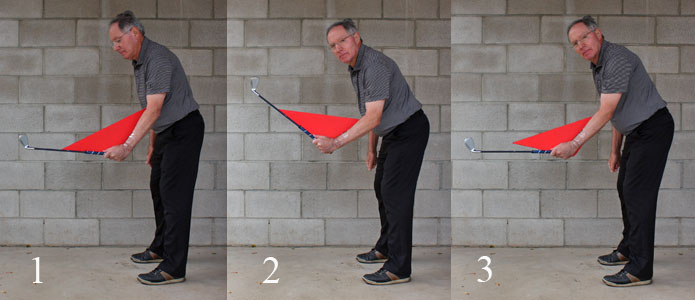
Note that the wedge-shaped angle between my left forearm and the clubshaft in image 1 exists because I have adopted a low palmar left hand grip, and that allows one to more easily conceptualise the mental concept of an intact LFFW as being a wedge-shaped structure (involving the lower lead forearm and the clubshaft) that is planar in nature. In image 2, I have radially deviated my left wrist while maintaining a GFLW/intact LFFW alignment, and in image 3, I have ulnar deviated my left wrist while maintaining a GFLW/intact LFFW alignment. Note that radial deviation and ulnar deviation of the left wrist does not disrupt an intact LFFW alignment if one maintains a GFLW and that the biomechanical phenomenon of upcocking (radially deviating) or uncocking (ulnar deviating) the left wrist happens within the plane of the LFFW. Upcocking my left wrist decreases the angle of the wedge-shaped alignment between my left forearm and the clubshshaft so that the wedge-shaped angle is closer to 90 degrees, while uncocking my left wrist increases the wedge-shaped angle between my left forearm and the clubshaft so that the wedge-shaped angle is closer to 180 degrees.
Now, although the biomechanical phenomenon of left wrist upcocking/uncocking does not disrupt a GFLW or intact LFFW alignment, it does alter the physical appearance of the back of my GFLW if I adopt a weak/neutral left hand grip - as seen in the following birds-eye view capture images where I continuously maintain a GFLW and intact LFFW alignment.
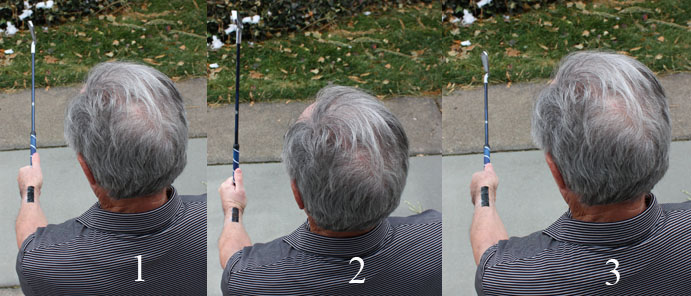
Image 1 shows a neutral position where I am holding my left wrist in a neutral cocked position approximately half-way between being fully upcocked (fully radially deviated) and fully downcocked (fully ulnar deviated). Note that the back of my left wrist looks to be slightly cupped (scooped) because I have adopted a weak left hand grip. Note that the clubshaft is straight-line-aligned with the black-taped area of my lower left forearm and that they are both in the same plane.
Image 2 shows my left wrist in an upcocked position (position of radial deviation) and one can see that the back of my left wrist looks to be more cupped.
Image 3 shows my left wrist in an uncocked position (position of ulnar deviation) and one can see that the back of my left wrist looks far less cupped and borderline anatomically flat or slightly bowed (minimally palmar flexed).
Note that both radial deviation of my left wrist and ulnar deviation of my left wrist does not disrupt the GFLW/intact LFFW alignment.
I strongly recommend that all readers of this review paper confirm my above biomechanical claims by personally repeating this demonstration at home.
Note that it is an obvious biomechanical fact that in order for a golfer (who uses a weak-neutral left hand grip) to maintain a GFLW all the way throughout the entire downswing between the P4 position (where the left wrist is radially deviated) to impact (where the left wrist is ulnar deviated), the left wrist angle must continuously change from being significantly dorsiflexed at P4 to becoming far less dorsiflexed (and even slightly palmar flexed) by impact.
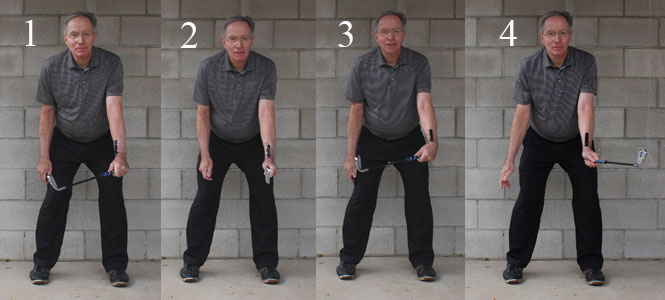
The following series of capture images show that it is biomechanically possible to maintain an intact LFFW/GFLW alignment throughout the backswing and entire downswing (including the early followthrough).
Backswing action capture images

These capture images are artificial in the sense that I am simply placing my left arm/clubshaft into different simulated P positions and holding those simulated P positions for each still photograph.
Image 1 shows a simulated address position where I have a GFLW/intact LFFW alignment.
Image 2 shows a simulated P2 position where I still have a GFLW/intact LFFW alignment. Note that the toe of the clubhead is pointing straight-up. Note that the clubface is straight-line-aligned relative to the back of my GFLW and the black-taped area of my left lower forearm.
Image 3 shows a simulated mid-backswing position where I still have a GFLW/intact LFFW alignment. Note that my clubface is straight-line-aligned relative to the back of my GFLW and the black-taped area of my left lower forearm, and they all parallel to the swingplane. To get the back of my GFLW and the watchface area of my left lower forearm parallel to the swingplane, I had to pronate my left forearm by a finite amount.
Image 4 shows a simulated end-backswing position where I still have a GFLW/intact LFFW alignment. Note that my clubface is straight-line-aligned relative to the back of my GFLW and the black-taped area of my left lower forearm, and they all parallel to the swingplane.
Downswing action capture images
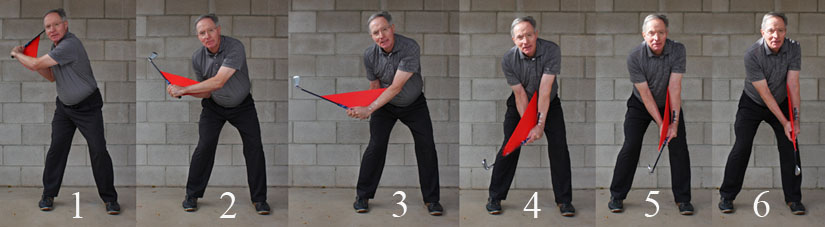
These capture images are artificial in the sense that I am simply placing my left arm/clubshaft into different simulated P positions and holding those simulated P positions for each still photograph.
Image 1 shows a simulated end-backswing position where I still have a GFLW/intact LFFW alignment. Note that my clubface is straight-line-aligned relative to the back of my GFLW and the black-taped area of my left lower forearm, and they all parallel to the swingplane. Note that my GFLW is significantly cupped because my left wrist is radially deviated.
Image 2 shows a simulated mid-downswing position where I still have a GFLW/intact LFFW alignment. Note that my clubface is straight-line-aligned relative to the back of my GFLW and the black-taped area of my left lower forearm, and they all parallel to the swingplane. Note that my left wrist is still cupped, which is expected if a GFLW is still radially deviated to a signficant degree.
Image 3 shows a simulated P5.8 position where I still have a GFLW/intact LFFW alignment. Note that my clubface is straight-line-aligned relative to the back of my GFLW and the black-taped area of my left lower forearm. Note that the toe of my clubhead is pointing straight up.
Image 4 shows a simulated P6.5 position where I still have a GFLW/intact LFFW alignment. Note that my clubface is straight-line-aligned relative to the back of my GFLW and the black-taped area of my left lower forearm. Note that I have partially released the club due to a left wrist uncocking action that has caused my left wrist to become more ulnar-deviated. Note that my more ulnar-deviated left wrist has caused the back of my GFLW to appear to be less cupped in appearance, and slightly flatter in appearance.
Image 5 is at a simulated impact position where I still have a GFLW/intact LFFW alignment. Note that my clubface is straight-line-aligned relative to the back of my GFLW and also the black-taped area of my left lower forearm. Note that my GFLW is not cupped in appearance and it is relatively flat in appearance, which is fully expected when a GFLW becomes markedly ulnar deviated (presuming the adoption of a weak/neutral left hand grip). Note that I have a small degree of forward shaft lean, and the clubshaft is not in a straight-line relationship with my left upper arm, which means that I have an intact LFFW, but not an intact LAFW.
Image 6 is at a simulated P7.1 position. Note that the clubshaft is straight-in-line with both the black-taped area of my left lower forearm and also my left upper arm, which means that I have an intact LAFW as well as an intact LFFW.
What I am demonstrating in an artificial manner actually happens in the "real life" golf swings of pro golfers (like Henrik Stenson, Justin Rose, Adam Scott and Tiger Woods) who use the intact LFFW/GFLW technique when adopting a weak or neutral left hand grip strength.
I will use Henrik Stenson as an example of a pro golfer, who uses the intact LFFW/GFLW technique with a neutral left hand grip strength.
As I have already explained, in order for a golfer (who uses a neutral left hand grip) to maintain a GFLW throughout the entire downswing, the golfer must have a significantly dorsiflexed left wrist when the left wrist is radially deviated (eg. at the end-backswing position) and he must have a minimally dorsiflexed, or slightly palmar flexed, left wrist when the left wrist is ulnar deviated (eg. at impact).
Here is a HackMotion 3D graph showing Henrik Stenson's left wrist angles during his downswing action.
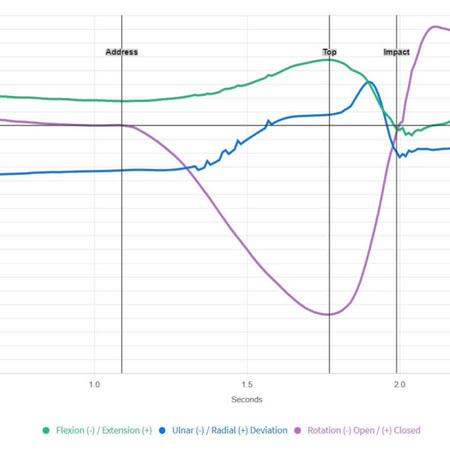
The black vertical line labelled "top" represents his end-backswing position while the black vertical line labelled "impact" represents his impact position and all downswing events involving the left wrist/hand occur between those two black vertical lines.
The green graph represents his left wrist extension-flexion graph. Note that his left wrist is maximally extended at his end-backswing position and that it remains relatively extended in the early downswing before it becomes non-extended by impact. That biomechanical phenomenon is exactly what one would expect if a golfer maintains a GFLW throughout the downswing. Note that his left wrist does not rapidly-and-massively extend through impact and that it is minimally bowed (minimally palmar flexed) during the early followthrough's immmediate impact zone between P7 and P7.2, which is actually expected because Henrik Stenson uses a drive-hold (DH) hand release action through impact.
The blue graph represents his left wrist's radial-ulnar deviation graph. Note that his left wrist is radially deviated at his end-backswing position and also during his early downswing and that it becomes increasingly ulnar deviated in his later downswing due to the club release phenomenon (which is due to a left wrist uncocking action called the release of *PA#2 in TGM terminology).
(* The term "PA" is an abbreviation of the TGM term "power accumulator" and Homer Kelley asserted in his TGM book that any release of a power accumulator is a significant factor in swing power generation)
The violet colored graph represents rotation of his left hand because the HackMotion device is placed of the back of his left hand. Rotary motion of the left hand in a closing direction during the downswing is not entirely due to left forearm supination because it could also be due to external rotation of the left humerus and/or a left wrist circumductory roll motion. Note that his left hand is rotated to an open position at his end-backswing position, and that it does not close very fast in his early downswing, but it does close steadily/progressively throughout his later downswing (and I will later show that it is mainly due to a left forearm supinatory motion, which is called a PA#3 release action in TGM terminology).
I will now present a number of capture images of Henrik Stenson's downswing action that are fully compatible with Henrik Stenson's HackMotion lead wrist extension-flexion graph.
DTL capture images of Henrik Stenson's early mid downswing.
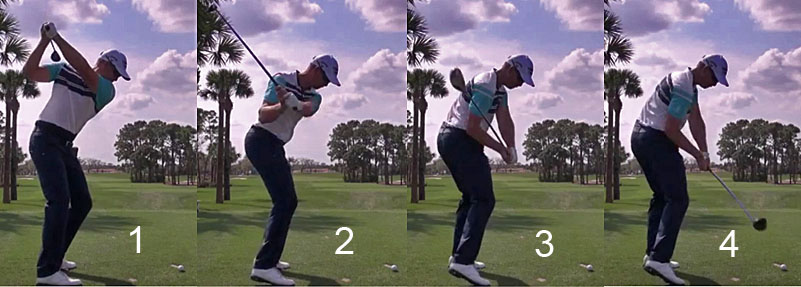
Image 1 is at the P4 position, image 2 is at his P5 position, image 3 is at his P5.5 position and image 4 is at his P6.2 position.
Note that his left wrist is significantly cupped at his P4 position when his left wrist is radially deviated, and also at his P5 position because he is still maintaining a radially deviated left wrist that enables him to retain clubhead lag. Note that his club is starting to release (representing a PA#2 release action in TGM terminology) by P5.5 due to a left wrist uncocking phenomenon and that its causes his GFLW to become less cupped between P5.5 - P6.2 as his left wrist moves increasingly towards ulnar deviation. Note that his left wrist is uncocking within the plane of his intact LFFW (which is parallel to the swingplane) between P5.5 => P6.2 and that it does not disrupt his intact LFFW/GFLW alignment.
Note that his clubshaft appears to be straight-line aligned with his straight left arm at the P4 position, which suggests an intact LAFW alignment. Note how he is shallowing the club between P5 => P5.5, which requires a small degree of left forearm pronatory motion, and that causes his clubshaft to no longer be straight-line-aligned with his left upper arm, so he does not have an intact LAFW at his P5.5 position (where one can clearly see that his clubshaft is on a slightly shallower plane than his left upper arm). However, he still has a GFLW/intact LFFW alignment between P5.5 - P6.2 where his clubshaft is straight-line-aligned with the lowest 3" of his left lower radial bone in his lower left forearm. Secondary proof that he still has an intact LFFW/GFLW alignment at the P5.5 position is to note that his clubface is parallel to the back of his GFLW and also the watchface area of his left lower forearm and that they are all equally parallel to the swingplane.
Note that he is starting to rotate the back of his left hand in a closing direction between P5.5 => P6.2, but you should note that he maintains an intact LFFW/GFLW alignment where the clubface remains parallel to the back of his GFLW and also the watchface area of his left lower forearm during that downswing time period.
Here are two more series of capture images of Henrik Stenson's downswing as seen from two different viewing perspectives.
Example 1
Example 2
Example 1 - image 3 is the P4 position, image 4 is just bypassing the P5 position, image 5 is at the P5.5 position and image 6 is at the P6.5 position.
Example 2 - Image 1 is at the the P4 position, image 2 is the P5.5 position, image 3 is at the P6 position, and image 4 is at the P6.5 position.
Note that his clubshaft appears to be straight-line-aligned with his left forearm and also his left upper arm at his P4 position, so he has an intact LAFW alignment at his end-backswing position. Note that his GFLW is significantly cupped at the P4 position because his GFLW is radially deviated.
Note that Henrik Stenson has shallowed his clubshaft to a shallower swingplane by P5.5, so he no longer has an intact LAFW alignment. However, he still has a GFLW/intact LFFW alignment. Note that the back of his GFLW is less cupped at his P5.5 position because his left wrist is less radially deviated.
Note that he still has a GFLW/intact LFFW alignment at the P6 position. The toe of his club is pointing straight up. Note that his clubface is parallel to the back of his GFLW and the watchface area of the back of his lower left forearm at P6 (example 2) thereby proving that he sill has a GFLW/intact LFFW alignment.
Note that he still has a GFLW/intact LFFW at the P6.5 position even though he is releasing the club (in the plane of his intact LFFW) and also starting to simultaneously rotate his intact LFFW counterclockwise secondary to a left forearm supinatory motion. It is particularly easy to discern that his clubshaft is straight-line-aligned with his lower radial bone in his lower forearm at the P6.5 position in example 1. Note that his GFLW is far less cupped at the P6.5 position because his GFLW is moving increasingly towards becoming ulnar deviated.
Now, I will demonstrate how Henrik Stenson squares his clubface by impact by using a PA#3 release action (which is secondary to a left forearm supinatory motion) in his late downswing between P6.2 => P7 (impact).
Here are face-on view capture images of Henrik Stenson's late downswing between P6.2 => P7.
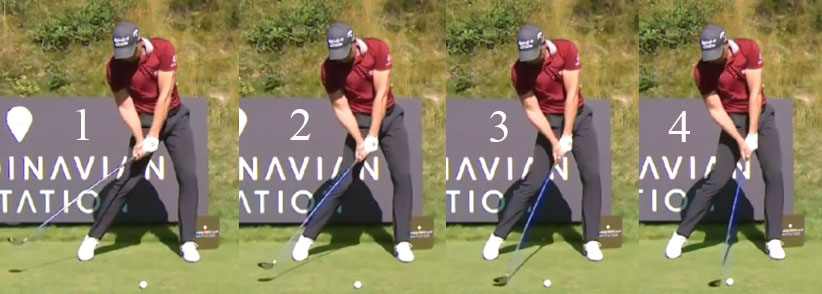
Image 1 is at the P6.2 position, image 2 is at the P6.5 position, image 3 is at the P6.8 position and image 4 is at impact.
Note that Henrik Stenson's clubface is still open to his clubhead arc at P6.2 and that it steadily closes during the later downswing between P6.2 => P7 so that it can become square to the clubhead arc and also the ball-target line at impact. Note how the back of his left hand and the watchface area on the back of his left lower forearm are closing at the same closing rate as the clubface (from an angular rotational perspective). There are two possible biomechanical causes that can explain why his left hand is rotating in a closing direction between P6.2 => P7 and they are i) external rotation of the left humerus or ii) a left forearm supinatory action. However, note that his left humerus appears to be internally rotated at P6.2 and P7 to roughly the same degree so that his olecranon bone (proximal end of his left forearm's ulna bone) points at the target to roughly the same degree at P7 compared to P6.2. Therefore, it suggests that the closing rotary motion of his left hand in a counterclockwise rotary direction is primarily due to a left forearm supinatory action (which is called a PA#3 release action in TGM terminology).
I am now going to use the above Henrik Stenson capture images as a benchmark as I start to examine the golf swings of pro golfers who use the bowed lead wrist technique - in order to determine i) whether their clubface is more closed relative to the clubhead arc at the P6.2 position and ii) whether they have to use no (or very little) PA#3 release action between P6.2 => P7 because they have already closed their clubface relative to their clubhead arc by P6.2.
I will start by analysing the driver golf swing of Collin Morikawa because he has the most bowed lead wrist alignment at impact that I have so far discovered.
If you are unfamiliar with Collin Morikawa's golf swing action, you can view the following you-tube video at https://www.youtube.com/watch?v=fkRgfMCQ1Xc
Collin Morikawa uses a weak lead hand grip strength and he starts to bow his lead wrist during his later backswing action.
Here are capture images of his takeaway (image 1), end-backswing position (image 2) and mid-downswing position (image 3).
I have drawn a green line along his lead lower radial bone in his lead lower forearm, a blue line along the back of his lead hand and a red line along his clubface. Note that these three lines are relatively straight-line-aligned (parallel to each other) at his P2 position (image1) because he has a non-bowed lead wrist and a weak lead hand grip strength.
Note that he has a bowed lead wrist by the time he reaches his P4 position (image 2) which causes the clubface (red line) to be more horizontal to the ground compared to his lead forearm (green line) by about 25 degrees. Many golfers refer to that more horizontal clubface alignment at the P4 position as being a closed clubface alignment, and I have already demonstrated that it is fully expected that lead wrist bowing will close the clubface if lead wrist bowing happens when the lead wrist is radially deviated.
Note that Collin Morikawa's lead wrist still appears to be closed relative to his clubhead arc at his P6 position (image 3) because his lead wrist is still significantly radially deviated. It appears to be tilted about 30 degrees closed relative to that green line, and that green line is an useful reference line indicating what one would expect if a golfer used a weak lead hand grip strength, but did not bow his lead wrist, and if he used an intact LFFW/GFLW technique (where the clubface would be straight-line-aligned with his left lower radial bone) at the P6 position.
Now, let's consider what happens to his clubface and clubshaft during his later downswing between P6 and impact.
Here are face-on capture images of his late downswing action.
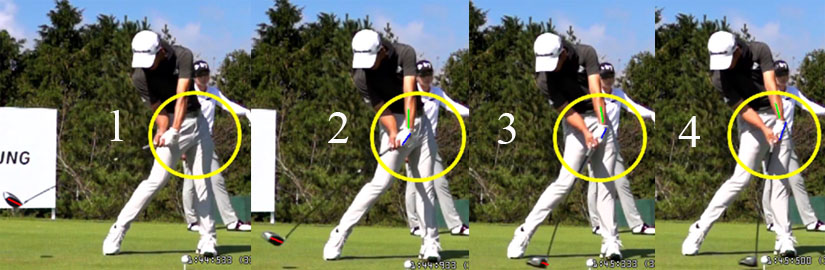
Image 1 is at the P6.2 position, image 3 is at the P6.5 position, image 3 is at the P6.8 position and image 4 is at impact.
Note that his clubface appears to be more closed to his clubhead arc at his P6.2 position - compared to Henrik Stenson at his P6.2 position - and let's presume that it is ~30 degrees more closed as a result of him having previously bowed his lead wrist when his lead wrist was radially deviated.
Some golf instructors believe that because he has closed his clubface by 30 degrees (relative to his clubhead arc) by the time he reaches the P6.2 position, that he can simply continue to rotate his torso into impact without having to use a PA#3 release action (or any other clubface closing mechanism) during his later downswing. I think that this viewpoint is far too simplistic and it does not take into account a number of other factors that require consideration. Also, note that although his clubface may be more closed by ~30 degrees relative to his clubhead arc at the P6.2 position (compared to Henrik Stenson) it is not yet square to the clubhead arc or the ball-target line and an additional amount of clubface squaring is necessary between P6.2 and impact (where the clubface must be square to the clubhead arc and also the ball-target line).
The first factor that one needs to consider is the fact that Collin Morikawa still maintains a markedly bowed lead wrist all the way between P6.2 => impact while his lead wrist is becoming increasingly ulnar-deviated. As I have previously demonstrated, lead wrist bowing happening when the lead wrist is ulnar-deviated angles the clubshaft away from the target without significantly affecting the clubface's closure relative to the clubhead arc. That clubshaft angulation phenomenon is clearly visible in the above capture images. Note that his hands have already reached the ball position by P6.5 (image 2) but his clubshaft is angled far backwards away from the target. What effect will that marked degree of backwards clubshaft angulation have with respect to Collin Morikawa's ability to get a square clubface by impact?
Here is a capture image of Collin Morikawa at the ~P6.5 position.

Note that Collin Morikawa's clubshaft is angled back (away from the target) and also more inside (closer to his body) due to his lead wrist bowing action that angles the clubshaft further back relative to his lead forearm's lower radial bone. That inserted small image on the right is a Photoshopped image created by rotating his clubshaft so that it is straight-line-aligned with his lead lower forearm's lower radial bone (which would happen if he used an intact LFFW/GFLW golf swing technique). The amount of image rotation needed to create that Photoshopped image can be determined by looking at the sides of the image relative to the black borders. Note that Collin Morikawa's clubface appears to be more open relative to the ball-target line as a result of the backwards angulation of his clubshaft (even though we know that it is ~30 degrees more closed relative to his clubhead arc).
Consider these DTL capture images of Collin Morikawa's late downswing action.
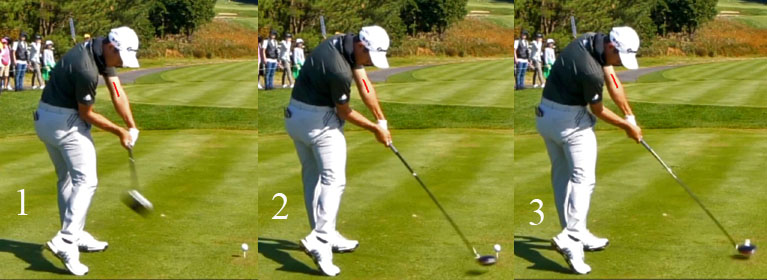
Note the shape of his clubhead arc between P6 (image 1) and impact (image 3) - the clubhead is approaching impact from more inside-out and also along a steeper clubhead path (which can be better seen in his face-on capture images above) as a result of his marked degree of clubshaft angulation happening between P6 => P7 due to lead wrist bowing happening when the lead wrist is ulnar deviated. Note that his clubhead is still inside the ball-target line when his clubhead is only situated ~12" before impact (image 2) and his clubface is still open relative to the ball-target line (even though it is ~30 degrees more closed relative to his clubhead arc as a result of him having previously bowed his lead wrist at the P4 position when it was radially deviated).
So, how does Collin Morikawa get his clubface square to the ball-target line by impact?
A simplistic "belief" expressed by some golf instructors is that Collin Morikawa's clubface will automatically become square by impact if he simply continues to rotate his body counterclockwise to a more open alignment by impact (as can be seen in Collin Morikawa's DTL capture images where his upper torso is definitely more open at P7 compared to P6). However, I believe that it is a fallacy to believe that an extra degree of upper torso rotation can close the clubface (relative to the ball-target line) independently of any counterclockwise rotation of either the lead humerus or the lead forearm.
Consider this 1st demonstration.
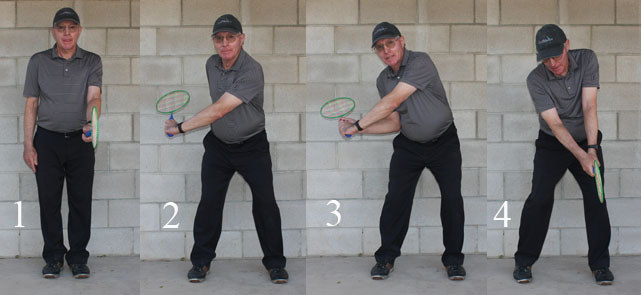
I am performing this 1st demonstration using a badminton raquet (instead of a golf club) because it is easier to see the racquet face.
In image 1, I am holding the racquet handle using a weak left hand grip, and the racquet face is straight-line-aligned relative to the watchface area of my left lower forearm because I have a GFLW.
In image 2, I am simulating a P2.5 position, where the racquet face, back of my GFLW and watchface area of my left lower forearm are all parallel to the swingplane.
In image 3, I am simulating a P5.5 position where the where the racquet face, back of my GFLW and watchface area of my left lower forearm are all parallel to the swingplane.
Image 4 represents a simulated impact position where the racquet face is square to the target, and that required that I get the back of my GFLW and watchface area of my left lower forearm to face the target at impact. How is that achieved biomechanically? I believe that it required a combination of counterclockwise rotation of the left humerus and left forearm, which is an independent bioemechanical action that is not causally due to the counterclockwise rotation of my upper torso, which is happening at the same time. Remember that the left shoulder socket joint is a ball-and-socket type of joint where the humeral head's articular shape is ball-shaped and where the glenoid fossa of the scapula is shallow thereby allowing for a wide range of directional movements of the left humeral head within the left shoulder socket joint. It is therefore readily possible for the left arm to rotate at a different rotational speed than the upper torso.
Now, consider this 2nd demonstration.
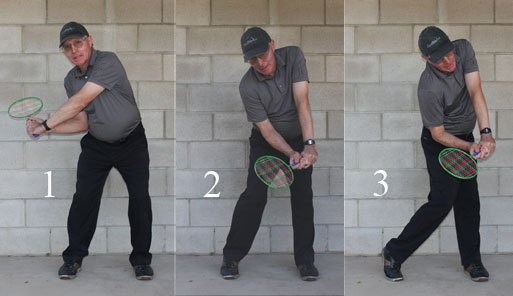
Image 1 at a simulated P5.5 position where the racquet face, back of my GFLW and watchface area of my left lower forearm are all parallel to the swingplane.
Image 2 shows that I have rotated my upper torso to the same degree as I did in my 1st demonstration, but note that the racquet face is not closing because I am rotating my upper torso counterclockwise without simultaneously rotating either my left humerus or left forearm counterclockwise.
Image 3 shows a much greater degree degree of upper torso counterclockwise rotation happening between P5.5 => P7, but note that it does not cause any more racquet face rotation because I am rotating my upper torso more counterclockwise without simultaneously rotating either my left humerus or left forearm counterclockwise.
In other words, based on this demonstration, for Collin Morikawa to close his clubface starting at P6.2 (where the clubface is open to the ball-target line because he has a marked degree of backwards shaft lean where his hands are well ahead of his clubhead), he must either rotate his left humerus and/or left forearm counterclockwise by a finite amount in order to get a clubface that is square to the ball-target line by impact.
Consider how much Collin Morikawa rotates his left humerus and left forearm counterclockwise in his later downswing.
Here again are the DTL capture images of his later downswing action.
Note that I have drawn a short red line down the center of his left antecubital fossa. If you look carefully, you should be able to discern that it is rotating counterclockwise between image 1 and image 3, thereby signifying that a finite amount of counterclockwise rotation of his left humerus must be happening in his later downswing.
Now, here are face-on capture images of his later downswing action between P6.5 => P7.
To roughly assess how much his left hand is rotating between image 1 and image 2, you can look at either the back of his left hand, or look at his left lower radial bone area in his left lower forearm, or look at the watchface area on the back of his left lower forearm. Note that there is a significant amount of counterclockwise rotation of his left lower forearm and left hand (and therefore club handle) happening between image 1 and image 2 - even though his left hand has only traveled targetwards by about 2" during that P6.5 => P7 time period.
Although Collin Morikawa has rotated his clubface closed by ~30 degrees relative to his clubhead arc as a result of bowing his left wrist when his left wrist was radially deviated (and that happened before P6), his clubface is still open relative to the ball-target line at P6.5 because he has such a marked degree of clubshaft angulation as a result of still having a markedly bowed left wrist when his left wrist is becoming increasingly ulnar deviated. This fact suggests that Collin Morikawa must have to rotate his club handle counterclockwise to a significant degree between P6.5 => P7 in order to get a clubface that is square to the ball-target line by impact, with part of the counterclockwise rotation of his club handle being due to a counterclockwise rotation of his left humerus and part of the counterclockwise rotation of his club handle being due to a counterclockwise rotation of his left forearm (secondary to a left forearm supinatory motion).
An interesting question arises. Who has the fastest club handle twist velocity near impact - Henrik Stenson or Collin Morikawa?
I strongly suspect that Henrik Stenson is supinating his left forearm between P6 => P7 much more than Collin Morikawa is supinating his left forerarm during that same P6 => P7 time period. However, Henrik Stenson is closing his clubface steadily/smoothly all the way between P6 => P7 due to a PA#3 release action (which is biomechanically due to lead forearm supination) and he may not necessarily have a fast handle twist velocity measurement as he gets very close to impact (~ between P6.8 => P7). By contrast, although Collin Morikawa has to use a lesser amount of a PA#3 release action than Henrik Stenson because his clubface is more closed to his clubhead arc by ~30 degrees at P6, he has to significantly rotate his club handle counterclockwise between P6.5 => P7 because he has so much more backwards clubshaft angulation that will open the clubface relative to the ball-target line, and he may have a significantly faster club handle twist velocity measurement between P6.8 => P7 because he has a far less left hand travel distance of about 2" of left hand travel to complete this necessary counterclockwise rotary motion of his left hand. This issue has never been scientifically studied and I would not be surprised if a well-designed scientific study produced comparative handle twist velocity measurements that would surprise a lot of golf instructors. To perform the handle twist velocity measurement study in a scientifically conclusive manner, where one wants to measure the instantaneous hand twist velocity immediately pre-impact, I suspect that the handle twist velocity measuring device must have a high sampling rate in the range of 2,000-5,000 samples/second. I personally think that a 3D system using a sampling rate of 240-480 samples/second is very inadequate, especially if it has a low signal/noise ratio.
Now, let's consider the steepness of the clubhead arc in the later downswing between P6.5 => P7 in Collin Morikawa's driver swing versus the driver swing of a pro golfer (Tiger Woods) who uses the GFLW/intact LAFW technique and also a non-bowed lead wrist combined with a weak lead hand grip strength.
Capture images of Collin Morikawa's later downswing action
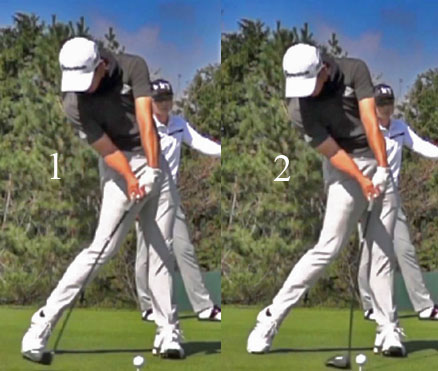
Image 1 shows Collin Morikawa when his hands have already reached a position that is slightly ahead of his ball position. Note that because he has a markedly bowed lead wrist that angles his clubshaft backwards away from the target, that his clubhead is situated about 15" before impact when his hands reach impact. Note that his clubhead's sweetspot is higher than the equator of the ball and that his clubhead is approaching impact along a steeper downward clubhead path that is conducive to striking the ball with a slightly negative, downward, clubhead attack angle.
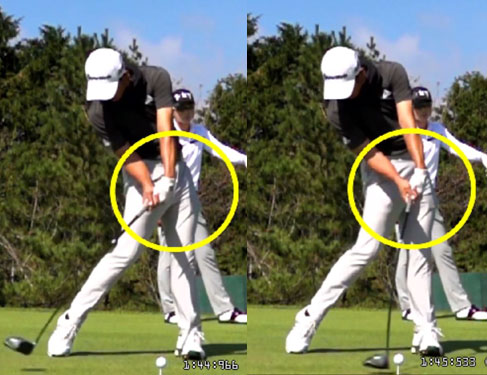
Capture images of Tiger Woods later downswing action (captured from his famous Nike commercial video)
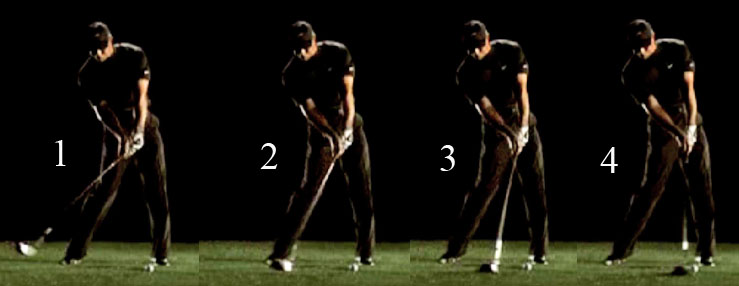
Image 2 shows Tiger Woods at a position when his clubhead is still about 15" away from impact. Note that his hands have not yet reached the ball position. Note that his clubhead's sweetspot is already level with the equator of the ball.
Image 3 shows Tiger Woods when his clubhead is about 7" away from impact. Note that his hands have not yet reached the ball position and that his clubhead is traveling level to the ground with the clubhead's sweetspot being level with the ball's equator.
Image 4 shows Tiger Woods at impact. His hands have now reached the ball position and his clubshaft is near-vertical with only a small amount of clubshaft angulation.
Note that Tiger Woods' clubhead is traveling level to the ground for many inches prior to impact, and that his clubhead attack angle at impact is likely to be much closer to being zero, thereby being very conducive to a level strike or even a slightly positive, or upward, clubhead attack angle strike (if he decided to position the ball slightly more forward of low point, which is usually located vertically below the left shoulder socket's position at impact).
I am now going to describe the effect of lead wrist bowing on the clubface and clubshaft in another pro golfer - Jon Rahm - who also uses a weak lead hand grip strength.
I have a copy of Jon Rahm's TPI-3D graph, which can provide more accurate lead wrist/forearm measurements than I can roughly deduce from looking at 2D capture images.
Here is Jon Rahm's TPI-3D graph (copied from a TPI video).
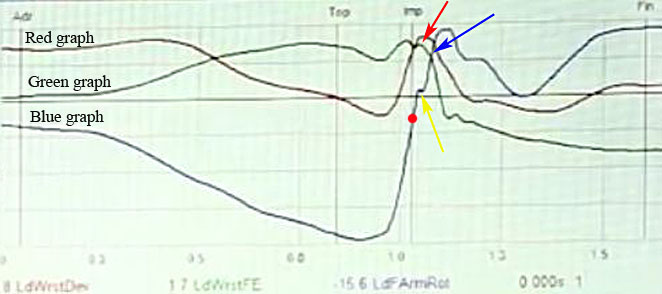
The green graph represents his lead wrist flexion-extension graph. The black vertical line labelled "top" represents the end-backswing position and the vertical black line labelled "imp" represents impact.
Note that Jon Rahm's lead wrist is bowed at his end-backswing position. Then, note that his degree of lead wrist bowing actually decreases slightly during the early downswing before increasing again in the later downswing to reach a peak degree of lead wrist bowing just before impact. Then, his lead wrist bowing becomes fractionally less bowed by impact. Most importantly, note that Jon Rahm still has a significantly bowed lead wrist in his early followthrough (see red arrow) and he does not rapidly-and-massively move his lead wrist in the direction of "lead wrist extending" during his early followthrough (roughly between P7 and P7.2). In fact, note that his bowed lead wrist only starts moving rapidly in the direction of "lead wrist extending" after the blue arrow. I don't know his precise P position at the exact point of the blue arrow, but I suspect that it is after P7.4. By keeping his lead wrist bowed between P7 => P7.4, Jon Rahm is biomechanically able to perform a superb DH-hand release action through impact (as I will later demonstrate).
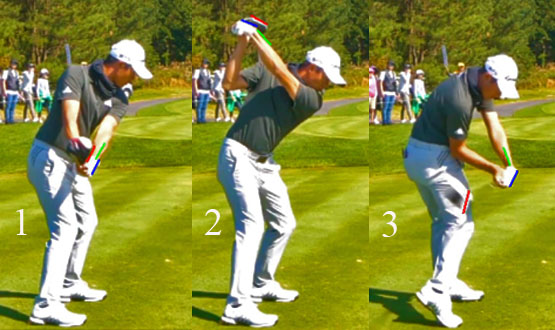
Now, I will present capture images of his downswing action that are fully compatible with the above 3D data.
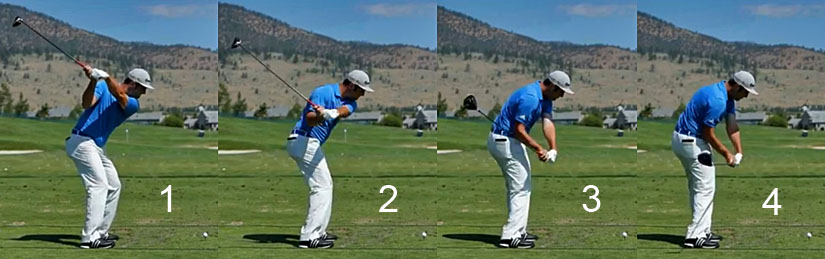
Image 1 is at the P4 position, image 2 is at the P5 position, image 3 is at the P5.5 position and image 4 is at the P6 position.
Note that Jon Rahm's lead wrist is bowed at his end-backswing position (image 1). That causes his clubface to become aligned more horizontal relative to the ground, and angled more closed relative to his clubhead arc. Jon Rahm uses a weak lead hand grip, and if his did not bow his lead wrist, then his clubface would be straight-line-aligned with the back of his lead lower forearm (watchface area) if he used an intact LFFW/GFLW technique. I don't know what's the measurement scale on Jon Rahm's lead wrist 3D flexion-extension graph, so I cannot accurately quantify his degree of lead wrist bowing at the P4 position, but let's presume it is ~30 degrees. That causes his clubface to close by ~30 degrees because we know that lead wrist bowing closes the clubface relative to the clubhead arc (without significantly angling the clubshaft away from the lead forearm) when lead wrist bowing happens when the lead wrist is radially deviated.
Note that Jon Rahm's lead wrist looks less bowed at his P5 position and that causes the clubface to become less closed relative to the clubhead arc and also relative to the watchface area on the back of his lead lower forearm.
Note that Jon Rahm is using the technique of "early lead forearm supination + increased lead wrist bowing" at the P5.5 - P6 position and that increases his degree of lead wrist bowing and it also closes the clubface more relative to his clubhead arc. The knuckles of the ulnar half of his bowed lead wrist appear to be very slightly more 'curled-in' in images 3 and 4, so he could be using a small degree of twistaway action at this time point of his downswing that can marginally increase the degree of clubface closing relative to his clubhead arc (but remember that any twistaway action will automatically dissipate in his later downswing). I can reasonably presume that his clubface could be ~30 degrees closed relative to his clubhead arc at his P6 position - based on considering both his capture image (image 4) and also his 3D lead wrist flexion-extension graph.
Now, let's consider his later downswing action.
Here are face-on capture images of his later downswing action.
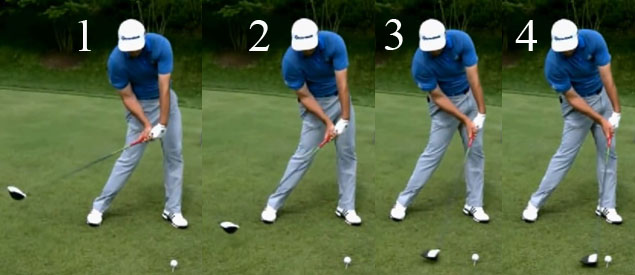
Image 1 is at his P6.2 position, image 2 is at his P6.5 position, image 3 is at his P6.8 position and image 4 is at impact.
Let's presume that his clubface is still roughly ~30 degrees closed relative to his clubhead arc at the P6.2 position. Does that mean that Jon Rahm does not have to use a PA#3 release action (which is biomechanically due to lead forearm supination) in his later downswing in order to get a clubface that is square to the clubhead arc, and also square to the ball-target line, at impact - as some golf instructors incorrectly believe when they state that "if you close the clubface early in the downswing, then you don't have to close the clubface in the later downswing by using lead forearm supination"? The answer is obviously in error - based on common sense and through simple observation. As I have already demonstrated, if a golfer maintains a bowed lead wrist between P6.2 => P7 when the lead wrist is moving in the direction of an increasing degree of ulnar deviation, that it will angle the clubshaft backwards away from the target with very little clubface closing effect (relative to the clubhead arc). That marked degree of backwards clubshaft angulation (relative to the lead lower forearm) causes the clubface to still be open relative to the ball-target line (even if the clubface was ~30 degrees more closed than usual relative to the clubhead arc at P6.2) and a golfer still needs to either externally rotate his lead humerus and/or supinate his lead forearm in order to square the clubface by impact.
Look at either the back of Jon Rahm's lead hand, or the lower radial bone area of his lead lower forearm, or the watchface area on the back of his lead lower forearm between P6.2 => impact and you will clearly see that they are all rotating counterclockwise to a significant degree in those capture images. Note that Jon Rahm's lead hand has nearly reached the ball position by P6.2 and note that there is not much forward/targetwards motion of his lead hand between P6.2 and impact, so he has to accomplish all that counterclockwise roll motion of his lead hand/clubface over a shorter lead hand travel distance. How much of the counterclockwise rotation of Jon Rahm's lead hand is due to external rotation of his lead humerus and how much is due to lead forearm supination? I strongly suspect that most of the counterclockwise rotation of his lead hand between P6.2 => P7 is due to lead forearm supination and far less due to external rotation of his lead humerus. How did I come to this conclusion?
Consider yet again Jon Rahm's 3D graph.
The blue graph represents Jon Rahm's lead forearm supination-pronation graph.
Note that Jon Rahm's lead forearm is slightly pronated at address. Note that he pronates his lead forearm much more during his backswing action. Note that Jon Rahm also pronates his lead forearm even slightly more during his early downswing and that is biomechanically expected because he shallows his clubshaft during the P4 => P5.5 time period. Then, note how rapidly Jon Rahm rotates his lead forearm in a counterclockwise supinatory direction in his later downswing - by looking at how steep his blue graph's slope is in his later downswing. That blue graph's slope steepness is similar to that seen in a pro golfer, who adopts a weak-neutral lead hand grip, but who uses a non-bowed lead wrist combined with a GFLW/intact LFFW technique (like Tiger Woods and Henrik Stenson). This 3D lead forearm supination-pronation graph disproves the idea that a golfer, who uses a bowed lead wrist technique combined with weak-neutral lead hand grip strength, does not have to use a significant amount of lead forearm supination during his later downswing - simply because he closed his clubface (relative to the clubhead arc) by ~30 degrees during his backswing or early downswing (when his lead wrist was radially deviated). One also has to take into account the fact that the lead wrist bowing technique causes a lot of backwards angulation of the clubshaft between P6.2 => P7 when the bowed lead wrist becomes increasingly ulnar deviated.
It is also interesting to note that Jon Rahm's lead forearm is less pronated at impact (see red dot where the blue graph crosses the vertical black line) compared to address.
This phenomenon also seems to be evident in comparison images of his address and impact alignments.
Close-up views of his address and impact alignments.

I have drawn a short red line over his lower radial bone in his lower lead forearm. Note that it is rotated more counterclockwise at impact - compared to address - presumably due to his lead forearm being less pronated at impact secondary to his PA#3 release action (which is biomechanically due to lead forearm supination). Note that his antecubital fossa faces the camera more at address than at impact because his lead humerus is more internally rotated at impact compared to address. Therefore, to get that red line to be more rotated counterclockwise at impact (compared to address) he needed to use a greater amount of lead forearm supination during his later downswing action (as clearly shown in his 3D's blue graph).
I have examined the golf swings of a number of other pro golfers who use the bowed lead wrist technique and they all show the same general pattern - about 20-30 degrees of clubface closing relative to the clubhead arc due to lead wrist bowing happening when the lead wrist is radially deviated, and then a lot of backwards clubshaft angulation happening in the later downswing due to the bowed lead wrist phenomenon causing clubshaft angulation (with little clubface closing relative to the clubhead arc) when the lead wrist becomes increasingly ulnar deviated. That backwards clubshaft angulation happening between P6 => P7 opens the clubface relative to the ball-target line necessitating the use of a PA#3 release action and/or external rotation of the lead humerus in order to get the clubface to become square to the ball-target line by impact. It may well be true that the bowed lead wrist technique means that a lesser amount of lead forearm supination is required in the later downswing's PA#3 release action - compared to the non-bowed lead wrist methodology using a GFLW/intact LFFW swing technique - but it may not be true that using the bowed lead wrist technique causes a slower club handle twist velocity speed near impact (~ between P6.8 => P7).
Although I am a strong proponent of the standard "non-bowed lead wrist alignment combined with a GFLW/intact LFFW technique" that is frequently used by many pro golfers (eg. Henrik Stenson, Tiger Woods, Justin Rose, and Adam Scott), I fully acknowledge that the bowed lead wrist technique has two potential advantages over the standard non-bowed lead wrist technique. First, it naturally leads to backwards shaft lean at impact where the clubhead is well behind the hands at impact (also called "forward shaft lean" by golfers who prefer to think of the hands being ahead of the clubhead) and this clubshaft angulation phenomenon is very useful because golf clubs are designed to have a finite degree of clubshaft angulation (where the hands are slightly ahead of the clubhead) at impact. Secondly, the bowed lead wrist technique is particularly conducive to performing a DH-hand release action through impact (from P7 => P7.2 or even further to P7.4).
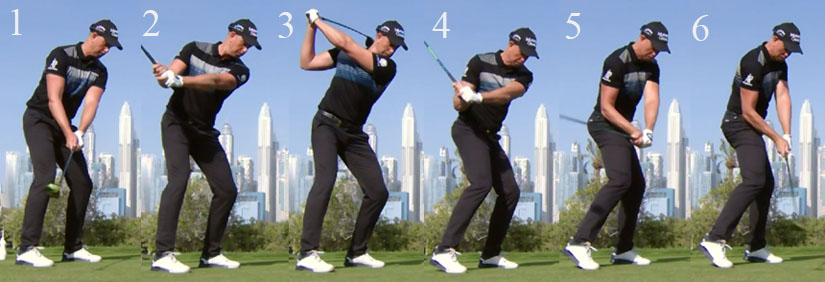
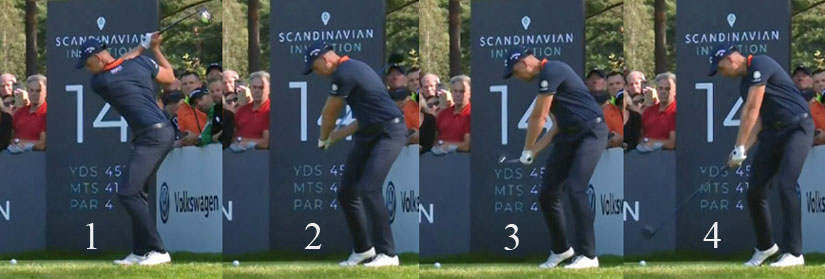
Here are capture images showing the drive-hold (DH) hand release action of 3 pro golfers, who use the bowed lead wrist technique.
Collin Morikawa
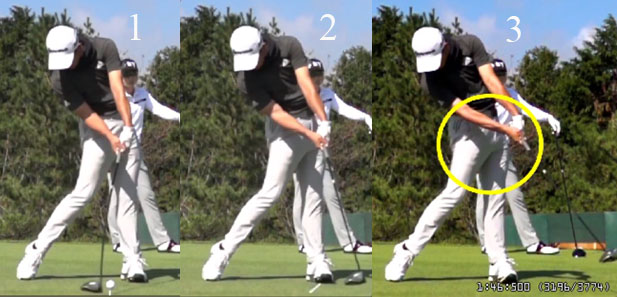
Image 1 is at impact, image 2 is at P7.2 and image 3 is at P7.4.
Jon Rahm
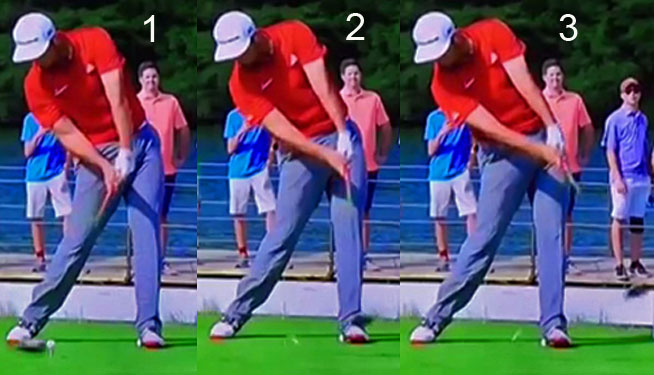
Image 1 is at impact, image 2 is at P7.2 and image 3 is at P7.4.
Cameron Champ

Image 1 is at impact, image 2 is at P7.2 and image 3 is at P7.4.
My definition of a DH-hand release action is a hand release action where the clubshaft does not bypass the lead arm (from an angular rotational perspective) between P7 and P7.2. Many DHers are so efficient that they can even prevent the clubshaft from bypassing the lead arm to beyond P7.2 and all the way to P7.4. Most DHers (who use the bowed lead wrist technique) maintain a straight left arm during their entire DH-hand release action, but some DHers (eg. Jordan Spieth) may have a bent lead elbow due to a chicken-winging phenomenon happening post-impact. Under those conditions, I prefer to draw an imaginary line between the left shoulder socket and the butt end of the club handle to represent an imaginary lead arm, and a golfer is still classified as a DHer if the clubshaft does not bypass that imaginary lead arm (from an angular rotational perspective). The advantage of a DH-hand release action is that it allows a golfer to more easily keep the clubface square to the clubhead arc during the early followthrough thereby generating the lowest practical clubface ROC (rate-of-closure) through the immediate impact zone between P7 => P7.2, which may contribute to ball flight accuracy. To efficiently perform a DH-hand release action, a golfer must match the forward/targetwards angular velocity of the lead arm to the forward/targetwards angular velocity of the clubshaft between P7 => P7.2+. If the clubshaft travels faster than the lead arm (from an angular rotational perspective) between P7 => P7.2, then the clubshaft will bypass the lead arm. If the clubshaft bypasses the lead arm between P7 => P7.2, then either the lead wrist must be extending to a significant degree and/or the lead forearm is significantly supinating - and a DHer must avoid those two biomechanical phenomena. If you look at the capture images of those 3 pro DHers, you will note that the back of their lead lower forearm (watchface area) must rotate counterclockwise by a finite amount between P7 => P7.2 (or even further to P7.4) in order to keep the clubface square to their clubhead arc (which is moving inside-left and slightly upwards) during that early followthrough time period - but that happens due to a counterclockwise rotation of the lead humerus, which will cause the entire lead arm/forearm to rotate counterclockwise at roughly the same angular velocity as the clubshaft, and the counterclockwise rotation of the watchface area of the lead lower forearm cannot be solely be due to lead forearm supination. A small degree of lead forearm supination can be happening during the P7 => P7.2 time period in a DH-hand release action, but it has to be small in degree because excessive lead forearm supination will cause the clubshaft to bypass the lead arm during the DH-hand release time period.
If you look carefully at the capture images of those 3 pro DHers, you will note that they have a number of biomechanical features in common during their entire DH-hand release time period between P7 => P7.4 - i) they all have an open pelvis and an open upper torso alignment; ii) they all maintain a significantly bowed lead wrist and iii) they all have an incompletely straightened trailing arm and significantly bent trailing wrist. How do these biomechanical features contribute to the efficient execution of a DH-hand release action?
To best answer that question, let's first consider how a skilled golfer can perform a DH-hand release action through impact into the early followthrough using a non-bowed lead wrist and an intact LFFW/GFLW technique.
Here are capture images of Kelli Oride's DH-hand release action (captured from Kelvin Miyahira's swing video at https://www.youtube.com/watch?v=p7hBadAiMcA )
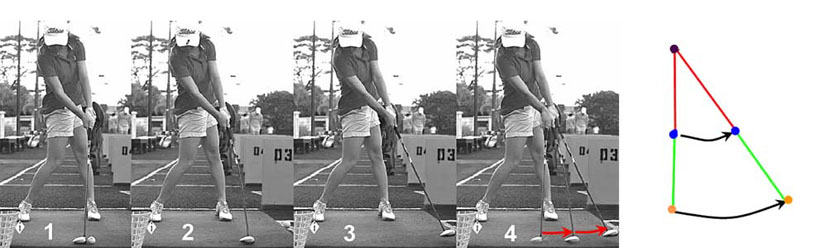
Kellie Oride uses a non-bowed lead wrist and an intact LFFW/GFLW technique during her downswing and early followthrough time period.
Image 1 is at P7, image 2 is at P7.2 and image 3 is at P7.4. Note that the clubshaft does not bypass her lead arm (from an angular rotational perspective) at P7.4, and note that she keeps her clubface square to her clubhead arc all the way between P7 => P7.4.
Note that she has a small degree of forward shaft lean at impact, which means that she has an intact LFFW but not an intact LAFW. Note that she has an intact LAFW at P7.2 (image 2) and also at P7.4 (image 3). Note that she maintains a GFLW all the way between P7 => P7.4, which means that she is not significantly extending her lead wrist during that time period, but she must have allowed her lead forearm to supinate to a small degree between P7 => P7.2 and that allows her intact LFFW to become an intact LAFW by P7.2.
Image 4 is a composite image showing the relative forward/targetwards motion of her lead hand and clubhead during the P7 => P7.4 time period, and the accompanying diagram shows that the lead hand (depicted by a blue dot) is traveling roughly at the same angular velocity as the clubhead (depicted by the orange dot) during that P7 => P7.4 time period. Kelli Oride's golf club has obviously gained a lot of angular momentum by impact and if Kelli's lead arm/hand stalls at any time point between P7 and P7.4, then the clubhead would automatically/naturally bypass her lead arm. Therefore, to efficiently perform a DH-hand release action between P7 => P7.4 Kelli Oride must maintain the forward/targetwards angular velocity of her lead arm/hand so that it matches the forward/targetwards angular velocity of her clubshaft. That requires a strong element of "rhythm" where one must swing the lead arm through impact in perfect synchrony with the clubshaft, and where one must avoid any lead arm stalling action that will allow the clubshaft to bypass the lead arm (as viewed from an angular rotational perspective). Having an open pelvis/upper torso through impact (as seen in Kelli Oride's golf swing action) makes this rhythmic type of DH-hand release action more easily achievable.
A second question arises - can the trailing arm/hand be used to help stabilise the lead wrist through impact so that it does not breakdown (= excessively extend) thereby allowing the clubshaft to bypass the lead arm? I believe that if a golfer avoids "running-out-of-right arm" (which is a situation where the right arm fully straightens and the right wrist fully straightens) during the early followthrough time period, that the trailing palm can potentially apply a finite amount of stabilising push-pressure against PP#1 (which is located at the base of the lead thumb) while the trailing hand's 3rd and 4th fingers are potentially applying a force against the club handle that is directed away from the target (secondary to the fact that the trailing wrist continuously maintains its significantly bent-back alignment) - thereby provide an additional element of mechanical stability to the lead wrist that can help prevent it from extending excessively during the early followthrough time period. Note that Kelli Oride's trailing shoulder moves very efficiently downplane between P7 => P7.4 so that she can avoid a "running-out-of-right arm" scenario and that is made more easily possible because of her open shoulder alignment though impact. I cannot prove that Kelli Oride is deriving an additional element of lead wrist mechanical stability between P7 => P7.4 by using her trailing hand/palm in the manner described, but the fact that she does not "run-out-of-right arm" makes this phenomenon more biomechanically achievable.
Now, look again at the capture images of those 3 pro golfers who use a bowed lead wrist technique and a DH-hand release action between P7 => P7.4. Note that they all avoid a "running-out-of-right arm" scenario and they all have an incompletely straightened right arm and a very bent right wrist at P7.4. I would not be surprised if a scientific research study (using pressure sensors placed at PP#1 and over the aft side of the neighbouring club handle near PP#1 and also over the leading side of the club handle near PP#3 where the trailing hand's 3rd/4th fingers could be pulling back against the club handle in an away from the target direction) demonstrated that they are using their trailing hand/palm to help mechanically stabilise their bowed lead wrist alignment between P7 and P7.4, thereby synergistically helping them to more efficiently perform a DH-hand release action between P7 => P7.4. I strongly suspect that having a bowed lead wrist alignment through impact is more mechanically stable than having a GFLW alignment through impact (between P7 and P7.2) from an anatomical perspective and I would not be surprised to learn that continuously maintaining a bent trailing wrist (as seen in the capture images of those 3 pro golfers) during that early followthrough time period could synergistically increase the degree of mechanical stability of the bowed lead wrist alignment in DHers who use the bowed lead wrist technique.
It is also important to appreciate the fact that my arbitrary definition of a DH-hand release action between P7 => P7.2 has to be modified for golfers who use the bowed lead wrist technique because they have more angulation of their clubshaft relative to their straight left arm at impact.
Consider the angulation of the clubshaft (relative to his lead arm) in Collin Morikawa's early followthrough.
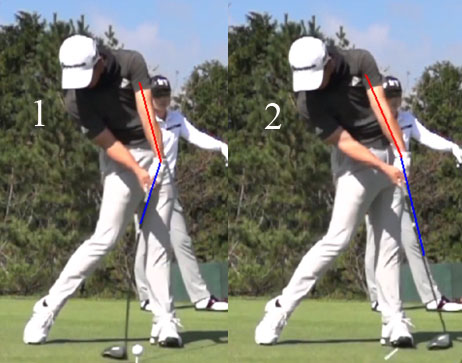
Image 1 is at impact, and image 2 is at P7.2.
Note that I have drawn a red line down the longitudinal axis of his lead arm and a blue line along the longitudinal axis of his proximal clubshaft. Those lines are angled at impact because he has a bowed lead wrist alignment (and not a GFLW alignment). To be a DHer that degree of angulation of the clubshaft relative to the lead arm must not change significantly in degree between P7 and P7.2 and I have arbitrarily suggested that any angle change in the direction of "lead wrist extending" must likely be <5 degrees in order for a golfer to qualify as a DHer. It is impossible to measure the amount of "lead wrist extending" that could possibly be happening between image 1 and image 2 by crudely comparing those 2D images because the left arm/clubshaft is continuously rotating and thereby changing its viewing angle relative to the face-on camera, and I think that it would require a 3D study using a very high sample rate of 2,000-5,000 samples/second (+ a signal with a high signal/noise ratio) to get scientifically accurate "lead wrist extending" measurements between P7 => P7.2. Most importantly, it is not critical to be very accurate with respect to measuring the degree of "lead wrist extending" happening in a DH-hand release action because the conceptual "idea" of a DH-hand release action is merely a conceptual guideline, and not a fixed rule, and it is designed to make golfers mentally aware of the "fact" that "real life" pro golfer-DHers are simply minimising the degree of "lead wrist extending" happening between P7 => P7.2 in order to keep their clubface square to the clubhead arc during that short time period. One should also appreciate the fact that a small degree of "lead wrist extending" happening between P7 and P7.2 is unlikely to cause excessive clubface roll between P7 => P7.2 if it is not associated with a lot of lead wrist circumductory roll motion.
I also believe that to be a DHer between P7 => P7.2 (or even further to P7.4), a golfer must not only avoid a significant amount of "lead wrist extending" from happening during that short time period, but he must also simultaneously avoid a significant amount of lead forearm supination from happening because that biomechanical phenomenon can also cause the clubshaft to bypass the lead arm (from an angular rotational perspective).
Consider Jon Rahm's 3D lead forearm supination-pronation graph (blue graph).
Note that the yellow arrow is pointing at a plateau in his lead forearm pronation-supination graph immediately post-impact, which shows that Jon Rahm temporarily stops supinating his lead forearm for a very short period between P7 => P7.2+ before continuing to rapidly supinate his lead forearm in his later followthrough when he transitions into a finish swivel action that will re-direct his clubshaft up the inclined plane (swingplane).
Jon Sinclair, who regards himself as an "expert" on wrist angles through impact, has stated that that any blip-plateau seen in a 3D graph is not reflective of a real biomechanical event and he has stated that it is due to "noise". Jon Sinclair claims that if a golfer is rapidly supinating his lead forearm immediately pre-impact (as seen in Jon Rahm's 3D graph) that the golfer cannot suddenly stop supinating the lead forearm for a short time period between P7 => P7.2+ before starting to rapidly supinate the lead forearm again in the later followthrough. I disagree with his opinion because the 3D data, showing a blip-plateau phenomenon, accurately matches the photo examples that I have presented.
I believe that a golfer can choose to use a DH-hand release action, or a roller subtype of non-DH hand release action, through impact between P7 => P7.2+ and that it is an optional choice.
Consider this swing video ( https://www.youtube.com/watch?time_continue=1&v=J_IkoI2LfMg ) of a golf instructor (Christina Ricci) teaching a roller subtype of non-DH hand release action.
Here are capture images from her swing video.
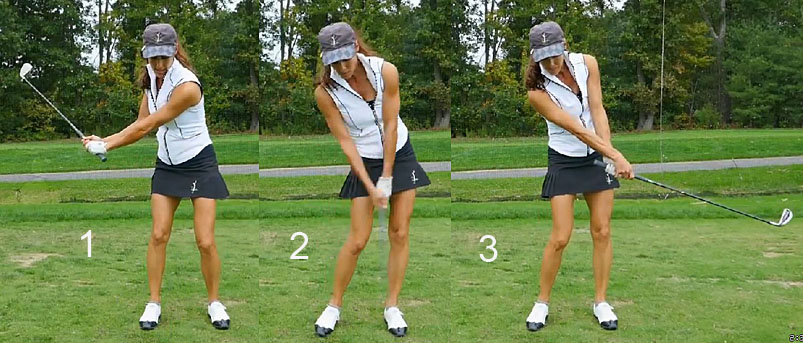
Image 1 shows Christina Ricci at a ~P5.5 position and image 2 shows her at impact. Note that she has to supinate her lead forearm by a finite amount between P5.5 => impact in order to get a square clubface by impact, with the required amount of lead forearm supination being inversely proportional to lead hand grip strength.
Image 3 shows that she deliberately continues to supinate her lead forearm through impact into her early followthrough in a non-interrupted manner, thereby producing a roller subtype of non-DH hand release action. However, that roller subtype of non-DH hand release technique is not obligatory and a golfer can optionally choose to perform a DH-hand release action through impact.
Consider yet again Kelli Oride's PA# 3 release action and also her DH-hand release action between P7 => P7.4 in the following swing video ( https://www.youtube.com/watch?v=p7hBadAiMcA )
Capture images of Kelli Oride's PA#3 release action and DH-hand release action.
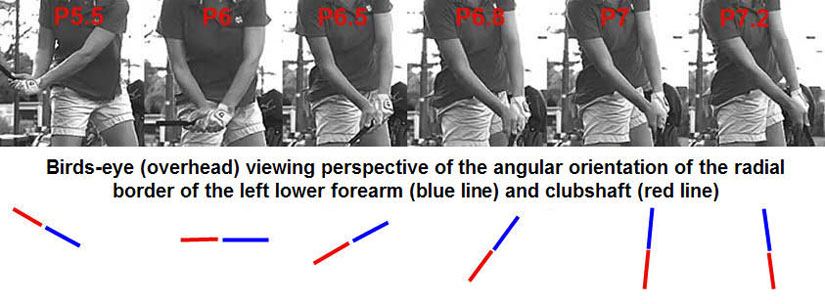
Between P5.5 and P7, Kelli Oride (who uses a neutral lead hand grip strength) has to use a lead forearm supinatory motion in order to square her clubface by impact. However, she temporarily stops supinating her lead forearm at a fast speed between P7 and P7.2 and any counterclockwise rotation of the back of her GFLW during that time period is primarily due to a counterclockwise (external) rotation of her lead humerus.
After P7.4, Kelli Oride starts to supinate her lead forearm more rapidly again in order to swivel her clubshaft up onto the inclined plane (swingplane) - as seen in the following capture images.
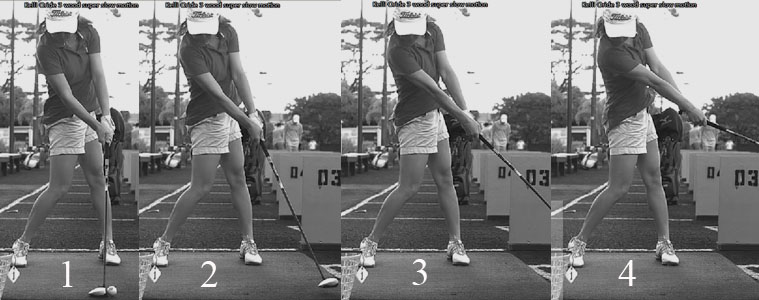
Image 1 is at impact, image 2 is at P7.4, image 3 is at P7.6 and image 4 is at P7.8.
Note that Kelli Oride is using a DH-hand release action between P7 => P7.4 and that any counterclockwise rotation of the back of her left hand (required to keep the clubface square to the clubhead arc) is primarily due to a counterclockwise rotation of her lead humerus.
Note that Kelli Oride is starting to more rapidly supinate her lead forearm, and pronate her trailing forearm, by P7.6 (image 3) as she starts to transition into her finish swivel action and that she continues to rapidly supinate her lead forearm at P7.8 (image 4) because she is continuing to perform a finish swivel action.
However, it is important to realise that a PA#3 release action and a finish swivel action are two separate biomechanical events that can be separated by a DH-hand release action event (where there is minimal lead forearm supination happening) if a golfer chooses to use a DH-hand release action (rather than a roller subtype of non-DH hand release action) through impact.
Many pro golfers use a roller subtype of non-DH hand release action for their driver golf swing action and a DH-hand release action for their short iron swing action. Consider an example - featuring Phil Mickelson.
Here is an animated gif showing Phil Mickelson performing a roller subtype of non-DH hand release action through impact.
Note how Phil Mickelson's lead forearm continuously supinates through impact in a non-interrupted manner.
By contrast, here are capture images (copied from Phil Mickelson's book on the short game) that show him using a DH-hand release action for his flop shot.
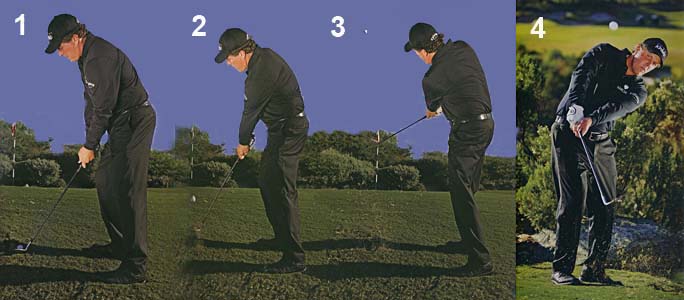
Image 1 is at address, image 2 is just after impact and image 3 is at P7.4+.
Images 3 and 4 show Phil Mickelson at his P7.4+ position - note that he has not allowed his clubshaft to bypass his lead arm (from an angular rotational perspective) and note his slightly bowed lead wrist and significantly bent trail wrist in image 4.
It requires a very high level of flexibility and athleticism to perform a DH-hand release action using a bowed lead wrist technique for a driver golf swing action because the clubshaft is traveling through the P7 => P7.4 post-impact zone at a much higher velocity, but a fair number of modern-day pro golfers (like Collin Morikawa, Cameron Champ, Jon Rahm and Dustin Johnson) are capable of achieving that goal and they are also amongst the longest drivers on the PGA tour.
Finally, I think that there is an additional advantage that comes from using a bowed lead wrist technique combined with a DH-hand release action and that relates to the topic of "one-way misses" versus "two-way misses". A right-handed pro golfer who has a "one-way miss" problem with his driver/iron swing tends to mainly miss the fairway on one side (eg. to the right) while a golfer who has a "two-way miss" problem with his driver/iron swing can miss the fairway to either the left side or the right side. I think that the roller subtype of non-DH hand release action is very timing dependent and I believe that it potentially predisposes a golfer to a "two-way miss" problem while a right-handed golfer, who uses the bowed lead wrist technique combined with a DH-hand release action, is more likely to only have an "one-way miss" problem where he may occasionally suffer from push-sliced shots to the right, but where he is far less likely to hook the ball into the rough to the left side of the fairway. Here is a link to a you-tube video where Collin Morikawa discusses his natural ball flight tendency, which is a natural tendency to hit a mini-fade, and where he occasionally suffers from push-sliced shots to the right - https://www.youtube.com/watch?v=iK9QSd5cHAg
Concluding remarks:
I suspect that many golf instructors and golfers believe that the major advantage of using a bowed lead wrist technique, where the lead wrist is bowed during the backswing or early downswing, is based on the assumed advantage that it closes the clubface relative to the clubhead arc. They subequently believe that if a golfer closes the clubface relative to the clubhead arc in the backswing (or early downswing) that it will eliminate, or at least decrease, the total amount of lead forearm supination required in the later downswing to get the clubface square to the clubhead arc, and ball-target line, by impact. A major source of this widespread "belief" can probably be assigned to the influence of the book "Search for the Perfect Golf Swing" co-authored by Alastair Cochran and John Stobbs. Dr. Gary Wiren called this book "The Most Influential Instructional Golf Book in History". It may well be true that it is the most influential golf intructional book in the history of golf instructional books, but I think that its influence has been partially deleterious because it got so many facts wrong! Chapter 16 of the book is labelled "Wrist action: Squares and Rollers" and it discusses the topic of the effect of lead wrist bowing on the amount of clubface closure required in the downswing. Let's consider some of the opinions expressed by the authors Cochran & Stobbs in their book.
In the 2nd paragraph of Chapter 16, the authors state-: "All golfers, in fact, 'roll the clubhead'. They have to, in order to swing it from a position where it lies about 90 degrees to the swing's plane and arc as it faces the target at address, to a position where it lies end to end within, or parallel to, the plane at the top of the swing; and then again in order to swing it back again through that 90 degree angle during the final stages of the downswing, in order to drive the ball straight off towards the hole". They then further discuss in their book how certain golfers supposedly "roll the clubhead" by a lesser amount during their backswing and they call those golfers "pushers" while other golfers supposedly "roll the clubhead" by a greater amount during their backswing and they call those golfers "rollers".
Here is a copied image of a "pusher" golfer that I copied from the Cochran & Stobbs' book.
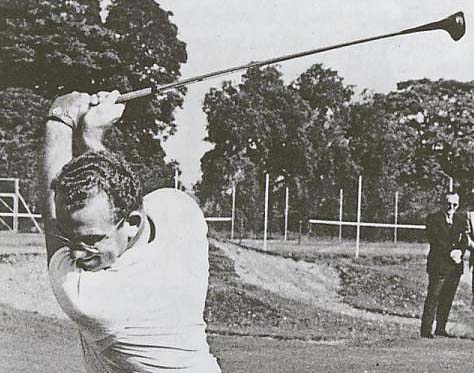
Note that the "pusher" golfer has a bowed lead wrist at his end-backswing position.
How did the "pusher" golfer "roll the clubhead" by a lesser amount during his backswing action? Here is an unedited series of statements made by Cochran & Stobbs in their book -:
"The methodical "pusher" - shut at the top
The opposite variation is 'shut at the top' or 'convex wristed'. 'Shut' because the toe of the club points outward above the plane and rather towards the horizontal at the top, having being rolled less than 90 degrees during the backswing. --- The man who swings in this way tries, therefore, to cut down the rate at which the clubface swings round near impact. He does this by decreasing the total amount of roll and roll back he uses in his swing as far below the 90 degree of the 'square" player as he can manage. By rolling the clubface round through less than 90 degrees on the backswing, he reduces the angle through which he has to roll the blade back during the final stage of the downswing. He thus slows the rate of change of the angle of the clubface through the area of impact".
I think that there a few wrongheaded statements in those few sentences from the Cochran & Stobbs book.
First of all, when Cochran & Stobbs state that the "pusher" golfer rolled the clubface less than 90 degrees during the backswing, what does that statement really mean? A pro golfer who uses a non-bowed lead wrist technique using a weak/neutral lead hand grip combined with an intact LFFW/GFLW technique (like Henrik Stenson) rolls the clubface through ~90 degrees during his backswing and Cochran & Stobbs label that type of golfer a "squarer". All the roll motion of the clubface between P1 => P4 is due to a clockwise rotation of the lead humerus and/or a clockwise pronatory roll motion of the lead forearm and there is no clubface rolling happening due to any independent roll motion at the level of the lead wrist. When one considers the "pusher" golfer image, note that the watchface area on the back of his lead lower forearm is angled skywards to the same degree as would be seen in a "squarer" golfer if they both angle their lead arm across the shoulder turn angle to the same degree at the P4 position, and that means that they both likely used the same amount of clockwise roll motion of the watchface area of their lead forearm between P1 => P4. The only difference is that the "pusher" golfer has bowed his lead wrist and it closes the clubface relative to the clubhead arc if bowing happens when the lead wrist is radially deviated.
The second error made by Cochran & Stobbs relates to the amount of clubface closing required during the later downswing in a "pusher" golfer. They claim that less than 90 degrees of clubface roll back will be required in the downswing if the clubface is more closed relative to the clubhead arc at the P4 position. However, they totally fail to consider what effect lead wrist bowing has on the clubshaft in the later downswing when the lead wrist becomes more ulnar-deviated. I have shown that lead wrist bowing in the later downswing angles the clubshaft backwards relative to the lead hand (without any significant change in the clubface angle relative to the clubhead arc). So, even if lead wrist bowing closes the clubface relative to the clubhead arc by ~30 degrees at the P4 position and also at the P6 position, the backwards clubshaft angulation happening after P6 opens the clubface relative to the ball-target line, and Cochran & Stobbs do not take the effect of this clubshaft angulation phenomenon on the clubface angle (relative to the ball-target line) into account. I have shown (using Jon Rahm as a prototypical example of a "pusher" type of golfer) that a large amount of lead forearm supination is required in the later downswing to counter the clubface opening effect (relative to the ball-target line) of this backwards clubshaft angulation phenomenon, and many golf instructors are oblivious of this fact.
The third potential error made by Cochran & Stobbs is the claim that a lesser amount of clubface rolling in the later downswing will automatically translate into a slower speed of clubface ROC as the clubhead reaches near-impact. However, that opinion may not be true! Even if Collin Morikawa (who uses the bowed lead wrist technique) uses a lesser total amount of counterclockwise roll motion of the watchface area of his lead lower forearm between P6.2 => P7 than Henrik Stenson (who uses the non-bowed lead wrist technique involving an intact LFFW/GFLW), it may be possible that his counterclockwise roll motion is actually faster near impact because his lead hand has already reached near the ball position by P6.2 and there is far less forward/targetwards travel distance of his lead hand happening during the significant amount of counterclockwise roll motion of his lead hand that is happening near impact (between P6.8 => P7). By contrast, Henrik Stenson is closing his clubface via a lead forearm supinatory motion in a steady/progressive manner all the way between P6.2 => P7 and he may not actually have a high handle twist velocity measurement near impact (between P6.8 => P7). I think that this controversial issue relating to the comparative magnitude of the handle twist velocity near impact (between P6.8 => P7) requires further scientific study in order to reach a valid conclusion.
I think that if a golfer wants to reduce the total amount of lead forearm supination required in the later downswing between P6 => P7 to get the clubface square by impact, and if he also simultaneously wants to reduce the magnitude of his handle twist velocity near impact (between P6.8 => P7), that a much more efficient biomechanical approach would be to adopt a very strong (4-knuckle) lead hand grip strength.
Consider the golf swing action of Jamie Sadlowski, who adopts a very strong lead hand grip strength at address.
Here are capture images of Jamie Sadlowski at address and at impact.
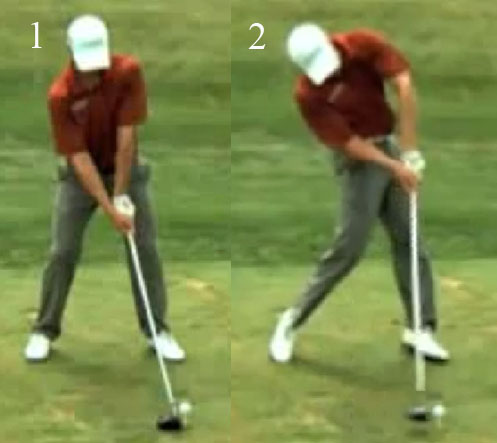
Image 1 shows Jamie Sadlowski at address, and image 2 shows him at impact.
Note that the back of Jamie Sadlowski's lead hand, and the watchface area on the back of his lead forearm, are facing the face-on camera at his P1 position and that they are both parallel to the swingplane.
Note that the back of Jamie Sadlowski's lead hand, and the watchface area on the back of his lead forearm, are facing the face-on camera at his impact position and that they are both still parallel to the swingplane.
Jamie Sadlowski adopts a very strong lead hand grip at address, and one could imagine that he acquires his strong lead hand grip by pronating his lead forearm more before gripping the club so that his lead palm can be placed over the top of the club handle at address. His lead humerus looks internally rotated at address. At impact, his lead humerus still looks to be internally rotated, but one cannot tell if it is the same in degree compared to address. What about his lead forearm - is it supinated more at impact than it was at address? It does not look more supinated to me. In fact, it possibly looks to be slightly more pronated to a very small degree.
So, the fundamental question arises - how much did the watchface area of his lead lower forearm rotate counterclockwise during his later downswing and how much of that counterclockwise rotation is due to lead forearm supination (rather than due to a counterclockwise rotation of his lead humerus)?
Here is a copy of Jamie Sadlowski's 3D graphs.
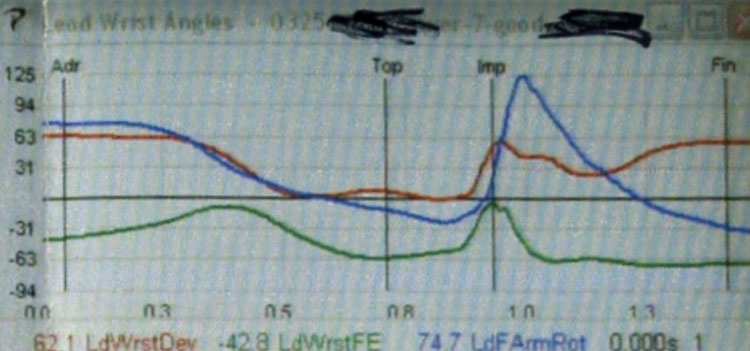
The blue graph is his lead forearm supination-pronation graph.
Note that Jamie Sadlowski's lead forearm is about 75 degrees supinated at address, which means that his lead humerus must be very internally rotated at address if the watchface area on the back of his lead lower forearm faces the face-on camera at address. In other words, Jamie Sadlowski acquires a very strong lead hand grip strength at address mainly by internally rotating his lead humerus by a large amount at address, and not by pronating his lead forearm, which is actually supinated at address.
Note that his lead forearm rotates clockwise in the direction of pronation by a significant amount during his backswing action and by a much smaller additional amount during his early downswing.
Note that Jamie Sadlowski's lead forearm rotates counterclockwise in a supinatory direction in his later downswing by a small amount and that it is very slightly supinated at impact. Note that not only is the total amount of lead forearm supination happening in his later downswing very small (when compared to the amount of lead forearm supination happening in the late downswing of Jon Rahm's bowed lead wrist golf swing action), but the slope of his blue graph near impact is far less steep than Jon Rahm's lead forearm supination graph near impact, thereby signifying the likelihood of there being a much slower handle twist velocity near impact.
In conclusion, it is my opinion that if a golfer wants to reduce the total amount of lead forearm supination required in the later downswing and if he wants to also reduce the magnitude of his handle twist velocity near impact, then he should consider using a very strong lead hand grip strength technique and not a bowed lead wrist technique.
Although I do not think that the bowed lead wrist technique is necessarily advantageous with respect to reducing the amount of lead forearm supination required in the later downswing, or reducing the magnitude of the handle twist velocity near impact - compared to the non-bowed lead wrist technique using an intact LFFW/GFLW with an equivalent lead hand grip strength - I do, however, think that the bowed lead wrist technique has certain advantages over the non-bowed lead wrist technique using an intact LFFW/GFLW. Those advantages include having a more mechanically stable lead wrist alignment at impact, and allowing for a more efficient DH-hand release action where maintaining the significantly bent trail wrist may synergistically help to increase the stability of the bowed lead wrist alignment between P7 => P7.2+. In addition, the bowed lead wrist technique combined with a DH-hand release action also likely helps to produce an "one-way miss" scenario rather than the more common "two-way miss" scenario.
Jeffrey Mann.
December 2020.