Critical Review: Brian Manzella's Release Ideas
Click here to go to the home page.
Introduction:
This review paper is targeted at a critical review of Brian Manzella's release ideas. In this scholarly review paper, the term "release" will refer to many aspects of a golfer's release action - and it will include the club release phenomenon, the release of the arms during the downswing, and the also release of the hands and clubhead through the impact zone.
Brian Manzella is a New Orleans-based golf instructor, and he also runs a golf forum [1] devoted to his golf teaching ideas. His golf forum is very popular, but it is not an open forum devoted to the open intellectual exploration of all opinions regarding golf swing mechanics/biomechanics. In fact, Brian Manzella freely admits that his golf forum is not open to a discussion of the teaching ideas of other golf instructors, and he frequently reminds forum members that his golf forum is primarily intended to promote his golf teaching philosophy. Forum members who transgress his censorship rules get promptly banned from his forum. Brian Manzella has a long history of exploring golf instructional ideas and he was originally very much influenced by Homer Kelley's TGM book [2] and his TGM concepts, and he was formally certified as an authorized TGM instructor. However, he has adopted a decidedly anti-TGM stance in recent years and he now derisively refers to TGM golfers as "handle-draggers". Although he has recently chosen to adopt a rigid anti-TGM stance, Brian Manzella does have a genuine interest in improving his knowledge of the "science of golf swing mechanics/biomechanics" and he actively consults scientific experts in the field. He has also personally organised, and moderated, two Brian Manzella AntiSummit conferences [3] where a panel of golf researchers give short presentations related to their field of expertise and where they also openly answer questions submitted by conference attendees.
I am not certain when Brian Manzella first developed his "new" ideas regarding the release action, and I also do not clearly understand the precise role that Mike Jacobs [4] has played in the development, and maturation, of Brian's "new" ideas regarding the release action. I actually first became aware of the "rotation-about-the-coupling point" release concept when Mike Jacobs posted links to his personal videos [5] in a Brian Manzella golf forum thread devoted to the topic of the "release". I do not have any insight into the degree of concordance between Brian Manzella's and Mike Jacob's opinions regarding the "release" and I will therefore arbitrarily ignore Mike Jacob's expressed opinions in this review paper, and I will only refer to Brian Manzella's opinons as they are expressed in his videos and golf forum posts. Brian Manzella has produced a number of freely available videos relating to this topic and he has also produced an "Ideas About the Release" video that can be purchased from his golf shop [6].
Brian Manzella's ideas about the release
In a post in his golf forum [1], Brian Manzella summarised his ideas about the release in the following short paragraph-:
"To achieve it, from the top pull the club in the direction of the shaft CONTINUOUSLY as you begin to straighten your right arm (and your left arm slightly if it was bent) out away from you away from the target WHILE you preserve as much of your FULL shoulder turn as you can. About half-way down, WHILE YOUR CHEST IS FACING YOUR HANDS, use your right shoulder and right arm to re-position themselves to help you rotate the club about a point between your hands. When the club has some speed from this rotation, and the clubhead is level or slightly lower than your hands, use everything you have to pull the grip off of the club as your hips move left, open, and you lose all of your forward bend."
Although that short paragraph succinctly summarises his ideas about the release, his personal opinions need to be dissected in great detail, so that website visitors can clearly understand his perspective. Brian Manzella divides the downswing into three phases, and he has seemingly defined those three phases based on a research paper published by Steve Nesbit [7]. Steve Nesbit studied the hand arc path (hub path) of four amateur golfers and he noted that the hand arc path was not perfectly circular.
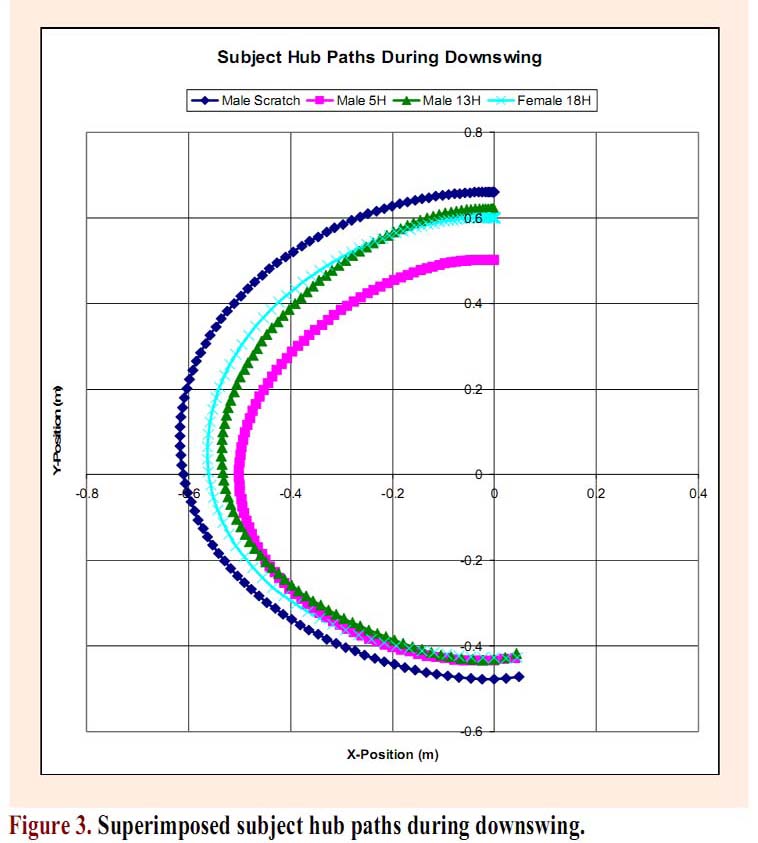
Here is a diagram showing the hand arc paths (hub paths) of the 4 amateur golfers who participated in the Nesbit research study.
Hand arc paths - capture images from the Steve Nesbit paper [7]
The hand arc paths are elliptical in shape, and one can readily see that they have a larger radius at the *P5-5.5 position and that the hand arc path becomes smaller in radius (thus producing a tighter hand arc path curve) between the P5.5 position and the P6-6.5 position. Steve Nesbit claims that the hand arc path reaches another maximum radius point at roughly the P6.4 position before again becoming smaller in radius in the late downswing (between the P6.6 position and the P7 position).(* I will be frequently referring to P positions in this review paper - see my wrist glossary and P system of classifying a golfer's positions review paper for more details about the P system if you are not familiar with the P system of classifying a golfer's position)
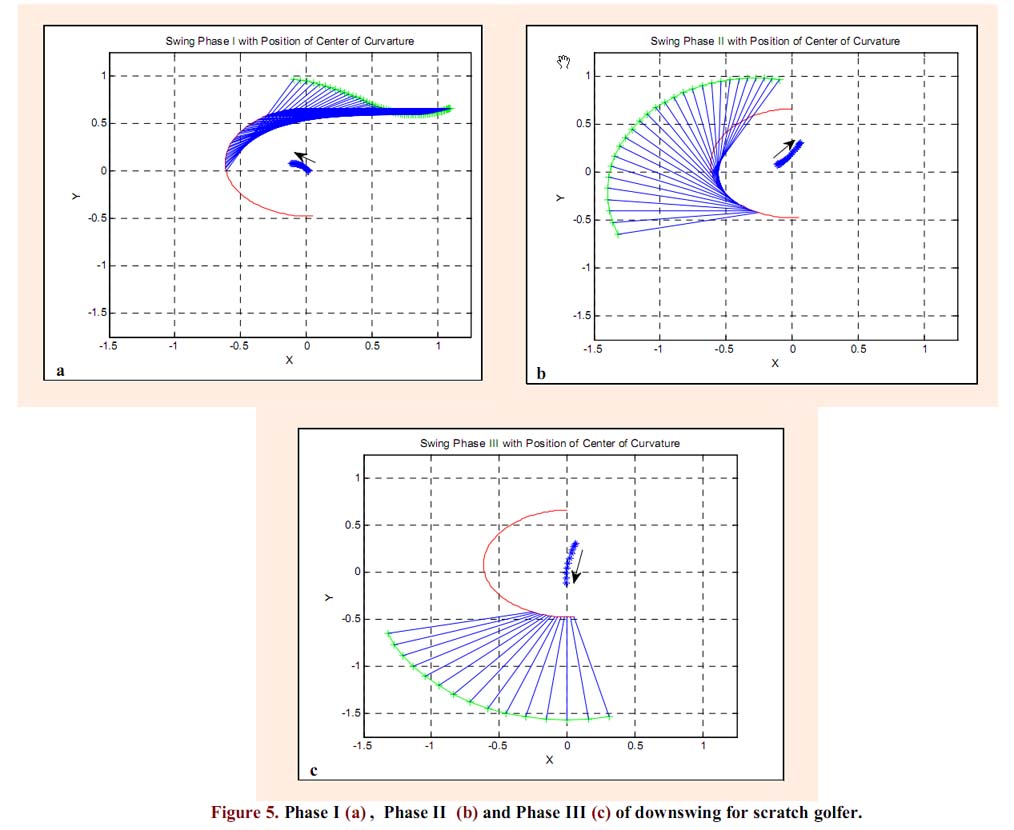
Based on the variable radius of the hand arc path at different time points during the downswing, Steve Nesbit divided the downswing into three phases of action.
Three phases of downswing action - capture images from the Steve Nesbit paper [7]
The red curved path represents the hand arc path, the green curved path represents the clubhead path and the straight blue lines represent the positional alignment of the clubshaft. Downswing phase 1 occurs between the end-backswing position (P4 position) and the end of the early downswing position (P5 position when the left arm becomes parallel to the ground and the clubshaft becomes vertical, or near-vertical, to the ground). Downswing phase 2 occurs between the P5 position and the P6-P6.5 position and it is during this phase that the club starts to release (release of PA#2). Downswing phase 3 starts roughly at the P6-P6.5 position and during this phase the club completes its release becoming straight-in-line with the left arm at low point.Steve Nesbit asserts that the changing shape of the hand arc path plays a causal role in the release mechanics of the club, and Brian Manzella also makes a similar claim in his explanatory video regarding "where the ideas come from" [8]. I will later demonstrate why I believe that one cannot arbitrarily make full-proof (scientifically conclusive) claims about golf biomechanics and any golfer-applied torques that could be involved in the release of a golf club - based on a research study of the hub path patterns of 4 amateur golfers. Any intellectual claims about golfer-applied torques are inferentially derived claims that are the end-result of a mental process of personal interpretation of a study's data - and those inferentially-derived interpretations can be deemed to be selective (personally subjective) interpretations.
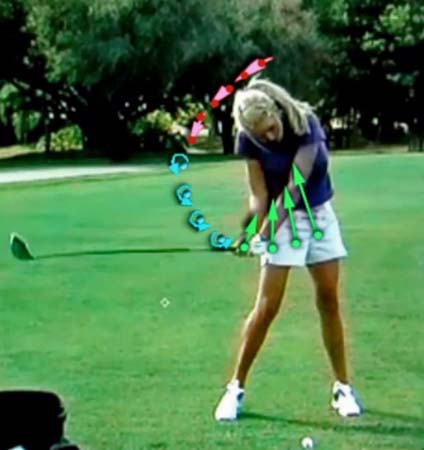
Here is an example of how Brian Manzella selectively analyses the downswing action of Lexis Thompson - http://vimeo.com/34442274 - where he also arbitrarily divides her downswing action into three phases, and where he personally claims that she is perfectly exhibiting his BM-release pattern (which is based on the Nesbit hub path model).
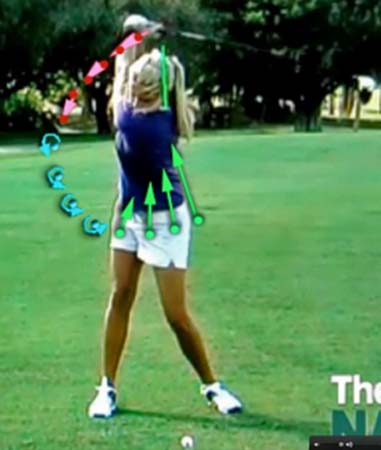
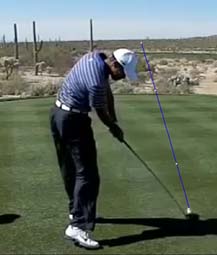
Lexi Thompson at the end-backswing position - capture image from the Brian Manzella video
Note that Lexi Thompson is ultra-flexible and she can get her left arm to the 12 o-clock position by her end-backswing. She doesn't turn her pelvis more than usual, but she is capable of rotating her upper torso (shoulders) > 90 degrees, and she is also capable of protracting her left scapula well forward so that her left shoulder socket moves around towards the front area of her left chest wall. Those two biomechanical phenomena allow Lexi Thompson to get her left arm far back to the 12 o'clock position.Brian Manzella has demonstrated the three downswing phases by using different colors - red arrows for phase 1, blue curved arrows for phase 2, and green arrows for phase 3.
It is important that you independently view the video so that you can correctly understand what Brian Manzella selectively/arbitrarily claims that Lexi Thompson is doing during those three phases of her downswing - while simultaneously noting that Brian even admits in his video that his personal claims about the "forces" cannot be directly derived from a simple viewing of a golfer's swing video and he readily admits that he is merely presenting his personally subjective opinions regarding the "apparent forces" that he believes are in play in Lexi Thompson's downswing action.
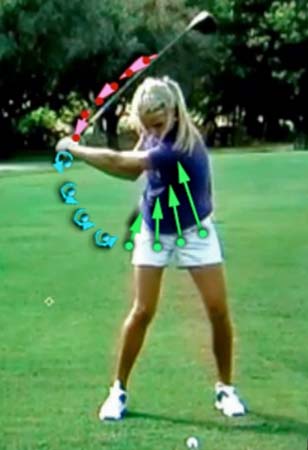
Lexi Thompson at the end of phase 1 - capture image from the Brian Manzella video
Note that Lexi Thompson's left arm is parallel to the ground and that represents the end of her early downswing, and the end of phase 1. So, let's consider the "forces" that Lexi Thompson is applying to the grip end of her club during phase 1. Brian Manzella claims that she is using a biomechanically-induced "force" to pull the grip end of the club in a direction that follows the direction of the red arrows (and he states that she is applying a pulling-force that is directed in a direction that is tangential to the hub path). I don't markedly disagree with his *assertion about the direction of the "force" that moves the hands - except that I wouldn't use the term "tangential", which implies a direction that is at right-angles to the radius of a circle, and that means that it must really be tangential to the hand arc path. I think that it is more factually correct to state that the "force" is being directed along the circumference of the hand arc path (in the direction of the red arrows).(* Brian Manzella describes his recommended biomechanical actions for phase 1 in much greater detail in his "ideas about the release" video [6] and I will discuss his recommended biomechancial actions in the next section of this review paper - when I dissect each of his three downswing phases in much greater detail)
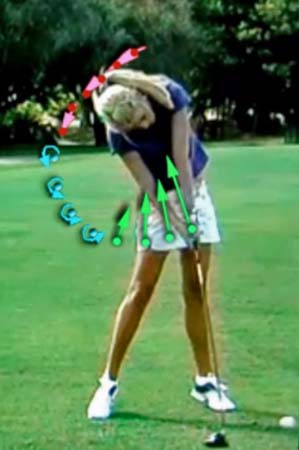
Lexi Thompson at the end of phase 2 - capture image from the Brian Manzella video
Lexi Thompson is at the P6 position and her clubshaft is parallel to the ground. Note that her hands are at the end of phase 2 of the hand arc path in the above photo. What happened to the club during phase 2? Any viewer can clearly see that her club is releasing during phase 2 due to the presence of a "club releasing force"? However, I do not believe that it is possible to conclusively discern the nature of the "club releasing force" from a simple observation of a swing video. Brian Manzella selectively/arbitrarily asserts that Lexi Thompson is "apparently" applying a positive torque around the coupling point, which causes the club to release. However, he doesn't have any evidence to support his personally subjective opinion. The reality is that her club could be releasing due to a CF-release action and not due to any right-sided "force" applying a push-force against the aft side of the grip below the *coupling point.(* the coupling point is a point on the grip midway between the two hands)
There is no way that any outside observer (who views her swing video) can definitively discern whether Lexi Thompson is applying a positive torque around the coupling point in her downswing action via her right hand - because it would require a well-designed scientific study that uses pressure sensors placed in the grip end of the club (which are capable of measuring any positive torque force being applied by the right hand) in order to acquire the necessary scientific data to conclusively support that assertion. In fact, Steve Nesbit openly states in his hub path paper that one cannot clearly discern what causal "forces" are in play during the club-releasing phenomenon that occurs during phase 2 - when he wrote-: "For all subjects, the initiation of phase II coincided with their first local hub radius minimum, while applying the majority of their respective maximum swing torque, and reaching about half of their respective maximum grip velocity. Acting together these effects increased the centrifugal loading on the club and initiated the rapid outward or uncocking movement of the wrists/club relative to the hub path. During phase II, as the club moved outward, the wrist torques continued to increase accelerating the angular motion of the club. The increase in hub path radius during this phase may be a result of the golfer shifting the effort from controlling the hub path to applying maximum wrist torque, or it could simply be a third-law reaction to the rapid outward movement of the club". In other words, Steve Nesbit is stating that the application of a swing torque that induces the release of PA#4 (release of the left arm which causes the left hand to move along the hand arc path), combined with a "tighter" hand arc path curve during phase 2 of the downswing, causes the club to *centrifugally release. He also states that any increase in hub path radius during the latter part of phase 2 could be due to a third-law reaction to the rapid outward movement of the club and not due to the application of any wrist torque.
(* although Steven Nesbit uses the term "centrifugal" to describe the passive release of PA#2, I now prefer nmgolfer's alternative mathematical explanation for the club release phenomenon and when I use the term "CF-release action" in any of my review papers, website visitors must realise that I am really referring to the mathematical release equation where Vclubhead = Vhands + Vrelease velocity, and where Vrelease velocity = Club length*angular velocity. This mathematical explanation can easily account for the "passive forces" that cause the club release phenomenon and it is important to realise that a golfer doesn't necessarily have to add an additional positive wrist torque in order to successfully complete the club release phenomenon if the hub path is optimised - and I think that Lexi Thompson has an optimal hub path for a golfer who chooses to be a swinger who uses a CF-release action)
Consider a capture image of Lexi Thompson as she reaches impact (end of phase 3).
Lexi Thompson at low point - capture image from Brian Manzella's video
Note that the clubshaft has caught up to her hands at low point and that the clubshaft is straight-in-line with her straight left arm. Note that her hands are higher (further away from the ground) at the end of phase 3 compared to its position at the start of phase 3 - when the hands were near the low point (nadir) of her hand arc path (which is located at a point roughly opposite her right thigh). What causes her hands to be higher at the end of phase 3? The answer is obvious - it is because her left shoulder socket is higher (further away from the ground), and considering the fact that her straight left arm has a "fixed" length, the hands must move higher in direct proportion to the degree that the left shoulder socket moves higher. Brian Manzella asserts that she is "pulling up on the club with all her might" - as if she is trying to pull the grip off the club by actively pulling upwards. In fact, Brian Manzella has drawn arrows pointing upwards showing the magnitude of the upward-pulling force that is "apparently" being exerted by Lexi as she decreases the radius of her hand arc path. Brian Manzella refers to this upward-moving force that is directed perpendicular to the hand arc path as a normal force, and he is seemingly implying that the magnitude of the normal force increases progressively as phase 3 proceeds, and that the sole cause of the steadily increasing normal force is causally related to her steadily decreasing hub path radius. If that is what Brian Manzella is asserting, then I personally think that Brian Manzella's "belief" is scientifically unfounded. Consider my reasoning.
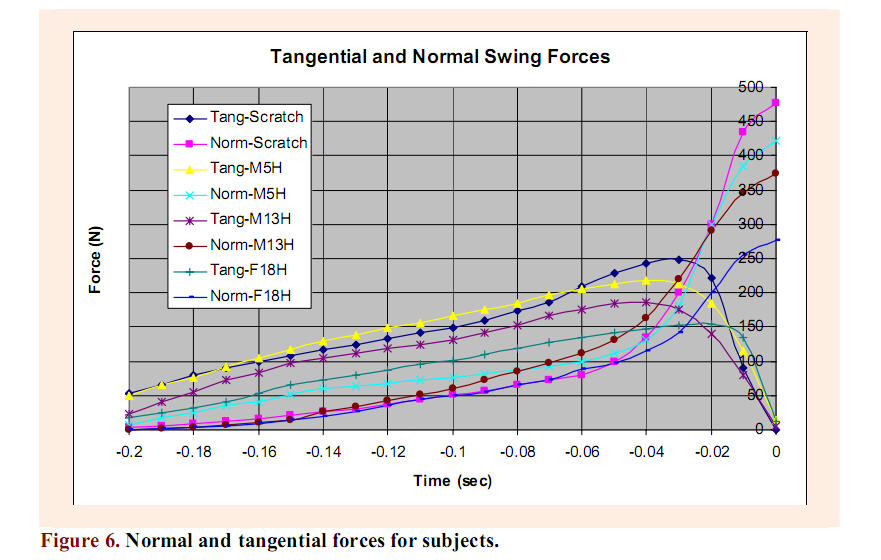
Here is a diagram from Steve Nesbit's hub path paper [7] showing the normal forces exerted by the four study participants.
Tangential and normal forces - capture image from Steven Nesbit's hub path paper [7]
Steve Nesbit states that a golfer exerts a linear force when he applies a swing torque to move the hands along the hand arc path. That linear force can be divided into two component forces - a tangential force that is directed at a tangent to the hand arc path and a normal force that is directed centrally in a direction that is perpendicular to the hand arc path. Note that Steve Nesbit demonstrates that the magnitude of the normal force increases dramatically in the latter part of phase 3 - increasing dramatically in magnitude after the hands reach a point on the hand arc path that is 0.04 seconds away from impact. I want you to only look at two curves - the turquoise-blue graph representing the 5-handicap golfer and the dark maroon-red graph representing the male 13-handicap golfer. Note that both golfers generate a similar magnitude of normal force (roughly between 350-425Nm) at impact, thus signifying that the two golfers are applying a normal force to approximately the same degree during the latter part of phase 3 (after bypassing the 0.04 seconds time point). What is causing the normal force to increase so dramatically in the last 0.04 seconds of the downswing? Brian Manzella seemingly believes that it is due to the active pulling up of the hands and the shortening of the hub path radius? Is that true? Consider the "evidence"?
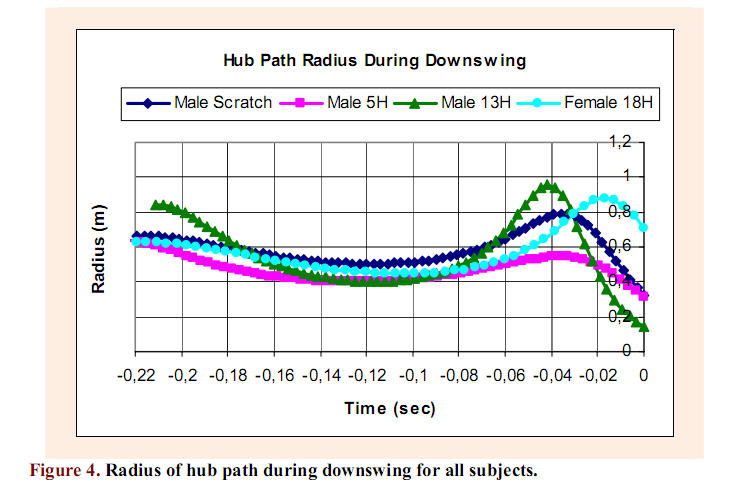
Radius of the hub path during the downswing action - capture image from Steve Nesbit's paper [7]
First look at the hub path radius graph of the male 13-handicap golfer - green graph. Note that his hub path radius decreases dramatically after the hands pass the 0.04 second time point and that the hub path radius reaches its smallest radius at impact. That would suggest that there is a direct causal relationship between a decreasing hub path radius in the last 0.04 seconds of the downswing and the magnitude of the progressively-increasing normal force during that same time period (as Brian Manzella infers). However, look at the hub path radius graph of the male 5-handicap golfer - pink graph. Note that there is very little change in his hub path radius in the last 0.04 seconds of the downswing. That would suggest that there is no direct causal relationship between a a decreasing hub path radius in the last 0.04 seconds of the downswing and the magnitude of the progressively-increasing normal force during that same time period. So, how do we reconcile these two incongruous facts? The answer can be found in Steven Nesbit's paper on page 243 - where he states-: "During phase I, the majority of the force is tangent to the path and primarily functions to accelerate the club. ------ During phase III the tangential force drops toward zero while the normal force increases to maximum values at ball contact. The primary action of the linear force during this phase is controlling the path and reacting to the large centrifugal loading from the club as it reaches its maximum club head velocity and coincident minimum hub radius". I have yellow-highlighted the statement where Steve Nesbit states that the primary action of the linear force (which is primarily a normal force during phase 3) is a reaction to the large centrifugal loading from the club as it reaches maximum clubhead velocity and coincident minimum hub radius as it nears impact. In other words, the linear force (normal force during phase 3) is primarily a reaction to the fact that the clubhead is reaching its maximum velocity while becoming progressively more straight-in-line with the left arm thereby generating a greater centrifugal pull, and it is not solely due to any active pulling-up action of the grip end of the club by a golfer in order to decrease the hub radius. In the last 0.04 seconds of the downswing a golfer is primarily reacting to the centrifugal pull of the club and he is primarily "holding on" by applying a centripetal force to the grip end of the club so that he can maintain control of the club and also control its path. If one understands this important fact, then it radically changes one's subjective interpretation of Steve Nesbit's normal force graphs, and I think that it is overly simplistic, and wrong-headed, to believe that there is an incontrovertibly singular causal relationship between any active pulling-up of the grip end of the club (in order to decrease the hub radius) and the magnitude of the normal force that is operant during the last 0.04 seconds of the downswing.Consider the mathematical equation that defines the magnitude of the normal force.
From the equation (which I obtained from Sasho MacKenzie), one can see that the magnitude of the normal force is primarily dependent on the interplay of three factors-: i) mass of the club; ii) clubhead velocity; and iii) the radius of the hub path. It is certainly true that the smaller the radius of the hub path, the greater the normal force, but one also has to consider all the biomechanical/mechanical factors that affect maximum clubhead velocity when contemplating all the biomechanical/mechanical factors that are responsible for the magnitude of the normal force. I will discuss this issue in much greater detail in the next section when I dissect each of the three phases of the downswing in a much more explicit manner, and I will particularly discuss this issue when I specifically discuss the issue of parametric acceleration, which can be used by a golfer during phase 3 of the downswing.
Phase 1 of the downswing
Consider again Brian Manzella's description of his BM-release action."To achieve it, from the top pull the club in the direction of the shaft CONTINUOUSLY as you begin to straighten your right arm (and your left arm slightly if it was bent) out away from you away from the target WHILE you preserve as much of your FULL shoulder turn as you can. About half-way down, WHILE YOUR CHEST IS FACING YOUR HANDS, use your right shoulder and right arm to re-position themselves to help you rotate the club about a point between your hands. When the club has some speed from this rotation, and the clubhead is level or slightly lower than your hands, use everything you have to pull the grip off of the club as your hips move left, open, and you lose all of your forward bend."
The bold-highlighted sentence summarises Brian Manzella's recommendations for the start of the downswing - he wants the right arm to straighten out away from the body while the right shoulder remains back at its end-backswing position.
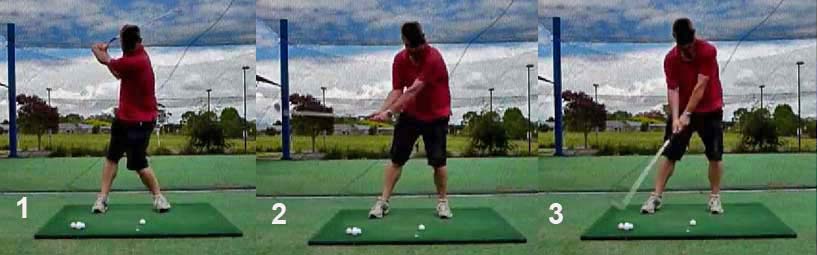
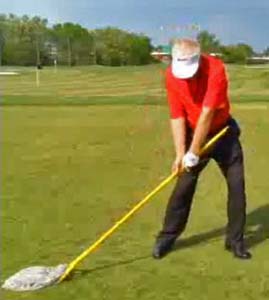
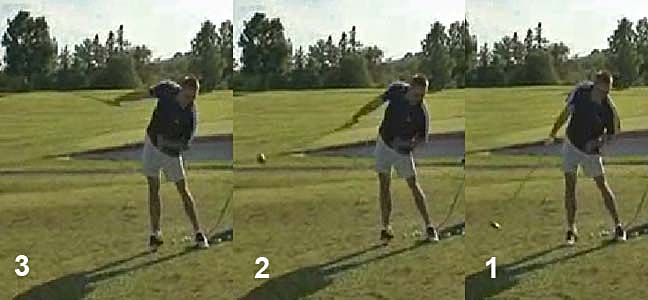
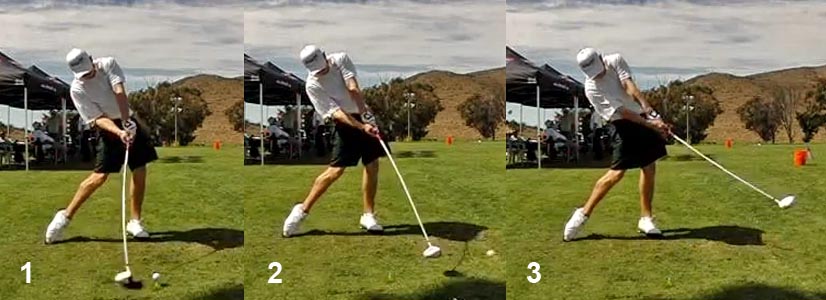
Here are capture images from his "Ideas About the Release" video - where Brian Manzella demonstrates his "out-toss" maneuver [6].
Brian Manzella demonstrating his "out-toss" maneuver - capture images from his swing video [6]
In his swing video [6], Brian Manzella states that a golfer should get a full shoulder turn during his backswing pivot action so that he can get his back to face the target at the end-backswing position. He also recommends that a golfer should allow the left arm to be relaxed and slightly bent at the level of the left elbow. Then, he recommends that a golfer start the downswing with an "out-toss maneuver" - where one "feels" that one is straightening the right arm and right wrist (as if one is throwing a basketball with the right arm in an "away-from-the-target" direction). That "out-toss" maneuver will obviously straighten a lax left arm and increase the width of the hand arc path. The "out-toss" maneuver will also produce a "pull-force" that is directed along the longitudial axis of the clubshaft and also in a direction that is curvilinearly parallel to a hand arc path that is directed away from the target and slightly downwards-and-outwards (as seen in Lexi Thompson's phase 1 hand arc path). During the "out-toss" maneuver, Brian Manzella wants the right shoulder to remain stationary, or near-stationary, and he doesn't want a golfer to prematurely rotate the upper torso counterclockwise during the early downswing.I don't disagree with the idea of moving the hands away from the target at the start of the downswing, but I personally think that starting the downswing with this "out-toss" maneuver will more likely predispose to casting (premature clubhead throwaway) and it will more likely disconnect the arms (power package) from the torso. I think that any premature straightening of the right arm will predipose to a sweep release pattern, and I much prefer to recommend a random release pattern for most golfers. In my downswing chapter, I recommend a different approach for phase 1 of the downswing action. I believe that a golfer should load PA#4 by the end-backswing position, and I believe that a golfer should avoid releasing PA#4 prematurely during the early downswing (which will happen if a golfer straightens the right arm in such a manner that it pushes the hands outwards away from the chest wall). I also recommend that the power package remain intact during the power package slotting phase and I believe that a golfer should actively addduct the right upper arm while maintaining a bent right right elbow during the entire early downswing (phase 1 of the downswing). I also believe that the power package should remain closely connected to the rotating torso, and I believe that any movement of the hands away from the target during phase 1 should be secondary to the rotation of the upper torso, and not secondary to a movement of the two arms away from the torso.
I believe that Lexi Thompson is following my swing recommendations during phase 1 of her downswing action.
Look again at Brian Manzella's video - http://vimeo.com/34442274
In particular, view the time period between 4:32 minutes - 4:50 minutes and you can clearly see how Lexi's hands move down the hand arc path due to the rotation of her upper torso, and not due to a right arm straightening action that moves her hands away from her torso while she preserves as much of her full shoulder turn as she had at the end-backswing position (as Brian Manzella recommends).
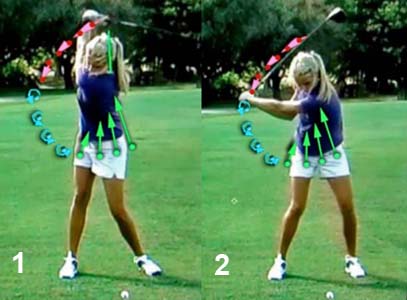
Lexi Thompson's early downswing swing action - capture images from Brian Manzella's video
Image 1 shows Lexi Thompson at the start of phase 1, and image 2 shows her at the end of phase 1. Note that she has not released PA#4 during phase 1 and that she has maintained the same angle between her left arm and her anterior chest wall, and that she has also maintained her bent right elbow and an intact power package (same internal alignment of the RFFW relative to the LAFW). Note that her hands are moving away from the target (in the direction of the red arrows) due to the rotation of her upper torso, and not due to an independent straightening action of the right arm. I believe that this is the optimal way for a swinger (who uses an active pivot action to release PA#4) to start the downswing sequence.
Phase 2 of the downswing
Consider again Brian Manzella's description of his BM-release action."To achieve it, from the top pull the club in the direction of the shaft CONTINUOUSLY as you begin to straighten your right arm (and your left arm slightly if it was bent) out away from you away from the target WHILE you preserve as much of your FULL shoulder turn as you can. About half-way down, WHILE YOUR CHEST IS FACING YOUR HANDS, use your right shoulder and right arm to re-position themselves to help you rotate the club about a point between your hands. When the club has some speed from this rotation, and the clubhead is level or slightly lower than your hands, use everything you have to pull the grip off of the club as your hips move left, open, and you lose all of your forward bend."
The bold-highlighted sentence summarises Brian Manzella's recommendations for phase 2 of the downswing.
I don't know what Brian Manzella means when he states that a golfer should "use your right shoulder and right arm to reposition themselves to help you rotate the club about a point between your hands", because I think that a golfer's right shoulder/right arm should automatically be correctly positioned if one slots the power package optimally - like Lexi Thompson.
The key isssue that I want to discuss is the issue of whether a golfer should apply a positive wrist torque via a right-sided push action against the aft side of the club below the coupling point. This a key feature of Brian Manzella's teaching philosophy regarding his BM-release action - the rotation-about-the-coupling point idea. What is the scientific basis for applying a positive wrist torque to induce/supplement the club release action in a *swinger?
(* Brian Manzella's release action only applies to swingers because Brian Manzella does not want there to be any "force-across-the-shaft" at impact - as would occur in hitters/swing-hitters who drive-load the clubshaft through impact)
The only theoretical/scientific justification that I have ever heard Brian Manzella offer for his belief that a golfer should apply a positive wrist torque with the right arm/hand to manually induce/supplement the club release phenomenon is based on a paper written by Aaron Zick [9] that has never been published in a peer-reviewed scientific journal. I have studied that paper in great depth and I reject its validity/utility because it is a computer-based model that is only two-dimensional and it doesn't deal with the forces needed to release PA#3 (rotate the left arm/forearm around its longitudinal axis during the release swivel phase of the downswing). I strongly believe that any computer-based modelling program must be three-dimensional so that it can clearly separate the biomechanical forces needed to uncock the left wrist (release PA#2) from the biomechanical forces needed to rotate the left arm around its longitudinal axis during the release swivel phase of the downswing (release PA#3). Brian Manzella and Mike Jacobs never discuss the release of PA#3 in their "release ideas" writings/videos, and I think that it is a major flaw (Achilles heel) in their "release ideas" philosophy.
What I would like to discuss at this point is what role the right arm/hand should play in a golfer's downswing action if he is a swinger. How can a golfer (swinger) use right arm/hand push-pressure against the aft side of the club fruitfully if he a swinger?
To answer that question, let's first consider how the right hand can mechanically apply a positive push-force during the downswing.
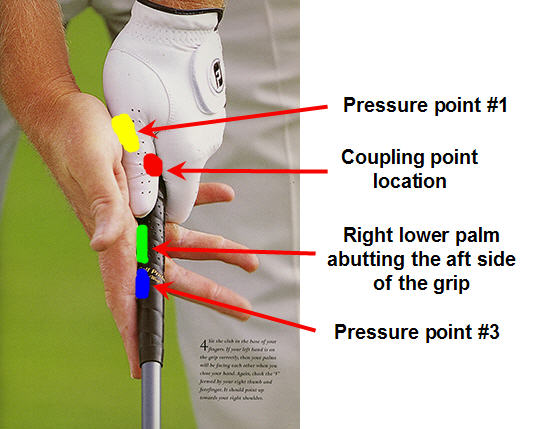
Right hand grip positioning - modified photo adapted from Ernie Els' book [10]
Note that I have located the coupling point opposite the left index finger knuckle, which roughly represents the midpoint between the two hands.
Most golfers use a neutral right hand grip where the palm of the right hand faces the aft side of the grip, and therefore the target at impact. The right hand can therefore potentially apply a push-pressure against three points on the aft side of the grip.
Point number 1 is pressure point #1, and it is located over the aft side of the left thumb where the right midpalmar crease rides over the aft side of the left thumb. Pressure point #1 is located above the coupling point, and any push-pressure pressure applied here will not rotate the club-around-the-coupling point. A golfer may selectively decide to apply a right arm/hand force at PP#1 in order to assist in the fluid release of PA#4 and thereby help maintain the forward momentum of the left arm in the downswing, or a golfer may selectively choose to apply a right arm/hand force at PP#1 during phase 3 of the downswing in order to assist in the efficient/fluid release of PA#3.
Point number 2 is where the lower part of the right palm (near the base of the right 3rd and 4th fingers) abuts the aft side of the grip end of the club, and point number 3 is pressure point #3 where the index finger's proximal interphalangeal joint area abuts against the aft side of the grip end of the club. These two points are below the coupling point and a swinger may selectively choose to apply a push-pressure via the right arm/hand at these two points in order to manually induce/supplement the release of PA#2 during phase 2 of the downswing (as Brian Manzella recommends).
To better understand how the right arm/hand can usefully contribute to a swinger's downswing action, consider a lead-arm only swing action.
Sasho MacKenzie's lead arm-only swing action.
DTL view - http://www.youtube.com/watch?v=7JW6A_J4KEA&NR=1
Face-on view - http://www.youtube.com/watch?v=GgF_9IfROAU
Sasho MacKenzie (SMK) has a PhD degree in sport's biomechanics, and he has written a number of important research papers on the golf swing [11]. I will be referring to one of his research papers [12] in this review paper.
Note that SMK can drive the ball 250 yards using his *lead arm-alone (I am using the term "lead arm" because Sasho MacKenzie is a lefty whose lead arm is the right arm). How does he accomplish that astonishing feat? I think that he is basically using a TGM swinging action - in the sense that he is using a triple barrel TGM swinging action (using PAs 4:2:3 in sequence).
(* I discussed the biomechanics of Sasho MacKenzie's lead arm-only swing in great detail in my Power Mechanics of Swinging, Swing-hitting and Hitting review paper)
According to Sasho MacKenzie, he can generate a driver clubhead speed of 95mph using a lead arm-only swing action, and 110mph when he uses a two-armed swing action. So, how does he gain an additional 15mph of clubhead speed when adding his rear arm to his swing action? Before answering that question, consider the results of Sasho MacKenzie's golf research project.
Sasho MacKenzie developed a three-dimensional forward dynamics computer-based golf swing model in order to simulate a golfer's swing action [12]. In contrast to Steve Nesbit's computer model [13] which is based on inverse dynamics, Sasho MacKenzie's computer model is based on forward dynamics. I think that Sasho MacKenzie's computer model is also more useful than Steve Nesbit's computer model because it separates out the release of PA#2 from the release of PA#3. In Sasho MacKenzie's computer model, he instructed the computer to achieve the dual goal of maximizing clubhead speed while also squaring the clubface by impact - and he allowed the computer to determine the optimum torques and their timing/duration of application during the downswing action. This is the result of his study.
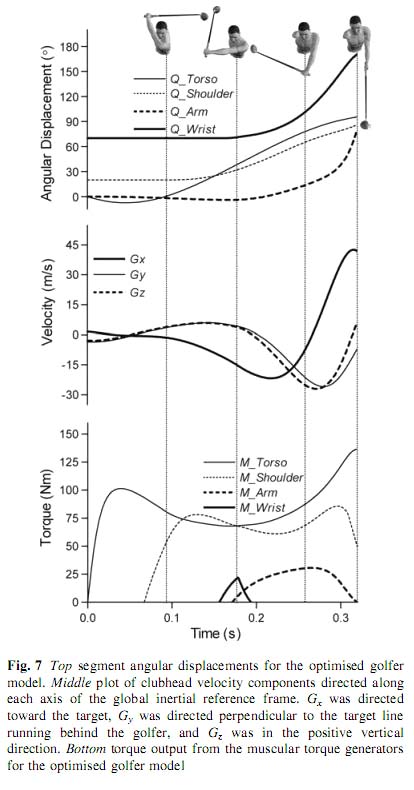
Torques that are applied during the downswing action - capture image from Sasho Mackenzie's research paper [12]
One can clearly see that a torque can be applied at the level of 4 biomechanical fulcrum points in Sasho MacKenzie's computer model - i) M torso - which is due to the rotation of the upper torso around the upper swing center located at the level of the upper thoracic spine; ii) M shoulder - which represents a torque due to the muscular action of the left shoulder girdle muscles that move the left humeral head in the left shoulder socket joint; iii) M wrist - which represents a torque that is applied at the level of the left wrist in the ulnar-radial plane of left wrist uncocking and iv) M arm - which represents the torque needed to rotate the left arm/forearm counterclockwise around its longitudinal axis (see the difference between the 3rd body-arm figure and the 4th body-arm figure at the top of the capture image). One can ascertain the magnitude of the needed torque (measured in Nm), and their timing of application, in the M graphs at the bottom of the capture image. The Q graphs at the top of the capture image show the timing and the degree of angular displacement. So, for example, one can see that the left arm/forearm rotates counterclockwise (Q arm representing the release of PA#3) in the last 0.04 seconds of the downswing - but, it is important to note that the torque responsible for the angular displacement (involved in the release of PA#3) must become active sooner (see M arm graph) so that they can efficiently generate the necessary energy needed to cause the angular displacement.From my perspective, the most important educational information, relating to the issue of the potential active role of the right arm/hand in the downswing of a swinger's action, can be derived from an interpretative analysis of the M wrist and M arm graphs. Note that very little positive torque (M torque) is needed to release PA#2 and that the duration of needed torque application is very short. Sasho MacKenzie has stated that he "feels" this phenomenon in his lead arm-only swing, and he has stated that he has no difficulty releasing PA#2 in his lead arm-only swing action because most of the club-releasing power happens automatically/naturally due to a CF-release action. He expressed this opinion in a personal communication and also at Brian Manzella's AntiSummit II conference (where he served as one of the panel experts). In other words, if a golfer has an optimised hand arc path, then he should have no/little difficulty releasing the club in an efficient manner via a CF-release action during phase 2 of the downswing - if he can release PA#4 efficiently. However, note that a golfer needs to apply a M arm torque starting during the latter part of phase 2 and continuing through most of phase 3 in order to efficiently release PA#3 (Q arm), and the rotary angular displacement (associated with the release of PA#3) primarily happens during the last 0.02-0.03 seconds of the downswing. Sasho MacKenzie has stated (in a personal communication and also at the Brian Manzella AntiSummit II) that he has significant difficulty mustering the necessary M arm torque in his lead arm-only swing action, and that he can perform the release of PA#3 much more fluidly/efficiently in his two-armed swing action by using the *right forearm's paddlewheeling action (which happens when the right arm actively straightens during the latter part of phase 2 and the entire time period of phase 3) to apply a positive torque against PP#1. Sasho MacKenzie stated that this is the major active role that his right arm plays in his downswing action - in terms of allowing him to actively generate an additional 15mph of clubhead speed.
(* if you do not understand the concept of a "right forearm paddlewheeeling action" - see question/answer number 18 in my downswing chapter)
I also think that an actively straightening right arm can also secondarily/synergistically assist in maintaining the forward speed of the left arm during phase 3 of the downswing - if it applies a positive push-force against PP#1 during the right forearm paddlewheeling action. Remember that most swingers use their pivot action to catapult their left arm downwards-and-forwards away from their rotating torso during phase 2 of their downswing, and the only biomechanical force that they can then use to maintain left arm speed during phase 3 of the downswing comes from their left shoulder girdle muscles and potentially the right arm straightening action (which can potentially apply a push-force against PP#1).
Consider what happens in a simple double pendulum swing model.
Simple double pendulum model - from David Tutelman's website [14]
If you watch carefully, you will note that the central arm (equivalent to the left arm in a golf-swinger's swing action) slows down slightly as the peripheral arm (equivalent to the golf club) releases. This is due to the COAM principle where a "fixed" amount of energy is inputted into the simple double pendulum system at setup, and where it gets redistributed during the release of the peripheral arm (equivalent to the clubshaft in a golf-swinger's action). When the peripheral arm releases it takes energy away from the central arm, which therefore has to slow down slightly. A "real life" golfer's swing action is different in the sense that a golfer can input additional energy into the system by biomechanically maintaining the speed of motion of the left arm during the club releasing stage of the downswing. In that sense, a more useful analogy for a golf-swinger's action is a driven double pendulum swing model.
Driven double pendulum swing model - from David Tutelman's website [14]
Note that the central arm (equivalent to the left arm in a golf-swinger's action) doesn't slow down when the peripheral arm (equivalent to the golf club) releases, and that means that additional energy must have been supplied to keep the central arm driving forwards during the club releasing stage. An actively straightening right arm that produces push-pressure against PP#1 during phase 3 of the downswing can synergistically assist the left shoulder girdle muscles in maintaining the forward speed of the left arm during the late downswing, and thereby help avoid any pre-impact stalling of left hand motion, which is causally associated with a greater likelihood of flipping through impact.Now, if you think about this situation more deeply, then you will realise that an active right arm straightening action will be able to apply a push-force at PP#1 (which is above the coupling point) - and thereby synergistically assist in the efficient release of PA#3 - if the right wrist remains bent throughout the late downswing. If the right wrist straightens excessively, then any right-sided forces will more likely apply a push-force against the shaft below the coupling point and not above the coupling point (where the push-force is really needed to assist in the efficient release of PA#3 +/- to assist in maintaining the forward momentum of the left arm/hand during the late downswing).
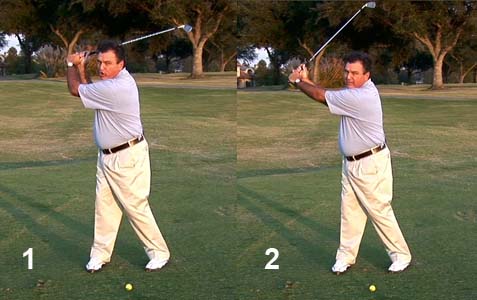
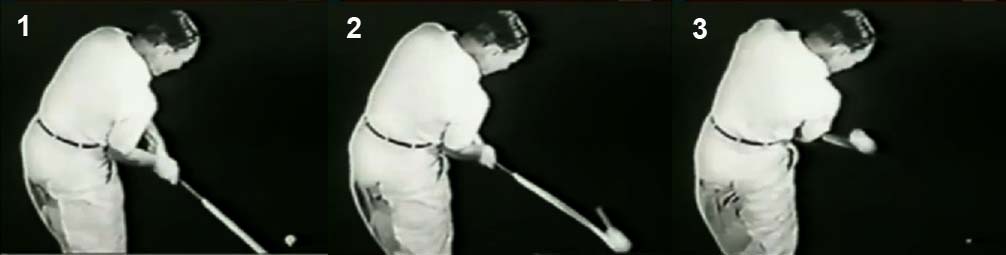
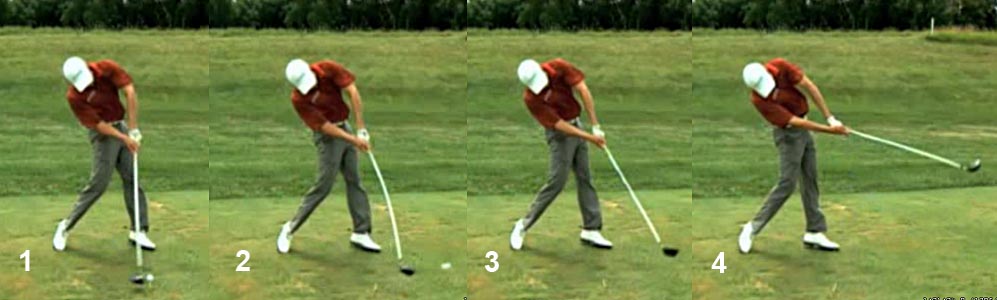
Here is an example of golfer who performs the right forearm paddlewheeling action, while maintaining a significantly bent right wrist, extremely well - David Toms.
David Toms swing video - http://www.youtube.com/watch?v=gb88dI4huDo
Here are capture images from that swing video.
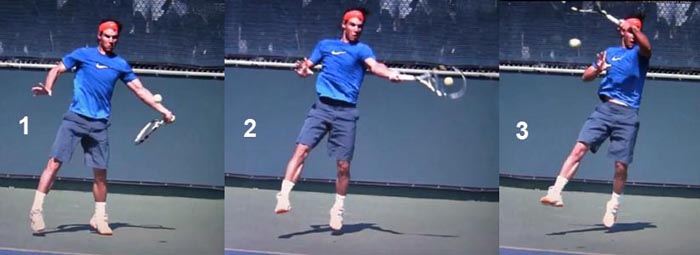
David Toms' right forearm paddlewheeling action - capture images from his swing video
Note how his right arm straightens between the P6 position (image 1) and impact (image 4) and note how his right forearm paddlewheels into impact. Note that he maintains a significant amount of bend in his right wrist during this time period, and that biomechanical alignment should allow him to efficiently apply push-pressure against PP#1 *if his right arm is actively straightening.(* I have no way of scientifically determining to what degree David Toms is actively applying push-pressure against PP#1 during his late downswing action because I cannot know how actively his right arm is straightening - simply by watching a video of his swing action. One would need to place pressure sensors in the grip, under PP#1, to measure any push-pressure being applied by the straightening right arm and this type of research experiment has not been performed. Nonetheless, his right arm/forearm/wrist/hand's biomechanical alignments and his right forearm's pattern of motion in the late downswing are perfectly compatible with a "belief" that he is actively using the right arm's straightening action to synergistically assist in the efficient release of PA#3).
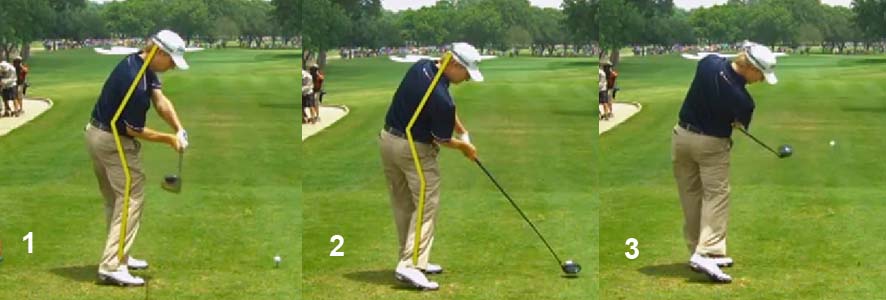
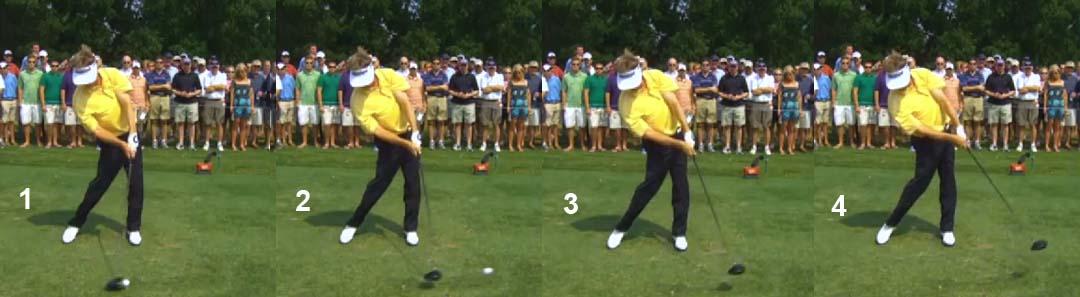
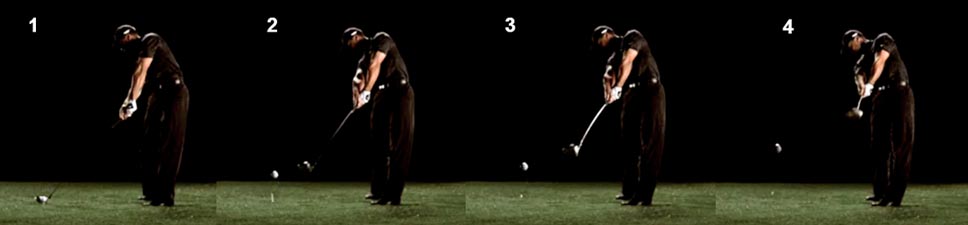
By contrast, consider an example of an amateur golfer who is attempting to implement Brian Manzella's rotation-about-the-coupling release technique by applying a push-force against the shaft below the coupling point (rather than above the coupling point) during phase 2 of his downswing action.
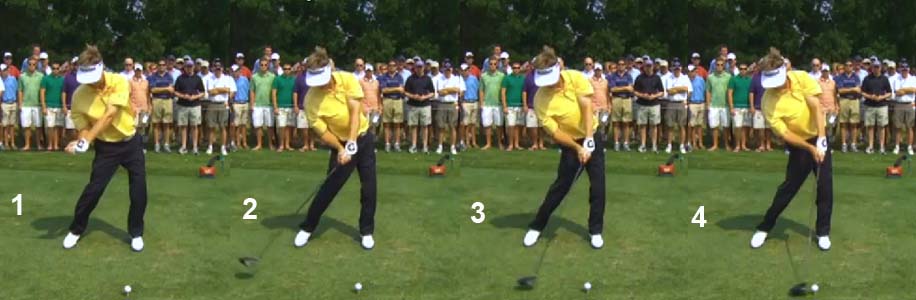
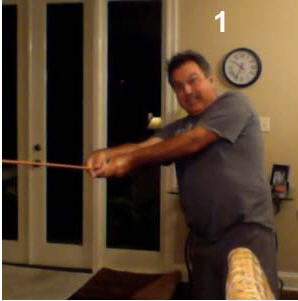
Anonymous amateur golfer attempting to implement the "rotation-about-the-coupling point" release technique - capture images from his swing video
Note that his right elbow is appropriately bent at the end-backswing position (image 1). Note that his right elbow is far less bent at the P6 position (image 2) - presumably because he has used an "out-toss" manever during phase 1 of his downswing action. Note how he straightens his right wrist during phase 2 of his downswing action - thereby applying a push-force against the aft side of the grip below the coupling point. He has obviously applied too much push-force againt the aft side of the grip below the coupling point, and his clubshaft has therefore prematurely caught up to his straight left arm by the P6.5 position (image 3), which is well prior to impact. This is an extreme example, but it demonstrates the potential downside of trying to apply a right-sided push-force against the aft side of grip below the coupling point (rather than above the coupling point).
Brian Manzella offers no practical advice in his videos, or prose writings, on how to modulate the i) magnitude of the push-force being applied below the coupling point and on how to ii) modulate the duration of this applied push-force, and I would therefore not be surprised if developing golfers prematurely lose their lag and flip before impact, or through impact, when they attempt to follow his rotation-about-the coupling point release ideas. I think that website visitors, who play golf as swingers (and not as hitters), should independently think more deeply about the issue of whether they really want to use push-force derived from an actively straightening right arm (or actively straightening right wrist) in their downswing action, and then they also need to decide whether they really want to use any right-sided push-force to augment the release of PA#2, rather than augment the release of PA#3, in their downswing action - and finally, they then need to think more deeply about the necessary biomechanical alignments/motions that will best accomplish that goal. My personal recommendation for swingers, who want to use the right arm to supply a push-force in the downswing, is to apply the push-force at PP#1 in order to help maintain the forward motion of the left arm/hand in phase 3 of the downswing and to synergistically assist in the efficient release of PA#3 in the last 0.03 seconds of the downswing, and to simultaneously avoid applying any push-force below the coupling point (as recommended by Brian Manzella).
Phase 3 of the downswing
Consider again Brian Manzella's description of his BM-release action."To achieve it, from the top pull the club in the direction of the shaft CONTINUOUSLY as you begin to straighten your right arm (and your left arm slightly if it was bent) out away from you away from the target WHILE you preserve as much of your FULL shoulder turn as you can. About half-way down, WHILE YOUR CHEST IS FACING YOUR HANDS, use your right shoulder and right arm to re-position themselves to help you rotate the club about a point between your hands. When the club has some speed from this rotation, and the clubhead is level or slightly lower than your hands, use everything you have to pull the grip off of the club as your hips move left, open, and you lose all of your forward bend."
The bold-highlighted sentence summarises Brian Manzella's recommendations for phase 3 of the downswing.
Note that Brian Manzella offers two major points of advice for phase 3 of the downswing - i) "use everything you have to pull the grip off of the club --- as you ii) lose all of your forward bend.
In other words, Brian Manzella is seemingly recommending that a golfer should "pull upwards on the grip with all his might" in a direction that is towards the center of the body while "jumping up" and losing all of one's forward spinal tilt (which is often referred to as "standing up" through impact). Brian Manzella also often refers to a near-impact (late phase 3) "pull-up" phenomenon as "going normal", which he seemingly signifies as being the biomechanical phenomenon of "pulling the grip end of the club straight up" directly away from the ball as one is reaching impact - with the direction of pull being perpendicular to the clubhead path arc.
Why is Brian Manzella offering this idiosyncratic advice - when most golfers simply want to continue to swing their arms across the front of their rotating torso (in the direction of the target) during the late downswing? Why is Brian Manzella idiosyncratically emphasising a vertically-oriented "force" rather than a more horizontally-oriented "force" that could continue to move the club targetwards through the impact zone?
I suspect that Brian Manzella (and Mike Jacobs) derived this "idiosyncratic idea" from a misinterpretation of Steve Nesbit's hub path research paper [7]. In that paper, Steve Nesbit was exploring the idea of there being a strong causal relationship between the normal forces (that automatically/naturally occur during phase 3 of the downswing) and a shortening of the hub radius that can occur (to a variable degree) in the last phase of the downswing - by studying the swings of 4 amateur golfers. As I previously demonstrated, there is no proven singular causal relationship between any shortening of the hub radius in phase 3 of the downswing and the total magnitude of the normal forces that are naturally operant during that time period - because one also has to factor in the effect of other biomechanical/mechanical factors that affect clubhead velocity in one's calculations. Brian Manzella seemingly believes that one must induce a shortening of the hub radius in phase 3 of the downswing by "jumping up" and "pulling the grip end of the club upwards with all one's might" in order to generate a normal force, and I believe that's not true. So, let's explore this relationship between the "normal forces" and the hub radius further by first explaining what is meant by the term "normal forces", and then secondarily explain how "normal forces" become operant during phase 3 of the downswing.
I will be referring to a research paper written by K Miura [15] to explain the phenomenon of normal forces and how they operate during a golf swing.
Miura was interested in learning to what degree an inward pulling of the club, and the shortening of the hub radius, near impact could increase clubhead speed at impact. He started off by simulating the golf swing of a skilled golfer using a computer program model - Working Model software - in order to first create a double-link swing model that could closely simulate the golf swing of a skilled golfer. He then modified the model by adding a pull actuator device that could pull the grip end of the club vertically upwards as it neared impact, so that he could determine what effect it would have on the normal forces and clubhead velocity at impact.
Let's first start off with his double-link model - without the pull actuator.
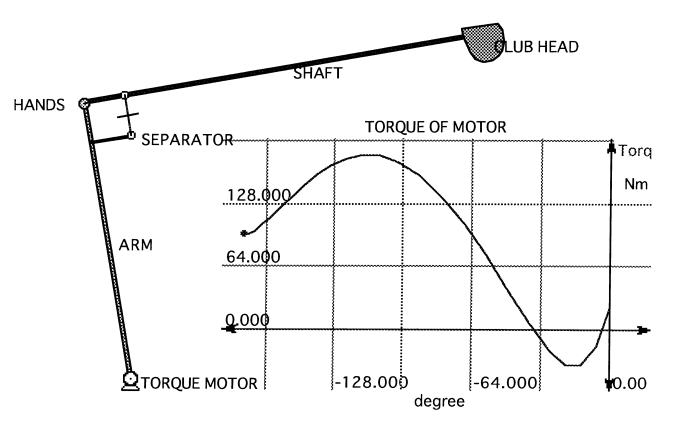
Torque motor system of his double-link model - capture image from reference number [15]
As you can see, the torque motor can apply a torque to rotate the arm (equivalent to the left arm in a golfer) and the club is attached to the peripheral end of the arm via a passive joint (equivalent to a passive left wrist joint in a golfer). Miura determined the torque values needed and the timing/duration of application of the torque in order to accurately simulate the golf swing of a skilled golfer.He then discussed the forces involved in the swing action in terms of tangential force and normal force.
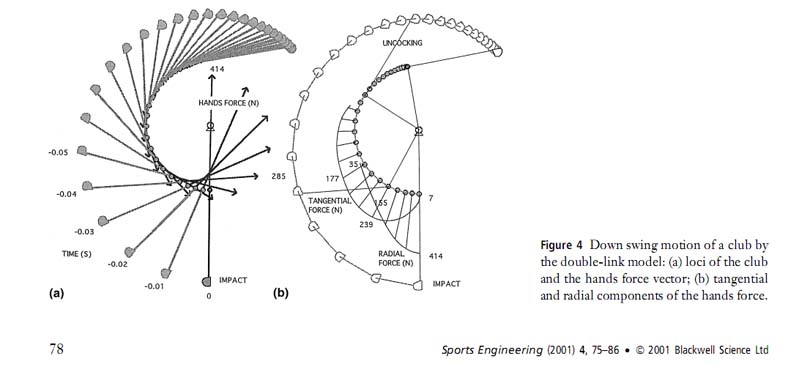
Downswing motion of the club by the double-link model - capture image from reference number [15]
It is important to note that the hub path radius (hand arc path radius) is constant in this double-link model swing action, and there is no deliberate attempt to shorten the hub radius near-impact by pulling up on the grip end of the club during phase 3 of the downswing (as recommended by Brian Manzella for his BM-release action). Note that it is not possible to apply a positive wrist torque in this model (as recommended by Brian Manzella for phase 2 of the downswing). This model is conceptually similar to Sasho MacKenzie's lead arm-only swing action (except that there is no release of PA#3 in this model because it operates on a single swingplane).Note that there is very little tangential force or normal force operant during phase 1 of the downswing because hand speed is slow during this time period with no significant acceleration of hand motion, and there is also no release of the club. Note that the tangential force becomes operant when the golfer increases his hand speed during phase 2 of the downswing and it is due to the accelerated hand motion. Note that the tangential force peaks at 239Nm and that happens at roughly the P6.5 position. After that time period, the tangential force slowly drops to zero by impact as the hands do not continue to accelerate after bypassing the P6.5 position and there is zero forward acceleration of the hands at impact. The tangential force "drives" the grip end of the club forward in the direction of the hand arc path and passively induces the club release phenomenon via a CF-release action (where Vclubhead = Vhands + Vrelease). Note that normal forces become operant when the club starts to release. Initially, the magnitude of the normal force is 35Nm and it increases to a maximum of 414Nm at impact (presuming that impact occurs at low point when the central arm and clubshaft are in a straight-line relationship). Note that Miura has drawn the "force" arrows in the same direction that the butt end of the club is pointing - and as the club releases those arrows become directed more vertically because the butt end of the club points more vertically. The last 5 arrows in the sequence-of-arrows represent the direction and magnitude of the normal (radial) force. What does the normal (radial) force represent? It simply represents the radial force that must be directed centripetally to counteract the centrifugal loading force that the club acquires when it releases. If a golfer wasn't supplying that normal force, then he couldn't keep his hands moving along the hand arc path and he couldn't control the club. The magnitude of the centrifugal loading force at every instantaneous moment of phase 3 of the downswing is dependent on three factors -i) the mass of the clubhead; ii) the instantaneous clubhead velocity and iii) the instantaneous angle of the clubshaft relative to the hub path. The magnitude of the normal force must become maximum at impact (when it is directed straight up - and is vertically-directed) because clubhead velocity is maximum at impact and the clubshaft is straight-in-line with the vertically-oriented left arm thereby exerting its maximum centrifugal loading force (away from the center). At impact, the golfer may experience a centrifugal pull of 100lbs if the clubhead speed is ~100mph, and it is patently obvious that the golfer must be supplying a normal force to counteract this centrifugal-loading pull if he is controlling the club's motion. However, and most importantly, a golfer doesn't have to consciously/deliberately pull the grip end of the club upwards (inwards) in a manner that will shorten the hub radius in order to supply that normal force. In fact, a golfer doesn't even have to be conscious of the existence of this normal force (which operates according to the laws of physics). Any skilled golfer who is swinging a golf club through the impact zone (from the P6 position to the P8 position) in an optimised manner, and who is generating a constant hub path radius, must be experiencing, and exerting, this normal force - even if he is not consciously aware of the presence of this normal force. Taken a logical step further, a skilled golfer does not have to alter his swing mechanics/biomechanics in any way if he suddenly becomes intellectually aware that this normal force is naturally operant in his swing action. He doesn't have to "jump up", or try to "pull the grip off the club with all his might", and he doesn't have to lose his forward bend and "stand-up" through impact in order to generate this normal force (which is due to a natural physical law that operates according to the laws of physics). As long as a golfer is generating a hand arc path that is circular in shape, then he must be generating normal forces in order to keep his hands moving along that circular hand arc path when the centrifugally-released club produces a centrifugal loading force that the golfer must continuously control - because a circular hand arc path of constant radius still has a finite radius (even if the radius is not shortening during phase 3 of the downswing due to a "pulling-up" action).
Consider again the magnitude of the normal force that a golfer will be exerting at impact if he generates a downswing where the hub path radius remains constant and where it has a finite radius of value "r".
The magnitude of the normal force at impact can be calculated from that equation - where Mclub = mass of the clubhead; Vclub = clubhead velocity; and r = finite radius of the hub path.All golfers who produce a circular hand arc path are producing a calculable normal force during the club-releasing phase of their downswing (phase 3 of the downswing) - even if their hub path radius doesn't shorten during phase 3 of the downswing.
Consider the downswing action of a superb golfer - Ben Hogan.
Ben Hogan's swing video - http://www.youtube.com/watch?v=QL_6M_xZvq0
Watch how Ben Hogan swings his arms/club through the downswing and followthrough - it's a continuous fluid motion directed towards the target. In his famous golf instructional book [16], Ben Hogan likened the "feel" of his hands moving through the impact zone as being equivalent to the "feel" of performing a two-handed basketball pass from the right side towards a target on the left side. He felt that his hands were like clamps on either side of the ball (equivalent to the grip end of a golf club) and he was simply thinking of swinging his "hands-holding-the-ball" across the front of his rotating torso while focusing his mind on the target. He never thought of "jumping up" or "pulling up on the grip with all his might" in phase 3 of his downswing action.
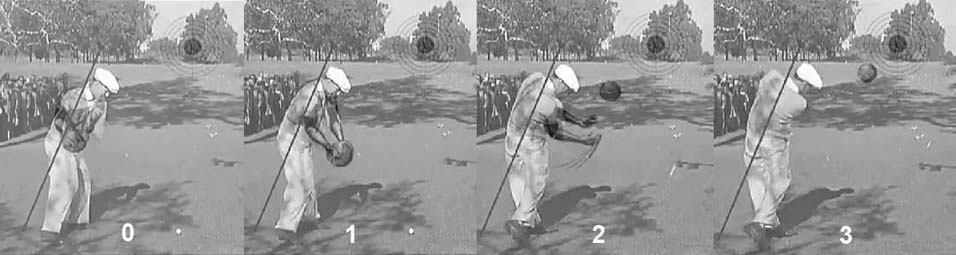
Here is a wonderful swing video where the originator superimposed Ben Hogan's two-handed basketball throw imagery onto an old film-based video of Ben Hogan's swing.
http://www.youtube.com/watch?v=4RpArp8XIbw
Here are capture images from that swing video.
Ben Hogan's phase 3 downswing and followthrough action - capture images from the swing video
Ben Hogan is simply thinking of moving his two hands through the late downswing and followthrough - as if he were throwing a basketball towards the target. He is not making any conscious effort to "jump up" or "pull up on the grip end of the club" in phase 3 of his downswing action, and he is maintaining his spine inclination bend throughout his late downswing and through impact.Here is a close-up DTLview of Ben Hogan's late downswing action - and one can clearly see that he is maintaining his spine bend inclination throughout the entire downswing.
Ben Hogan swing video - http://www.youtube.com/watch?v=LJdChWnxDvU
Here are capture images from that swing video.
Ben Hogan swinging through impact - capture images from his swing video
Note how Ben Hogan is maintaining his spine bend inclination and he is not "jumping up" and "losing all of his forward bend" (as Brian Manzella recommends) - in fact, there is no biomechanical reason that he should have to "stand up" in order to ensure that the naturally-occurring "normal forces" are operant during phase 3 of the downswing.Consider the downswing action of another superb PGA tour golfer - David Toms.
David Toms swing video - http://www.youtube.com/watch?v=gb88dI4huDo
David Toms' phase 3 downswing action - capture images from his swing video
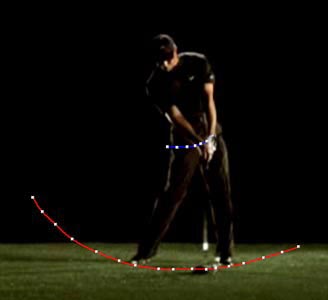
Note that there is no evidence that David Toms is "jumping up" in his late downswing - note that he still has some flex in his left knee at impact (like Ben Hogan) and he doesn't excessively straighten his left leg (like Lexi Thompson). Note that his hands reach the nadir of his hand arc path when his hands are opposite his right thigh (image 2), and that there is very little elevation of his hands during the remainder of phase 3 of his downswing - because he is not excessively lifting his left shoulder socket upwards (like Lexi Thompson).Consider an image of David Toms' hand arc path (plotted in red with a multispline tool).
David Toms' hand arc path - capture image from his swing video
Note that there is no evidence of any shortening of his hub path radius during the last part of phase 3 of his downswing as he nears impact. However, David Toms is obviously still applying the necessary amount of "normal forces" that must naturally be operant in phase 3 of his downswing action - otherwise he wouldn't be maintaining such perfect control of his centrifugally-released club and hub path during phase 3 of his downswing.Finally, here are DTL capture images from his swing video.
David Toms maintaining his spine bend inclination angle - capture images from his swing video
Like Ben Hogan, David Toms is maintaining his spine bend inclination angle during phase 3 of his downswing and he is not losing his forward bend (as Brian Manzella recommends).Now, although there are many professional golfers who do not significantly shorten their hub path radius in phase 3 of the downswing, the question remains - what would happen if one deliberately shortened the hub radius by pulling upwards on the grip end of the club as one nears impact.
So, let's go back to Miura's research project.
Miura modified his double-link model by adding a linear actuator that he situated above the torque motor, which then becomes a movable pivot (rather than a fixed pivot) if the linear actuator actively pulls the torque motor upwards during the late downswing. When he activates the linear actuator during phase 3 of the downswing it pulls up on the torque motor, which in turn pulls the grip end of the club upwards to exactly the same degree (as the central arm has a fixed length).
Here are the results of his research study.
Modified double-link model with pull motion - capture image from reference number [15]
The graph on the left shows that he activates his linear pull actuator (in order to pull the club upwards) in the latter part of phase 3 of the downswing, and the slope of the graph shows the rate of acceleration of the pulling-up action of the linear actuator.Note that the normal force arrows are increased in magnitude as a result of this added pulling-up action, which will shorten the hub radius near impact.
The graph on the right shows that he can get an extra 5% of clubhead speed using this maneuver. So, why is the increase in maximum clubhead velocity not greater than ~5%? The answer is related to the fact that the clubhead has already released due to a CF-release action, and it is therefore difficult to get the club to release faster if the pulling up action is superimposed on an already-released club that has already gained 80-90% of its maximum clubhead velocity by the time the pulling-up action is instituted. Think of the situation of "cracking a whip" where the whip-cracker abruptly pulls up on the whip thereby transferring energy very fast down the length of the whip. One can only get the whip to crack if the whip pulling-up action is perfected so that one releases the energy late using an abruptly performed grip pulling-up action (equivalent to a late snap release action in a golf swing). If one allows the whip to release (straighten/unravel) earlier and then tries to crack the whip, then the whip-cracking maneuver will not work - because energy has already being released into the whip. The same situation applies to golfers who use a random release pattern, which is the club release action most frequently used by professional golfers. One cannot expect to gain much more clubhead speed by abruptly pulling up on the grip end of the club in phase 3 of the downswing if one uses a sweep release action or a random release action.
This maneuver of shortening the hub radius in phase 3 of the downswing (via the biomechanical mechanism of a pulling-up action) produces parametric acceleration of the club.
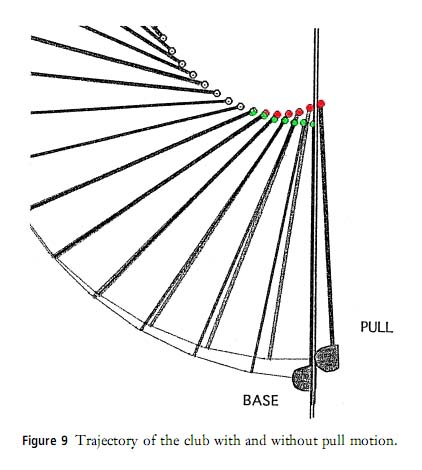
Here is a diagram showing parametric acceleration of a golf club.
Parametric acceleration of the club - color-modified image from reference number [15]
The red dots show a shortening of the hub radius due to the biomechanical maneuvers (straightening of the left leg, elevation of the left pelvis, vertical extension of the left side of the mid-upper torso +/- standing up on one's toes => elevation of the left shoulder socket) used to induce parametric acceleration of the club. Note how it pulls the clubhead arc upwards in phase 3 of the downswing.It is obvious that Lexi Thompson is using parametric acceleration in phase 3 of her downswing and thereby potentially acquiring slightly more clubhead speed. Some female golfers get their left shoulder to rise even more during phase 3 of the downswing by getting up on their toes through impact, and that maneuver can potentially produce a few more mph of added clubhead velocity at impact.
However, there is a major downside to the use of parametric acceleration - and that downside is causally related to a significant change in the clubhead arc path during phase 3 of the downswing.
Consider Tiger Woods swing at the time the famous Nike commercial was filmed.
Tiger Woods swing video - http://www.youtube.com/watch?v=meVTld5GvbM
I think that Tiger Woods had a superb swing action when that video was recorded and he did not over-flex his knees during phase 2 of his downswing and he did not then abruptly "jump-up", thereby abruptly straightening his left leg, during phase 3 of his downswing.
In recent years, Tiger Woods has shown a marked tendency to over-flex his knees during phase 2 of his downswing and then abruptly "jump-up" during phase 3 of his downswing (as Brian Manzella recommends) and he could potentially be gaining a few extra mph in his driver's clubhead speed due to the phenomenon of parametric acceleration. However, it can come at the expense of clubhead arc control and ball flight accuracy - because it is difficult to generate a consistent clubhead arc path through impact if one is "bobbing up-and-down" to a large degree during one's downswing.
Here is an example of Tiger Woods pulling his driver shot leftwards, and I think that it is causally due to his clubhead arc path moving upwards-and-inward during phase 3 of his downswing.
Tiger Woods swing video - http://www.youtube.com/watch?v=wTTKmqmIWVw
Here are capture images from that swing video.
Tiger Woods straight pull ball flight - capture image from his swing video
The blue line traces his straight pull ball flight - where the ball was pulled left of the ball-target line. What is the likely cause of that faulty ball flight pattern?
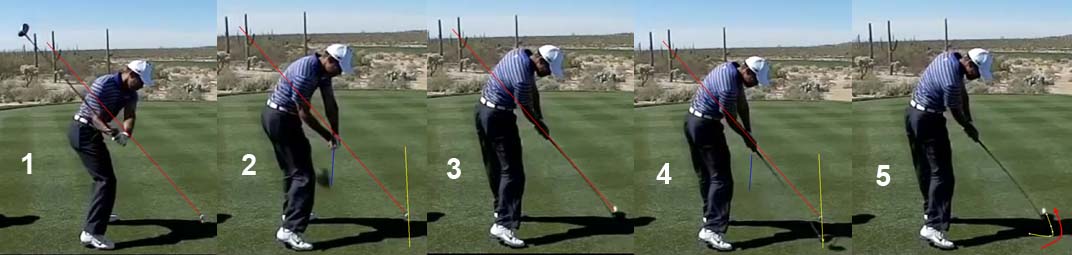
Tiger Woods downswing action - capture images from his swing video
Image 3 shows his impact position. I drew a red line through his shaft and that red line passes through his right elbow - which shows that he is on the elbow plane at impact.Image 2 shows him at the delivery position. Note that his clubshaft (straight blue line) is parallel to the ball-target line (straight yellow line) which means that he is not underplane (defining underplane as being a clubshaft that is coming too much from in-to-out).
However, note that his hands are lower-to-the-ground in image 1 and 2 - relative to his hands at impact. That is due to the fact that he has a lot of knee flex and hip bend flex in his mid downswing. Image 1 shows his exaggerated "sit-down" look where he has a lot of knee flex and hip flex. In the late downswing, he abruptly straightens his left leg and "jumps up" and that biomechanical action lifts his hands to the elbow plane by impact. Note that he is "standing-up" at impact due to the lesser amount of knee/hip flex at impact, and that his head is much higher in image 3 (relative to image 1).
Image 4 shows his clubshaft/clubhead in the late downswing - note that the clubhead is outside the ball-target line (straight yellow line).
In image 5, I have traced the clubhead arc (curved yellow line) in the pre-impact time period which shows that his clubhead moves out-to-in just before impact (curved red arrowed line represents its curved directional motion) and it produces a straight pull shot because the clubhead path/clubface orientation at impact is directed leftward. I think that it is causally due to his "jumping up" action which pulls his hands abruptly upwards just before impact, and that motion affects the clubhead arc's 3-D path in space. The clubhead arc was moving more groundwards during his mid downswing due to his exaggerated knee/hip flex action, and that caused the clubhead to temporarily move outside the ball-target line in the first half of his late downswing. Then, his clubhead is pulled more upwards as he "jumps-up" in phase 3 of his downswing (compare the height of his pelvis in image 3 to the height of his pelvis in image 1) and as he pulls his hands to a level that is further from the ground.
I much prefer to see golfers keep their upper swing center (and therefore head) relatively stable during the downswing action (like Ben Hogan and David Toms) and thereby avoid the problem of having an inconsistent clubhead arc path from swing-to-swing - due to variable degrees of "bobbing up-and-down" motion during the downswing action.
Consider Annika Sorenstam's swing action - http://www.youtube.com/watch?v=4ODdv5pmib4
Here are capture images from her swing video.
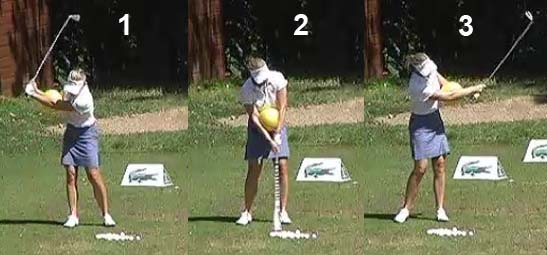
Annika Sorenstam performing a drill with a ball - capture images from her swing video
Annika Sorenstam is simply swinging to-and-fro with the ball held between her elbows, and she keeps her arms (and therefore the ball) in front of her rotating torso throughout her swing action. Note that she has zero "bobbing up-and-down" motion in her downswing action and she generates a perfectly controlled clubhead arc that allows her to just scuff the grass at low point. I think that Annika Sorenstam is a perfect role model for a developing golfer.In his "Ideas About the Release" video, Brian Manzella claims that his "jumping up" action during phase 3 of the downswing helps shallow the clubhead attack angle and prevent a too steep clubhead attack angle - by shallowing-out the clubhead arc path. However, that is happening only because the clubhead attack angle was too steep in phase 2 of his downswing action due to over-flexing the knees/hips during the early-mid downswing action.
Consider the following diagram of the clubhead path.
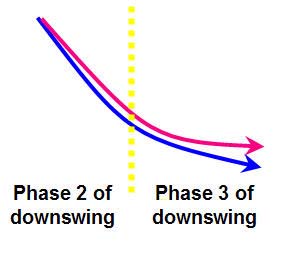
Clubhead path diagram
The blue clubhead path represents the clubhead path of a golfer who has a steep clubhead attack angle due to the fact that he flexes his knees and flexes his hips during phase 2 of the downswing action (as occurs in Tiger Woods "bobbing up-and-down" swing video). The red clubhead path shows how the clubhead path would shallow-out if the golfer "jumps up" and shortens the hub radius in phase 3 of the downswing action.However, when Tiger Woods was not "bobbing up-and-down" in his "old" swing action (as represented by his Nike commercial swing action), he could easily generate a shallow clubhead path in his driver swing action.
Here is a capture image showing his clubhead path in his Nike commercial swing action.
Tiger Woods' hand arc path and clubhead path- capture image from his Nike commercial video
The blue-colored splined path shows his hand arc path - note that the low point of his hand arc path is near his right thigh and that there is only a small degree of elevation of his hand arc path in phase 3 of his downswing.The red arc path is his clubhead path and one can clearly see that it is very shallow in the 12" prior to impact.
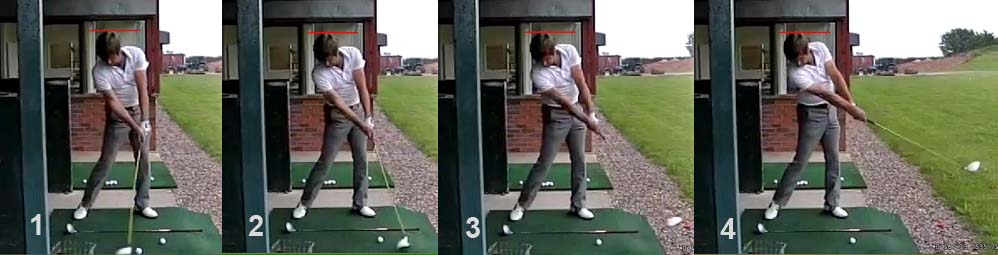
Finally, here is another example of a superb professional golfer who does not "bob up-and-down" during his downswing action, and who maintains a very stable head/upper swing center during his entire downswing - Robert Rock.
Robert Rock swing video - http://www.youtube.com/watch?v=mBobUYV-Sws
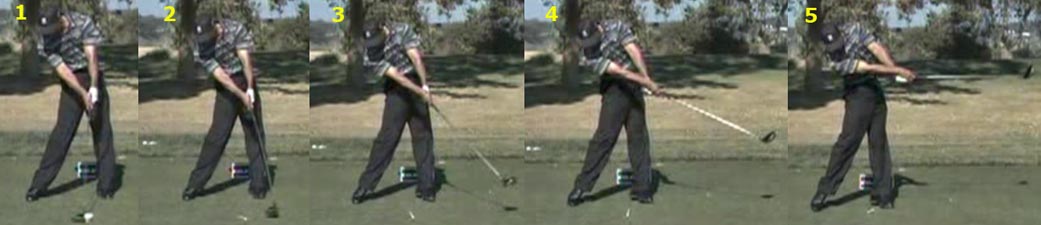
Here are capture images from his swing video
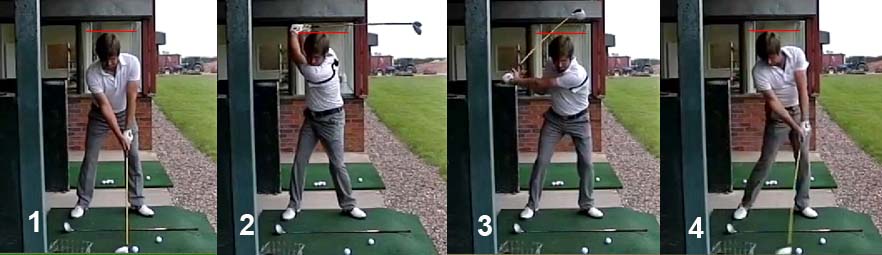
Robert Rock downswing action - capture images from his swing video
Image 1 shows him at address - I have drawn a red line just above his head to serve as reference level for his head position.Image 2 shows him at the end-backswing position - note that his head position hasn't changed.
Image 3 shows him at the end of phase 1 of his downswing - note that his head only drops about 1" because he doesn't over-flex his knees or acquire an excessive amount of forward hip flex.
Image 4 shows him at impact - note that his head went back to his reference level position. Note that he is not "jumping up" or excessively straightening his left leg - and his left shoulder socket is not abnormally high at impact (as seen in Lexi Thompson's swing).
Here is an image showing his hand arc path.
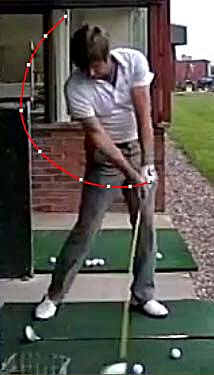
Robert Rock hand arc path - capture images from his swing video
Note that his hand arc path is very rounded and there is no shortening of his hand arc path radius in late phase 3 of his downswing.Like Annika Sorenstam, I think that Robert Rock is a perfect role model for a developing golfer.
Each individual golfer needs to independently decide to what degree he wants to employ parametric acceleration in his driver swing action. Theoretically, a golfer, who drives the ball 250 yards, could get another 15 yards of distance if he employs parametric acceleration in his swing action. However, the downside of inducing parametric acceleration by the active biomechanical process of "jumping up" and "pulling-up on the grip with all one's might" is that one can potentially generate an inconsistent clubhead arc path from swing-to-swing and decrease one's chances of generating an accurate ball flight (that occurs secondary to a perfect sweetspot strike by a squared clubface). I think that a golfer should primarily focus his mental attention during phase 2 of the downswing on the biomechanics/mechanics that are related to the efficient release of PA#4, while also simultaneously ensuring that he generates an optimum hand arc path shape that can centrifugally-release the club with maximum efficiency. During phase 3 of the downswing, I think that a golfer should primarily focus his mental attention on maintaining the forward momentum of his left arm so that he can avoid left hand stalling in the late downswing, and he should also focus his mental attention on efficiently releasing PA#3 so that he can square the clubface by impact. Now, if a golfer definitely wants to apply parametric acceleration in his late downswing action, then he could choose to use the "pulling-up" technique (recommended by Brian Manzella). However, if a golfer doesn't want to supplement his downswing action with the additional element of parametric acceleration, then I cannot understand why any golfer would believe that he must "jump-up" and "pull-up on the grip with all his might" during phase 3 of the downswing (as Brian Manzella recommends).
Phase 4 - clubface control through the immediate impact zone
This is where we get to the most important difference between Brian Manzella's release ideas and my personal release ideas - when we start to study the effect of any recommended release mechanics/biomechanics on clubhead movement and clubface control through the immediate impact zone.The immediate impact zone is the zone between the P6.9 position and the P7.1/P7.2 position.
Capture images from the famous Nike commercial video of Tiger Woods' swing
Image 1 shows the clubhead approximately 6" before impact (roughly at the P6.9 position). Note that the back of Tiger's FLW and clubface are both facing the target.Image 2 shows the clubhead approximately 6-9" after impact (roughly at the P7.1 position). Note that the back of Tiger's FLW and clubface are both facing the target.
Image 3 (the composite image) shows the immediate impact zone as the orange-colored area, and impact should occur within this zone - when the clubface is square to the clubhead arc and also square to the target.
Brian Manzella believes that a golfer should freely release the clubhead through impact, and he has a strong aversion to what he calls the TGM handle-dragging technique of dragging the club through impact (as if one were dragging a wet mop through impact).
Here is Lynn Blake demonstrating what he calls the "secret of golf" - sustaining lag - in a golf instructional video.
"Lynn Blake Explains the Secret of Golf" swing video - http://www.youtube.com/watch?v=hzG7thLPnBU
Lynn Blake believes that the "secret of golf" is the TGM concept of sustaining lag throughout the downswing and he demonstrates how one can learn to acquire the "feel of sustaining lag pressure" throughout the downswing by dragging a wet mop.
Lynn Blake dragging a wet mop - capture image from his swing video
Brian Manzella thinks that this "mop-dragging" teaching idea is ridiculous, and I basically agree with Brian Manzella's general sentiment. I think that this mop dragging idea can be very useful for learning how to chip well - where one leads with a FLW through impact, using a "hinge-and-hold" technique, in order to avoid flipping pre-impact (avoid scooping at the ball).Brian Manzella and I both agree that in a full golf swing, a swinger should release the clubhead freely and that there should be no "force-across-the shaft" (drive-loading force against the aft side of the grip end of the club) at impact. Even though I agree with Brian Manzella regarding the lack of utility of "mop dragging" teaching for a full golf swing, I disagree mightily with Brian Manzella's recommended release mechanics/biomechanics - because I believe that they cannot guarantee a stable clubface through the immediate impact zone (defining a stable clubface as a clubface that is square to the target for at least 6-12" between the P6.9 position and the P7.1/7.2 position).
Let's first start off by examining Brian Manzella's teaching philosophy regarding the release of the clubhead through impact.
Brian Manzella believes the right wrist should passively straighten through impact and that the left wrist should bend soon after impact.
Consider Brian Manzella's reasoning.
Watch these two videos produced by Brian Manzella.
Charlie Brown and the Golf Swing video - http://vimeo.com/29646505
Two Drills ... again video - http://vimeo.com/33692125
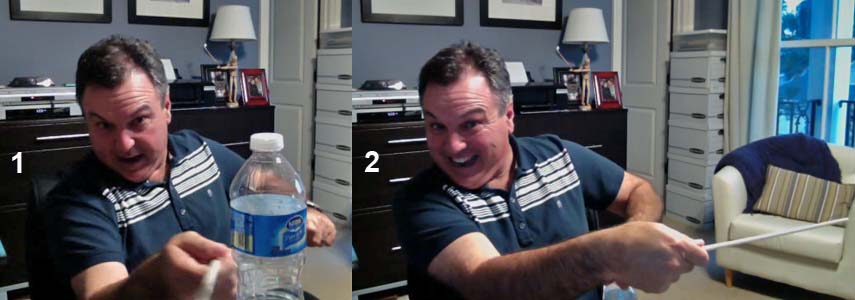
Both of those videos show the same characteristic feature of his rotation-about-the-coupling point (RACP) release action - the idea of inducing a free release of the clubhead through impact. In the first video, he uses the back of a couch chair, and in the second video he uses a plastic bottle (masquerading as a piñata- a piñata is a papier-mâché or other type of container that is decorated).
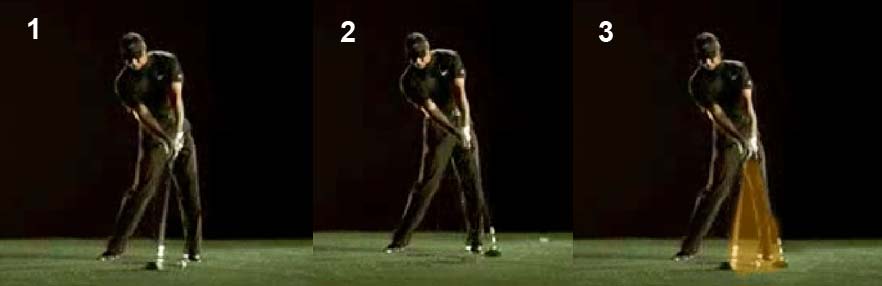
Brian Manzella demonstrating the effect of his RACP release action - capture images from his "Two Drills... again" video
In image 1, Brian Manzella asks the question - "what would happen if you gave a person a short stick and asked him to efficiently hit the bottle (actually a piñata) with maximum speed - if you abruptly removed the bottle (actually a piñata) in a Charlie Brown manner"? In image 2, Brian Manzella demonstrates the answer - the right wrist would bend forward (flatten) soon after impact. In other words, if a golfer allows the clubhead to pass through impact at maximum speed due to the free release of the clubhead, then the right wrist would straighten/flatten (palmar flex) soon after impact. In this demonstration, it may look like Brian Manzella is performing an active slap hinge release action, but he claims that he is not actively straightening his right wrist in his recommended RACP-release action - because he wants there to be no "force-across-the-shaft" at the exact moment of impact. The right wrist straightens through impact because it passively follows the forward/gained momentum of the RACP-released club, which has been freely released through impact. Note that he still has a slightly bent right wrist at impact (which will ensure a FLW) at impact, and the right wrist only fully straightens/flattens immediately after impact.
If the right wrist straightens passively through impact, what would then happen to the left wrist immediately after impact?
In the first video, Brian Manzella proposes an answer to that question.
Brian Manzella demonstrating the appearance of the left wrist after impact - capture image from his "Charlie Brown and the Golf Swing" video
Note that Brian Manzella has a bent left wrist and a straightened/flattened right wrist in this photo. In the video, Brian Manzella makes the outrageous claim that "nearly all good golfers" look like this after impact, which is not true because most professional golfers maintain a FLW until at least the P7.2 position (and often to the P7.5 position). He even has a collection of images of great golfers [17], who he claims are using the equivalent of his type of RACP-release action. The first great golfer in his collection is Harry Vardon.
Harry Vardon's hand release action - capture image from Brian Manzella's collection [17]
Note that Harry Vardon has flip-bent his left wrist soon after impact.I believe that any flip-bending of the left wrist very soon after impact can only happen if one-of-two positive forces are present in a swinger - i) a positive push-force pushing the club forward through impact due to an actively straightening right wrist; or it can be due to ii) the club's gained angular momentum derived from the club release phenomenon (release of PA#2) and where the right wrist passively straightens through impact because it simply keeps up with the released club. The first explanation represents an active slap hinge release action - which Brian Manzella doesn't recommend for his RACP-release action. So, the only rational answer is explanation number 2 - the golfer releases the club with enough forward momentum that it passes through impact with enough gained speed that its passively flip-bends the left wrist soon after impact. If you think about the situation of Brian Manzella's Charlie-Brown piñata demonstration, the likelihood of the left wrist flip-bending very soon after impact is greater if the forward momentum of the left hand between the P7 position and the P7.5 position is slowed. In other words, any slowing/stalling of the forward motion of the left wrist/hand soon after impact will increase the likelihood of the left wrist flip-bending soon after impact and it will increase the likelihood of it happening sooner (for a given amount of "forward momentum power" of the released club through impact). An additional biomechanical factor that plays a supplementary role is the degree of floppiness of the left wrist - any enhanced left wrist floppiness increases the likelhood of the left wrist-flip bending for a given amount of forward-directed momentum that the club has acquired by the time it reaches impact.
From my perspective, any flip-bending of the left wrist too soon after impact (while the clubface is still within the immediate impact zone between P7 and P7.2) means that a golfer doesn't have a stable clubface throughout the entire immediate impact zone. Kelvin Miyahira refers to flipping soon after impact as a pro-flipper release action [18]. I believe that Brian Manzella's RACP release action (or any equivalent "throwing the clubhead at the ball" release action) predisposes to pro-flipping, which means that obtaining a square clubface at impact requires perfect timing of the pro-flipping action. If the wrist flipping action is perfectly timed so that the clubface is square to the target at impact, then the ball will still go straight - because it doesn't matter if the clubface becomes closed to the clubhead arc after impact due to a left wrist flip-bending phenomenon. However, if the left wrist flip-bending phenomenon occurs too soon and it occurs pre-impact, or during the impact interval, then the clubface will not be square to the target at impact. I do not believe that it is easy to perfectly time a pro-flipping release action consistently from swing-to-swing, and that is why I reject it as a viable hand release option for serious golfers who want to develop a sound golf swing based on sound biomechanical principles. I believe that one should eliminate any horizontal left wrist hinging motion through the immediate impact zone by maintaining a FLW during that entire time period. Playing with an intact LAFW/FLW throughout the entire downswing and followthrough completely eliminates this problem, and I think that it represents the optimum biomechanical/mechanical solution.
Consider a golfer who maintains an intact LAFW/FLW throughout his entire downswing and followthrough swing action.
Sasho MacKenzie's lead arm-only swing action - http://www.youtube.com/watch?v=GgF_9IfROAU
Here are capture images from that swing video.
Sasho's followthrough swing action - capture images from his swing video
Because Sasho MacKenzie is a lefty, one has to view his followthrough swing action sequence from right-to-left.Image 1 shows him at the P7.4 position, image 2 shows him at the P7.8 position, and image 3 shows him at the P8+ position. Note that he has maintained an intact RAFW/FlatLeadWrist and the club has not passed his lead arm from a rotational perspective. Note that there is no horizontal motion (flip-bending) of his lead wrist in the post-impact zone. I think that this is the optimal way for a swinger to perform a golf swing that will allow one to consistently maintain a stable clubface (clubface that is square to the target) throughout the immediate impact zone (between P6.9 - P7.2) and I would encourage all golfers to adopt this intact LAFW/FLW swing technique.
It is important to realise that it doesn't require some special "negative torque" to maintain a FLW throughout one's entire downswing/followthrough swing action - other than an ability to maintain a reasonably firm left wrist (to the same degree that it would be required by a back-handed tennis player who strokes the ball). One doesn't have to perform "some" special biomechanical action to firm-up the left wrist for impact - one simply has to maintain a reasonably firm FLW as one swings one's left arm (in a stroke-like manner) through the impact zone. It is much easier to accomplish that goal if one has a intact LAFW/FLW throughout one's entire backswing, downswing and followthrough swing action. A key requirement for maintaining an intact LAFW/FLW through the immediate impact zone (and preferably to the P7.5 position) - like Sasho MacKenzie - is the physical requirement that a golfer must ensure that he maintains the forward speed of the left arm/FLW, and he must avoid any stalling of the forward motion of the left arm/FLW through impact. I believe that Brian Manzella's recommended release mechanics actually predisposes to stalling of the forward motion of the left arm/FLW at impact - because Brian Manzella encourages golfers to "go normal" at impact and he doesn't encourage golfers to maintain the forward speed of their left arm through impact. A golfer who follows Brian Manzella's recommendations for phase 3 of the downswing ("jumping up" and "pulling up on the grip with all his might" and losing one's forward bend and "standing up") is more likely to stall the forward motion of the left arm/FLW through impact. I believe that one must actively maintain the forward motion of the left arm/FLW beyond impact - but not in a "handle dragging" manner that is focused on the issue of lag, but rather in a biomechanically natural manner that simply ensures that one continues to swing the left arm/FLW actively forward beyond impact.
Consider again Ben Hogan's "two-handed basketball pass" analogy.
Hogan's hand motion through the impact zone - capture images from a swing video
Note that Hogan is actively moving his hands in a targetwards-direction in image 2. On page 98 of his soft-edition book [16], Hogan stated-: "As in the old two-hand basketball pass, the left arm and hand lead the right arm and hand. Be sure you hit through with the left as hard as with the right. On page 100 of his soft-edition book [17], Hogan stated-: "The great value, as I see it, of thinking in terms of this two-hand action is that it keeps the left hand driving all the time".I agree with Hogan - one must keep the left hand driving targetwards between impact (P7 position) and the P7.5 position in order to ensure that one maintains an intact LAFW/FLW throughout this time period, which will therefore also ensure that one has a stable clubface throughout the entire immediate impact zone (between P6.9-P7.2). The technique of maintaining an intact LAFW/FLW well beyond impact is not a handle-dragging action - it is simply the biomechanical action of maintaining the forward momentum of the left arm/FLW beyond impact (like a tennis player performing a back-handed tennis stroke action).
Consider Roger Federer's back-handed tennis stroke action - http://www.youtube.com/watch?v=zZ2zmsPIMXI
Here are capture images from one of his back-handed tennis stroke actions.
Roger Federer performing a back-handed tennis stroke action - capture images from his U-tube video
Look at image 5 - note that he has maintained a FLW and note that there is no wrist flicking/flipping motion through the impact zone. He is not handle-dragging! He is simply swinging his arm through the impact zone while avoiding any wrist flicking/flipping action in the immediate post-impact zone. He is releasing his tennis racquet freely through impact - but he is doing it with an arm motion, and not a wrist-flicking motion. Swinging his arm through impact, while avoiding any superimposed/additional wrist motion in a horizontal plane, is simply a more optimum way of guaranteeing a square racquet face through impact. In other words, Roger Federer is simply maintaining an intact RAFW/FRW well beyond impact in his back-handed tennis stroke action in order to guarantee a square clubface during the racquet's travel-time through the immediate impact zone.Professional tennis players use the same principle of avoiding horizontal wrist flicking/flipping motions through impact when performing a forehand tennis stroke action.
Here is a slow motion video of Rafael Nadel performing a forehand tennis stroke action - http://www.youtube.com/watch?v=IsMb6xNiQbU
Here are capture images from the video.
Rafael Nadal performing a forehand tennis stroke action - capture images from his swing video
Image 1 demonstrates that he bends his left wrist backwards in order to acquire lag during his backstroke action.Image 2 shows that he loses that lag by impact and he has a FLW at impact.
Image 3 shows that he maintains his FLW, and he never allows the racquet to flip passed his left arm, in the followthrough.
Here is a superb PGA tour golfer - David Toms - who is also efficiently maintaining an intact LAFW/FLW through impact to the P7.5 followthrough position.
David Toms swing video - http://www.youtube.com/watch?v=gb88dI4huDo
Here are capture images from that video.
David Toms' followthrough action - capture images from his swing video
Note that David Toms has maintained an intact LAFW (his clubhead has not passed his left arm from a rotational perspective) and a FLW all the way to the P7.5 position (image 4).Note that David Tom's clubface still faces the target when it is about 6-12" after impact (image 2) and that is because his FLW is still facing the target and he still has an intact LAFW (clubshaft is still straight-in-line with his left arm). In fact, his clubface is still (amazingly) facing the target in image 3 - which is well beyond impact, and his FLW is still directed targetwards. I believe that David Toms can maintain an intact LAFW/FLW to the P7.5 position due to the fact that he is maintaining sufficient forward motion of his left arm/FLW to prevent the possibility of any left wrist bending/flipping after impact. It may "appear" as if David Toms is employing a handle-dragging technique through impact - because he is maintaining a FLW and bent right wrist well beyond impact. However, I think that any such claim would be a misinterpretation of David Toms' swing technique, which is more likely based on swinging with an *intact LAFW/FLW through the impact zone. Handle-dragging golfers are primarily focused on maintaining lag in the pre-impact phase of the downswing, while golfers who swing with an intact LAFW/FLW (like David Toms) are primarily focused on maintaining a stable clubface through the immediate impact zone, and that is best achieved if a golfer maintains an intact LAFW/FLW post-impact to well beyond the P7.2 position (which is the end-limit of the immediate impact zone).
(* to learn much more about the topic of "swinging with an intact LAFW/FLW" - see reference number [19])
Golfers may note that David Toms is maintaining a bent right wrist to the P7.5 position (which is well beyond the end-limit of the immediate impact zone) and incorrectly conclude that he is drive-loading the shaft through impact. I believe that it is highly unlikely that David Toms is drive-loading the shaft through impact - as occurs in TGM hitters and swing-hitters. I think that David Toms is a swinger and I strongly suspect that he he is not applying "force-across-the-shaft" at impact. I think that he can maintain a bent right arm and a bent right wrist wrist all the way to the P7.5 postion because he has such an efficient post-impact pivot motion that he ensures that he never "runs-out-of-right arm - note how actively his torso opens to the target post-impact and note how actively he drives his right shoulder downplane under his chin. Note that David Toms is using a no-roll hand release action (angled hinging action) in his followthrough - note that his clubface is angled ~45 degree relative to the ground, and perpendicular to the inclined plane, in image 4. I think that golfers (who are swingers who choose to use a no-roll hand release action) should optimally continue to pivot actively after impact - if they want to perform a no-roll hand release action as efficiently as David Toms. Golfers, who cannot pivot very actively through the impact zone, may alternatively choose to use a full-roll hand release action through the impact zone. If a golfer chooses to use a full-roll hand release action, then he should still use an intact LAFW/FLW swing action in order to guarantee a stable clubface through the impact zone, and to avoid any pro-flipping action after impact.
Consider a golfer who uses a full-roll hand release action for his driver swing - Tiger Woods.
Tiger Woods followthrough action - capture images from a swing video
Note that Tiger Woods is using a full-roll hand release action - see images 4 and 5. Note how Tiger Woods allows his right wrist to passively straighten through impact - as Brian Manzella recommends for his BM-release action. However, note that Tiger Woods maintains an intact LAFW/FLW to beyond the end of the immediate impact zone - image 2 & 3 - and note that the back of his FLW and clubface are still both facing the target in image 2. Note that Tiger Woods only starts to institute his full-roll hand release action (horizontal hinging action) in image 3, which is well after the end of the immediate impact zone (which ends at the P7.2 position). That's a critical point - a golfer who uses a full-roll hand release action must learn how to create a *no-roll transitional zone between the roll-motion of the pre-impact release swivel action (PA#3 release action) and the roll-motion of the post-impact full-roll hand release action (HH action) in order to ensure that he has a stable clubface clubface (clubface that is square to the target) throughout the entire immediate impact zone (from P6.9 to P7.2).(* see my Hand Release Actions Through the Impact Zone review paper for further details on the topic of a "no-roll transitional zone")
A sceptic may suspect that Tiger Woods has a bent left wrist - rather than a FLW - in image 4 (where the back of the left wrist/hand is hidden from the camera). However, one can clearly see that Tiger Woods maintains a FLW during his full-roll hand release action by viewing his swing action from either a birds-eye or upline viewing perspective.
Consider an upline video of Tiger Woods driver swing - http://www.youtube.com/watch?v=yoTuzAM132Q
Here are capture images of his followthrough action.
Tiger Woods followthrough action - capture images from his swing video
One can clearly see that Tiger Woods maintains a FLW during the entire duration of his full-roll hand release action which ends at the end of the followthrough (P7.5 position) - image 3 - and that his FLW rotates counterclockwise. Note that his FLW remains roughly perpendicular to the ground (and not perpendicular to the inclined plane) during its counterclockwise rolling motion, and that represents a horizontal hinging action (HH action).Note that his clubhead doesn't pass his left arm (from a rotational perspective) during the execution of his full-roll hand release action, which means that he is maintaining an intact LAFW from impact (P7 position) to the end of the followthrough (P7.5 position).
In order to maintain an intact LAFW/FLW throughout the followthrough (to the P7.5+ position) while performing a full-roll hand release action, a golfer must maintain the forward momentum of the left arm/FLW, so that he can avoid a pro-flipping problem (which is inherent to the BM-release action). Brian Manzella talks about the concept of "replacing the left arm" with the right arm after impact - which is his mental descriptive image of the scenario where the clubshaft becomes straight-in-line with the straightened right arm while the left wrist bends back (as demonstrated by Brian Manzella in a previously posted photo). Note that Tiger Woods gets his clubshaft to become straight-in-line with his straightened right arm in image 5 - but he doesn't have to bend his left wrist (as Brian Manzella demonstrates in the previously posted photo) in order to achieve that goal. It is only possible because Tiger Woods has perfected his full-roll hand release action by maintaining an intact LAFW/FLW throughout his followthrough action - which requires that one actively maintain the forward momentum of the straight left arm well beyond impact.
Consider another superb PGA tour golfer who uses a full-roll hand release action - Robert Rock.
Robert Rock swing video - http://www.youtube.com/watch?v=mBobUYV-Sws
Robert Rock followthrough action - capture images from his swing video
Note that Robert Rock is maintaining an intact LAFW/FLW to the end of his followthrough, which ends at the P7.5 position - image 3.Note that Robert Rock maintains a stable clubface (clubface that is square to the target) throughout the clubhead's travel-time through the immediate impact zone - image 2 - and that is only possible because he creates a no-roll transitional zone between the end of his release swivel action (which ends at impact - image 1) and the start of his full-roll hand release action (which starts in image 3). As I have repeatedly re-emphasised - creating this no-roll transitional zone requires that a golfer maintain the forward momentum of the left arm/FLW so that he can maintain an intact LAFW/FLW to the P7.5 position, and thereby avoid any post-impact flipping phenomenon from happening in the immediate impact zone.
Some golfers may suspect that maintaining an intact LAFW/FLW beyond impact (to the P7.5 position) will impede a golfer's ability to generate maximum clubhead speed at impact. I know of no scientific evidence to support that belief. If a golfer could obtain greater clubhead speed at impact by superimposing a horizontal wrist flicking motion on their hand release action through the impact zone, then you would expect that long-drive competitors, who are trying to win a long-drive competition by driving the ball >400 yards, would routinely use that pro-flipping release technique. However, they usually don't use a pro-flipping action and they maintain a FLW throughout the immediate impact zone, and often to the end of the followthrough (P7.5 position).
Consider Jamie Sadlowski's followthrough action.
Jamie Sadlowski swing video - http://www.youtube.com/watch?v=ep-qidwgCII
Here are capture images from his swing video.
Jamie Sadlowski's followthrough - capture images from his swing video
Note that the clubshaft has not bypassed Jamie Sadlowski's left forearm in image 1 and 2 and 3, and that his left wrist only bends back after it bypasses the end of the immediate impact zone (image 4). Jamie Sadlowski is maintaining an intact LAFW and FLW throughout the immediate impact zone (between impact and the P7.2 position).Here is a swing video of the 16 year-old Domenic Mazza hitting a 404 yards drive as he achieved second place in the 2010 ReMax World Long-Drive competition.
http://www.youtube.com/watch?v=3YXbH8eJQhQ
Here is a slow motion video of Domenic Mazza tuning-up for the 2011 World championship.
http://www.youtube.com/watch?v=8kOsio_JeIo
Here are capture images from that swing video.
Domenic Mazza's followthrough action - capture images from his swing video
Image 1 shows Domenic Mazza approaching impact. Note that the proximal clubshaft is nearly straight-in-line with his left arm.Image 2 shows that Domenic Mazza keeps his clubface facing the target throughout the entire immediate impact zone, and there is no flip-bending of his left wrist immediately after impact. Note that he still has a FLW and an intact LAFW (clubshaft has not bypassed his left arm) - despite a straightened right wrist. It is a fallacy to believe that any passive right wrist straightening action must flip-bend the left wrist soon after impact - and it will not happen if the golfer is actively moving the FLW/grip end of the club targetwards at a fast enough speed.
Image 3 shows Domenic Mazza at the end of his followthrough (~P7.5 position). Note that his right wrist has fully straightened - but he is not flip-bending his left wrist, which is starting to rotate counterclockwise due to the delayed onset of his full-roll hand release action. His proximal clubshaft has still not bypassed his left arm, and he therefore still has an intact LAFW.
If long-drive competitors, like Domenic Mazza, avoid flip-bending the left wrist soon after impact in a pro-flipping manner, then why should any rational amateur/professional golfer seriously consider using an unreliable pro-flipping clubhead release technique, which is less likely to ensure a stable clubface through the immediate impact zone!
Jeffrey Mann.
February 2012.
References:
1. Brian Manzella's golf forum - http://www.brianmanzella.com/golfing-discussions
2. The Golfing Machine. Homer Kelley.
3. Brian Manzella AntiSummit conferences - videos available for purchase.AntiSummit I - http://www.brianmanzella.com/shop
AntiSummit II - http://www.brianmanzella.com/golfing-discussions/16615-anti-summit-ii-video-now-sale-4-minute-trailer-now-up.html
4. Mike Jacobs golf website - http://www.xgolfschool.com
5. Mike Jacob's U-tube videos on the topic of the release.Impact and Low Point show - http://www.youtube.com/watch?v=mfDasDW1RbM
Golf Show Part 2 Impact Low Point - http://www.youtube.com/watch?v=4mKYXd9erAM
6. Brian Manzella's "Ideas About The Release" swing video - http://www.brianmanzella.com/shop
7. Kinematic analysis of the golf swing hub path and its role in golfer/club kinetic transfers. Steven Nesbit and Ryan McGinnis.Available as a pdf file at http://www.jssm.org/vol8/n2/11/v8n2-11pdf.pdf
8. "Where the ideas come from" swing video. Brian Manzella.
9. The Physics of a Simple Golfing Machine. November 27th 2005. Aaron A. Zick.
10. How to Build a Classic Golf Swing. Ernie Els.
11.Sasho MacKenzie's website and research papers.Website - http://people.stfx.ca/smackenz
Research papers - http://people.stfx.ca/smackenz/publications.html
12. MacKenzie, S. J. and Sprigings, E. J. (2009). A three-dimensional forward dynamics model of the golf swing. Sports Engineering, 11, 165-175.
13. A Three Dimensional Kinematic and Kinetic Study of the Golf Swing. Steven Nesbit.
Journal of Sports Science and Medicine (2005) 4, 499-519.
Available at http://jsportscimed.org/vol4/n4/17/v4n4-17pdf.pdf
14. Golf Swing Physics. The Double Pendulum Swing. Rod White.http://www.tutelman.com/golf/swing/golfSwingPhysics2.php#doublependulum
15. Parametric Acceleration - The Effect of Inward Pull of the Golf Club at Impact Stage. K Miura.Sports Engineering (May 2001) 4: 75-86.
Abstract available at http://onlinelibrary.wiley.com/doi/10.1046/j.1460-2687.2001.00071.x/abstract
16. Ben Hogan's Five Lessons - The Modern Fundamentals of Golf. Ben Hogan.
17. "Rotation About the Coupling Point" video collection. Brian Manzella.
18. Kelvin Miyahira's "PGA Tour Release Styles" article.Available at http://kelvinmiyahira.com/articles/56-2010-09-pga-tour-release-styles
19. Video lessons by the author on playing golf with an intact LAFW.
a. The Virtues of a Left Arm Flying Wedge.Video interview-presentation by the author hosted by Ralph Perez of the Gotham Golf Blog - http://www.youtube.com/watch?v=96quJ-BkfgI
b. Maintaining a flat left wrist post-impact.
Author video presentation - http://www.ustream.tv/recorded/10830713