Backswing
Click on any of the hyperlinks to rapidly navigate to another section of the review: Homepage (index); overview; grip; address setup; downswing; impact; followthrough-to-finish
Introduction:
I have decided to completely rewrite/revise this chapter on the "backswing" to better reflect my latest golf instructional insights.
When I started my website in February 2007, I wrote a number of chapters on different phases of the modern day, total body golf swing (traditional/conventional golf swing). My golf instructional opinions were primarily derived from the teaching of traditional golf instructors such as David Leadbetter, Jim McLean, and the "Swing Like A Pro" authors. During the past few years, my knowledge of golf swing mechanics/biomechanics has increased exponentially and I harbor a whole series of new insights, that contradict my previously expressed opinions. I have expressed my "new" insights in many new review papers, but I was reluctant to make major revisions to my basic chapters, because the required work-effort is so labor-intensive. I occasionally added short addendums to my original backswing chapter, which alerted readers to the fact that I have changed my recommended approach, but that advice forced readers to read a number of different review papers to learn about my "new" insights regarding the backswing action. In this *major revision of my backswing chapter, I have expressed all of my "new" insights using a totally different descriptive approach.
(* Readers, who are interested in reading my original backswing chapter, can access my original backswing chapter by clicking on the hyperlink)
In my original backswing chapter paper, I mainly focused on describing the different positions a golfer must pass through when using an one-piece takeaway, and I also focused my attention on recommendations that would allow a golfer to avoid an OTT move (and out-to-in downswing clubhead path). Another section of my original backswing chapter dealt with backswing factors that could increase swing power - based on Jim McLean's X-factor theory. I presently do not believe in the validity of the X-factor theory, and I will describe a totally different conceptual approach to thinking about the backswing action.
What is the purpose of the backswing action?
From a conceptual perspective, a golfer first needs to understand what's the primary purpose of the backswing action. I believe that the primary purpose of the backswing is to load the power accumulators, which are going to be used to power the swing during the downswing (when the loaded power accumulators are fully released in order to power the golf swing). The concept of "power accumulators" was first described by Homer Kelley in his book [1], and I have described the power accumulator concept in great detail in my How to Power the Golf Swing review paper.
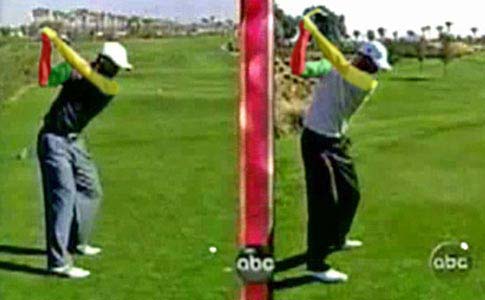
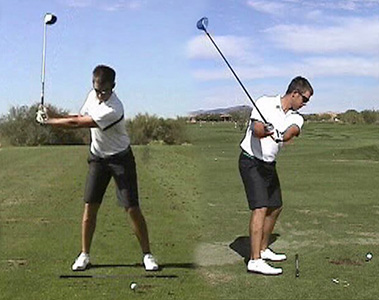
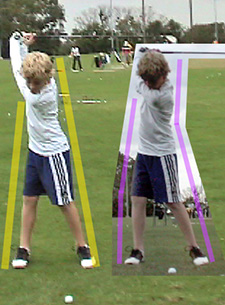
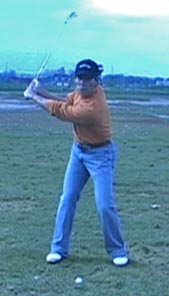
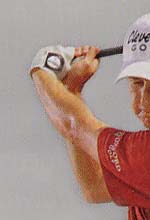
The following photograph demonstrates two golfers with their power accumulators fully loaded at their end-backswing position.
Tiger Woods and Adam Scott at the end-backswing position - capture images from a swing video
Note that the left arm is loaded across the upper chest wall, and that represents the loading of power accumulator #4.Note that the clubshaft is at a 90 degree angle to the left arm and that represents the loading of power accumulator #2.
The release of power accumulators #4 and #2 provide most of the swing power in a left arm swinger's action, which is the swing style used by the majority of traditional golfers.
The combination of the left arm and the clubshaft (which is in a straight-line-planar relationship with the left arm) is called the left arm flying wedge (colored in yellow).
The combination of the bent-back (dorsiflexed) right wrist and the right forearm is called the right forearm flying wedge (colored in red). Note that the right forearm flying wedge supports the left arm flying wedge - like the wing strut of a small Cessna airplane supporting the wing.
The green colored area is the right upper arm and it connects the right forearm flying wedge to the torso at the right shoulder socket joint. The combination of the left arm flying wedge, the right forearm flying wedge and the right upper arm/right shoulder represents the power package assembly, and a golfer needs to learn how to optimally assemble the power package during the backswing - and I will describe the different methods of achieving that goal in the next section of this chapter.
In the traditional/conventional golf swing, a golfer powers the release of PA#4 (release of the left arm) via a downswing pivot action. To perform the pivot action with maximum efficiency/fluidity, a golfer needs to perform a backswing pivot action in an optimal way, so that his torso acquires an optimal alignment/orientation at the end of the backswing. I will describe the alternative methods of performing a backswing pivot action in a separate section of this chapter.
Assembling the power package assembly during the backswing:
In this section, I will describe two alternative methods of executing a backswing action that will allow the power package assembly to be correctly assembled by the end of the backswing.
The two methods are the one-piece takeway and the right forearm takeaway. The one-piece takeaway is the traditional method that has been taught during the past 50+years and I will describe the process in great detail. I personally much prefer the right forearm takeaway, because it more easily allows a golfer to keep the clubshaft "on-plane" during the backswing and it also allows the left arm flying wedge to remain intact during the backswing action. I will describe the right forearm takeaway after I have described the one-piece takeaway.
One-piece takeaway
The takeaway is the first part of the backswing that starts at the address position, and it ends when the club is parallel to the ground, and the hands are at about mid/upper thigh level (8 o'clock position of the left arm). The major body movements that occur during the takeaway is the rotation and lifting of the arms while the shoulders start to rotate around the spinal axis. There is very little wrist movement during the takeaway, and only a very small amount of body shift.This is a photo of Aaron Baddeley's end-takeaway position. You can readily see that the back of his left hand is nearly parallel to the ball-target line, which means that the hands must have rotated nearly 90 degrees (partly due to shoulder rotation around the spine, and partly due to internal rotation of the left humers + a small degree of left forearm pronation). You can see that the clubshaft is no longer in line with the left arm, which means the left wrist must have cocked up and the right wrist hinged back to a very small degree (see the glossary of wrists movements to understand the difference between the terms "cocking" and "hinging").
Aaron Baddeley takeaway - from reference number [2]
It is stunning to realise how many errors can occur during the takeaway. For example, a beginner golfer may move his arms too far from the body, or keep them too close to the body. Or, the beginner golfer may move his arms along a too-inside path or a too-outside path. Or the beginner golfer may lift the arms while tilting, rather than rotating, the shoulders. A beginner golfer may also excessively rotate his left hand clockwise and thereby move the clubshaft too far inside during the takeaway, instead of keeping the hands in a neutral position during the takeaway. All these problems, in various combinations, can ruin the backswing, because if a beginner golfer gets into the incorrect position at the end of the takeaway, then it is extremely difficult to recover from that incorrect position during the rest of the backswing.
How should one start the takeaway to avoid these problems?
The traditional method of executing the takeaway is called the one-piece takeaway.
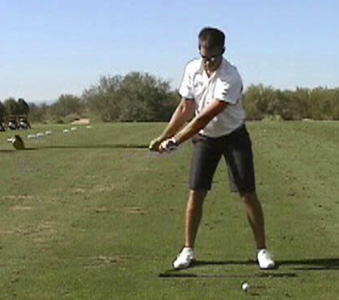
The following photo will demonstrate what's meant by the term one-piece takeaway.
Takeaway triangle - from reference number [2]
The takeaway triangle consists of the two arms and the shoulders. During the one-piece takeaway, one must move the two arms and the left shoulder at the same speed so that the dimensions of the red triangle remain essentially unchanged. That explains the term "one-piece". One should think of the shoulder rotation, and movement of the two arms, as the movement of a SINGLE structural unit, which will move as an unitary structure in space. The one-piece takeaway starts with the simultaneous movement of the two arms and left shoulder (which moves downwards and backwards away from the target). One should not start the takeaway with the arms alone, or the shoulders alone. They must move synchronously together. Some beginner golfers start the takeaway with an independent wrist/hand movement, and that is a major error when performing an one-piece takeaway. The wrists and hands should be relatively passive during the early takeaway, and a golfer should imagine his wrists/hands being encased in a loose plaster cast, so that there is very little independent wrist/hand movements during the initial takeaway.
Another way of thinking of the one piece takeaway is to think of taking the entire club away as a single unit, so that the butt end of the club and the clubhead move away at the same approximate speed. A golfer should avoid having the clubhead end of the club moving much faster than the grip end - due to excessive independent wrist motions occurring during the takeaway.
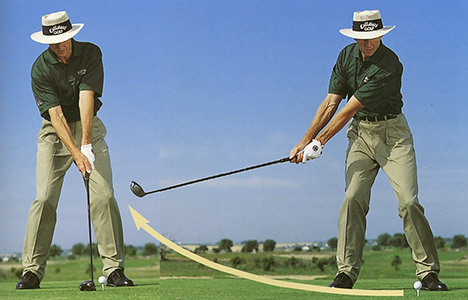
Another important feature of an one-piece takeaway is the fact that the clubhead remains low to the ground during the first 12" of travel. Why does this happen naturally in an one-piece takeaway action?
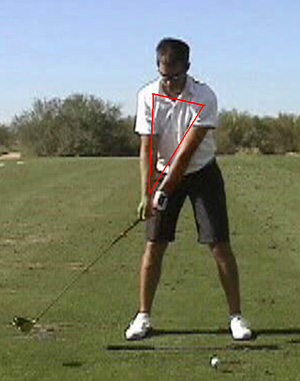
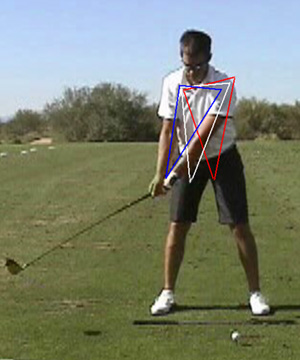
Consider the following photo of the takeaway triangle as it evolves sequentially in time.
Takeaway triangles - from reference number [2]
The red triangle represents the address position. Notice that the left upper apex of the triangle is higher than the right upper apex of the triangle - due to the small degree of spinal tilt to the right that should exist at address. The white triangle represents the one piece takeaway after the clubhead has moved approximately 12" in space. Notice that the upper left hand corner of the triangle has moved down and to the right (due to the rotation of the left shoulder down-and-to-the-right, as it rotates around the spinal axis) and that the top of the triangle is roughly parallel to the ground. Notice that the bottom apex point of the white triangle is even closer to the ground than the bottom apex point of the red triangle. That means that the clubhead should remain very close to the ground during its first 12" of backswing travel. If the clubhead is high off the ground at this point in the takeaway, it either indicates that the golfer has flexed the arms (instead of keeping them straight), and/or cocked-up the left wrist, and/or tilted the upper torso to the left (called a reverse pivot move). The blue triangle represents Aaron Baddeley's present position, and one can see that the clubhead has climbed up to a position approximately 8" from the ground by this time-point.In the following photo from his golf instructional book [3], David Leadbetter advises a golfer to keep the clubhead low to the ground during the takeaway in order to create width in the backswing.
Low takeaway - from reference number [3]
Note three points. First of all, note that Leadbetter's two arms are still straight, and that he has kept the takeaway triangle intact. Secondly, note that his right upper arm is no longer closely applied to his upper torso (as it normally is at address) and that there is small degree of seperation between the right upper arm and the upper torso. Thirdly, note that the distance between the butt end of the club and the belt buckle at this point in time is slightly greater than the butt end-belt buckle distance that existed at address (left photo). That is a normal phenomenon in the takeaway and it indicates that one should gradually move the butt end of the club a few inches further away from the body during the takeaway move. This widening movement is a very gradual move that helps to widen the backswing arc during the takeaway, and a golfer needs to avoid a too-narrow, body-hugging backswing arc - note that the right elbow has moved away fom the body and that it doesn't tightly hug the right side of the body. Some developing golfers incorrectly keep the right elbow too tightly close to the torso during the one-piece takeaway, and they should allow the right upper arm to seperate slightly from the torso during the takeaway.
The amount that the right arm moves away from the right side of the upper torso is limited/controlled by the left arm. The straight left arm acts as a checkrein that limits how far the hands can move away from the body during the takeaway - one cannot stretch the left arm straighter than "straight".
In this photo of Leadbetter, it would appear that there is no lateral shift of the hips or thighs during the takeaway. However, that is not always true, and a small amount of right lateral shift of the thighs may often occur during the takeaway, which indicates that the golfer is starting to shift his weight to the right side.
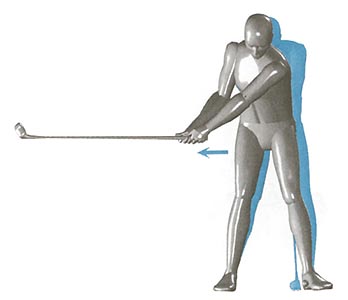
In the following photo, the SLAP authors recommend that a small amount of shift of the thighs to the right should occur during the early backswing (blue image is the body at address).
Shift of the thighs and hips during the early backswing - from reference number [4]
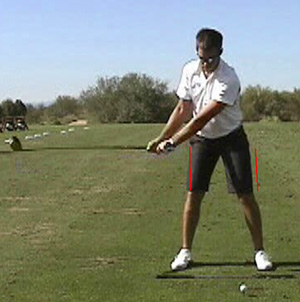
The amount of shift varies considerably between different players, and you can see that Aaron Baddeley has very little shift in the following photo (red lines represent the outer thigh positions at address) while other golfers have a thigh-shift of 1-2".
Body shift to the right in the early backswing - from reference number [2]
In the modern, total golf swing, a golfer tries to avoid any swaying of the right thigh to the right by "fixing" the slightly flexed right knee in position during the takeaway (maintaining the same degree of right knee flex unchanged during the takeaway).From the above photo, you can see that the clubshaft is parallel to the ground. However, how far back around the body (towards the tush line) has the clubshaft moved? The answer to that question requires that one see a down-the-line view of the end-takeaway position.
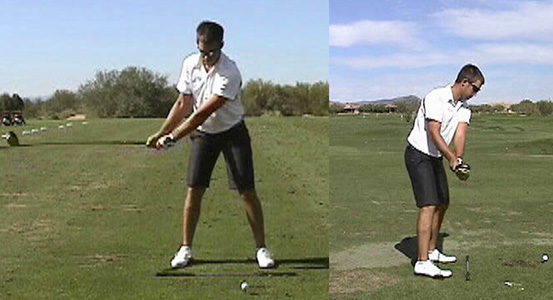
Consider this down-the-line view of the end-takeaway position.
End-takeaway position - from reference number [2]
First of all, and most importantly, note that the clubshaft is not only parallel to the ground at the end of the takeaway - it is also parallel to the ball-target line and directly over the toe line. That's a very desirable end-takeaway position.Note that the clubhead's toe is pointing up, and that the clubface is nearly parallel to the ball-target line. That indicates that the clubface has rolled open to a very small degree (relative to the clubhead arc) during the takeaway. For that mechanical phenomenon to happen, the left forearm must have pronated a small amount during the takeaway - and pronation is due to a clockwise rotation of the left forearm's radius bone around the longitudinal axis of the left forearm's ulna bone. This biomechanical action of left forearm pronation represents the takeaway swivel action and that swivel action will eventually allow the back of the left wrist/hand to become parallel to the inclined plane by the mid-backswing.
Most importantly, note (on the face-on view) that the right forearm is higher than the left forearm. If any part of the right forearm is visible below the left forearm at this point in the backswing, then it suggests that the left forearm was allowed to over-pronate during the takeaway. If the left forearm over-rotates during the takeaway, it will cause the clubhead to move too far inside and the clubshaft will be angled too far inwards by the end of the takeaway.
Note that Aaron Baddeley's hands are outside his right foot, and in line with his toes. In the address position, the hands were a few inches in front of the toe-line. So, did he pull his hands inwards during the takeaway to get to this position? The answer is "no". The hands get to this marginally inside position (relative to their position at address) as a result of the shoulder rotation. Note that the left shoulder has moved down towards the ball-target line, while the right shoulder has moved back (towards the tush-line). That small degree of rotation of the shoulders around the bent-over spine causes the hands to move slightly inwards. There should be no deliberate attempt to move the hands inwards during the initial takeaway by keeping the left arm glued to the chest wall. That will cause the hands to move too far inside during the takeaway, and the hands will end up behind the toe line by the end-takeaway position. The key thought, in the takeaway, is to rotate the shoulders (turn the shoulders perpendicularly around the spine) while simultaneously thinking of moving the back of the right hand straight back (away from the target). A golfer should imagine that there is a baseball catcher standing directly behind him, and he should think that he is trying to place the clubhead in the catcher's mitt - by simultaneously i) rotating, and not tilting, the shoulders and ii) moving the hands straight back. Of course, the hands do not actually move straight back, because of the rotation of the shoulders around the bent-over spine, and the hands should slightly inside and "correctly" end up over the toe-line by the end of the takeaway.
Also, note that the left upper arm is still lightly connected to the pectoral area of the left chest wall without being over-tightly connected to the chest wall. If the left arm is tightly connected to the chest wall during the takeaway move so that the chest and left arm move as a single unit, then this will cause the left arm to move inwards too much and the hands could end up behind the toe-line, and be closer to the tush-line, at the end of the takeaway. That inside hand position is not desirable, and should be avoided. Likewise, if the left upper arm completely loses its connection to the chest wall (and one can see "air" between the left upper arm and the chest wall), then it means that the arms have moved away from the rotating upper torso, and the left arm-body seperation will cause the hands to end up outside the toe-line and closer to the ball-target line (by the time the left arm reaches the 8 o'clock position). That outside hand position is also undesirable, and should be avoided.
The three-quarter (9 o'clock) backswing position
If a golfer has successfully passed through the correct end-takeaway position, then the next important backswing position that must be correctly achieved is demonstrated in the following photo.
Three quarter (9 o'clock) backswing position - from reference number [1]
I have arbitrarily labelled this face-on backswing position - where the left arm is parallel to the ground - the three quarter backswing position. If one thinks of the left arm movement as starting at the 6:30 o'clock position at address, then this left arm position is at 9 o'clock. The final left arm position, at the end of the backswing, is usually at approximately 11 o'clock in a flexible golfer, so one can estimate that the left arm has travelled about three quarter of its way to its final end-backswing position.
Starting with the face-on view, note that the clubshaft is at right angles to the left arm. This cocking-up of the left wrist during the mid-portion of the backswing is often referred to as "setting the wrists". Setting of the wrists usually begins when the hands reach the right trouser pocket in the takeaway, and many golf instructors (such as David Leadbetter) believe that it is advantageous to complete the "setting of the wrists" by the time the left arm has reached the horizontal position in the backswing (9 o'clock position), although other golf instructors favor a delayed setting of the wrists. At the three quarter position, when the clubshaft is fully set in a vertically upright position, it will feel "light" in the hands. For the club to be angled at 90 degrees to the left arm at this stage of the backswing - the left wrist has to cock upwards while the right wrist bends back (dorsiflexes) and the right elbow bends.
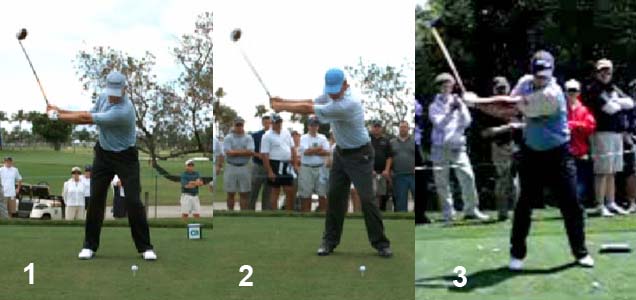
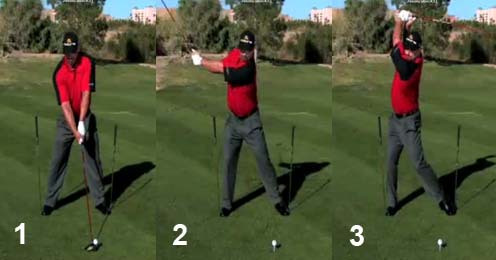
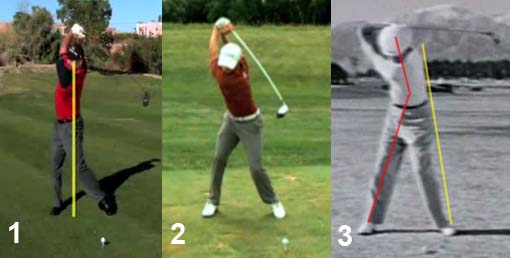
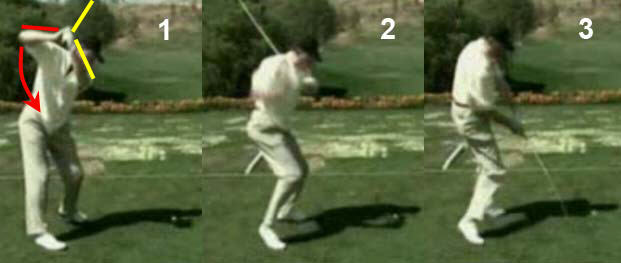
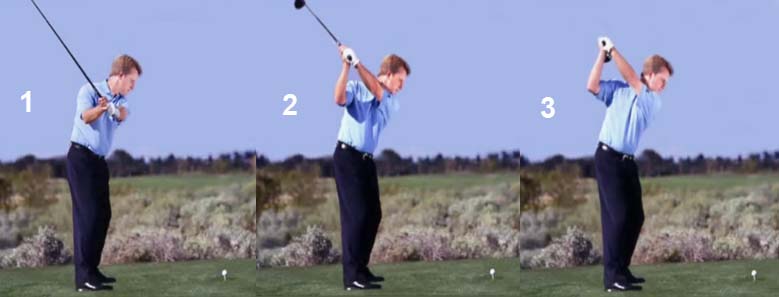
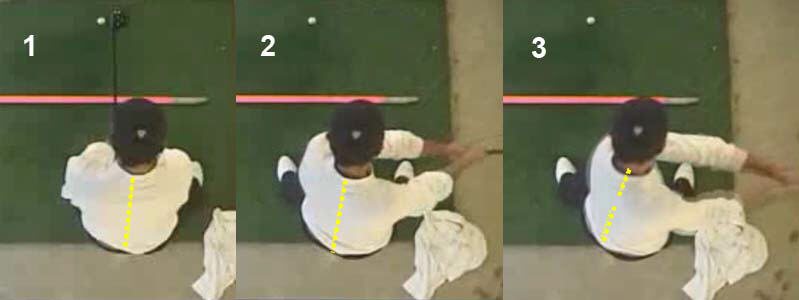
Some golfers prefer to delay the "setting of the wrists".
Delayed left wrist cock in the backswing - capture images from swing videos
Image 1 - Retief Goosen; image 2 - Lucas Glover; image 3 - Steve Stricker.There is no "fixed" rule as to when an one-piece takeaway golfer should cock-up the left wrist, and acquire a 90 degree relationship between the left arm and clubshaft, during the backswing. Most golfers acquire this 90 degree angle by the three-quarter backswing position. If a golfer has acquired a 90 degree angle between the left arm and the clubshaft by the time his left arm is parallel to the ground, then one can study the angle of the clubshaft (its inclined angle to the ground) from a down-the-line view perspective.
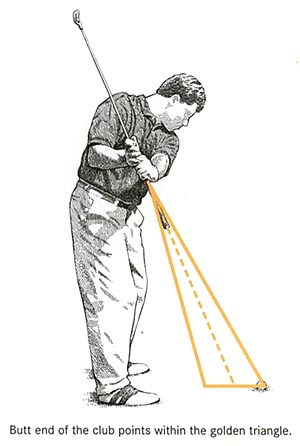
Jim McLean and David Leadbetter, two highly regarded golf instructors, both advocate getting the clubshaft "on-plane" by setting the wrists during the mid-portion of the backswing. The acceptable inner-outer limits to the corridor of success for being "on-plane" is demonstrated in the following photo.
Golden triangle - from reference number [5]
Note that the base of the golden triangle along the ground extends from the ball to a point about halfway between the toes and the ball. As long as the butt end of the club points in that zone, then it fulfills David Leadbetter's and Jim McLean's criteria of being "on-plane". If the butt end the club points beyond the ball (outside the ball-target line), then the backswing clubshaft angle is too flat. If the butt end of the club points inside the inner limit of the base of the triangle, then the backswing clubshaft angle is too steep. The corridor for a successful backswing clubshaft angle lies within the golden triangle.If a golfer has the clubshaft angle within that "golden triangle" range then it is very likely that the hands/clubshaft will reach a position near the right shoulder (at, or just below, or just above the right shoulder) by the end of the backswing. At that time-point, the left arm will lie across the shoulder turn angle (or just above, or just below the shoulder turn angle).
Consider Tiger Woods and Adam Scott at the end-backswing position.
Tiger Woods and Adam Scott at the end-backswing - capture from their swing video
Note that Tiger Woods has his left arm lying across the shoulder turn angle (angle of the line-between-the-shoulder sockets relative to the ground) while Adam Scott's left arm is marginally/negligibly steeper than his shoulder turn angle.Note that the clubshaft is lying in the same plane as the left arm (which means that the internal left arm flying wedge alignment is intact). Note that the right forearm flying wedge is roughly at a right angle to the left arm fllying wedge - supporting the left arm flying wedge like a small Cessa airplane's wing strut supports the airplane's wing.
Note that the right elbow is pointing at the ground and that the right forearm is vertical to the ground. That is not a critical alignment and it is only due to the fact that the left arm has that "particular" angle relative to the ground. If the left arm was angled at a slightly steeper angle (relative to the ground) and the right forearm flying wedge had a "correct" relationship to the left arm flying wedge, then the right elbow would point backwards.
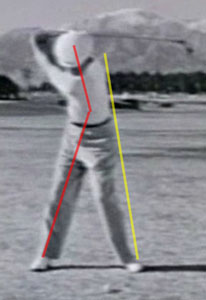
Consider an example - Jim Furyk's backswing action.
Jim Furyk's end-backswing - capture image from a swing video
Note that Jim Furyk has turned his shoulders relatively horizontally in the backswing, so that his shoulder turn angle (relative to the ground) is similar to that of Tiger Woods and Adam Scott.However, note that his left arm is lying along a much steeper angle and his hands are high above his right mid-clavicle.
Note that his right forearm flying wedge (colored in red) has the "correct" alignment relationship to the left arm flying wedge (colored in yellow). However, note that the right elbow points backwards and the right forearm is not vertical to the ground - and that is due to the fact that the left arm is angled steeper relative to the ground. As long as a golfer assembles the power package correctly so that the right forearm flying wedge has the "correct" angular alignment relative to the left arm flying wedge, then it doesn't matter where the right elbow is pointing at the end-backswing position.
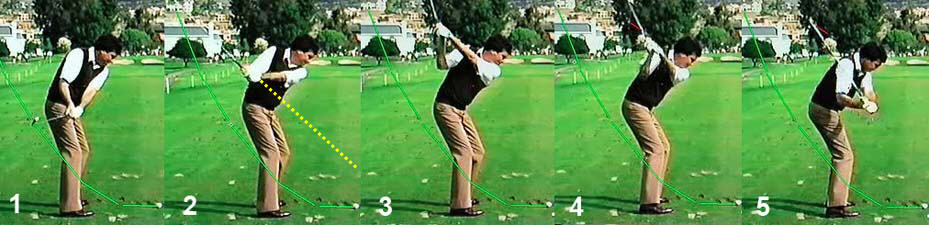
Note that Jim Furyk's left wrist is slightly arched (slightly palmar flexed) at his end-backswing position and that causes his clubshaft to not be in a straight-line relationship with the left arm - the blue dotted line shows where the clubshaft should be angled if the internal alignment relationship of the left arm flying wedge was perfectly intact (and that requires a geometrically flat left wrist). The degree of clubshaft misalignment is very small and not consequential.
What causes Jim Furyk's left arm to become so steep (relative to the shoulder turn angle) by his end-backswing position?
A beginner golfer needs to understand that the backswing action consists of multiple biomechanical movements that are independent of each other. During the backswing, a golfer is rotating his upper torso (shoulders) roughly perpendicular to his rightwards tilted spine and that causes the right shoulder to end-up slightly higher than the left shoulder by the end-backswing position. At the same time, his left/right upper arms are moving independently within their respective shoulders sockets (while the shoulder sockets are moving in space). If the left/right upper arms are elevated (lifted upwards) too much during the backswing action, then the hands will end-up in a position high above the right clavicle, instead of ending-up in a position behind, and slightly above, the right shoulder (as can be seen in the Tiger Woods and Adam Scott end-backswing photo).
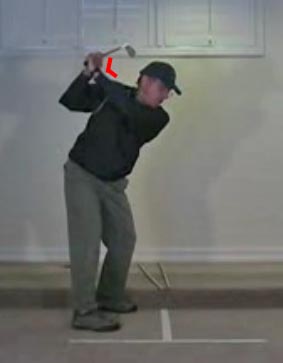
Golfers, who have a propensity to elevate their arms too much during the early-mid backswing, often also tend to lift their clubshaft along a too-steep path during the mid-backswing by cocking up their right wrist (while they excessively abduct the right upper arm). Normally, if a golfer takes the club back along a shallow plane, the right wrist should mainly bend backwards (dorsiflex) during the backswing, and there should be no/little upcocking motion of the right wrist during the early-mid backswing. Consider what would happen if the right wrist cocks upwards in the mid-backswing by viewing Ryan Moore's backswing action.
Ryan Moore swing video - http://www.youtube.com/watch?v=_m3lCmj9yrU
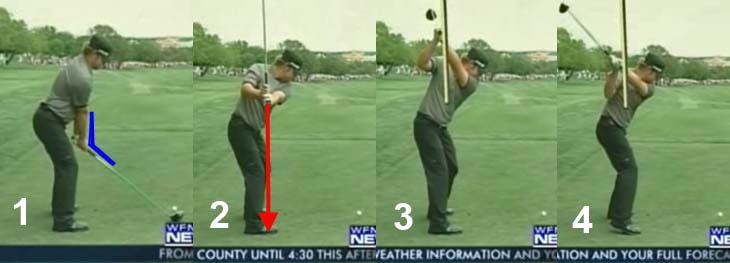
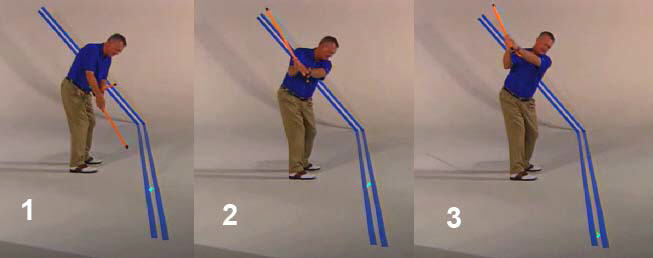
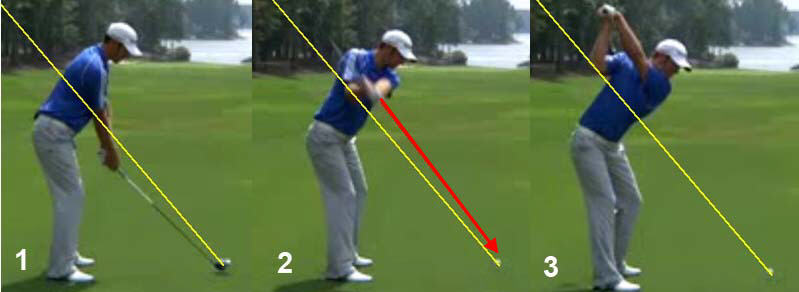
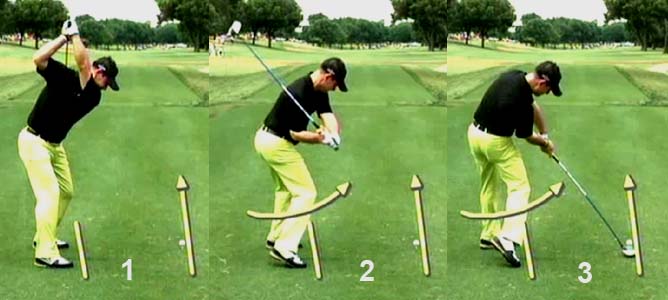
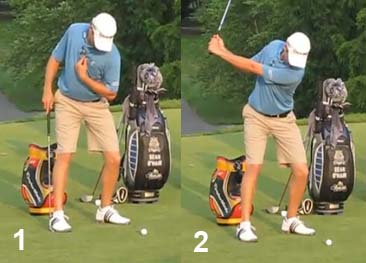
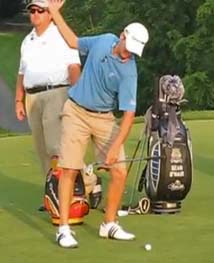
Ryan Moore backswing action - capture images from his swing video
Image 1 demonstrates that Ryan Moore has a large power accumulator #3 angle at address (angle between his straight left arm and clubshaft) - angle colored in blue.At the three-quarter backswing position (when his left arm is parallel to the ground) - image 2 - note that the butt end of his clubshaft is pointing vertically down at the ground (red arrow), and that it is much steeper than the angle recommended by Jim McLean and David Leadbetter (golden triangle concept). That is due to the fact that Ryan Moore is upcocking his right wrist while excessively abducting his right arm, and this combination causes him to finally assemble his power package at a slightly steeper angle relative to the ground - image 3. Note that his right forearm is not vertical to the ground and note that his right elbow points backwards. His left arm flying wedge is intact (left arm and clubshaft are in a straight line relationship and he has a geometrically flat left wrist) and his right forearm flying wedge has the "correct" alignment relationship relative to the left arm flying wedge.
Image 4 shows Ryan Moore's arm/clubshaft movement at the start of the early downswing. Note how he drops the entire (structurally intact) power package down towards the ground by actively adducting his right upper arm towards the right side of his right torso. At this time point of his early downsing he looks very similar to Tiger Woods' end-backswing position - where the left arm lies along the shoulder turn angle. In other words, Ryan Moore has to perform a compensatory shallowing action at the start of his downswing in order to drop his power package down into an appropriately shallower "slot". That extra compensatory move would not be necessary if he assembled his power package at a shallower angle during his backswing - where the left arm lies along the shoulder turn angle at the end-backswing.
Now, consider the opposite problem where a golfer takes the clubshaft inside too soon (with a shallower clubshaft angle) during the early-mid backswing.
Consider Bruce Lietzke's backswing action - http://www.thegolfersnation.com/tgn/online/index.php?/en/Bruce-Lietzke.html (click on the video to view Jim McLean's swing analysis).
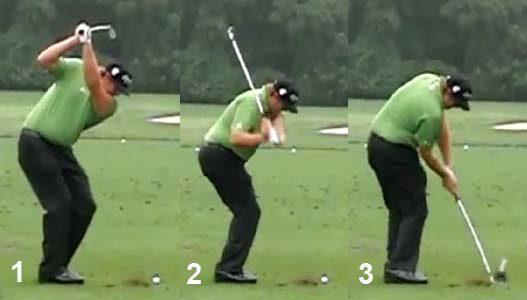
Bruce Lietzke backswing action - capture images from the Jim McLean swing video
The green curved line traces his clubhead path in the backswing.Image 1 shows Bruce Lietzke at the end-takeaway position (when the clubshaft is parallel to the ground). Note that his hands have been pulled back behind the toe line, and his clubshaft is angled backwards (instead of being parallel to the ball-target line). What causes this situation? The usual reason for this phenomenon is that a golfer is turning his shoulders and keeping his left arm glued to his upper chest wall - thereby allowing the rotation of the shoulder sockets to primarily dictate the path of movement of the hands/clubshaft during the takeaway. There is insufficient independent motion of the two arms (due to an independent movement of the humeral heads within the shoulder socket joints while the shoulders are rotating) per unit time during the takeaway that will allow the hands to avoid being pulled inwards too fast during the takeaway action.
Image 2 shows Bruce Lietzke at the three-quarter backswing position (when his left arm is parallel to the ground). Note how deep (far away from the ball-target line) his hands are at this time-point - his hands are behind his torso. Also, note that the butt end of his club is pointing at a point on the ground that is outside the ball-target line (yellow dotted line). That overly shallow clubshaft angle is a common phenomenon that frequently occurs when a golfer takes his hands too far inside in the early backswing - the left forearm often tends to over-pronate (rotate excessively clockwise) thus causing the back of the left hand to face too much skywards. At this backswing time-point, a golfer becomes "jammed" and cannot take the hands further back (away from the ball-target line) because he has already fully adducted his left arm across the front of his torso. Therefore, the golfer is forced to lift his hands up to their end-backswing position during the remainder of the backswing action - by elevating his left upper arm upwards across the front of his chest wall.
Image 3 shows how Bruce Lietzke has lifted his arms up to their end-backswing location. Note how his left arm is lying along his shoulder turn angle, and note that his power package is correctly assembled (right forearm flying wedge has the correct supportive relationship with respect to the left arm flying wedge). He looks very similar to Tiger Woods and Adam Scott (at their end-backswing position), and he seems to be in a perfect position to start his downswing. However, note what happens in his early downswing.
Image 4 shows how he pulls his hands over his right shoulder when he starts his downswing, and image 5 shows how his clubshaft descends very steeply down the TSP plane in the mid-downswing. This steep clubshaft path can predispose to an out-to-in swingpath through the impact zone. Bruce Lietzke's clubshaft path is only minimally OTT (over-the-top) and his clubhead path is only slightly out-to-in through impact. Although Jim McLean states in his swing video analysis that he would not recommend that any golf instructor "correct" this type of backswing action, I think that many beginner golfers will get into considerable trouble if they adopt this type of backswing action (which Jim McLean calls a reverse slot swing action - see my review paper called "Book Review: The Slot Swing - Jim McLean" for further details). It is very difficult to prevent the arms/clubshaft from eventually going OTT when the arms/clubshaft are taken too far inside during the takeaway, which causes the arms to get temporarily "jammed" during the mid-backswing, and the arms/club are subsequently lifted "over-the-top" (OTT) as the golfer finally transitions from the end-backswing to the start of the downswing (like a railroad construction worker wielding a sledge-hammer by throwing the sledgehammer over his right shoulder as he transitions from the backswing action to the downswing action).
The SLAP authors describe this swing pattern in their book [4].
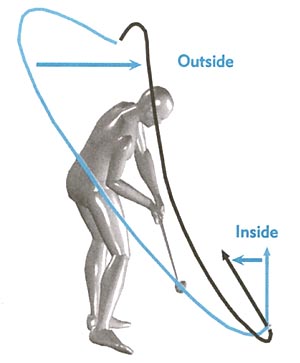
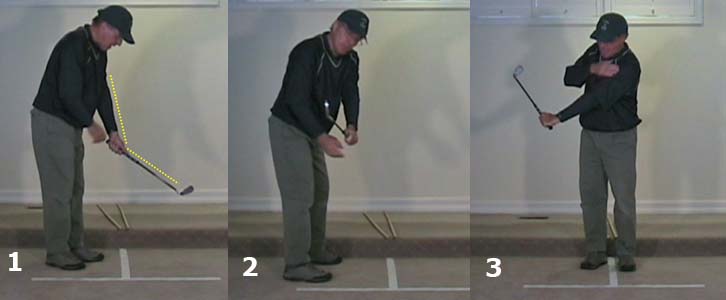
Downswing clubhead paths - from reference number [4]
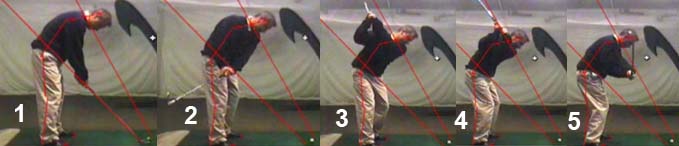
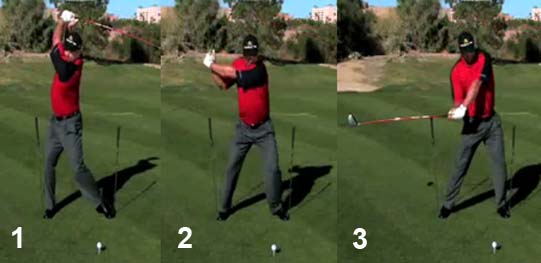
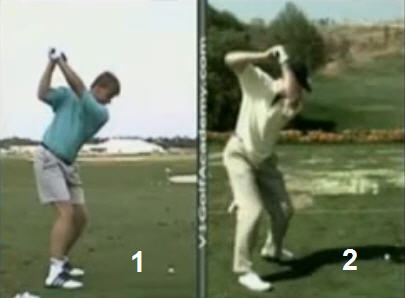
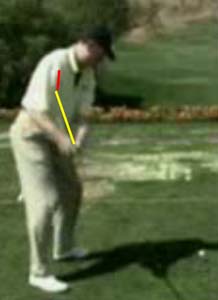
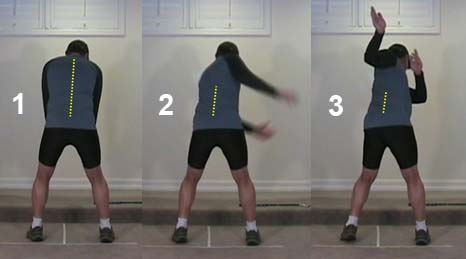
The desirable downswing clubhead path is depicted in blue. An OTT downswing clubhead path is depicted in black - where the club is thrown over the right shoulder before it descends too-steeply down towards the ball. The too-steep downswing clubhead path often causes the clubhead to move out-to-in through the impact zone (instead of in-to-square-to-in through the impact zone). As previously mentioned, a reverse slot backswing style can predispose to this OTT problem.Consider another example of a reverse slot swing backswing action, where the golfer moves his club grossly OTT at the start of the downswing.
Reverse slot backswing action - capture images from a swing video lesson [6]
Note how the golfer takes the club too-inside at the start of the backswing (image 2). He then gets "jammed" when he cannot move his hands further back (away from the ball-target line), so he is forced to lift his club up to its end-backswing position (image 3). He then starts the downswing by throwing his club over his right shoulder (image 4) - like a railroad construction worker wielding a sledgehammer). That OTT action causes his hands/club to descend too-steeply down to the ball (image 5) and that OTT action will eventually result in an out-to-in clubhead path through impact (which will produce a straight-pull ball flight if the clubface is square to the clubhead path and a pull-slice ball flight if the clubface is open to the clubhead path).The scenario of taking the club back along a too-shallow/too-inside path (like Bruce Lietzke), or along a too-steep path (like Jim Furyk and Ryan Moore) is due to the fact that different golfers have a variable amount of independent arm action (independent humeral head motion within the shoulder socket joint) occurring during the backswing, while they are simultaneously rotating their upper torso (shoulders) perpendicularly around their rightwards tilted spine. Both Jim Furyk and Bruce Lietzke turn their shoulders relatively horizontally during their backswing action, and the major difference between their backswing actions is the degree of left arm lifting and left arm adduction happening per unit time - relative to the amount of shoulder rotation (upper torso rotation) happening per unit time. To perform a backswing so that the clubshaft/clubhead path is not too-shallow or too-steep, a golfer needs to control the amount of adduction, elevation and rotation of the left upper arm that occurs within the left shoulder socket (per unit time) while he is simultaneously rotating his torso during the backswing. I think that the easiest method of learning how to accomplish this goal is to learn how to perform the right forearm takeaway, which is a biomechanically natural/easy way to perform the backswing action.
I have described the right forearm takeaway in great detail in my How to Move the Arms, Wrists and Hands in the Golf Swing review paper, and I have personally demonstrated the action in the swing video lesson that accompanies that review paper. I will only describe the general principles of the right forearm takeaway in the next section.
Right foream takeaway
Although it is perfectly acceptable to use an one-piece takeaway, I strongly prefer a right forearm takeaway. I think that it is a biomechanically natural way of moving the arms in space during the backswing, and it solves many additional problems. First of all, it allows a golfer to more easily take the clubshaft along a backswing path that is neither too steep or too shallow. Secondly, it allows a golfer to keep the clubshaft on-plane throughout the entire backswing. Thirdly, it allows a golfer to come back down the same path in the downswing - thereby simplifying the golf swing action. There is no need to loop the club over to a steeper path in the downswing (like a reverse slot swing golfer) or drop the club down to a shallower path (like a classic slot swing golfer eg. Jim Furyk and Ryan Moore). Finally, it allows a golfer to more easily keep the left arm flying wedge intact during the backswing action.
Consider a very good example of a golfer who uses a right forearm takeaway backswing action - Stuart Appleby.
http://www.youtube.com/watch?v=_jqJ9R2LypY&NR=1
When watching the video, note how his clubshaft comes down the same path in the downswing as it followed in the backswing.
Here are a series of capture images of his backswing action.
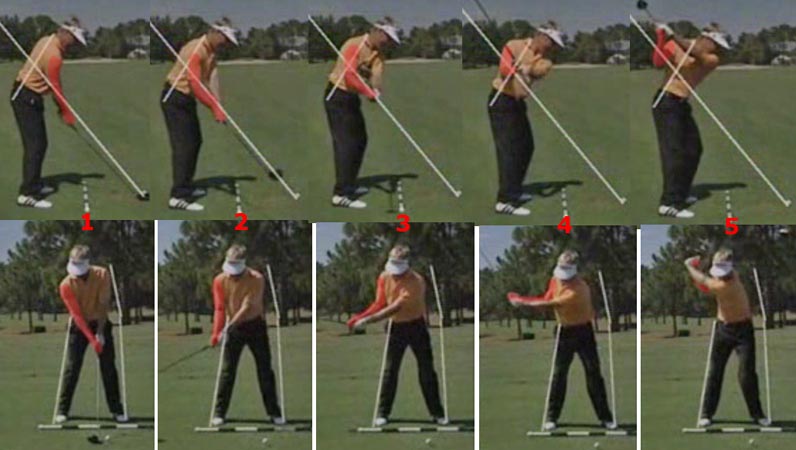
Stuart Appleby's backswing action - capture images from his swing video
Note that Stuart Appleby's golf instructor has drawn a white line that passes through Stuart Appleby's right elbow at address (image 1). That imaginary line is called the elbow plane line and it exits his body through his mid-back. Note that his clubshaft moves up that line in the takeaway (image 2) before it starts to climb more steeply in the mid-late backswing. Also, note how Stuart Appleby's right elbow stays very close to that white line (elbow plane) throughout the entire backswing. That phenomenon is a very characteristic feature of a right forearm takeaway backswing action, and a beginner golfer can use that principle as a general guide when learning how to correctly direct the movement of his right upper limb in space.To acquire a mental image of what Stuart Appleby is actually doing during his right forearm takeaway backswing action, concentrate all your attention on the movement of his right upper limb (colored in red). When he starts the takeaway, the primary right arm movement involves an external rotation of the right humerus (of the right upper arm) in the right shoulder socket joint combined with a small amount of right arm abduction. That biomechanical motion causes his right forearm to move away from the target and travel roughly parallel to the elbow plane in the early takeaway (image 2). That biomechanical motion also causes the right hand, and therefore the clubhead, to move upwards-and-inside-and backwards. Note how the clubshaft/clubhead automatically/naturally tracks up the elbow plane in the takeaway (DTL view - images 2 and 3). As the backswing continues, the right humerus continues to externally rotate in the right shoulder socket joint while his upper torso rotates perpendicularly around his rightwards-tilted spine. During this biomechanically natural torso rotation movement, the right shoulder socket becomes slightly higher than the left shoulder socket (while at address, the right shoulder socket is obviously slightly lower than the left shoulder socket due the presence of rightwards spinal tilt at address). Because the right shoulder is being elevated during the mid-late backswing torso rotation action - while the right humerus continues to externally rotate and elevate in the right shoulder socket joint - the hands and clubshaft start to climb to a higher plane (DTL view - image 4 and 5). At his end-backswing position, Stuart Appleby's hands and clubshaft are behind and slightly higher than his right shoulder, and they are both on the *turned shoulder plane (TSP).
(* see my review paper on the Swingplane for a detailed discussion of the different planes).
Note two other biomechanical actions that are happening during his backswing - with respect to his right upper limb. Note how his right elbow starts to fold as the backswing evolves and note that his right elbow folds to a roughly 90 degree bend-angle by the end of his backswing (image 5). Secondly, note that his right wrist bends back more (dorsiflexes more) as the backswing evolves and that it is maximally bent back at the end-backswing position (image 5). Note that he doesn't upcock his right wrist very much during his backswing action (like Ryan Moore).
In summary, to optimally perform a right forearm takeaway action, a golfer needs to master the synchronous motion of three major right upper limb motions (while he is simultaneously rotating his upper torso) - i) external rotation and elevation of the right humerus in the right shoulder socket joint; ii) increased folding of the right elbow until it has acquired a ~ 90 degree bend; and iii) increased right wrist dorsiflexion and iv) a small degree of right wrist upcocking in the later backswing action between P3 and P4 (which is greater in magnitude if one has a steeper left arm angle at the end-backswing position and/or if one has a greater than a 90 degree of left wrist upcocking).
It may seem biomechanically complicated to perform these three right upper limb motions in a coordinated manner, but they are very easy to coordinate if you have the "correct" mental image in your mind. Consider two mental images that can help you master these natural biomechanical motions.
Mental image number 1:
Imagine that you are at a friend's birthday party, and that you are sitting in low-backed chair with your right hand in your lap. Imagine that a friend approaches your chair from behind and offers you a glass of wine. Imagine that he holds the glass of wine just above and just behind your right shoulder. What biomechanical actions would you perform to reach for the glass of wine? Without conscious thought, you would rotate your upper torso clockwise so that you could more easily reach for the glass of wine. At the same time, you would move your right hand away from your lap and direct it towards the glass of wine. Without conscious thought, you would actually be performing the three right upper limb biomechanical actions that constitute the right forearm takeaway action - i) you would externally rotate and elevate your right humerus in your right shoulder socket joint; ii) you would increasingly bend your right elbow and iii) you would increasingly dorsiflex your right wrist. In other words, the right forearm takeaway action is a natural biomechanical action that occurs naturally/automatically and it doesn't incorporate any biomechanically unnatural/uncomfortable motions.
Mental image 2:
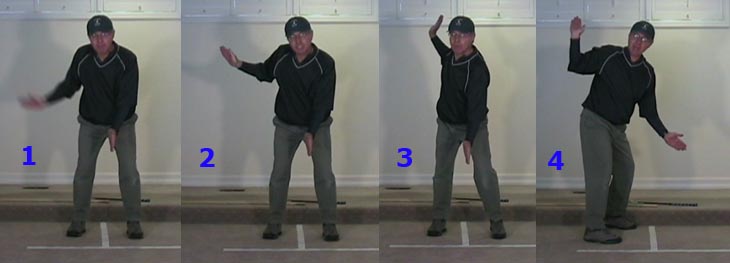
To practice the right forearm takeaway motion using a simple mental image, simply think of performing a right clap hand action. I described this natural easy-to-perform action in great detail in my How to Move the Arms. Wrists and Hands in the Golf Swing review paper, and I demonstrated the "right clap hand action" in the accompanying swing video lesson.
Author demonstrating the "right clap hand action - capture images from his swing video lesson
In the *"right clap hand" action, I am essentially moving my right hand away from my left hand and moving it to a position just behind, and just above, my right shoulder. That's the natural biomechanical action that a golfer essentially needs to perform when executing a right forearm takeaway backswing action. That 3-D motion involves the three right upper limb motions (previously described) while simultaneously rotating my upper torso naturally around my rightwards-tilted spine. One needs to blend the i) right upper limb motions with the ii) torso rotational movement so that the right hand can move in a smooth arc away from the left hand (which is on the hand plane at address) to its end-backswing position (on the TSP).
(* If you look at the photos of my "right clap hand" maneuver, you will note that the right palm is not parallel to the inclined plane, which must happen in a "real life" backswing action, and that mechanical requirement will necessitate a certain amount of right forearm supinatory motion during the execution of a RFT maneuver).
After a golfer has grossly mastered this right forearm takeaway action, then he can refine the motion by making it more precisely accurate - by using a training aid to that allows him to learn how to keep the clubshaft "on-plane" during the backswing.
I previously described David Leadbetter's concept of being "on-plane" in the section on the one-piece takeaway - and I described his golden triangle concept.
I much prefer Homer Kelleys' concept of an "on-plane" golf swing, which he descibed in his TGM book [1]. I think that it is a much more rational way of understanding the concept of being "on-plane".
Homer Kelley stated that a clubshaft is "on-plane" during the backswing, downswing or followthrough when the end of the clubshaft, that is nearest the ground, always points at the ball-target line (or more precisely the baseline of the inclined plane). The only time that this rule doesn't apply is when the clubshaft is parallel to the baseline (ball-target line if the stance is symmetrically square to the ball-target line).
There are two practical methods of learning how to keep the clubshaft on-plane during the backswing (and downswing and followthrough) - by i) using a dowel stick or by ii) using a laserlight wand device. Both methods train the right forearm/right hand to trace a straight plane line (SPL).
I demonstrated the method of keeping the clubshaft "on-plane", using a dowel stick, in my swing video lesson that accompanies my How to Move the Arms, Wrists and Hands in the Golf Swing review paper.
A more precise method of learning how to keep the clubshaft "on plane" requires the use of a commercial (or home-made) laserlight wand device.
Here is a link to a swing video of Martin Hall using a "Smartstick" - which is a commercially-available laserlight wand device.
See - http://smartstickgolf.com/why-it-works/plane
Click on the button to view the Martin Hall video.
He uses the "Smartstick", which has a laserlight at both ends of the Smartstick (which is equivalent to a golf clubshaft). Note that one of the laserlights must always be pointing at the ball-target line, or an extension of the ball-target line (which happens when the laserlight tracks up the side-wall) - except when the clubshaft is parallel to the ball-target line.
Martin Hall using a Smartstick to trace a straight plane line (ball-target line) during the backswing - capture images from his swing video
If one performs the "laserlight/flashlight drill" correctly (as demonstrated by Martin Hall), then one has to learned how to keep the clubshaft "on-plane" throughout the backswing, downswing and followthrough.
Although it is not an imperative to keep the clubshaft "on-plane" during the RFT backswing action, I think that its allows a golfer to create a clubshaft path pattern in the backswing, that can be followed back down during the downswing - as demonstrated by Martin Hall.
Once one has mastered the 3-D right upper limb motion involved in a right forearm takeaway backswing action, then one needs to learn how to "correctly" move the left upper limb during this RFT backswing action. The biomechanical advantage of a right forearm takeaway action is that it only requires that a golfer learn how to move the right upper limb "correctly" in space during the backswing, which then makes it very easy to learn how to move the left upper limb in space - because the right hand basically "directs" the left hand (and grip end of the club) to its end-backswing position. In other words, when performing a right forearm takeaway action, a golfer must distinctly "feel" that the right hand is *directing the left hand to its end-backswing position, and a golfer doesn't need to consciously think of the directional motion of the straight left arm in space. The straight left arm will naturally/automatically move along the "correct" path if a golfer simply learns how to allow his left arm to move in a biomechanically natural manner.
(* It is important to realise that a golfer, who is a swinger, powers the motion of the left arm from the address position up to its end-backswing position using a pivot motion combined with a left arm adduction/elevation motion performed by the left shoulder girdle muscles - and the right hand arm/hand doesn't power this motion via a muscle-powered "carrying action". The right arm/hand primarily "directs" the directional motion of the left arm via the biomechanical actions performed by the right arm/hand during a RFT backswing action)
What natural biomechanical motions occur with respect to the straight left arm during the right forearm takeaway backswing action?
During a RFT backswing action using a neutral left arm/neutral left hand grip, the straight left arm will have to rotate clockwise (as viewed from above) during the left arm elevation/adduction motion so that the left hand can end-up behind, and slightly above, the right shoulder at the end-backswing position (presuming that a golfer is sufficiently flexible to get the left hand that far back). At this end-backswing position, the back of the left hand will be facing the sky. The rotation of the straight left arm occurs, from a biomechanical perspective, at two biomechanical levels - i) there is a certain amount of internal rotation of the left humerus (of the left upper arm) in the left shoulder socket and ii) there is certain amount of left forearm pronation (clockwise rotation of the left forearm).
To practice the "feeling" of rotating the straight left arm in a biomechanically natural manner during the backswing, one can simply perform this natural motion without a golf club.
I have demonstrated this natural left arm movement in the swing video lesson, that accompanies my How to Move the Arms, Wrists and Hands in the Golf Swing review paper.
Swing video lesson segment number 6 - http://www.youtube.com/watch?v=c9OQevIZS38 (starting at the ~4 minute mark)
Author demonstrating the natural left arm rotation in the backswing - capture images from his swing video lesson
In image 1, I am starting off with my left arm straight-in-line with my left shoulder socket. I have stretched-out the fingers of my left hand so that the left wrist is perfectly flat (perfectly flat left wrist = Anatomically FLW). The back of the anatomically FLW is straight-in-line with the back of the left forearm.
Image 2 shows me rotating the left upper arm clockwise and simultaneously pronating the left forearm during my left arm adduction/elevation motion - while rotating the upper torso around a rightwards-tilted spine. Note that the back of the flat left wrist/hand faces the ball-target line in image 2. That's the "correct" position of the back of the left hand at the end-takeaway position (P2 position) - when the clubshaft is parallel to the ground and also parallel to the ball-target line.
Image 3 shows my left arm in the mid-backswing. The left upper arm has continued to internally rotate in the left shoulder socket joint and the left forearm has continued to pronate - while the left shoulder socket continues to move backwards (away from the target) due to the rotation of the upper torso. The back of the FLW is still straight-in-line with the back of the left forearm, and it is parallel to the inclined plane.
Image 4 shows the appearance of the left hand at the end of the backswing. The left wrist has cocked upwards, but the back of the FLW is still straight-in-line with the back of the left forearm. The left wrist should never bend (dorsiflex) during the backswing action.
Keeping the left wrist flat during the left arm's rotational movement during the backswing is essential to the left arm flying wedge concept! One must always have the "feeling" that the back of the FLW is straight-in-line with the back of the left forearm throughout the entire backswing action (starting off in the late takeaway when the bent left wrist, which is present at address when the clubshaft is perpendicular to the ball-target line, gets straightened by a right wrist dorsiflexion action). That "feeling" will allow a golfer to keep the left arm flying wedge intact throughout the backswing. The left arm flying wedge is deemed to be intact if the clubshaft is always in a straight-line planar relationship with the left forearm.
To better understand the left arm flying wedge concept, consider the following explanation.
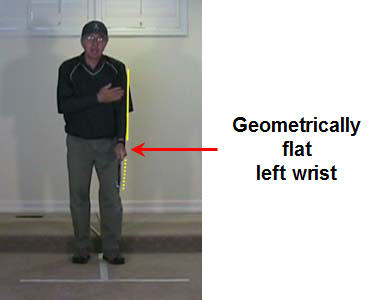
Author demonstrating the left arm flying wedge alignment
Note that the straight left arm (solid yellow line) is straight-in-line with the clubshaft (dotted yellow line) and that requires a geometrically flat left wrist (and I am increasingly referring to a GFLW as being equivalent to a "functionally-flat" left wrist in my newer review papers). A geometrically FLW differs from an anatomically FLW in an important visual sense - the visual sense that the back of the left wrist appears slightly cupped/scooped, and not perfectly flat. The back of the left hand (when the left wrist is neutral - neither dorsiflexed or palmar flexed) adopts this slightly cupped/scooped appearance when a golfer grips a rounded club grip in a fist-like neutral grip (2-knuckle grip). The degree of cupping/scooping will appear to be be slightly greater if a golfer adopts a stronger left hand grip (3-knuckle grip), and it will appear to be slightly less if a golfer adopts a weaker left hand grip (1-knuckle grip). A bent left wrist (dorsiflexed left wrist) will also make the back of the left hand appear to be cupped/scooped, but it differs from a geometrically FLW because the clubshaft will not be in a straight-line planar relationship with the left forearm. That's the critical difference! A golfer must avoid allowing the left wrist to bend at any time point during the backswing - he must maintain a geometrically FLW throughout the backswing in order to ensure that he maintains the left arm flying wedge's alignment intact. The only time that the left wrist should be bent is at address (when the clubshaft is perpendicular to the ball-target line) - before starting the takeaway action. After the takeaway starts, a golfer needs to quickly acquire a geometrically FLW and maintain it throughout the entire backswing - if he wants keep the left arm flying wedge's alignment intact during the backswing action.
The left arm flying wedge concept is better understood when viewing a golfer from a DTL view.
Author demonstrating the left arm flying wedge concept - capture images from his swing video lesson
Image 1 shows the appearance of the left arm flying wedge when the left arm is held straight-in-line with the left shoulder socket - it is equivalent to the same image as the geometrically FLW image above, but it is seen from a DTL view. In a DTL view, one cannot see that the left arm is straight-in-line with the clubshaft (because that requires a face-on view). However, one can see that there is an angle (called the accumulator #3 angle) between the left arm and the clubshaft (yellow dotted line) and that angle gives the left arm-clubshaft alignment a wedge-like appearance.During the backswing, this wedge-angle is going to decrease in magnitude (and become less obtuse) as the left wrist cocks upwards. If the left wrist cocks upwards, without bending, then the clubshaft should always remain in a straight line relationship with the left forearm, and that means that a golfer has maintained the left arm flying wedge's alignment intact.
Image 2 shows the appearance of the left arm flying wedge at the end-takeaway position (when the clubshaft is more-or-less parallel to the ball-target line). Note that it required a certain amount of internal rotation of the left upper arm and a certain amount of left forearm pronation to get the back of the geometrically FLW to become parallel to the ball-target line. Note that the clubshaft is in a straight-line planar relationship with the left forearm, and that requires a geometrically FLW (and not a bent left wrist).
Image 3 shows the geometrically FLW from a face-on view. During the mid-backswing, when the left hand moves further up the inclined plane, the left wrist should continue to be geometrically flat and the back of the geometrically FLW should be parallel to the inclined plane.
If a golfer maintains an intact left arm flying wedge alignment during the mid-backswing, then the left arm flying wedge alignment should also be "intact" at the end-backswing position.
To make all these points more clearly understandable, let's re-consider Stuart Appleby's backswing action.
Stuart Appleby's backswing action - capture images from his swing video lesson
Image 1 shows Stuart Appleby at address. Note that his clubshaft is perpendicular to the ball-target line, and not in a straight-in-line relationship with his left arm. That means that the cupping in his left wrist is partly due to a bent left wrist.Image 2 shows Stuart Appleby starting the right forearm takeaway action by moving his right forearm straight back, roughly parallel to the elbow plane line, and that causes his clubshaft to also move roughly parallel to the elbow plane line (white line). During the RFT backswing action, the clubshaft is going to become progressively more closer to being straight-in-line with the left forearm, and the bent left wrist will flatten slightly and become a geometrically FLW by the end of the takeaway (image 3).
Image 3 shows Stuart Appleby at the end-takeaway position (actually just past the end-takeaway position). Note that he has a geometrically FLW and note that his left forearm and clubshaft are now in a straight-line planar relationship. Note that the back of his left hand is parallel to the ball-target line, and that represents a 90 degree rotation of the left hand (relative to its address position). That 90 degree rotation of the left hand, and therefore the clubface, causes the toe of his clubhead to point straight-up (skywards). The 90 degree rotation of the left hand is due to a certain amount of internal rotation of the left upper arm in the left shoulder socket and due to a certain amount of left forearm pronation, and this combined biomechanical action, that rotates the left hand/clubface 90 degrees, is called the takeaway swivel action.
Image 4 shows Stuart Appleby in his mid-backswing. The back of his left hand has swivelled onto the inclined plane, and the butt end of his clubshaft is pointing at the ball-target line, which means that his clubshaft is "on-plane". Note that he has a geometrically FLW and his clubshaft is in a straight line planar relationship with his left forearm, which means that his left arm flying wedge alignment is intact/correct. Note that his left wrist is cocking upwards (without bending). Note that his right wrist is bending backwards without cocking upwards. In other words, his left wrist's plane of motion is perpendicular to the right wrist's plane of motion - the left wrist is cocking upwards in the vertical motion of cocking, while the right wrist is bending back in the horizontal motion of hinging. Note that his right elbow is bending (folding more) at the same time. That's a critical point that a beginner golfer must understand - the bending of the right elbow makes it biomechanically much easier for the left wrist to move in a plane of motion that is at a 90 degree angle to the plane of motion of the right wrist in the mid-backswing.
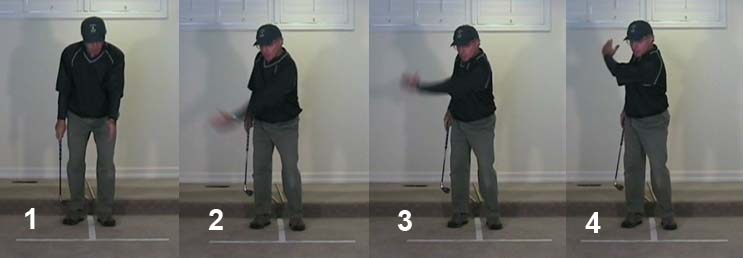
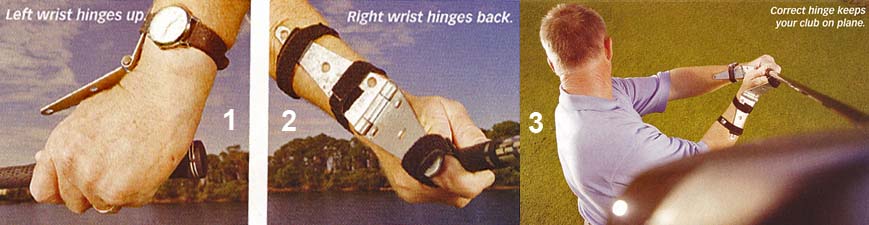
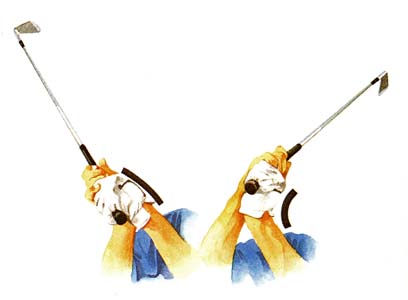
Martin Hall demonstrating the wrist hinging/cocking action - from a Golf Magazine article
Martin Hall has placed a door hinge on his left wrist - along the radial border of his left forearm and left hand (image 1); and another door hinge on his right wrist - on the back (dorsum) of his right forearm and right hand (image 2). Image 3 shows how the left wrist cocks upwards while the right wrist bends back - and it is the bending of the right elbow that allows the right wrist to more easily move in a plane of motion that is perpendicular to the plane of motion of the left wrist.Another very important biomechanical phenomenon that a golfer must understand is the phenomenon of extensor action. Note how close Stuart Appleby's right upper arm/elbow is situated relative to the right side of his torso in images 2 and 3. Note that his right arm separates slightly away from the right side of his torso in image 4 (when his left arm is parallel to the ground). In other words, there is small amount of right arm abduction occurring (while the right upper arm is externally rotating in the right shoulder socket). That biomechnical action should give a golfer a "feeling" that he is stretching-out his right arm slightly (away from the right side of his torso) - even while his right elbow is undergoing its folding process. This "feeling" of slightly stretching-out the right arm results in the left arm being pulled straight (via right palm push-pressure being applied at PP#1) and this biomechanical action is called *extensor action. The straight left arm acts as check-rein during this extensor action process, and limits how far the right upper arm becomes abducted away from the right side of the torso - because the left arm cannot be straightened more than straight. A golfer should only apply enough extensor action to keep the left arm comfortably straight (and not rigidly straight), and there should be no sense-of-tension in either the left arm or right arm.
(* I discussed the process of extensor action in my How to Power the Golf Swing review paper and I demonstrated it in the accompanying swing video lesson).
Image 5 shows Stuart Appleby at his end-backswing position. Note that his left arm flying wedge alignment is intact - his clubshaft and left forearm are in a straight-line planar relationship and he has a geometrically FLW. If the left arm flying wedge alignment is intact/correct and a golfer has a geometrically FLW, then the clubface should be parallel to the back of the left forearm. Note that his right forearm flying wedge correctly supports his left arm flying wedge (like the wing strut of a small Cessna airplane supporting the wing). Note that his right forearm is not vertical to the ground, and that is due to the fact that Stuart Appleby has a slightly shortened backswing action - he doesn't get his clubshaft parallel to the ball-target line at the end of his backswing.
The shorter the backswing, or the steeper the backswing (left arm more upright relative to the ground), the more likely the right forearm will be parallel to the spinal bend angle, rather than being vertical to the ground, at the end-backswing position. A golfer should not worry if his right elbow is pointing backwards, rather than pointing at the ground, as long as his right forearm flying wedge correctly supports the left arm flying wedge (like the wing strut of a small Cessna airplane supporting the wing).
To better understand this point, consider the following photo.
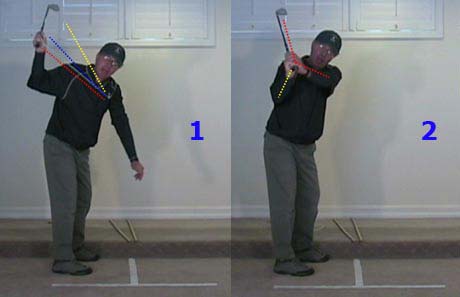
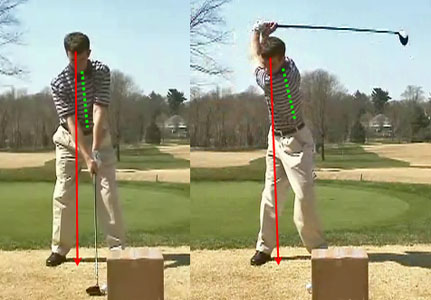
Desired end-backswing position - capture image from the author's swing video lesson
Starting with image 1. The red dotted line represents a very desirable position for the left arm angle at the end-backswing position - it directly crosses over the right shoulder socket joint. Tiger Woods has his left arm at that particular angle at his end-backswing position (see previous photo). The blue dotted line represents a slightly steeper left arm angle, which is also perfectly acceptable. Adam Scott has his left arm at that angle at his end-backswing position (see previous photo). The yellow dotted line is much steeper (see Jim Furyk's swing photo previously presented) and I think that golfers should preferably avoid having their left arm at that steep angle at their end-backswing position, because it requires a large compensatory move to shallow-out the clubshaft from that "high-hands" position.
Note the position of the right hand at the end-backswing position. It is behind and slightly higher than the right shoulder. Note that the clubshaft is in the same plane as the straight left arm (represented by the red dotted line) and that requires that the golfer have a geometrically flat left wrist at the end-backswing position. Note that the right forearm flying wedge is roughly at right angles to the left arm flying wedge (represented by the red dotted line and clubshaft). Note that the right forearm is vertical to the ground, and that is only due to the fact that the left arm (red dotted line) has that specific angle relative to the ground. If a golfer has his left arm at a slightly steeper angle (blue dotted line) then the right forearm flying wedge would have to be tilted more forward, and that would cause the right forearm to be angled more forward (closer to being parallel to the spine angle).
Image 2 shows the end-backswing position adopted by a golfer (author) who lacks the flexibility to get his hands behind the right shoulder. The hands will end up opposite, or even slightly in front of the right shoulder, by the end of the backswing. Note that the right forearm flying wedge (yellow dotted line) is still at the "correct" angle relative to the left arm flying wedge (red dotted line) - even though the right elbow is pointing more backwards. Note that the clubshaft is in a straight-line planar relationship with the left forearm (red dotted lines) and note that the left wrist is geometrically flat.
I have repeatedly emphasized the fact that a golfer should optimally have a geometrically FLW at the end-backswing position, because that would ensure that the left arm flying wedge's alignment is intact/correct. However, that is not an absolute imperative, and it is very acceptable to have a small misalignment of the left arm flying wedge at the end-backswing position.
For example, many golfers (eg.Tiger Woods), prefer to have an anatomically FLW at the end-backswing position - which means that they have palmar flexed their left wrist to a small degree and that causes the clubshaft to be marginally out-of-alignment with respect to the left forearm (clubshaft droops down more towards the ground).
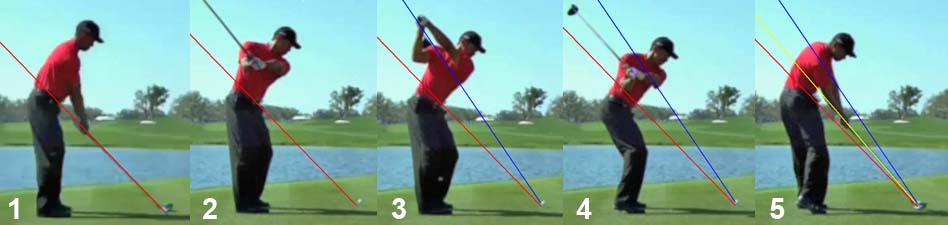
Tiger Woods swing - capture images from a swing video
Image 1 shows Tiger Woods at address.Image 2 shows Tiger Woods when his left arm is parallel to the ground in the backswing. Note that his clubshaft is in a straight-line planar relationship with his left forearm, and that he has a geometrically FLW.
Image 3 shows Tiger Woods at his end-backswing position. Note that his left wrist is no longer geometrically flat (geometrically FLW = slightly cupped left wrist). His left wrist is anatomically flat - and his left wrist can even be considered to be very slightly arched/bowed. An anatomically FLW condition represents a state of slight palmar flexion of the left wrist - and that causes the clubshaft to droop slightly (note that his clubshaft is not aligned perfectly straight-in-line with his left forearm). However, the degree of misalignment is very small and not mechanically consequential - note how easily Tiger Woods gets his clubshaft straight-in-line with his left forearm by the end of the early downswing - image 4.
Consider another example of a golfer who has a non-geometrically FLW at the end-backswing position.
Dustin Johnson - http://www.youtube.com/watch?v=DXU_IC1qpdw
Dustin Johnson has a superb golf swing and he uses a RFT backswing action. That allows him to more easily come back down the same path in the downswing as the backswing (similar to Stuart Appleby).
Dustin Johnson's backswing action - capture images from his swing video
Image 1 shows Dustin Johnson at address. I have drawn a yellow line through his right elbow at address, and that represents the elbow plane line. Note how his right elbow tracks up that line during his RFT backswing action.Image 2 shows Dustin Johnson when his left arm is parallel to the ground. Note that his clubshaft is "on-plane" (red arrow points at the ball-target line). Note that his clubshaft is straight-in-line with his left forearm and note that he has a geometrically FLW.
Image 3 shows his end-backswing position. Note that he has an overtly arched/bowed left wrist and that causes his clubshaft to droop down. His clubshaft is not straight-in-line with his left forearm and his left arm flying wedge alignment is not intact/correct. The degree of misalignment is significantly large, but he still manages to get his clubshaft to fall-in-line with his left arm during his downswing. Even if a golfer can reconstitute the left arm flying wedge alignment in the downswing, an overly arched left wrist at the end-backswing position represents an avoidable complicating factor, and I think that a golfer should preferably have an intact/correct left arm flying wedge alignment at the end-backswing position.
To summarise my golf instructional position, I believe that it is optimum to have a geometrically FLW at the end-backswing position and an intact/correct left arm flying wedge alignment. I also believe that it is biomechanically acceptable to have an anatomically FLW, or a slightly arched left wrist, at the end-backswing position. However, I think that a golfer should avoid allowing the left wrist to be markedly arched, or markedly bent, at the end-backswing position.
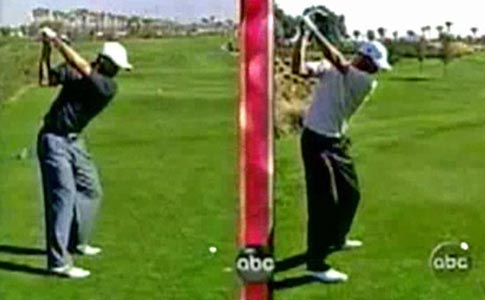
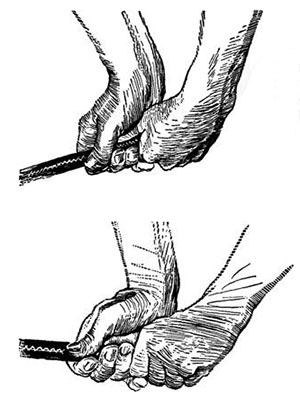
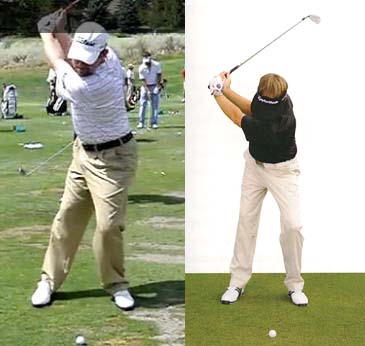
Arched left wrist and bent left wrist - from reference number [7]
Note that the left wrist is markedly arched in the first image, and markedly bent in the second image (which causes the clubshaft to cross the line and point to the right). Note that the clubshaft is not in a straight-line relationship with the left forearm, which means that the left arm flying wedge alignment is not intact/correct.
Compare the end-backswing position of a golfer versus a baseball player.
End-backswing position of a golfer and baseball player - from reference number [8]
Note that the golfer has a geometrically FLW and his clubshaft is straight-in-line with his left forearm.Note that the baseball player has a markedly bent left wrist (markedly dorsiflexed left wrist) and that causes his clubshft to be angled too steeply (relative to his left forearm). That means that the clubshaft has to "fall-back" at the start of the downswing to become straight-in-line with the left arm. That's an unnecessary complicating factor, and it is better to have an intact/correct left arm flying wedge alignment at the end-backswing position - because one then can transition into the downswing without having to first execute a club "fall-back" phenomenon that correctly aligns the clubshaft so that it becomes straight-in-line with the straight left arm.
Ben Hogan's downswing action - capture images from a swing video
Image 1 shows Ben Hogan at his end-backswing position - he has a geometrically FLW and his left arm and clubshaft are in a straight-in-line relationship. That allows him to "slot" his club in the downswing (images 2-5) without any club * "fall-back" phenomenon.(* I have discussed this club "fall-back" phenomenon in great detail in my Book Review: Slot Swing - Jim McLean review paper.
Backswing pivot action
During the backswing, a golfer has to rotate the torso, while lifting the clubshaft with the arms, so that he can assemble the power package assembly in an optimum manner at the end-backswing position. I have already discussed the "correct" arm movements in the backswing action, and I will now discuss the "correct" way to perform a backswing pivot action.
During the backswing, a flexible golfer should rotate the lower torso (pelvis) approximately 45 degrees, and the upper torso (shoulders) about 90+ degrees, so that his back faces the target at the end-backswing position.
In their book [8], Bennett/Plummer have a diagram showing the appearance of different backswing pivot actions - as seen from a face-on view.
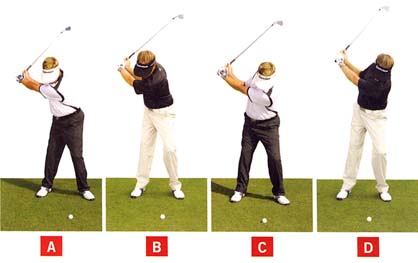
End-backswing postures - photo from reference number [9]
These four golfers have all rotated their pelvis about 45 degrees, and they have all rotated their upper torso about 90 degrees, so that their backs face the target.However, one can clearly see that golfers A and B have rightwards-tilt of their upper torso, while golfers C and D have leftwards-tilt of their upper torso.
I believe very strongly that a golfer should never use a leftwards-tilted backswing action, and I have described my reasons in great detail in my Book Review: The Stack and Tilt Swing - Michael Bennett and Andy Plummer review paper.
I think that a golfer should only use a rightwards-tilted backswing action (or a vertical-centralised backswing action - that is intermediate between photo B and photo C), and I much prefer golfer B over golfer A, because golfer A has too much swaying of his upper torso away from the target. If a golfer sways the upper torso too far away from the target, then he may have a problem with low point consistency (hitting the ground at the same spot - low point - swing-after-swing), because he has to sway his upper torso too much forwards in the downswing. I think that a golfer should try to keep his torso relatively centralised between his feet during the entire backswing action, and I think that a golfer should minimise any unnecessary weight shift to the right during the backswing action. I think that the "most desirable" upper torso motion in the backswing can be summarised in one swing thought - as essentially being a centralised upper torso rotation around a rightwards-tilted spine.
There are three critical words in my description of an "optimum" backswing pivot action - i) centralised; ii) rotation; iii) rightwards-tilted spine.
I think that a golfer should not attempt to sway the upper torso away from the center during his backswing action and he should think of his upper torso rotation movement as being a rotary movement around a rightwards-tilted spine, and not a sliding/swaying movement.
Let's start with a description of my preferred backswing pivot action - which I label a *rightwards-centralised backswing action.
(* I have described the difference between a rightwards-centralised backswing action and a leftwards-centralised backswing action in great detail in my Optimal Weight Shift in the Full Golf Swing review paper).
I think that Stuart Appleby is a good role model for a golfer who wants to learn how to perform a rightwards-centralised backswing action.
Stuart Appleby swing video - http://www.youtube.com/watch?v=_jqJ9R2LypY&NR=1
When watching the video, concentrate your mental attention on his right thigh and upper torso movements.
Stuart Appleby's backswing action - capture images from his swing video
Image 1 shows Stuart Appleby at address. His golf instructor has drawn a white line alongside the outer border of his right leg (face-on view). Note that Stuart Appleby has rightwards spinal tilt at address - this is a natural biomechanical phenomenon that happens automatically if the right hand is placed lower on the grip than the left hand (while the shoulders are kept square to the ball-target line). If a golfer wants to place his right hand lower on the grip then his left hand, then he will naturally have to tilt his right shoulder downwards (relative to the left shoulder) and that natural action causes a golfer to naturally/automatically acquire a few degrees of rightwards spinal tilt at address. Note that his pelvis is centralised between his feet, and he appears to have his lower body's weight distribution about 50:50 between his feet. However, because he has his upper torso tilted a few degrees to the right, his overall weight distribution may be 55:45 or 60:40 (right relative to left) at address.During his backswing action, note that Stuart Appleby keeps his right leg continuously against that white line, and there is no swaying of the right thigh/leg to the right during the backswing. In other words, the right leg must be thought of as a "fixed" post, and a golfer should think of rotating his lower torso (pelvis) without allowing the "fixed" post to sway to the right. On the DTL view, note that Stuart Appleby has a small amount of right knee flex at address, and he maintains that same amount of right knee flex throughout his entire backswing action. That's a good mental image for a beginner golfer.
Note that Stuart Appleby's pelvis remains horizontal during his backswing action, and he makes no attempt to lift up his right pelvis in the late backswing (by straightening his right leg).
Note how Stuart Appleby's upper torso rotates naturally around his rightwards-tilted spine - without any swaying of his upper torso to the right (images 2-5). He maintains the same degree of rightwards spinal tilt (face-on vew) and the same degree of forward spinal bend (DTL view) throughout his backswing - and he is simply rotating his upper torso naturally around his spinal axis (which has a small degree of rightwards spinal tilt). At address, his right shoulder is slightly lower than his left shoulder, and when he rotates his upper torso naturally around his rightwards-tilted spine, his right shoulder is going to end up slightly higher than his left shoulder at the end-backswing position. However, his shoulder rotation can be considered to be relatively horizontal, and there is no dipping of the left shoulder down towards the ground. From a biomechanical perspective, his shoulders are rotating nearly perpendicularly around the axis of his mid-upper thoracic spine, and this natural upper torso rotary movement should occur naturally/automatically without any need for conscious thought.
To demonstrate how centralised Stuart Appleby has remained during his backswing swing action, consider the following composite photo (taken from another swing video).
Stuart Appleby backswing - capture images from a swing video
This composite image demonstrates how centralised Stuart Appleby remains during his backswing action. He is right-centralised, because he is simply rotating his upper torso around a rightwards-tilted spine. There is very little weight shift during a rightwards/centralised backswing action - and he will only have slightly more weight on the right side at his end-backswing position, simply because both arms are on the right side at the end of his backswing. Note how his head swivels naturally to the right by a few inches, because his head is rotating naturally around the axis of a rightwards-tilted cervical spine. Note how his eye-line (straight line drawn between the pupils of both eyes) remains horizontal to the ground. There should be no tilting of the head along an up-and-down arc during the backswing. The head should preferably rotate horizontally without any tilting.Consider another example of a golfer who has a rightwards-centralised backswing action.
Michael Finney *swing video - http://vimeo.com/22638381
Michael Finney's backswing action - capture images from his swing video
In the left image, one can see Michael Finney at address. Note that he has small degree of rightwards spinal tilt at address (green dotted line) and that his head is behind the center of his stance (red-arrowed line). Note that his head doesn't move during the backswing, and that his head is still vertically above the same point on the ground at the end of his backswing. The green dotted line in image 2 shows the overall degree of rightwards tilt of his spine and upper torso at the end-backswing position. Mike Finney has a very rightwards-centralised rotary swing with no lateral shift of his mid-upper torso to the right during the backswing. During the backswing, he makes no attempt to change the degree of spinal tilt that he adopted at address, and he simply rotates his mid-upper torso naturally around his rightwards tilted spine, without making any deliberate swaying movements of his upper torso to the right.
To better understand the biomechanics of the backswing pivot-rotation action, consider the biomechanical movement of the pelvis in the backswing.
A good way to understand how the pelvis should move in the backswing is to watch this Brady Riggs swing video lesson
http://www.youtube.com/watch?v=WvOr5nNqYEw&mode=related&search=
Brady Riggs' backswing pivot action - capture images from his swing video lesson
Brady Riggs drew a yellow line along the outer border of his right pelvis at address. In image 1, he is "incorrectly" sliding his pelvis to the right and that causes his upper torso to lean leftwards. Image 2 shows his left-leaning upper torso at his end-backswing position, and he has demonstrated one cause of a reverse pivot posture at the end-backswing position - a rightwards pelvic sway action.Brady Riggs demonstrates the "correct" pelvic motion in image 3. The "correct" pelvic motion involves a rotation of the pelvis against the resistance of a "fixed" right leg so that the right buttocks moves backwards and leftwards. Note how that pelvic rotation movement "creates space" - note the "air space" between the outer border of his right pelvis and that yellow line. The more "air space" one creates, the more one has shifted the pelvis to the left during the backswing by slanting the right thigh to the left. Note that his pelvis doesn't remain centered between his feet at his end-backswing position (image 3) - it has shifted to the left.
How much "air space" should a golfer create between that yellow line and the outer border of the right pelvis during the backswing pelvic pivot-rotation action? There is no "correct" answer to this question. Although I prefer Stuart Appleby's rightwards-centralised backswing action swing style, where the pelvis doesn't shift that far to the left during the backswing pelvic pivot-rotation action, it is biomechanically acceptable to shift the pelvis more to the left during the * backswing pelvic pivot-rotation action.
(* I have described this pelvic pivot-rotation action in much greater detail in my The Backswing and Downswing Hip Pivot Movements: Their Critical Role in the Golf Swing review paper).
A key biomechanical movement that must simultaneously occur during this pelvic motion is a slant-rotation of the spine, and therefore the upper torso, to the right. Note that Brady Riggs' spine and upper torso has slant-rotated to the right - note that he has a distinct slant of his upper torso rightwards (away from the target) in image 3.
To learn how to acquire a "feeling" of the upper torso slant-rotating to the right during the backswing pelvic rotation movement, one can perform this "crossing guard" drill recommended by Brian Manzella [9].
Crossing guard drill - from reference number [10]
In this drill, one places a golf club across the front of the body - from the right hip to the left shoulder. Then one should perform a backswing pelvic pivot-rotation movement (ala Brady Riggs) and simultaneously allow the spine and upper torso to natutally/automatically slant-rotate to the right - until the clubshaft is perpendicular to the ball-target line (blue line). Note that this maneuver causes the upper torso to acquire a rightwards-slant away from the target (yellow line). Note how the head has moved to a position vertically above the right knee.This drill is designed to give a golfer a "feeling" of how the spine, and therefore the upper torso, naturally/automatically acquires a rightwards slant during the backswing pelvic-rotation action. In a "real life" golf swing, one would keep the head more stationary and not allow the rightwards-slant of the upper torso to be that exaggerated. However, a golfer should also not resist the natural tendency of the upper torso to acquire that natural rightwards slant by keeping the head "fixedly" stationary.
Brian Manzella student
The first image (with the yellow lines) shows the "correct" rightwards-slant of the upper torso that should naturally/automatically occur, and the inserted image (with violet lines) shows the same student resisting that biomechanically natural slant-rotation of the upper torso to the right by torquing his upper thoracic spine to the left.
If a golfer naturally allows the upper torso to slant-rotate to the right during the pelvic pivot-rotation movement (that moves the right buttocks left-backwards), then a golfer should acquire a reverse-K posture at the end-backswing position.
Ben Hogan's reverse-K posture at the end-backswing - capture image from a swing video
Ben Hogan has the classic reverse-K posture at his end-backswing position. Note that his right thigh is slanted to the left (lower red line) as he shifts his right buttocks left-backwards and that he has "created space" (ala Brady Riggs) during his backswing pivot-rotation action. Note that his upper torso has a rightwards slant (upper red line). Note that the rightwards slant of his upper torso causes the left side of his upper torso to become straight-in-line with his left leg (yellow line). The two red lines and the yellow line represents a reverse-K image (mirror image of the letter "K").Many golfers have been influenced by the S&T swing methodology that has come into fashion in the last few years, and they try to keep their upper torso very centralised during the backswing.
Here is an example of a former long drive champion, Jason Zuback, trying to keep his upper torso centralised during the backswing - based on the conceptual idea that it is better to have a centralised pivot axis and a centralised head.
Jason Zuback swing - https://www.youtube.com/watch?v=YL9dzMe_H9o
Note that Jason Zuback promotes his personal interpretation of the S&T swing methodology in that swing video, and he advises a golfer to rotate around an imaginary centralised pivot axis. Jason Zuback states that a golfer should not sway the upper torso to the right during the backswing and he recommends that a golfer should simply rotate his upper torso around a centralised pivot axis, while keeping the head centralised (vertically in-line with that imaginary centralised pivot axis).
Consider the biomechanical movements involved in Jason Zuback's centralised pivot-rotation action.
Jason Zuback's backswing action - capture images from his swing video
Image 1 shows Jason Zuback at address - note that his pelvis and head are centralised (with respect to those two vertical shafts placed alongside the outer border of his right foot and left foot) and note that he has minimal rightwards spinal tilt.Image 2 shows Jason Zuback performing his personal version of a centralised backswing pivot action - where he tries to keep his head centralised and where he tries to rotate around an imaginary centralised pivot axis. Note how much he has swayed his pelvis, and mid-torso, rightwards.
Image 3 shows Jason Zuback at his end-backswing position. Note how much he has swayed his pelvis, and mid-torso, rightwards. Also, note how his upper spine, and upper torso, are leaning leftwards in the direction of the target. I think that he is reverse-pivoting, and I have labelled this type of backswing pivot action a *leftwards-centralised backswing pivot action.
(* See my review paper on Optimal Weight Shift in the Full Golf Swing for further details on a leftwards-centralised backswing pivot action versus a rightwards-centralised backswing pivot action).
Compare his leftwards-centralised backswing pivot action to golfers who have a rightwards-centralised backswing pivot action.
End-backswing posture of three golfers - Jason Zuback, Jamie Sadlowski and Ben Hogan
Image 1 shows Jason Zuback rotating around an imaginary centralised pivot axis (yellow line). Note how he acquires the reverse-pivoting posture of a golfer who adopts a leftwards-centralised backswing pivot action.Image 2 shows Jamie Sadlowski, and image 3 shows Ben Hogan, at their end-backswing position. Both of these golfers use a rightwards-centralised backswing pivot action, which causes them to acquire a reverse-K posture at the end of the backswing. Note how they do not allow their pelvis to sway rightwards during the backswing, and they are simply rotating their upper torso around their rightwards-tilted spine - without any lateral swaying motion of their lower or upper torso.
What are the consequences of a leftwards-centralised backswing pivot action? Consider Jason Zuback's downswing pivot action.
Jason Zuback's early downswing action - capture images from his swing video
Note how his mid-torso is bulging to the right in image 1 (end-backswing position) and note that he has no "space" under his right shoulder ,and in front of his right hip, for the power package's descent during the early downswing's club "slotting" process. If he doesn't create that "space" by means of some compensatory biomechanical maneuver, then he will be forced to throw his hands/clubshaft OTT in order to get his hands and clubshaft down towards the ball. Note that he "creates space" in the early downswing by the compensatory biomechanical maneuver of assertively sliding his pelvis left-laterally towards the target - thereby reversing his spinal tilt (image 2 and 3). In other words, the only way that a leftwards-centralised golfer can reverse the leftwards-tilt of the spine/upper torso during the early downswing is to perform an assertive left-lateral pelvic slide motion towards the target. I believe that his assertive left-lateral pelvic slide action involves excessive latriflexion forces operating at the level of the lumbar spine, and I suspect that this unnatural biomechanical action can predispose to *chronic back problems over the long-term.(* I have discussed this issue in great detail in my Book Review: The Stack and Tilt Swing: Michael Bennett and Andy Plummer review paper).
I markedly prefer a rightwards-centralised backswing action swing style - as exemplified by Stuart Appleby's, Dustin Johnson's and Ben Hogan's swing. I think that their backswing actions are biomechanically natural and I believe that it is unlikely to cause chronic back problems. I also think that a rightwards-centralised backswing action "creates space" under the right shoulder, and in front of the right hip area, and it allows a golfer to "slot" the club in the early downswing without any need for an assertive left-lateral pelvic slide action in the early downswing.
Ben Hogan's early downswing action - capture images from a swing video
Note that Ben Hogan has "space" under his right shoulder, and in front of his right hip, at his end-backswing (image 1). Note how Ben Hogan drops his right elbow into that "space" during the club slotting procedure.
Further backswing insights - presented in a question-and-answer format.
I will progressively add more content to this section over a period of time.
Question number 1:
Consider Eamonn Darcy's swing - http://www.youtube.com/watch?v=S7S8LyE0HpY
Eamonn Darcy has a very unusual backswing action, and his end-backswing position looks very strange.
David Leadbetter, the famous golf instructor, states that he has no idea how Eamonn Darcy gets there. Do you understand the biomechanics/mechanics of Eamonn Darcy's backswing action?
Answer:
Yes.
I think that it is very important to understand the mechanics/biomechanics of Eamonn Darc's backswing action, because it will help you understand the biomechanics of the "correct" right arm movement in the backswing.
Consider a comparison between Ermie Els and Eamon Darcy at the end-backswing.
Ernie Els and Eamonn Darcy - capture images from the swing video
Ernie Els in image 1 has the typical look of a swinger, who has enough flexibility to get his hands behind, and above, the right shoulder at the end-backswing position - his right forearm is vertical to the ground and his right elbow points at the ground.By contrast, Eamonn Darcy in image 2 has his right forearm horizontal to the ground and his right elbow points straight backwards. His straight left arm is almost vertical.
What causes Eamon Darcy to have his right forearm/elbow alignment at a 90 degree angle to Ernie Els' right forearm/elbow alignment.
Before I directly answer that question, consider the natural biomechanics of the right arm's movement in a skilled golfer's backswing action - by considering Stuart Appleby's backswing action.
Stuart Appleby's backswing action - capture images from his swing video
Stuart Appleby uses a right forearm takeaway backswing action, and the key biomechanical movement in this type of backswing action is an external rotation of the right humerus in the right shoulder socket. The right upper arm is continuously undergoing an external rotation in the right shoulder socket throughout the entire backswing and that causes the right hand to move "deep" (away from the ball-target line). While the right upper arm is externally rotating in the right shoulder socket, Stuart Appleby also allows his right elbow to progressively fold and his right wrist to increasingly dorsiflex. That combination of right upper limb movements allows him to get his right palm to face upwards-and-outwards and to be parallel to the inclined plane in the mid-backswing - image 4. If the right palm faces upwards-and-outwards and is parallel to the inclined plane, then it ensures that the back of the geometrically FLW will be parallel to the inclined plane (and on a plane that is marginally steeper than the elbow plane). The biomechanical action of allowing the geometrically FLW to swivel onto the inclined plane in the early-mid backswing is called the takeaway swivel action. Note what happens to the right elbow in the later backswing - image 4 and 5. As the right upper arm continues to externally rotate in the late backswing, it causes the hands to catch-up to the right elbow, and the right elbow ends up in a position below the hands at the end-backswing position (image 5). In summary, the key movement that gets the right elbow to point groundwards at the end-backswing position, and the right forearm to become near-vertical to the ground, is a continuous external rotation of the right upper arm in the right shoulder socket.Now, to better understand Eamonn Darcy's backswing action, think of your right upper arm's movement when you start a lawnmower by pulling on the lawnmower cord. When one starts a lawnmower by pulling on the starting cord, one pulls the cord handle straight back, and one should "feel" that the right elbow juts straight backwards. Think of the direction of movement of the right humerus in the right shoulder socket when you perform this natural lawnmower cord-pulling action. The right humerus internally rotates in the right shoulder socket, and that motion will cause the right elbow to jut backwards and the right forearm to become near-horizontal to the ground.
That is the key difference between Ernie Els' backswing action and Eamonn Darcy's backswing action - Ernie Els allows his right humerus to externally rotate in his right shoulder socket, while Eamonn Darcy allows his right humerus to internally rotate in his right shoulder socket.
Consider the repercussions of allowing the right humerus to internally rotate during the backswing.
Here is a photograph of Eamonn Darcy at the end-takeaway position.
Eamonn Darcy's end-takeaway position - capture image from his swing video
Note that Eamonn Darcy's clubshaft (yellow line) is parallel to the ball-target line at the end-takeaway position, but it is significantly uplifted. Note that the clubface (red line) is parallel to the ball-target line, and note that the toe of the club is pointing upwards. Most importantly, note that his right palm is facing downwards. If a golfer doesn't allow the right humerus to externally rotate in the early-mid backswing, then it becomes biomechanically impossible for the back of the right hand to rotate clockwise onto the inclined plane, and it therefore becomes biomechanically impossible for the geometrically FLW to rotate clockwise onto the inclined plane. In other words, it becomes biomechanically impossible to perform a takeaway swivel action. Eamonn Darcy's right palm will always be facing downwards-and-outwards throughout his backswing action (as a result of the internal rotation of the right humerus in the right shoulder socket), and that forces the straight left arm to move vertically upwards - because it cannot move inside the toe line (against the resistance of the outwards-facing right palm). The end-result is that the hands cannot bypass the right elbow in the late backswing, and the hands will always be well outside the right elbow at the end-backswing position. You should now understand why Eamonn Darcy has the following four biomechanical features at his end-backswing position - i) right elbow points straight back; ii) right forearm is horizontal to the ground; iii) right palm faces outwards and iv) the straight left arm is near-vertical to the ground.How does Eamonn Darcy generate an in-to-square-to-in clubhead path through the impact zone - from that unusual end-backswing position?
Eamonn Darcy's downswing action - capture images from his swing video
Image 1 shows Eamonn Darcy at his end-backswing position. Note that he does not have a geometrically FLW, and his left arm flying wedge's alignment is not intact/correct (solid yellow lines) - the clubshaft is pointing too far to the right (presumably because his right palm is pushing the clubshaft slightly to the right). Note that his right forearm flying wedge (solid red line) is correctly aligned relative to his left arm flying wedge, but his right palm is preventing the clubshaft from angling slightly back so that it is more parallel to the ball-target line.
The red arrow shows how Eammon Darcy starts his downswing - he assertively adducts his right upper arm towards the right side of his torso and that motion directs his right elbow down towards to its pitch location in front of the right hip. During his motion, his clubshaft falls back and becomes better aligned with respect to his left forearm in the early downswing - the left arm flying wedge becomes more accurately aligned (image 2). Image 2 also shows that his clubshaft descends very steeply down to the ball - descending down a plane that is slightly steeper than the TSP.
Image 3 shows his late-downswing alignments - note that his right elbow is in a pitch location alongside the right hip area and his clubhead is approaching the ball from an inside track. It required a very large compensatory move to get to that pre-impact position.
From a beginner golfer's perspective, the major learning point is that if one wants to be a swinger, then it is very important to allow the right humerus to externally rotate during the backswing, so that one can easily/naturally perform a takeaway swivel action that gets the geometrically FLW to lie parallel to the inclined plane by the mid-backswing. One needs to avoid Eamonn Darcy's example of allowing the right humerus to internally rotate during the backswing swing action if one wants to avoid having a steep left arm backswing action.
Addendum added May 2011:
I have recently discovered two present-day PGA tour golfers who also have a very steep left arm backswing action (like Eamonn Darcy) - Steve Marino and Rory Sabbatini.
Consider their swings.
Steve Marino - http://www.youtube.com/watch?v=y0_3CIx04jU
Rory Sabbatini - http://www.youtube.com/watch?v=_TLVDqPmu5k&NR=1
Steve Marino's swing - capture images from his swing video
Rory Sabbatini's swing - capture images from his swing video
Note that both Steve Marino and Rory Sabbatini have a very steep left arm backswing action and their right forearm is near-parallel to the ground at their end-backswing position (image 1).Both golfers adduct their right upper arm very actively groundwards at the start of the downswing, and they both successfully get their right elbow to the pitch location near the front of the right hip area by the end of their mid-downswing (image 2). Rory Sabbatini manages to shallow his clubshaft during his early-mid downswing, while Steve Marino's clubshaft descends along a much steeper plane. However, both golfers successfully maintain an intact LAFW/FLW during their downswing action.
Both golfers have excellent impact alignments, although Steve Marino's clubshaft is on a steeper plane (VSP) at impact - image 3.
I now believe that it is possible to play excellent golf using this atypical/idiosyncratic backswing action, but it requires a large compensatory right arm adduction maneuver at the start of the downswing to successfully shallow the clubshaft plane by impact.
Question number 2:What is the difference in the backswing action between a TGM swinger and a TGM hitter?
Answer:
I discussed the differences between TGM swinging and TGM hitting in my How to Power the Golf Swing review paper. I will only discuss the major differences in the backswing action of TGM swingers versus TGM hitters in this answer.
A TGM swinger needs to optimally load the the left arm (PA#4) and the left wrist (PA#2) during the backswing.
Tiger Woods and Adam Scott at their end-backswing position - capture images from a swing video
Tiger Woods and Adam Scott are both swingers, who use a pivot-driven swing to power the release of PA#4. They therefore need to optimally load PA#4 in the backswing by getting their left arm to lie across their shoulder turn angle at the end-backswing position. They also need to ensure that they have optimally loaded PA#2 by getting a 90 degree angle between the left arm and the clubshaft at the end-backswing position. A key feature of a swinger at the end-backswing position is the fact that the FLW is parallel to the inclined plane, and the back of the FLW will therefore face skywards. For the FLW to get to that position, a swinger has to perform a takeaway swivel action that gets the FLW onto, and parallel to, the inclined plane by the mid-backswing. Then during the mid-late backswing, as the hands move up the inclined plane to their end-backswing position, the FLW will remain parallel to the inclined plane (which naturally becomes progressively steeper during the later backswing).
A TGM swinger doesn't have to load the right elbow, and the main function of the right forearm flying wedge is to support the load of the left arm flying wedge at the end-backswing position. The right forearm flying wedge offers its best support when the right elbow is below the hands at the end-backswing position (presuming that the left arm angle is not too steep and presuming that golfer has enough flexibility to get the hands behind the right shoulder).
In question/answer number 1 - I stated that a key biomechanical phenomenon that allows a golfer to i) perform a takeaway swivel action and ii) that allows the right elbow to move under the hands in the late backswing is external rotation of the right humerus in the right shoulder socket. During the takeaway swivel action, the external rotation of the right humerus allows the back of the dorsiflexed right wrist to rotate clockwise so that it lies against the inclined plane. A swinger must also simultaneously allow the left forearm to freely pronate so that the FLW can also rotate clockwise onto the inclined plane.
A swinger should not resist the natural external rotation of the right upper arm and the natural pronation of the left forearm in the early backswing, because they are essential to a swinger's takeaway swivel action, which gets the FLW to rotate onto the inclined plane.
A TGM hitter, by contrast, wants to load the right elbow (PA#1) in the backswing because he primarily powers the swing by releasing PA#1. To optimally load the right elbow, a TGM hitter must not allow the right upper arm to undergo excessive external rotation in the late backswing, because that will cause the hands to move passed the right elbow as the right elbow moves under the hands. A TGM hitter must ensure that his hands are in front of the right elbow at the end of the backswing - the hands must be closer to the ball-target line than the right elbow.
End-backswing postion of a hitter - capture images from a swing video
This photo (of my friend Scott) shows the optimal end-backswing position for a TGM hitter. The right elbow is optimally loaded when there is a 90 degree bend in the right elbow, and the right elbow is behind the hands (further away from the ball-target line than the hands). That means that the hands must not move further away from the ball-target line than the right shoulder, and the hands should preferably be opposite, and in front of the right shoulder, at the end of the backswing (in TGM terminology this position is called the "top-of-the backswing" position). When the right elbow is in that optimum position, note that the right forearm will be roughly parallel to the spinal bend angle, and the right elbow will point slightly backwards (and not point straight down at the ground).
When a TGM hitter powers his downswing, he is going to be directing his right palm in an active thrust action towards the ball by actively straightening the right arm. He will not employ a release swivel action in his downswing action, and he will use the active release of PA#1 (active straightening of the right elbow) to drive the left hand/grip end of the club towards impact. Because a TGM hitter doesn't use a release swivel action in the downswing, he shouldn't be using a takeaway swivel action in the backswing.
Therefore, if a TGM hitter doesn't use a takeaway swivel action in the early backswing, and if he doesn't allow the right elbow to move under the hands in the late backswing, then a major biomechanical difference between a TGM hitter and a TGM swinger is the fact that a TGM hitter doesn't externally rotate the right upper arm as much as a swinger in the backswing.
During a TGM hitter's takeaway, the clubface will appear to be looking at the ball, and the toe of the club will not point straight-up at the end-takeaway position. That means that the clubface is relatively closed to the clubhead arc during the takeaway.
End-takeaway position of a TGM hitter - capture image from a swing video
Note that the clubface is slightly closed (to the clubhead arc) at the end-takeaway position. That means that a TGM hitter is not using a takeaway swivel action, which means that there will be less external rotation of the right humerus, and less pronation of the left forearm, in the early backswing (when compared to a TGM swinger). A TGM hitter continues to keep the clubface relatively closed (to the clubhead arc) throughout his backswing by limiting the amount of external rotation of the right upper arm that occurs per unit time (when compared to a TGM swinger). A TGM hitter will always "feel" that he is keeping his right palm facing downwards towards the ball-target line throughout the backswing, and he will not allow the right palm to rotate clockwise so that the right palm becomes more face-upwards and subsequently parallel to the inclined plane.
Question number 3:
What is a "twistaway" maneuver, and do you think that a golfer, who has a slice problem, should use a "twistaway" maneuver to remedy his slice problem?
Answer:
Brian Manzella, a golf instructor based in New Orleans, teaches a "twistaway" maneuver in his multi-pronged approach to helping a golfer who has a slice problem [11]. Brian derived the term "twistaway" from one of his young students, who used the term "twistaway" when being shown how to perform the maneuver. The actual biomechanics used in the maneuver have been previously described by other golf instructors. I don't know who first described the maneuver - I personally discovered a description of the maneuver in a golf instructional book "Four Magic Moves to Winning Golf" by Joe Dante, which was published in 1962.
Joe Dante used the following diagram to demonstrate the *maneuver.
(* You can read Joe Dante's description online at http://www.golf-swing-magic.com/golf-backswing3.html)
The "twistaway" maneuver - image from reference number [12]
The top diagram demonstrates the "twistaway" maneuver, and the bottom diagram represents the standard takeaway maneuver.Joe Dante recommended that a golfer should press down firmly with the right palm against the left thumb (at PP#1) during the takeaway so as to drive the knuckles of the left hand under the grip. I personally also think that it is advantageous to think of gripping more tightly with the left 3rd, 4th and 5th finger tips during this maneuver, in order to help twist the grip in a counterclockwise direction. One should have the "feeling" that one is twisting the left hand under the grip, so that the knuckles face more groundwards during the "twistaway" maneuver. In a standard takeaway manuever (designed to swivel the geometrically FLW onto the inclined plane by the mid-backswing), the back of the left hand will face the ball-target line in the late takeaway as the left forearm pronates during the takeaway action (lower image in the above diagram). When performing the "twistaway" maneuver, a golfer is resisting this left forearm pronatory action, and he can be perceived to be deliberately supinating the left forearm during the takeaway action.
If you understand the above-described biomechanical maneuver, then you should realize that this "twistaway" maneuver is automatically/naturally used by a TGM hitter, who doesn't use a takeaway swivel action.
TGM hitter's takeaway action - capture images from a swing video
Look at Scott's left hand during the takeaway. Note how he is rotating his left hand counterclockwise under the grip end of the clubshaft during his takeaway. In other words, he is resisting the natural left forearm pronatory movement that accompanies the standard takeaway swivel action (which is used by TGM swingers). The "twistaway" manuever can be thought of as being an "anti-pronatory" maneuver of the left hand, that is designed to keep the clubface more closed to the clubhead arc during the takeaway.If a golfer uses the "twistaway" maneuver during his backswing action, then he is basically keeping the clubface more closed to his clubhead arc during his backswing action. If the clubface is more closed to the clubhead arc during the backswing, then it will obviously have a "real life" benefit for a slicer who has an open clubface problem at impact. However, the "twistaway" maneuver is not actually correcting the cause(s) of a slicer's problem, and it should be thought of as a temporary band-aid approach that can be very effective. I personally believe that the "twistaway maneuver" should only be used by a golfer who uses a TGM hitting action. I personally don't believe that it is the optimum solution to correct a slice problem in a swinger, who uses a right forearm takeaway and a takeaway swivel action - because it interferes with the natural biomechanics involved in a takeaway swivel action. I think that a swinger, who has slice problem, should optimally identify the *true cause(s) of his slice problem and apply targeted remedies - instead of using the band-aid "twistaway" maneuver approach.
(* See my Causes and Cure of a Slice Problem review paper for a detailed list of slice causes and recommended cures).
Question number 4:In his book [13], Hank Haney recommends that a golfer ensure that his clubshaft is parallel to the clubshaft-at-address plane - during the mid-late backswing. He states that if a golfer keeps the clubshaft parallel to the clubshaft-at-address plane - then it is equivalent to keeping the clubshaft "on-plane". Do you agree with Hank Haney's "congruent angles" concept of keeping the clubshaft "on-plane"?
Answer:
No.
Hank Haney demonstrating his "congruent angles" concept - adapted from reference number [13]
Hank Haney believes that a clubshaft should be "on-plane" during the mid-late backswing, and according to his definition of an "on-plane" backswing action, a clubshaft is "on-plane" when it is continuously parallel to the clubshaft-at-address plane during the mid-late backswing (see red arrows).Hank Haney is free to invent his own definition of an "on-plane" backswing action. However, I know of no biomechanical/mechanical imperative that mandates that a clubshaft should be parallel to the clubshaft-at-address plane during its mid-late backswing path-of-travel. I believe that it is advisable for the left arm flying wedge alignment to be intact/correct during the mid-late backswing (as demonstrated by Hank Haney in the above diagram), but I do not believe it is imperative that the clubshaft have a "precisely-defined" angle (relative to the ground) during the mid-late backswing. I believe that different golfers have different body shapes, different bent-over spine angles, and they also have variable degrees of i) left upper arm internal rotation/left forearm pronation; ii) left arm abduction; iii) right arm abduction; iv) right upper arm external rotation; and v) right elbow folding per unit time during their mid-late backswing action. All those biomechanical factors can influence the clubshaft angle during the mid-late backswing. Therefore, I cannot think of a reason why a golfer should be impelled to follow Hank Haney's advice, that is based on his mental concept of an "on-plane" backswing, that is arbitrarily defined by his arbitrary idea of "congruent angles". I think that Homer Kelley's "on-plane" concept makes more sense as a guiding principle for keeping the clubshaft "on-plane" during the backswing, downswing and followthrough - because it will help a golfer generate a clubhead arc that is symmetrically "in-to-square-to-in" relative to the ball-target line.
Question number 5:Jim McLean believes very strongly in his X-factor theory that states that a golfer can generate more swing power if a golfer restricts his pelvic rotation and maximises his shoulder rotation in the backswing. Do you believe that his X-factor theory is valid, and do you believe that a golfer should deliberately restrict his pelvis rotation in the backswing so as to maximise his X-factor stretch (degree of torso-pelvic shoulder separation)?
Answer:
No.
I don't believe that there is any scientific evidence to support the X-factor theory. I discussed this issue in great detail in my Jim McLean's Triple-X factor - A Critical Review review paper.
Jim McLean continues to promote his X-factor theory and he published the following table in the April 2010 issue of Golf Digest magazine.
X-factor analysis - from the Gof Digest magazine
According to this table, Jamie Sadlowski has a X-factor stretch value of 117 degrees and Jim McLean has concluded that this high value is primarily responsible for his long-driving carry distance of 375 yards. However, that doesn't represent scientific proof! One could look at this same table and conclude that it's Jamie Sadlowski's shoulder turn of 166 degrees that is primarily responsible for his long driving distance carry of 375 yards. That would make more sense, because most of the swing power in a swinger is derived from the speed of release of PA#4, and a golfer who can maximise his shoulder turn angle in the backswing can theoretically load and release PA#4 with greater force/speed. However, there are other factors that can also affect clubhead speed - efficacy of the downswing pivot action, degree of lag, efficacy of release of lag, timing of clubhead release through impact - and I discussed these other factors in my analysis of Jamie Sadlowski's swing - see my Swing Analysis - World Long-drive Champion, Jamie Sadlowski's Swing review paper.I think that each individual golfer should decide whether he wants to restrict his pelvic rotation in the backswing, or whether he wants to freely rotate his pelvis so that he can more easily maximise his shoulder turn. Phil Mickelson and Sam Snead are examples of golfers who have a large pelvic and shoulder turn in the backswing, and who drive the ball a long way (relative to their peers).
Sam Snead
http://www.youtube.com/watch?v=WDn_2_kvmBE
Phil Mickelson
http://www.youtube.com/watch?v=BrJjTJcIMhY
http://www.youtube.com/watch?v=FtEfOAruVco
The reason why they can both drive the ball a long way is because they have a full backswing that allows for a complete loading of power accumulator #4 (left arm loaded against the left upper chest wall during the backswing). They also have a superb downswing pivot action that allows them to fully and efficiently release power accumulator #4. If a golfer can get the left arm to swing freely and fast towards impact in the downswing, then he will likely hit the ball a long way.
Question number 6:Does this golfer have a bent left wrist at his end-backswing position?
Golfer at the end-backswing position - adapted from a Golf Digest article
Answer:
I cannot tell from that photo whether the golfer has a bent left wrist. The only conclusion that is valid regarding that photo, is that the golfer has a cupped/scooped left wrist (non-anatomically FLW) at his end-backswing position. Left wrist cupping at the end-backswing position can be due to a geometrically FLW or a bent left wrist - and one needs to see whether the clubshaft is straight-in-line with the left forearm to determine whether the cupping is due to a geometrically FLW or due to a bent left wrist. If the clubshaft is straight-in-line with the left forearm, then the cupping is due to a geometrically FLW. If the clubshaft is out-of-line with respect to the left forearm, then the cupping is due to a bent left wrist.
Here is the original April 2010 Golf Digest photo - featuring David Toms.
David Toms' end-backswing position - adapted from a Golf Digest article
One can see that David Toms has an intact left arm flying wedge alignment - his clubshaft is straight-in-line with his left forearm from a planar perspective, and his clubface is parallel to the back of his left forearm. David Toms therefore has a geometrically FLW, which is responsible for the slight degree of cupping visible in the back of his left wrist.
One can more clearly see that David Toms has a FLW, and not a bent left wrist, in a DTL view of his late backswing action.
David Toms' late backswing action - capture images from a swing video
Image 1 shows David Toms when his left arm is parallel to the ground in his mid-backswing. Note that he has an intact left arm flying wedge alignment with a geometrically FLW, and his clubshaft is "on-plane".Image 2 shows him slightly later during his backswing action. His left arm flying wedge alignment is still intact/correct. One can now only see the ulnar border of his left wrist/hand, and one cannot assess whether his left wrist is cupped from this DTL view.
Image 3 shows him at the end-backswing position, when his clubshaft is parallel to the ball-target line. He has a FLW and his left arm flying wedge alignment is intact/correct. One cannot see whether he has left wrist cupping from this DTL view.
Left wrist cupping due to a bent left wrist - capture image from a swing video
Note that the golfer's left wrist is cupped (solid red angled-line). The cupping is due to a bent left wrist - because the clubshaft is not in a straight line planar relationship with the left forearm. The left wrist is bent-back (dorsiflexed) and that causes the clubshaft to angle more towards the right, rather than being more parallel to the ball-target line. Note that the toe of the clubhead is pointing more downwards (compared to the clubface in the David Toms photo), and note that the clubface is not perfectly parallel to the back of the left forearm. The fact that the clubface is angled more downwards means that the clubface is more open to the clubhead arc, and that is due to the fact that the golfer (author) has allowed his left wrist to bend-back (dorsiflex).
Question number 7:Some golfers state that there is no such thing as a "pure" rightwards-centered backswing action, and they state that all golfers have some leftwards-tilt of their spine during the backswing. Are they correct?
Answer:
Defenders of the S&T swing methodology, which I define as a leftwards-centralised backswing action swing style methodology, often use this fallacious argument. They state that when a golfer is viewed from behind, that even a rightwards-centralised backswing action swing style golfer seems to have leftwards-tilt of the spine. However, I believe that they are mistaking an upper thoracic spine, that is being torqued leftwards due to a large shoulder turn, as being reflective of a leftwards-tilted spine. But, a leftwards-tilted spine and an upper thoracic spine that is torqued slightly leftwards, are not the same thing.
Consider this swing video lesson, where I am demonstrating a rightwards-centered backswing action.
Weight shift swing video lesson - Segment 3 - http://www.youtube.com/watch?v=b293B4Z6mks
You only need to watch the first 35 seconds of the swing video lesson segment. In that video segment, I am simply rotating my upper torso naturally around my rightwards-tilted spine. I am trying to keep centralised and I am trying to avoid any swaying motion to the right. Note that I am not holding a golf club - because I am only demonstrating the backswing pivot action.
Author performing a rightwards-centralised backswing action - capture images from his swing video lesson
Image 1 represents the address position. The yellow dotted line shows that I have a small degree of rightwards-tilt of the spine, which causes the right shoulder to become slightly lower than the left shoulder at address.
Image 2 represents the mid-backswing. Note that I have maintained the same degree of rightwards-tilt of the spine - note that my head is still in the same position. The yellow dotted line represents my rightwards-tilted spine. One cannot see the upper half of my spine, because it is now obscured by my right shoulder blade.
Image 3 shows the end-backswing position. Note that my head has remained roughly in the same position, and note that my degree of rightwards-tilt of the spine has remained nearly unchanged - moving only slightly more rightwards (see yellow dotted line). The right shoulder blade is obscuring the upper half of my spine. Note how a large shoulder turn can torque the upper thoracic spine slightly leftwards. However, a slight torquing of the upper thoracic spine to the left (due to a large shoulder turn motion) is not the same phenomenon as a deliberate leftwards-tilt of the spine (as recommended for a S&T golfer via the biomechanical mechanism of bowing the spine away from the target).
Geoff Jones (aka as Slicefixer), an Arkansas-based golf instructor, also teaches his golf students a rightwards-centralised backswing action swing style.
Consider how his golf students use a rightwards-centralised backswing action.
Slicefixer student swing video compilation - http://www.youtube.com/watch?v=12KHR1xr2SA
Note how his golf students simply turn around their rightwards-tilted spine. They do not usually torque their upper thoracic spine leftwards (as much as many PGA tour golfers) because Geoff Jones prefers that his students use a shorter backswing action.
Slicefixer student (birds-eye view) - capture images from his swing video
Image 1 shows a Slicefixer student at address. Note his rightwards-tilted spine.Image 2 shows how he simply rotates his upper torso around his rightwards-tilted spine during the mid-backswing. Note that he doesn't sway his head and upper torso to the right.
Image 3 shows the Slicefixer student in the late backswing. Note that he has remained centralised with a rightwards-tilted spine. Any "appearance" of the upper thoracic spine being torqued to the left is only due to the effect of the clockwise movement of the right shoulder blade around his rightwards-tilted spine.
I would highly recommend a rightwards-centralised backswing action swing style for all golfers, and I believe that all golfers should avoid any deliberate tilting (arch-extension) of their spine to the left during their backswing action. An unintentional torquing of the upper thoracic spine to the left, due to a large shoulder turn, is perfectly acceptable - as long as a golfer doesn't deliberately lean leftwards and adopt a reverse pivoting posture.
Question number 8:You state that you do not want golfers to use a leftwards-centralised backswing action, which you label a reverse-posturing backswing action. What about a vertical-centralised backswing pivot action?
Answer:
What is a vertical-centralised backswing action?
Re-consider this photo-diagram from Bennett/Plummer's S&T golf book [9].
End-backswing postures - from reference number [9]
I prefer a rightwards-centralised backswing action - represented by photo B. By contrast, Bennett/Plummer recommend a leftwards-centralised backswing action (photo C) for their S&T swing style. A vertical-centralised backswing action is intermediate between posture B and posture C - where the upper torso appears to be vertically-centralised between the feet. Sean O'Hair is a good example of a golfer who uses a vertical-centralised backswing action.
See - http://www.youtube.com/watch?v=phEWUVJE3CA
Sean O'Hair describes the biomechanics of his backswing action in this swing video - http://www.youtube.com/watch?v=BNS9ZxE4ji8
In that video, Sean O"Hair states that he tries to keep his sternum centralised over the ball.
Sean O'Hair demonstrating how he performs his backswing action - capture image from his swing video
Note that Sean O'Hair tries to keep his sternum centralised when performing his backswing pivot action - image 1. That gives him a vertical-centralised posture at his end-backswing position - image 2.Most importantly, note that Sean O'Hair states that he doesn't use the S&T maneuver of arch-extending the spine (towards the target) in his backswing action.
Sean O'Hair demonstrating the S&T maneuver of arch-extending the spine - capture image from his swing video
Note that Sean O'Hair is arch-extending his spine (bowing the spine away from the target) while performing his backswing pivot action, and that causes his upper torso to be leaning leftwards in a leftwards-centralised backswing action (reverse-posturing) manner - upper spine is vertical, but more left-leaning relative to the lower lumbar spine. Sean O'Hair doesn't use that S&T maneuver (called the "Leaning Tower of Pisa" feeling by the S&T golfer Charlie Wi) in his vertical-centralised backswing action.
I think that it is perfectly acceptable to use a vertical-centralised backswing action as an alternative to a rightwards-centralised backswing action. In both cases, one can rotate the pelvis in the downswing without having to perform the "butt-thrust-under-the-lower spine" maneuver (assertive left-lateral pelvic shift maneuver) that is so characteristic of the S&T swing, and that may produce potentially harmful latriflexion forces at the level of the lumbar spine.
Question number 9:Sean O'Hair, who uses a vertical-centered backswing action, presently has Sean Foley as his golf instructor (2010). Tiger Woods is now (August 2010) also being exposed to Sean Foley's golf instructional teaching. There has been considerable controvery in the "golf-gossip" world of professional golfers as to whether Sean Foley is teaching the S&T swing, or some personal variant of the S&T swing, and many golfers actually believe that Sean O'Hair is really a S&T golfer - even though Sean O'Hair has stated publically that he is not using the S&T swing. Could you more clearly demonstrate the difference between Sean O'Hair's vertical backswing action swing style and the S&T swing style?
Answer:
Although Sean Foley has asserted that he has only acquired 5% of his swing style teaching philosophy from Bennett/Plummer, there are many similarities between Sean O'Hair's swing and the S&T swing. Sean O'Hair and a S&T golfer both use a centered backswing action - where they try to keep the torso very centered during the backswing action. I previously stated that Sean O'Hair uses a vertical backswing action swing style, and that a S&T golfer uses a leftwards-centralised backswing action swing style. However, the issue is much more complex, because many S&T golfers do not look leftwards-centralised at their end-backswing position. Consider an example - Troy Matteson.
Troy Matteson and Andy Plummer at the end-backswing position
I obtained the Troy Matteson capture image from a swing video [14] and I obtained the Andy Plummer photo from the S&T book [9].At first glance, it would seem that Troy Matteson has a rightwards-centralised backswing action - because his torso appears to be leaning to the right, while Andy Plummer's torso appears to be leaning very slightly to the left. However, Troy Matteson's right-leaning appearance is due to the fact that his he has shifted his pelvis more left-laterally - note that the outer border of his left pelvis is outside his left foot. If the pelvis shifts left-laterally, then the lumbar spine also moves left-laterally. If the head is kept stationary over the ball, then the torso will appear to be more right-leaning - even if the S&T golfer is using the very characteristic S&T extension maneuver. The extension maneuver is also referred to as a spine straightening maneuver, or an arch-extension maneuver. This extension maneuver is very characteristic of the S&T swing and it causes the thoracic spine to become left-leaning relative to the lumbar spine - even if the whole torso appears to be right-leaning. If you look carefully at Troy Matteson's torso, you will see that his upper torso is slightly left-leaning relative to his lower torso - even though his whole torso appears to be right-leaning. If a golfer uses the characteristic S&T extension maneuver, then he can be correctly labelled a S&T golfer, irrespective of whether his torso appears to be slightly right-leaning, or appears to be vertical, or appears to be left-leaning, at the end-backswing position. Sean O'Hair has a vertical backswing action, which causes his head, upper swing center and lower swing center to become vertically aligned - but he doesn't utilise the S&T swing's extension maneuver, and that fact differentiates his swing from a S&T golfer's swing. To make this complex issue much clearer, I will describe the biomechanics of the S&T swing's extension maneuver in greater detail.
Consider the natural spinal anatomy of a person who stands erect.
Diagram of the human spine
When a golfer stands erect, there is a very slight concave-curvacture of the lumbar spine - called lordosis. By contrast, the thoracic spine is minimally curved in the opposite direction - called kyphosis.
When a golfer bends over ~30-40 degrees into his address posture, there should be no significant change in the spinal architecture.
Representation of a golfer bending forward about 30-40 degrees
The hip joint is the fulcrum point for the bending-over process, and the golfer's entire spine bends overs with no significant change in spinal curvacture. In other words, the spine is not more flexed when a golfer bends over, or more extended when the golfer stands more erect. In some good golfers there may be a slight decrease in the amount of lumbar lordosis when they adopt a "correct" bent-over posture, but the overall spinal architecural alignment should basically be retained.
Here is Nick Faldo's address posture with the spine diagram superimposed.
Nick Faldo's address posture with spine diagram superimposed on the image
Note that Nick Faldo's mid-upper back appears to be slightly curved, and that is due to the fact that the human thoracic spine naturally has a slightly kyphotic (convex) curvacture. In the traditional/conventional golf swing, that slight kyphotic curvacture of the spine is retained during the backswing action, and it will still be present at the end-backswing position if the golfer rotates his upper torso 90 degrees during his backswing action. However, the thoracic spines are facing the target at the end-backswing position (because the thoracic vertebrae have rotated 90 degrees), and it will be difficult to note this curvacture when viewing the golfer from a face-on view.In a S&T golfer's swing, this slight kyphotic curvacture of the thoracic spine is partially eliminated by the S&T swing's extension maneuver, which attempts to extend/straighten the spine - while the thoracic spine is rotating during the backswing. To understand what affect this extension maneuver will have on the spinal alignment at the end-backswing position, consider this demonstration of a human skeleton model undergoing a rotational movement.
http://www.youtube.com/watch?v=Vtfy6Km3kvY
You only need to watch the first few 20 seconds of the video, where the subject demonstrates the 90 degree rotation of the skeleton's thoracic spine and a 45 degrees rotation of the lumbar spine/pelvis. (The rest of the video is devoted to his "spine engine" theory, which I believe is totally invalid - and I may write a critical review paper re: the "spine engine" theory in the near future).
I have created this animated gif to demonstrate the spine's rotational movement.
In the video demonstration, note that the spine is erect, while in a golfer's swing this spinal rotation will occur while the spine is bent-over at 30-40 degrees. However, this will not alter the essential nature of the spine's natural movements during the rotation of the upper/lower torso during the backswing action.
Capture image from the swing video
In this capture image, the thoracic spine has rotated 90 degrees, while the lumbar spine and pelvis have both rotated ~45 degrees. Note that the demonstrator is not allowing the spine to tilt to the left-or-right during this demonstration. This demonstration basically shows what happens to the spine in a vertical-centered backswing action - like Sean O'Hair's swing. The rotation is nearly a "pure" rotation, and there is no attempt to lean the spine away from, or towards, the target. Note that this "pure" rotation movement will allow a golfer to keep the head, upper swing center (located near the second thoracic vertebra), and the lower swing center (located near the mid-sacrum) centralised over the ball during the backswing, with the mid-upper thoracic spine becoming near-vertical at the end-backswing position - see Sean O'Hair in his swing video demonstration. Finally, note that the thoracic spine is still slightly kyphotic (as it was at address). However, note that the kyphotic convex arch of the thoracic spine is directed towards the target (because the thoracic spine has rotated 90 degrees).
Now consider what happens in a S&T golfer's swing when he performs the extension maneuver (also called a spine straightening maneuver).
Modified photo - designed to demonstrate the biomechanical effects of the extension maneuver
I have created two spinal images to demonstrate what I perceive to be happening to a S&T golfer's spine when he performs the extension maneuver, that will give a S&T golfer a distinct "sensation" of experiencing what Charlie Wi (Bennett/Plummer's proto-typical S&T golfer) calls a "Leaning Tower of Pisa" sensation. The upper spine moves leftwards due to the influence of the extension maneuver ("attempt to straighten the thoracic spine" maneuver), and the magnitude of the extension maneuver's effect on the thoracic spine (at different levels) is represented by the size of the red arrows - and that leftwards motion is obviously happening while the spine is rotating during the backswing action.The next photo represents my perception of the relative difference between Sean O'Hair' thoracic spine (yellow curve) and a S&T golfer's thoracic spine (red curve) at the end-backswing position - presuming that the upper torso rotation is limited to 90 degrees, and the upper torso doesn't over-rotate >>90 degrees and torque the upper spine leftwards.
Modified photo - designed to demonstrate the magnitude of the effect of the extension maneuver
Note that the lumbar spine (green curved line) is unchanged, but the S&T spine (red curved line) is more left-leaning (relative to the lumbar curve line) than Sean O'Hair's spine (yellow curved line). In other words, the upper spine becomes more bowed/arched towards the target under the influence of the S&T swing's extension maneuver, but there is very little change in the degree of verticalization of the mid-upper thoracic spine.The following photo demonstrates my perception of these spinal curves as superimposed on Andy Plummer's S&T swing - at his end-backswing position.
Back view of Andy Plummer at his end-backswing position - from reference number [15]
I have kept the colors the same, so it should be apparent where the thoracic spine and lumbar spine are roughly situated. I believe that the thoracic spine's arch-curvacture to the left (relative to the lumbar spine) is responsible for the S&T swing's left-leaning look - the "Leaning Tower of Pisa" look, where the upper torso appears to be leaning leftwards relative to the lower torso, even while the mid-upper thoracic spine appears to be vertical when viewed from a face-on view.
I think that one characteristic sign of this S&T spine "arch-extension maneuver" is the fact that the right side of the mid-torso appears to be bulging slightly to the right - thereby obliterating part of the "space" that is created by a traditional/conventional golfer who performs a rightwards-centralised backswing pelvic action.Addendum added December 2010:
I have produced a 9 minute video which shows how an arch-extension maneuver is needed to convert a rightwards backswing pivot action, or a rightwards-centralised backswing pivot action, into a vertical-centralised backswing pivot action, or a leftwards-centralised backswing pivot action (which requires a greater degree of arch-extension towards the target in order to cause the thoracic spine to be more leftwards leaning relative to the lumbar spine).
http://www.youtube.com/watch?v=BPd5hSGuikg
Jeff Mann.
First version: February 2007.
First major revision: March 2010.
References:
1. The Golfing Machine. Homer Kelley.
2. Aaron Baddeley swing video.
Obtainable from the V1 Home Swing Analyser website. http://v2.v1home.com
3. 100% Golf: Unlocking Your True Golf Potential. David Leadbetter.
4. Swing Like a Pro. Ralph Mann and Fred Griffin.
5. The Fundamentals of Hogan. David Leadbetter.
6. Slice the Slice Out of Your Swing!
http://video.google.com/videoplay?docid=-4312420981818984859&hl=en
7. The Golf Swing. David Leadbetter.
8. The Slot Swing. Jim McLean.
9. The Stack and Tilt Swing. Michael Bennett and Andy Plummer.
10. Perfect Pivot - Part 1: Backswing Pivot. Brian Manzella.
http://www.brianmanzella.com/forum/golfing-discussions/3675-perfect-pivot-part-1-backswing.html(Registration may be required)
11. "Never Slice Again!" video. Brian Manzella.
http://www.brianmanzella.com/videocart/neversliceagain.html
12. The Four Magic Moves to Winning Golf. Joe Dante.
http://www.golf-swing-magic.com/index.html
13. Hank Haney's Essentials of the Swing. Hank Haney.
14. Troy Matteson swing video.
http://www.youtube.com/watch?v=tVp9Fy1j-Wc
15. The New Tour Swing. Article written by Peter Morrice. Golf Digest Magazine. June 2007.