How To Hit The Ball Straight - The Essential Elements
Click here to go back to the index page.
Introduction:
In this paper, I will be discussing all the essential elements that are required to hit the ball straight when executing a full golf swing. The number of essential elements is large, and that is why it is difficult to hit a golf ball straight. If a single swing fault (single missing element or single incorrectly applied element) occurs during the golf swing, then it significantly decreases the likelihood of the ball being hit straight. I am going to attempt to address this complex issue in a methodical manner, so that each explanatory step builds upon the foundations established by the previous explanatory steps. Hopefully, at the end of this lengthy explanatory process, a beginner golfer will have a much clearer idea of what he needs to accomplish in order to hit the ball straight.The characteristic feature of the golf swing is the fact that that the golfer stands parallel to the ball-target line and then swings the clubshaft around the body using a sideways swinging-action (arms/clubshaft are swung across the front of the body, which is aligned parallel to the ball-target line). The clubshaft traces an arc around the body, and the clubshaft approaches the ball from the inside during the downswing. After hitting the ball, the clubshaft traces an inwards-directed arc around to the left during the followthrough. The clubshaft/clubhead swingarc is therefore in-to-square-to-in.
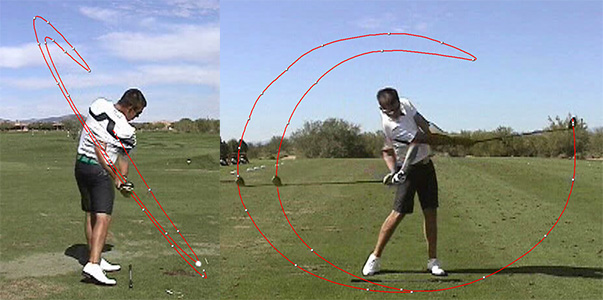
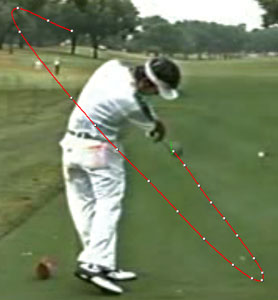
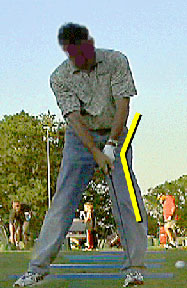
Clubhead swingarc of Aaron Baddeley's driver swing - from reference number [1]
Note that Aaron Baddeley is standing parallel to the ball-target line and that he swings the club around the front of his body. One can readily note that the clubhead approaches the ball from the inside, becomes momentarily square to the ball-target line at the exact moment of impact, and then passes inside again immediately after impact. The clubhead never travels in a straight line and it is always moving along a circular path. For the clubhead to hit the ball straight, it must be travelling straight towards the target at the exact moment of impact and the clubface must also be vertically square at the exact moment of impact. Therefore, there are two essential factors that must be got right at the exact moment of impact in order to hit the ball straight - i) the clubhead must approach the ball from an inside track and become momentarily square to the ball-target line at the exact moment of impact, and ii) the clubhead's clubface must be perfectly square to the target at the exact moment of impact.
Here is a series of SwingVision capture images of a driver's clubface impacting a golf ball.
Trevor Immelman's driver at impact
Although it appears that the clubface is perfectly square to the ball during the entire time that the ball is in contact with the clubface, the true reality is that the *clubface is closing slightly while the clubface remains in contact with the ball. The clubface remains in contact with the ball for approximately 4/1000 of a second at a clubhead swing speed of 100mph. During that time period, the clubface closes by approximately 0.75 degrees. The ball will go straight if the clubface is perfectly square at time of clubface-ball separation, which means that the clubface must be minimally open when it first impacts the ball. At slower swing speeds, the clubface should be approximately 1-2 degrees open at the moment of first impact to ensure that the clubface is perfectly square at the time of clubface-ball separation. A golfer should become aware of this fact, and he should deliberately avoid hitting the center-back of the ball with a square clubface. A golfer should, instead, think of hitting the inner back quadrant of the ball with a minimally open clubface (1-2 degrees open) to ensure that the clubface is square at the exact moment of clubface-ball separation.(* To avoid confusion in the ensuing discussion and to make things simple - I am going to ignore this fact in the ensuing discussion, and I am going to refer to a square clubface as indicating that the clubface is square at the time of first impact)
How does a golfer i) control the clubface angle, and how does he ensure that the ii) clubhead's downswing swingarc becomes square to the ball-target line at the exact moment of impact? I will be discussing these two issues in the next two sections of this review paper, and a beginner golfer needs to learn that the left hand controls the clubface angle while the right hand/right forearm controls the clubhead's swingpath.
Controlling the clubface at impact
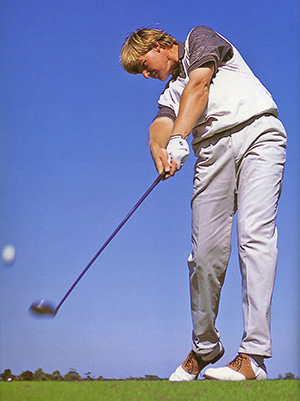
Consider this image of Vijah Singh at the exact moment of impact.
Vijah Singh at impact
Note that the clubface is square at impact. Note that the left wrist is flat and that the back of the left hand is facing the target. Therefore, one can conclude that if a golfer grips the club with a neutral grip so that the clubface is parallel to the back of the left hand AND if the golfer hits the ball with the back of the left hand facing the target at the exact moment of impact, then the clubface must be square at impact. Both conditions must be met for the clubface to be square at impact.How can one ensure that the clubface is parallel to the back of the left hand at address? One method is to grip the club's grip with the left hand while holding the club in front of the body with the right hand. Use the right hand to hold the club at waist level so that the clubshaft is at right angles to the body (and ball-target line) and parallel to the ground. while ensuring that the clubface is square to the target. Then grip the club with the left hand so that the back of the left hand faces the target. To check that the clubface is parallel to the back of the left hand, you can perform the following check - see next photo.
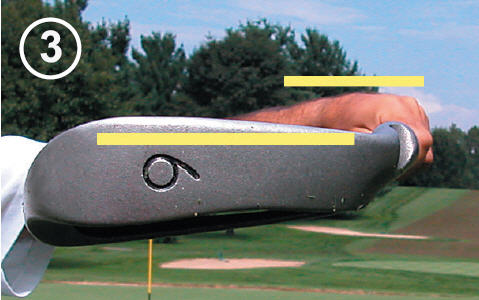
Checking left hand grip - from reference number [2]
In this photo, Brian Manzella is holding his left arm/forearm parallel to the ground, such that the clubshaft is angled slightly inwards in front of his face. Note that the back of his left hand is flat and parallel to the ground. He is looking at his clubface and noting that the lower groove lines on the clubface (represented by the yellow line) are parallel to the back of the left hand. One should not look at the lower edge of the clubface because the lower edge of the clubface may be rounded and not parallel to the clubface's groove lines.After ensuring that the clubface is correctly aligned with the back of the left hand, the golfer should place the clubhead lightly on the ground behind the ball and i) ensure that the back of the left hand faces the target and ii) that the clubshaft is perpendicular to the ball-target line. Theoretically, the groove lines on the clubface should face the target and be square to the ball-target line. If they are not, then you may have to make a final adjustment to ensure a square clubface at address. Consider the following photo.
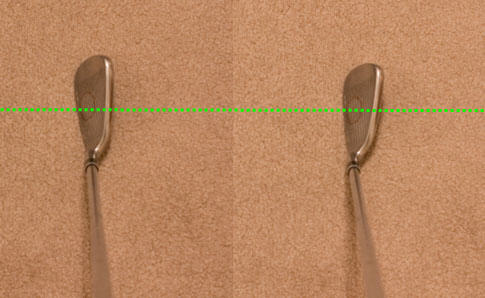
Clubface positioning at address
The green dotted line represents the ball-target line. Note, in the first image, that the clubface is slightly closed relative to the ball-target line. One should look at the grooves in the region of the sweetspot (red circle area) which are approximately 3-6 groove lines up from the bottom of the club. If the club is truly square to the ball-target line, then those groove lines should be perfectly perpendicular to the ball-target line. If the clubface is slightly closed (as seen in image 1), then one should loosen the left hand grip and twirl the clubshaft clockwise in the hands before retightening the left hand grip. A square clubface should look like the clubface in image 2 - where the groove lines are perpendicular to the ball-target line. Do not look at the top edge of the clubhead, because the top line of the clubhead is usually not parallel to the groove lines on the clubface.It is very important to have a square clubface at address and a golfer should not even accept a slightly closed clubface at address. A slightly closed clubface at address can mean that the clubface is facing far more inside-leftward than can readily be perceived by simply looking at the clubface from above - especially when using short irons.
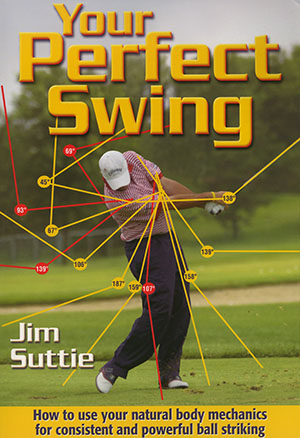
Clubface alignment aid - from reference number [3]
In this photo, a clubface alignment aid, which has a magnetic base, has been placed on the clubface surface of a short iron. Note how far left the alignment stick is pointing although the clubface only appears slightly closed. This closed clubface alignment will result in a pulled shot.A beginner golfer must place close attention to the clubface angle at address, and carefully ensure that the clubface is either perfectly square, or minimally open (1-2 degrees open), at address.
Controlling the clubshaft/clubhead swingpath - the concept of the straight plane line
I previously stated that the clubshaft/clubhead moves along a circular downswing path that is inclined at an angle to the ground and that the clubhead will only be momentarily square to the ball-target line at the exact moment of impact, and that the clubhead never travels along a straight line path.
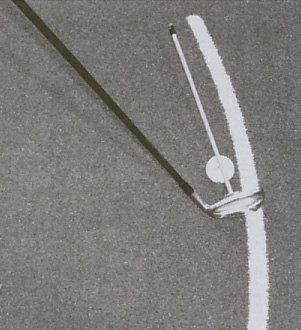
Consider the clubhead swingpath of a PGA tour golfer - Kevin Na.
Clubhead path of Kevin Na - from reference number [4]
I used a spline tool to trace Kevin Na's clubhead swingpath during the downswing and early followthrough phase of his driver swing. Note how symmetrical the clubhead swingpath is relative to the ball-target line, and note how the clubhead swingpath only touches the ball-target line at the exact moment of impact. How can a beginner golfer learn how to swing his clubshaft/clubhead along a similar path, that is perfectly symmetrical to the ball-target line? In order to learn how to accomplish that feat, a beginner golfer first needs to understand how to trace a straight plane line.Look at this swing video lesson by Mike Bender, who is teaching Zach Johnson how to swing along a straight plane line using a plane board as a teaching aid.
http://www.youtube.com/watch?v=7WtzWAoZ6Zk
Note that Mike Bender is teaching Zach Johnson to keep his clubshaft travelling along the plane board during the backswing, downswing and followthrough - when the clubshaft is below waist level. If the clubshaft continuously runs along the flat surface of the plane board during the downswing and followthrough, then the clubhead (which is located at the peripheral end of the clubshaft) will follow a symmetrical path that is very similar to Kevin Na's swing (in the previous photo). Although Mike Bender doesn't use the term "straight plane line", he is actually teaching Zach Johsnson how to trace a straight plane line. To understand the concept of a "straight plane line", consider this series of capture images from the Mike Bender swing video lesson.
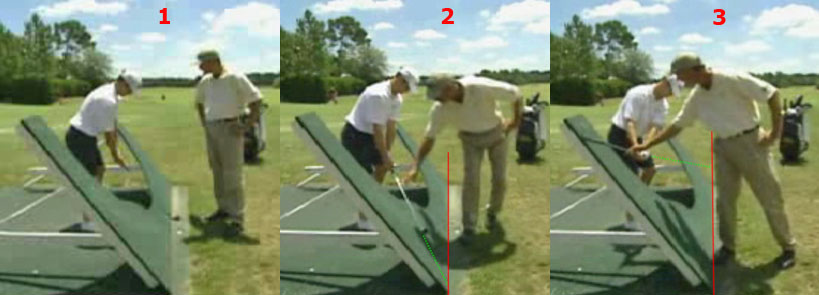
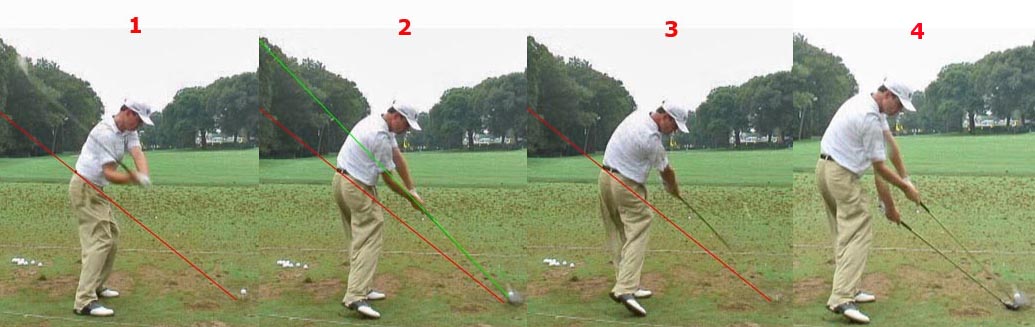
Zach Johnson tracing a straight plane line - from the Mike Bender swing video lesson
In image 1, note that Zach Johnson is in the address position with the clubshaft perpendicular to the ball-target line. The plane board is angled back so that it perfectly matches Zach Johnson's clubshaft-at-address angle. Most professional golfers hold their clubshaft at that approximate address angle - whereby a line extended from the butt end of the club will pass through the belt buckle.Image 2 shows Zach Johnson starting the takeaway by keeping his clubshaft along the plane board. Note that I have drawn a red line along the base of the plane board (where it touches the ground) and that red line represents the straight plane line. I have also drawn a green dotted line, which is an imaginary line-extension of the clubshaft. Note that the green dotted line hits the ground at the red line (straight plane line) implying the clubshaft is pointing at the straight plane line. That is what is meant by tracing a straight plane line. If an imaginary line, drawn from either the clubhead end, or butt end, of the clubshaft (at any point in the swing when the clubshaft is below waist level, but not parallel to the ground) hits the ground along the straight plane line, then the golfer is effectively tracing a straight plane line. Image 3 shows Zach Johnson just after he has passed beyond the end-takeaway position - note how an imaginary line (green dotted line) drawn from the butt end of the clubshaft intersects the ground along the red line (straight plane line).
Here is a series of images of Zach Johnson tracing a straight plane line during the downswing.
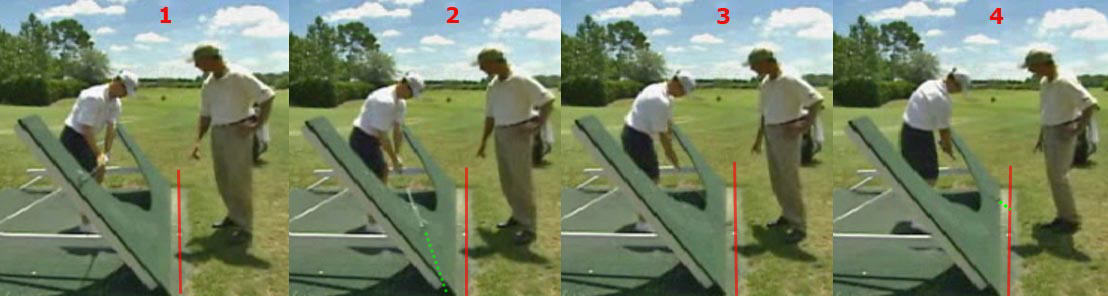
Zach Johnson tracing a straight plane line during the downswing - from the Mike Bender swing video lesson
I have a drawn a red line through the ball, and that red line represents both the ball-target line and the straight plane line. Obviously if one uses the hosel of the clubshaft as representing the clubshaft's swingpath, then it will trace a straight plane line that is at the exact base of the plane board (where it contacts the ground), while if one thinks of movement of the sweetspot of the clubface, then it is tracing a straight plane line that is a few inches further away from the base of the plane board (and it is coincident with the ball-target line).Image 1 shows Zach Johnson at the delivery position (when the clubshaft is parallel to the ground and parallel to the ball-target line). Neither the clubhead end, or the butt end, of the clubshaft can point at the straight plane line when the clubshaft is parallel to the ground - and that is the only time-point in the downswing when that happens. Image 2 shows that an imaginary line (green dotted line) extending from the clubhead end of the clubshaft points at the straight plane line. Image 3 shows that the clubhead touches the straight plane line at only one time-point in the downswing - at the time-point of ball impact. Image 4 shows the early followthrough, and the clubhead end of the clubshaft points at the straight plane line.
One can see that if a golfer's clubshaft traces a straight plane line, and that straight plane line is along the ball-target line, that he will be generating a clubhead swingpath that is perfectly symmetrical relative to the ball-target line. Note that the clubhead swingarc will only touch the straight plane line (ball-target line) at one point in time, and that is at the time-point of impact. If the clubface is square at the moment of impact, then the ball should be hit straight down the straight plane line (ball-target line). Note that the clubhead never goes beyond the straight plane line (crosses the straight plane line), and the clubhead swingarc is always in-square-in.
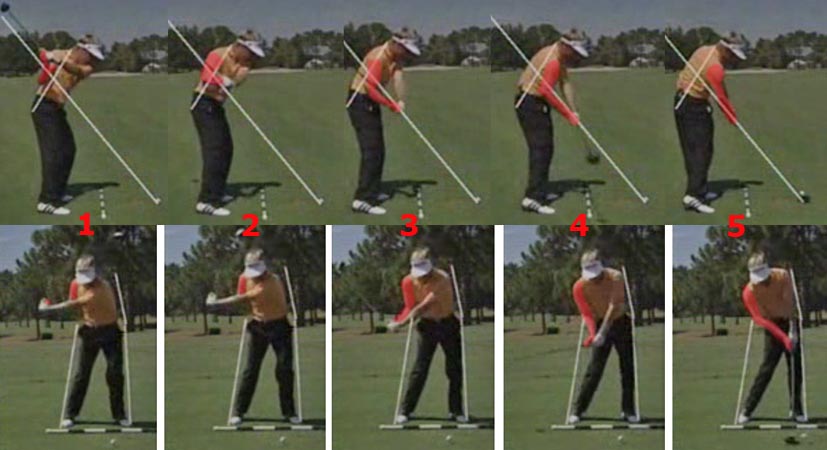
Although, Zach Johnson uses the plane board as a training aid, it is obvious that he doesn't actually swing along the same inclined plane during both the backswing and downswing. Most professional golfers swing along a slightly steeper plane during the downswing (steeper than the clubshaft-at-address plane). Here is a photo of Zach Johnson's downswing plane.
Zach Johnson downswing sequence - from a swing video
The red line is the clubshaft-at-address plane - it is also called the hand plane - and it passes through his belt buckle. Image 2 demonstrates that his clubshaft is along a steeper plane at the exact moment of impact - green line - and that plane passes through the right elbow. This plane is called the elbow plane and it is steeper than the hand plane (clubshaft-at-adress plane.) Image 3 demonstrates that his clubshaft still points at the ball-target line after impact, which means that he is still tracing a straight plane line that is coincident with the ball-target line. Image 4 shows the relative position of his hands at impact compared to the address position, and it is obvious that his hands are higher at impact. It is important for a beginner golfer to realise that Zach Johnson is still tracing a straight plane line (that is along the ball-target line) during the downswing, even though the clubshaft's angle relative to the ground is slightly steeper in the downswing compared to the backswing.It is critically important that a beginner golfer fully understands the concept of a straight plane line, because if he can learn how to swing along a straight plane line (that is perfectly aligned along the ball-target line) then he is much more likely to hit the ball straight (presuming he has a square clubface at impact). To ensure that a beginner golfer fully understands the concept of a straight plane line, I am going to provide another illustrative example.
Look at this video lesson of Martin Hall teaching Morgan Pressel how to swing along a straight plane line.
http://youtube.com/watch?v=bRTqx4tW3mQ
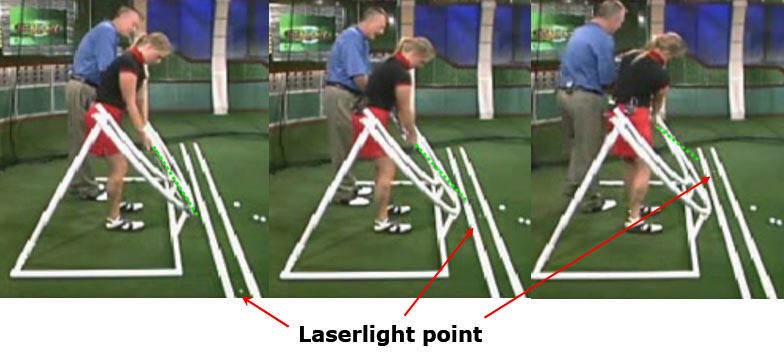
Note that Martin Hall has created a plane board structure out of PVC tubing, and that Morgan Pressel is using a shaft that has a laserlight at either end. The laserlight produces a light spot along the ground and if Morgan Pressel continuously keeps her shaft along the plane board, then the laserlight will produce a continuous series of light spots that traces an imaginary path along the ball-target line. Although Martin Hall talks of "swinging along a straight circle", he is essentially referring to the concept of swinging along a straight plane line.
Here is a photo-sequence of Morgan Pressel tracing a straight plane line with her laserlight wand, and note that the straight plane line is coincident with the ball-target line.
Morgan Pressel tracing a straight plane line - from the Martin Hall swing video
I have drawn a green-dotted line over the laserlight wand shaft because it is difficult to see the laserlight wand shaft clearly in these capture images, and I have drawn red arrows that point to the laserlight spots on the ground.Note that Martin Hall states that Morgan Pressel can only be conceived to be swinging on a single plane (one plane) when she is swinging the laserlight shaft below waist level, and that she must swing on a steeper plane when she is swinging the shaft above waist level. Mike Bender made the same point in his swing video lesson with Zach Johnson. A beginner golfer must realise that a golfer has to swing on a steeper plane when the hands are above waist level, and that it is biomechanically/anatomically impossible to swing along the same plane as the plane board when the hands move above waist level.
If a golfer has to swing on a steeper backswing plane when the hands are above waist level, how steep should that backswing plane be? There is no definitive answer to that question. I personally believe that although the hands have to move along a steeper plane when the hands move above waist level, that one should minimise the degree of steepness of the hand arc to the smallest necessary amount - so that it is easier to get back on the optimum clubshaft plane in the downswing.
Here is a photo demonstrating the steepness of Zach Johnson's hand movement arc in the latter half of the backswing.
Zach Johnson's backswing hand arc - from the Bender swing video
I used a spline tool to demonstrate Zach Johnson's hand movements during the second half of the backswing, and one can readily see that his hand movement arc becomes slightly steeper in the latter half of the backswing. Note that Zach Johnson's left arm is along his shoulder turn angle at the end of the backswing, and that his left arm is not steeper than his shoulder turn angle. That indicates that Zach Johnson has minimised the degree of steepness of his backswing plane in the latter half of the backswing. Many PGAtour players are adopting a shallower left arm plane in the backswing, and I think that it advantageous because it minimises the degree of planar shift that inevitably has to happen during the backswing.Consider another example of a golf swing where the golfer minimises plane shifts during the backswing, and where the downswing clubshaft plane is very similar to the backswing clubshaft plane.
See this swing video of Stuart Appleby's swing - http://www.youtube.com/watch?v=_jqJ9R2LypY&NR=1
Stuart Appleby backswing - capture images from a swing video
Note how Stuart Appleby stands at adddress - he is perfectly parallel to the ball-target line. His feet, knees, pelvis, and shoulders are all parallel to the ball-target line. Beginner golfers should realise that it is much easier to swing along a straight plane line that is coincident with the ball-target line if one aligns one's feet/knees/pelvis/shoulders parallel to the ball-target line.The person (Steve Bann) who generated this swing video lesson has drawn a white line through Stuart Appleby's right elbow at address, and this represents his elbow plane. Note that his hands are slightly below this line at address, and that the hand plane (clubshaft-at-address plane) is only slightly less steep than the elbow plane. Image 2 shows the start of the takeaway and one can see that his clubshaft moves back along the elbow plane line. At the end-takeaway position (image 3), his clubshaft is only slightly above the elbow plane line. When he reaches the 9 o'clock position, where the left arm is parallel to the ground (image 4), note that the butt end of the clubshaft points just inside the ball-target line, and the clubshaft is not much steeper than the elbow plane line. Image 5 shows the position of his hands at the end-takeaway position, and his hands are just above the elbow plane line while the left arm is along the shoulder turn angle. Note that Stuart Appleby doesn't have a much steeper clubshaft plane in the second half of his backswing compared to the first half, and that there is very little planar shift.
Now, consider what happens in his downswing.
Stuart Appleby downswing - capture images from a swing video
Note that Stuart Appleby starts the downswing with a hip squaring action that drops his hands down towards the elbow plane line at the very start of the downswing (image 1). When his left arm is parallel to the ground, the butt end of the club is pointing at the ball-target line and his hands are already down to the elbow plane line (image 2). From that point onwards, his hands remain on the elbow plane line, and his clubshaft is always pointing at the ball-target line (straight plane line) throughout the remainder of the downswing. At impact, his clubshaft is perfectly in line with the elbow plane line (image 5).I think that Stuart Appleby's swing pattern is a good role model for beginner golfers to emulate, because it is so symmetrical, so simple and there is very little shift in the clubshaft plane during the backswing when the clubshaft moves from a below waist level position (when it is tracing a straight plane line) to an above waist level position. Compared to Zach Johnson, his hands at impact are only slightly higher than his hands at address. Note that Stuart Appleby also has a very "quiet" lower body, and the pelvis doesn't lurch sideways during either the backswing or downswing. During the downswing, his pelvis only moves left-laterally to a small degree - so that he can replant weight over the left foot, which will allow him to effectively pivot his body over a straightened left leg.
Let me recap the two main points that I have made in this clubshaft-controlling section of my paper. I first stated that a beginner golfer must learn to i) swing his clubshaft on a straight plane line when his hands are below waist level, and secondly that he should ii) preferably minimise clubshaft plane shifts when his hands move from a below waist level position to an above waist level position.
Now, how can a beginner golfer accomplish this feat? A beginner golfer may understand the idea that he should allow his clubshaft to trace a straight plane line if he wants to hit the ball straight, but he still needs to learn how to move his body, arms, wrists, and hands in space to accomplish that goal. I have thought about this complex issue for many months, and here is my suggested approach for beginner golfers.
I believe that a beginner golfer must first realise that if he wants the clubshaft to trace a straight plane line in the downswing, that he must first learn how to move his right hand in the correct way, because the right hand directs the movement of the clubshaft during the downswing and allows it to trace a straight plane line. Although it is only important to trace a straight plane line during the downswing (because one doesn't hit the ball during the backswing), I have previously argued that it is easier to accomplish that goal if a golfer has a symmetrical swing that allows him to trace a straight plane line during both the backswing and downswing.
A beginner golfer must clearly understand what I mean when I state that the right hand directs the movement of the clubshaft.
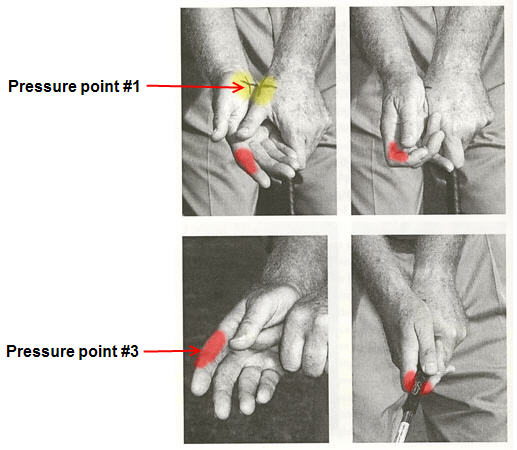
The position of the hands when establishing a grip - from reference number [5]
When one establishes a grip, one places the right palm (lifeline of the right mid-palm) over the back of the left thumb - see yellow-colored area in the above photograph. This action bonds the hands together so that they can function as a single, cohesive grip-holding unit during the entire swing. This hand-bonding action also serves two other functions -: i) The right hand pushes downwards over the left thumb and this helps to keep the left arm fully extended during the swing - this left arm-extending action is known as extensor action. ii) During the early/mid downswing, downward/outward/forward thrust pressure from the right side of the body (mainly right upper torso/shoulder) is applied to the clubshaft at this pressure point (yellow-colored area), and this is a power action that drives the clubshaft towards the ball.The red-colored area is the area around the right index finger's first joint where it abuts the club's grip. In a "good" grip, one should separate the right index finger slightly from the right middle finger, so that the right index finger can lightly press the shaft against the thumb in a pincer-style fashion. A golfer should be able to feel continual pressure in that red area during the downswing - as the clubshaft lags behind the hands - and that allows a golfer to develop a "feel" for lag pressure. However, that red-colored area also serves as "director" of the movement of the entire right upper limb (arm, forearm, wrist, hand) during both the backswing and downswing via its propioceptive sense of its own location in space. That red-colored area is the "director" of the right upper limb's "correct" movement in space - a movement that allows the right hand to trace a straight plane line during both the backswing and downswing. Before I demonstrate that movement via a swing video lesson, a beginner golfer first needs to have a clear idea how the right upper limb moves in space during both the backswing and downswing. I'll start with the backswing before I discuss the downswing.
Re-consider this photo of Stuart Appleby's backswing movements.
Stuart Appleby backswing - capture images from a swing video
Note that I have highlighted the right upper limb in red.Note the following facts that apply to Stuart Appleby's right upper limb in the address position (image 1). His right shoulder is lower than his left shoulder. His right wrist is hinged slightly backwards. His right elbow is held close to his right hip area. There is a very slight bend in the right elbow with the right antecubital fossa (hollow in front of the elbow) facing forwards in the direction of the ball-target line - this elbow position allows the right elbow to fold easily in the backswing, so that the right elbow remains close to the right side of the torso during the entire backswing, and doesn't move away from the body ("flying right elbow" problem)
Note what happens to his right upper limb in the early takeaway (image 2). He maintains the same degree of right wrist back-hinging (dorsiflexion), and he takes his right forearm straight back (away from the target) and that allows the clubshaft to trace a straight plane line as it moves roughly parallel to the elbow plane line. Note that his right elbow starts to bend a little during the late takeaway (image 3) and that causes the clubhead to move upwards along an inclinced arc.
Note what happens to the right upper limb in the later backswing (after passing the end-takeaway position) - images 4 and 5. Note that the i) right elbow continues to bend so that it has a 90 degree angle bend at the end-backswing position; ii) that the right wrist hinges further back so that it has a 90 degree back-bend at the end-takeaway position; and iii) that the right forearm/arm rotates counterclockwise (supinates) and that causes the right hand to end up underneath the shaft at the end-backswing (like a waiter holding up a tray of dishes). This counterclockwise rotation of the right forearm/arm is a fanning action that actually starts during the takeaway and occurs smoothly through the entire backswing.
It is important to realise that the right wrist never upcocks during the backswing, and it only hinges backwards (see the wrist glossary if you don't clearly understand the difference between wrist hinging and wrist cocking).
A beginner golfer should practice these right upper limb movements without using a golf club, and he should try to mimic Stuart Appleby's right upper limb movements as closely as possible, so that he can get a "feel" of how the right upper limb moves in space during the backswing. After mastering this right upper limb backswing movement, he should consider the downswing movements of the right upper limb.
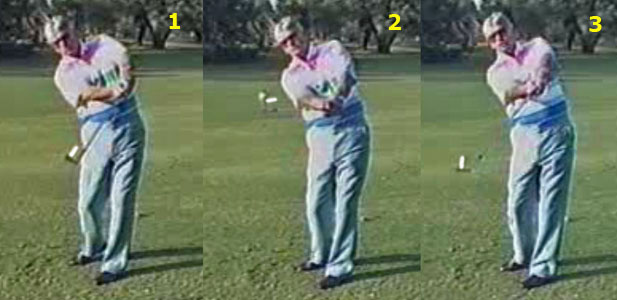
Stuart Appleby downswing - capture images from a swing video
Note that Stuart Appleby starts the downswing with a hip squaring action (images 1 and 2) that helps pull the right arm/elbow towards the right side of the body.
Note that by the time the hands get to waist level, that the right arm is closely applied to the right torso and the right elbow approximates the right hip area (image 3). Note that the right elbow still maintains its right angle bend, and that the right wrist is still hinged back 90 degrees.
As the hands move below waist level towards their impact position (image 4-to-image 5), the right elbow starts to partially straighten and the right wrist starts to unhinge (palmar flex). Note that the right elbow is incompletely straightened and the right wrist incompletely unhinged by impact (image 5). Note that the right elbow bypasses the front of the right hip in the late downswing as the clubhead nears impact.
A beginner golfer should practice these right upper limb downswing movements without using a golf club, so that he can get a "feel" for how the right upper limb moves in space during the downswing. Note how Stuart Appleby shifts his pelvis left-laterally during the early/mid downswing in order to create space for the right elbow, and a beginner golfer should also move his pelvis appropriately during the downswing while rehearsing these right upper limb movements.
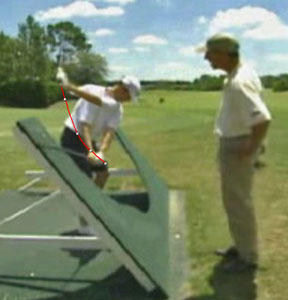
Once a beginner golfer has a clear "feel" for the movements of the right upper limb in the backswing and downswing, then he should perform the "straight plane line tracing flashlight drill" depicted in the following video.
Addendum added April 2009: I previously had a link to my personal demonstration of the "flashlight drill". However, my personal demonstration was very crude and I have found a much better demonstration of the "flashlight drill" using a laserlight wand device called the "Smartstick".
See - http://smartstickgolf.com/why-it-works/plane
Click on the button to view the Martin Hall video.
He uses the "Smartstick", which has a laserlight at both ends of the Smartstick (which is equivalent to a golf clubshaft). Note that one of the laserlights must always be pointing at the ball-target line, or an extension of the ball-target line (which happens when the laserlight tracks up the side-wall) - except when the clubshaft is parallel to the ball-target line.
If one performs the "flashlight drill" correctly (as demonstrated by Martin Hall), then one has to learnt how to keep the clubshaft on-plane throughout the backswing, downswing and followthrough.
After a beginner golfer gets to understand how the right hand "directs" the show - "directs" the body and right arm to move in space in the "correct" way that enables the golfer to trace a straight plane line - he may wonder what the left arm does during the backswing and downswing.
The main function of the left arm is to maintain the full radius of the swingarc. That is why the left arrm remains fully extended during the golf swing. The left arm basically acts as la ever and it is swung around the body by the rotating torso, and it doesn't control the path of the clubshaft during the backswing and downswing. The right arm/hand controls the clubshaft's path during the backswing and downswing and the left arm/hand simply goes along for the ride. In order for the left arm/hand to work synchronously with the right arm/hand during the backswing and downswing, it must move in a very specific manner.
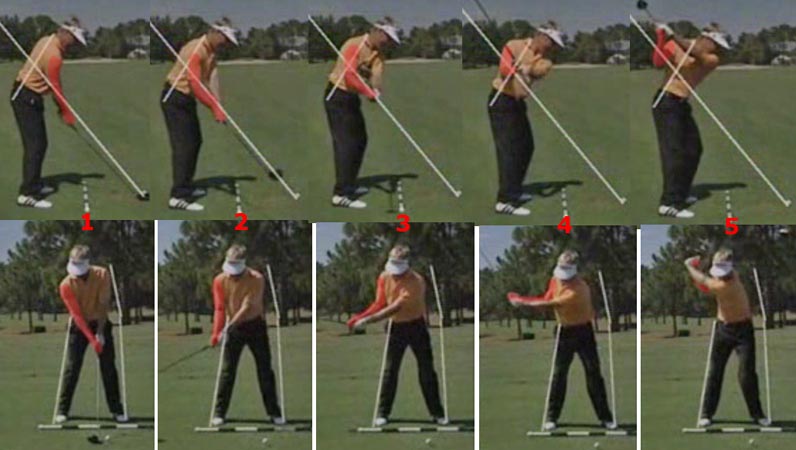
Consider what happens to the left arm and left hand during the backswing by studying this sequence of photos of Stuart Appleby's backswing.
Stuart Appleby's backswing - capture images fom a swing video
Note, at address (image 1), that Stuart Appleby's left arm is straight and his left wrist is flat so that the back of the left hand faces the target. Then, note what happens to the left arm and left hand during the backswing. During the backswing, the left arm rotates so that the back of the left hand faces the sky at the top of the backswing (image 5). The left wrist is still flat at the top of the backswing, which means that the left wrist does not hinge during the backswing. The only movement that occurs at the left wrist joint is an upcocking movement that causes the clubshaft to acquire a 90 degree angle relative to the left arm at the top of the backswing. In other words, the left wrist upcocks during the backswing while the right wrist hinges back.During the downswing, the opposite movements occur. The left arm rotates back, and the left wrist uncocks. There is no hinging motion in the left wrist during the downswing.
Consider what happens to Stuart Appleby's left arm and left hand during the downswing.
Stuart Appleby's downswing - capture images from a swing video
Note that when Stuart Appleby gets to the delivery position (where the clubshaft is parallel to the ground), that the left wrist is still flat (back of the left hand is in line with the back of the left forearm) and the left wrist is still significantly upcocked. During the time period that the clubshaft moves from the delivery position (image 4) to the impact position (image 5), the left arm rotates about 90 degrees so that the back of the left hand faces the target and the left wrist uncocks (causing the clubshaft to be in line with the straight left arm).The following swing video lesson by Martin Hall should help a beginner golfer understand how the left and right wrists behave during the backswing and downswing.
Martin Hall swing video lesson (watch the first 4 minutes of the video that deals with the right wrist hinging/left wrist cocking movements)
http://www.youtube.com/watch?v=44fev4wqC6U
To trace a straight plane line, the left and right wrists have to move synchronously in the correct manner during the downswing, while the right index finger directs the movement of the entire swing unit - which consists of the swinging arms, cocking/hinging wrists and the pivoting/rotating torso. Although the right index finger is the director of the show, the right index finger (and therefore the clubshaft) will not trace a straight plane line if the actors in the show (swinging arms, cocking/hinging wrists and pivoting/rotating torso) do not act properly (act in a perfectly synchronised manner). The sequencing of movements (body and arm/wrist movements) has to evolve in the correct sequence and also with perfect timing. If a golfer's timing is off, then it is impossible to establish a square clubface at impact. Timing is an essential element that must be got right!
Timing - an essential element in a golfer's ability to trace a straight plane line
A beginner golfer may learn to understand, and master, the body movements involved in tracing a straight plane line when performing a practice drill, but may not be able to square the clubface at the exact moment of impact when on the golf course. A common cause of this problem is a timing issue. During the mid-downswing, the clubshaft automatically releases, and it should reach the point of impact at the exact moment the hands reach their impact position. If the hands reach their impact position too fast, and far ahead of the clubhead, then the clubface will not have had sufficient time to get square and the clubface will likely be open at impact, which will result in a push-slice ball trajectory. By contrast, if the hands are too slow relative to the clubshaft, then the clubhead will bypass the hands before impact (= flipping) and may hit the ball with a closed face, which will result in a pulled shot.
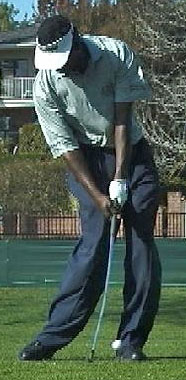
Flipping through impact
In this photo of an anonymous golfer, one can see the clubhead flipping past the hands at impact, which causes the left wrist to be bent at impact (rather than flat). The clubface may be square at impact or slightly closed at impact (if the clubhead is already travelling towards the inside), which will result in a pulled shot.Good timing is not easily taught, and it depends on a golfer's ability to coordinate his body movements so that every body part works synchronously with all the other body parts involved in the full golf swing. Each individual golfer has to learn how to move his body synchronously in space/time, and this requires practice. Some golfers are natural athletes and easily acquire a good sense of timing with vey little practice, while other golfers have to spend endless hours practicing at a golf practice facility.
Here is a swing video of a good golfer's iron swing (Slicefixer is the internet name of a Texas-based golf instructor who teaches this student golfer) - with the camera mounted above the golfer, thus providing us with a birds-eye view.
http://youtube.com/watch?v=iAkFST89yr8
I used my Swing Analyser program to capture single frame images from that swing video at different time-points in the downswing.
Capture images from the above swing video showing the sequence of body movements in the downswing
Image 1 - End-backswing postion.I placed two short green lines alongside the outer border of his left and right pelvis. I placed a blue line over the tush line. The yellow line shows the degree of pelvic turn in the backswing, which is close to 45 degrees. The red line shows the degree of shoulder rotation in the backswing, which is close to 90 degrees.
Image 2 - Early downswing. Hip squaring period.
Note that the downswing starts with the pelvis sliding slightly to the left while the pelvis rotates to square. Note that the right buttocks remains on the tush line in the early downswing. Note that the hip squaring action occurs while the shoulders start to rotate, and that the shoulders turn more than the pelvis (in terms of the absolute degree of angular change per unit time) during this phase of the downswing.Image 3 - Mid-downswing
Note that the pelvis continues to slide a little more left laterally, and that the left buttocks is starting to be pulled back to the tush line (left hip clearing action) as the pelvis starts to open up. The shoulders continue to rotate, but the angle between the pelvic turn angle and shoulder turn angle is not significantly decreasing compared to image 2 thus demonstrating that the shoulders and pelvis are rotating at roughly the same speed at this time-point in the downswing.
Image 4 - Later downswing
Note that the pelvis slide is coming to an end, and that the pelvis is now significantly open to the target with the left buttock on the tush line. The right pelvis is now leaving the tush line as it rotates forward. It is at this point that the right heel will be lifting up as the right pelvis rotates forward. Note that although the hips are open to the target, that the shoulders are still closed to the target - despite a significant reduction in the pelvis-shoulder turn angle difference (from the downswing-start position).
Image 5 - Impact. Note that the hips are well open, and the shoulders slightly open at impact. The left buttocks is on the tush line. Note the total amount the pelvis (and torso) has slid left-laterally throughout the entire downswing (from image 1 to image 5).This series of images demonstrates the complexity of body movements in the golf swing, and a golfer has to synchronise the movements of his hips, shoulders, arms and clubshaft motions perfectly if he wants the clubshaft to trace a straight plane line and become square to the ball-target line at impact. In the next few months, I plan to write a review paper on a simple swing style - which I have labelled a "Straight Plane Line Swing Style" - that will maximise a beginner golfer's chances of successfully swinging the clubshaft along a straight plane line. In that paper, I will provide much more details on how the body has to move in space to allow the right hand to trace a straight plane line in the backswing and downswing.
Clubface control through the impact zone
The issue of body movement timing in the downswing is very complex, and there is another complex clubface control timing issue that is also very important - the rate of rolling-over of the left hand, and therefore clubface, through the impact zone. I previously mentioned that the left wrist should be flat throughout the downswing, which means that the back of the left hand is in line with the back of the left forearm in the late downswing as the clubhead approaches impact. At the exact moment of impact, both the back of the left hand and back of the left forearm should be facing the target to ensure a square clubface. Immediately after impact, both the left hand/forearm will be moving inwards and that will allow the clubshaft to continue to trace the straight plane line in the early followthrough - you should imagine the clubshaft running up along the surface of an imaginary plane board in the early followthrough. While this is happening, a golfer may "feel" as if the left forearm is rolling counterclockwise (as seen from above) if the back of the left hand is kept at a neutral 90 degree angle to the path of the clubhead up the inclined plane of the planeboard - but no "true" rolling is occurring if the clubface is neutrally square to the clubhead swingarc which is moving up the inclined plane of the plane board. If the back of the left hand is perpendicular to the clubhead swingarc soon after impact, then it means that the back of the left hand is facing slightly left-upwards soon after impact. Because the clubface is parallel to the back of the left hand, the clubface should also be facing left-upwards in the early followthrough.
Consider a photo of Ernie Els in the early followthrough.
Ernire Els in the early followthrough - from reference number [6]
Note that the back of Ernie Els' left forearm and left hand and clubface are all angled slightly left-upwards. You should imagine the clubshaft running up the inclined surface of the plane board in the early followthrough while the clubhead end of the clubshaft points at the ball-target line (straight plane line). You should also imagine the left arm hinging at the left shoulder socket joint in such a manner that the entire left arm/forearm hinges left-upwards after impact - and this "normal" hinging action at the shoulder socket joint enables the clubshaft to trace a straight plane line in the early followthrough. During this left shoulder socket hinging action, there is naturally a small amount of left arm/forearm rotation that causes the back of the left forearm/hand to face left-upwards. If the degree of left arm/forearm rotation is neutral (no-roll), then the clubface will be facing left-upwards at approximately a 45 degree angle. If the left arm/forearm over-rotates (rolls), then the clubface will face more horizontally towards the ground. If the left arm/forearm under-rotates (reverse rolls), then the clubface will face more vertically towards the sky.
Clubface positions after impact - from Tom Tomasello's swing video lesson [7]
Tom Tomasello is demonstrating the different left arm hinging actions that can occur immediately after impact in the early followthrough phase of the golf swing. He attached a 3" long white post perpendicular to the surface of the clubface, so that it is easier to discern in which direction the clubface is pointing.In image 1, he is demonstrating angled hinging (no-roll) where the clubface doesn't rotate after impact, and the clubface remains neutrally perpendicular to the clubhead's swingarc as the clubhead tracks up the inclined plane surface of an imaginary plane board. Although the clubface is perpendicular to the clubhead's swingarc, it is angled about 45 degrees relative to the ground. Angled hinging will result in a straight ball flight with a tendency for the ball to fade slightly to the right at the end of its flight. A professional golfer may prefer to use angled hinging for most of his shots because it produces a power-fade ball flight, where the ball flies straight but lands softly with little tendency to roll forward (due to a slight fade action at the end of the ball flight trajectory).
In image 2, he is demonstrating horizontal hinging (roll) where the clubface rotates counterclockwise (as seen from above) after impact. Note that the clubface is horizontal to the ground. Horizontal hinging will result in a straight penetrating ball flight with a slight tendency to draw leftwards at the end of its flight. A professional golfer may prefer to use horizontal hinging for his driver shots because he wants to maximise distance with a penetrating straight ball flight that has a slight draw at the end of its flight, which increases the likelihood of the ball rolling further forward after landing.
In image 3, he is demonstrating vertical hinging (reverse-roll) where the clubface rotates clockwise (as seen from above) after impact. Note that the clubface is vertically-oriented and faces the sky. Vertical hinging will result in a ball flight that is to the right-of-straight and there will be a strong tendency for the ball to fade further to the right. A professional golfer may use vertical hinging when hitting out of bunkers and when using a lob wedge to produce a Phil Mickelson-style flop shot. Vertical hinging is not generally used in standard driver/iron shots.
Is is critically important to understand that these different hinging actions occur due to slight variations in the degree of left arm/forearm rotation at the shoulder socket joint. They are not produced at the wrist joint as a result of active forearm/wrist/hand manipulations. A golfer should never attempt to manipulate the clubface through the impact zone by means of active forearm/wrist/hand manipulations because it is virtually impossible to consistently time those active forearm/wrist/hand manipulations. If an advanced golfer deliberately wants to program a penetrating straight ball flight that has a slight tendency to draw at the end of its flight, then he must mentally program the "extra" left arm rotation into his swing before he actually swings. A good swing thought is to deliberately think of ensuring that the toe of the club passes the heel of the club soon after impact, so that it encourages a more complete horizontal hinging action.
Note, in the following photo, that Keven Na has used a horizontal hinging action in his driver shot - note that the clubface has slightly over-rotated (rolled) after impact and that the clubface is horizontal to the ground.
Kevin Na driver swing - capture image from a swing video
Note that Kevin Na's clubface is horizontally-oriented, but note that he didn't roll his wrists-hands over to accomplish the horizontal hinge action. The "extra" rotation of the left hand required to roll the clubface over slightly after impact occurs at the level of the shoulder socket joint and the "extra" rotation involves the entire left arm/forearm/wrist/hand unit.
For standard straight iron shots where maximising distance is not a major priority, a golfer may prefer to use angled hinging (no roll) through the impact zone because it results in a straight ball flight and a softer, more controllable, landing.
Conclusion:
In this review paper, I have discussed the essential elements that must be got right if a golfer wants to hit the ball straight. First of all, a beginner golfer must align his body (feet, knees, pelvis, shoulders) parallel to the ball-target line. Then, he should adopt a neutral grip with the back of the left hand parallel to the clubface. Both the back of the left hand and the clubface should face the target at address. The golfer should move his body and arms in such a way that he can trace a straight plane line (that is along the ball-target line) with his right index finger and clubshaft during the backswing and downswing and early followthrough - when the hands are below waist level. The golfer should also consider the advisability of adopting a backswing style that minimises plane shifts as the hands get above waist level, so that it is easier for the golfer to get his clubshaft back to the correct clubshaft plane in the mid-late downswing when the clubshaft moves below waist level. The golfer should realise that the left hand controls the clubface, and that the back of the left hand must face the target at impact, and that the left wrist should also be flat at impact. An advanced golfer can also learn to control his clubface through the peri-impact zone by changing the pattern of left arm hinging that occurs in the peri-impact zone, and thereby fine-tune his ball flight pattern. Finally, a golfer needs to understand that "timing" is the most essential element that glues all the other essential elements together. Without optimised timing, it will not be possible to consistently hit the ball straight.
Jeff Mann.December 2007.
Commentary, criticism and controversy:
Insightful comments from readers will be included in this section.
References:
1. V1 Home Swing Analyser website. http://v2.v1home.com
2. Get a Grip and Save Your Swing. Brian Manzella. AutoSucess Magazine. September 2003.
3. Your Perfect Swing. Jim Suttie.
4. Kevin Na Swing Video.Available at http://www.youtube.com/watch?v=E0EKksPTyk0
5. Golf's Critical Details. George Hibbard.
6. How To Build A Classic Swing. Ernie Els.
7. Tom Tomasello Swing Video Lessons.
Available at Lynn' Blake's website - free registration required to access the videos.
http://www.lynnblakegolf.com/gallery/showgallery.php?cat=518