Click here to go back to the home page.
Introduction
This review paper is devoted to the topic of hand release actions through the impact zone. The relevant operant term is the term "hand release" which is a term used to describe the motions of the hands through the impact zone, and I will not be primarily talking about the topic of the "club release phenomenon" or the topic of the "power accumulator release phenomenon" in this review paper. I became particularly interested in the topic of "hand release actions through the impact zone" earlier this year (2011) when I was involved in an online golf forum discussion/debate on the issue of "optimum hand release actions through the impact zone". A member of the golf forum referred to Kelvin Miyahira's article on PGA tour release styles [1]. I repeatedly studied Kelvin Miyahira's article, but I soon decided that I disagreed with both his definitional terminology and his description of the underlying biomechanics that are responsible for the different hand release actions. I have refined my own personal opinions re: hand release actions during the past 6-12 months, and I will be presenting my *personal definitional terms for different hand release actions and my personal biomechanical explanations in this review paper.
(* website visitors, who are interested in studying the differences between Kelvin Miyahira's definitions and biomechanical explanations and the author's personal definitions and biomechanical explanations, should visit the relevant part of the appendix section of this review paper)
When I use the term "impact zone", I will be referring to three arbitrary definitions of the impact zone.
First definition - general impact zone

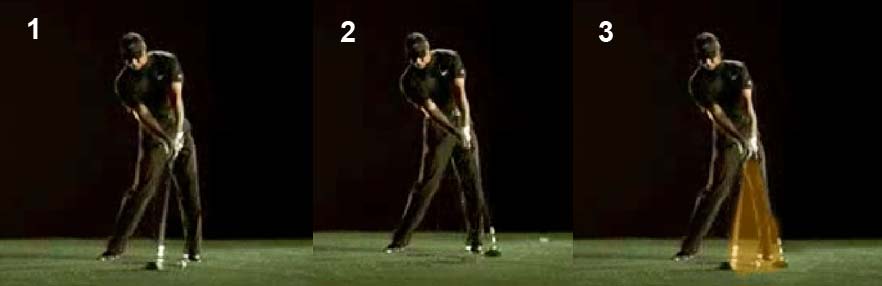
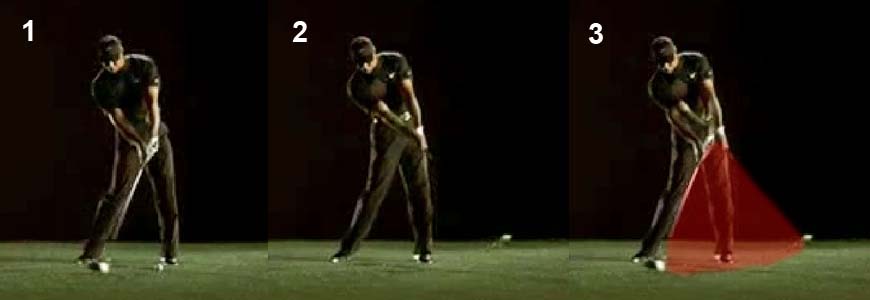
Capture images from the famous Nike commercial video of Tiger Woods' swing [2]
Image 1 shows Tiger's clubshaft being parallel to the ground at the end of the mid-downswing. That position is often referred to as the delivery position, or the 3rd parallel position, or the *P6 position.(* I have recently decided to use the P classication system for describing a golfer's arm/club positions - see my wrist glossary and P system of classifying a golfer's positions review paper for more details. The P system allows me to more precisely describe a golfer's position - for example, the P6.5 position is halfway between a P6 position and a P7 position while a P6.8 position is 80% of the way between a P6 position and a P7 position)
Image 2 shows Tiger's clubshaft being parallel to the ground after impact, and that is called the 4th parallel position or the P8 position (impact is the P7 position).
The yellow-colored area in image 3 (the composite image) represents the general impact zone and it is the zone between the P6 position and the P8 position.
Second definition - impact zone
Capture images from the famous Nike commercial video of Tiger Woods' swing [2]
The impact zone starts approximately 18" before impact (roughly at the P6.7 position) - see image 1. Note that the clubface is slightly open to the clubhead arc and target at this time point.The impact zone ends approximately 18" after impact when both arms are straight (roughly at the P7.4 position) - see image 2. Note that the clubface is slightly closed to the clubhead arc and target at this time point.
Image 3 (the composite image) shows the impact zone as the red-colored area, and this is the zone where the relevant hand release actions happen. In a traditional swinger's action, the relevant hand release actions usually include the pre-impact release swivel action (release of PA#3) and the initial phase of the post-impact roll release action. Between these two biomechanical actions there is a transition zone where the clubface should be square to the clubhead arc and the target, and impact must occur within this transition zone so that the clubface is square to the target at impact.
Third definition - immediate impact zone
Capture images from the famous Nike commercial video of Tiger Woods' swing [2]
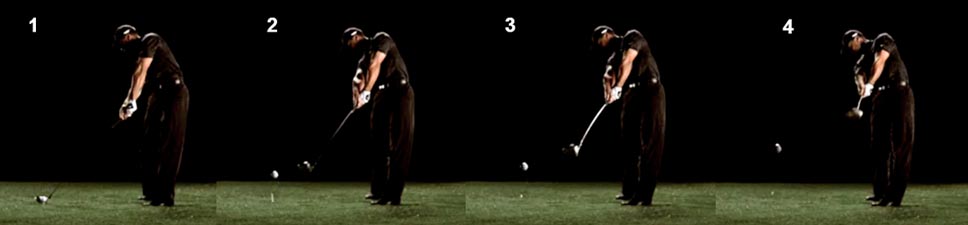
Image 1 shows the clubhead approximately 6" before impact (roughly at the P6.9 position). Note that the back of Tiger's FLW and clubface are both facing the target.Image 2 shows the clubhead approximately 6-9" after impact (roughly at the P7.1 position). Note that the back of Tiger's FLW and clubface are both facing the target.
Image 3 (the composite image) shows the immediate impact zone as the orange-colored area, and impact should occur within this zone - when the clubface is square to the clubhead arc and also square to the target. This square clubface alignment will ensure a straight ball flight (presuming a level strike on the sweetspot of the clubface) if the clubhead path at impact is also directed at the target. I will later describe the optimum hand release action that will most likely create these ideal clubface-alignment conditions in the immediate impact zone. The primary purpose of the optimum hand release action is to control the clubface so that a golfer can hit the ball straight, and that means that any optimum hand release action must ensure that the FLW/clubface both face the target during their passage through the immediate impact zone.
Solving the problem of choosing the optimum hand release actions in the impact zone
Before I describe the optimum hand release action through the impact zone (for a swinger), I would like to take a step backwards and describe the problems that a golfer needs to solve in order to hit the ball straight.
I believe that a golfer needs to control the i) clubshaft, the ii) clubhead and the iii) clubface in order to hit the ball straight, and a beginner golfer needs to learn these three club control-issues in that sequential order.
Starting with clubshaft control.
I believe that optimum clubshaft control for a straight ball flight pattern will ensure that the clubhead arc is symmetrical to the ball-target line, so that the clubhead can be located on the ball-target line at impact (or low point if the ball is placed at low point).
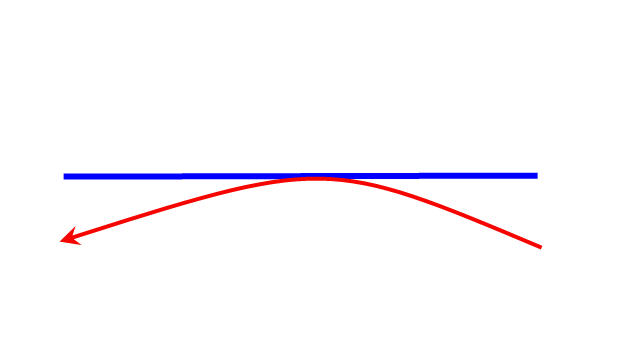
Optimum in-to-square-to-in clubhead path for a straight ball flight
The blue line represents the ball-target line and the curved red arrowed line represents the clubhead arc through the impact zone. Note the symmetry of the clubhead arc to the ball-target line. To create a clubhead arc that is symmetrical to the ball-target line, a beginner golfer needs to learn *how to trace a straight plane line (SPL) and he also needs to learn how to keep the clubshaft on-plane during his downswing/followthrough swing action. I have discussed this issue in great depth in a number of my review papers, and I will not repeat the instructional information in this review paper.(* to see Martin Hall tracing a SPL with a Smartstick training tool, you can view his video at - http://smartstickgolf.com/why-it-works/plane . Click on the button to view the Martin Hall video)
Presuming that a beginner golfer has already learned clubshaft control, he then has to ensure that he sucessfully learns how to control the clubhead. A golfer, who is a swinger, has successfully learned how to control the clubhead if he can ensure that he reaches impact with his hands marginally ahead of the clubhead, so that there is small amount of forward clubshaft lean at impact. The amount of forward shaft lean at impact depends on ball position. The further behind low point (and the closer to the center of the stance) a golfer places the ball, the more forward shaft lean one would expect to see at impact - if the hands are in the same impact loaction. Many golfers usually place the ball further behind low point for short iron shots (relative to long iron shots). The clubshaft should only become straight-in-line with the left arm (as seen from a face-on perspective) at the low point (nadir) of the clubhead arc, which is usually located a few inches ahead of impact when hitting irons, and it is at a time point when the clubshaft is roughly vertically aligned with the left shoulder socket. When hitting a driver, a golfer may choose to place the ball behind low point (for a downward strike), at low point (for a level strike), or ahead of low point (for an upward strike).
To master clubhead control, a beginner golfer needs to learn how to master the club release phenomenon. The club release phenomenon in a swinger works according to the principle of a driven double pendulum swing model [3].
Here is an animated gif of the driven double pendulum swing model
Animated gif of a driven double pendulum swing model - from reference number [3]
When viewing the driven double pendulum swing model, note that the central arm (representing the left arm) doesn't slow down as the peripheral arm (representing the clubshaft) releases. Note that the clubshaft (peripheral arm) releases passively/automatically and it doesn't require positive torque (from muscular forces) to induce a successful club release phenomenon where the clubhead reaches low point at the same time as the left wrist/hand (peripheral hinge point). I usually refer to this passive club release phenomenon - which Homer Kelley called the passive release of PA#2 [4] - as a centrifugal-release action (CF-release action). Although I will continue to use the term "CF-release action" for convenience sake, website visitors must realize that there is no such phenomenon as a centrifugal force, and the physics responsible for the club release phenomenon is actually due to the effect of a changing hand arc path's direction-of-motion on the club. When the *hands constantly change their direction of motion in the downswing, transcribing a circular (or near-circular) path in space, the circular path motion of the left wrist/hand induces the club to release.(* To better understand the mathematical principles describing the club release phenomenon, a website visitor can read this short article by nmgolfer)
In the driven double pendulum swing model, the peripheral hinge point (representing the left wrist) travels in a circular direction because the central arm (representing the left arm) has a "fixed" fulcrum point. In a "real life" golf swing, the left shoulder socket (which is the fulcrum point for the left arm) is in constant motion during the downswing, so the hand arc path is not perfectly circular, and it is more U-shaped in appearance. Golfers produce varying U-shaped hand arc paths, and therefore they produce different club release patterns. Each individual golfer needs to learn how to shape his U-shaped hand arc path, and he also needs to learn how to modulate the speed of left wrist/hand motion during its downswing passage along his U-shaped hand arc path, in order to ensure that the clubhead reaches impact with "correct" (optimum) timing. I have previously described the process of the club release phenomenon in great detail in many of my previous review papers, and I will not repeat that instructional information in this review paper.
Presuming that a golfer has succesfully learned how to control the clubshaft, and also learned how to control his clubhead, then he needs to learn how to control his clubface through the impact zone so that he can consistently achieve a square clubface through the immediate impact zone (where the clubface is square to the clubhead arc and also square to the target). To learn how to achieve that goal, he needs to learn how to optimise his hand release action through the impact zone.
What represents the optimum hand release action pattern through the impact zone - a hand release action that will allow a golfer to consistently achieve a square clubface through the immediate impact zone?
I think that, from a purely theoretical perspective, that the optimum way for a golfer a to control the clubface through the impact zone is to simply keep the clubface square to the clubhead arc throughout the entire downswing action, so that the golfer doen't have to rotate the clubface to square during the later downswing (between P6 and P7). That will avoid a timing-issue problem that is intrinsic to the biomechanical process of having to rotate the clubface to square in the late downswing using the biomechanical mechanism of a release swivel action - what Homer Kelley called the release of PA#3 [4].
The following diagram shows a clubface that it square to the clubhead arc through the impact zone (between P6.5 and P7.5).
Diagram showing a clubface that is square to the clubhead arc through the impact zone
The straight/short black line represents the clubface, and I have drawn the clubface as being square to the clubhead arc during the entire passage of the clubhead through the impact zone. If the clubface is square to the clubhead arc throughout the entire downswing, and therefore during its entire passage through the general impact zone, then the clubface will automatically be square to the target at impact if the golfer has perfect clubshaft/clubhead control. Who uses this technique?There are a few professional golfers who use this technique, and prime examples include two long-drive competitors (Jamie Sadlowski and Dominic Mazza) and one PGA tour golfer (David Duval). There are a number of other professional golfers who also use this technique, but it is not frequently seen because it is biomechanically very difficult to use this technique in a "real life" golf swing.
To use this technique (often called the square technique because the clubface is square to the clubhead arc throughout the entire backswing/downswing/followthrough), a golfer needs to adopt a very strong left hand grip (4 knuckle grip) at address. I will demonstrate the biomechanics of this square technique using Jamie Sadlowski as a role model.
Here is Jamie Sadlowski' swing action.
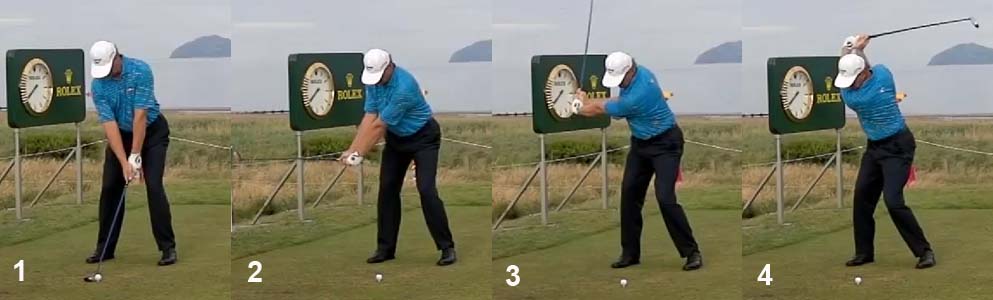
Jamie Sadlowski's backswing action - capture images from his swing video [5]
Image 1 shows Jamie Sadlowski at address - note that he has internally rotated his left humerus and fully pronated his left forearm so that he can place his left palm directly over the top of his grip - this represents a very strong left hand grip (4-knuckle grip). Note that the back of his left wrist/hand is roughly parallel to the ball-target line at address.Images 2-6 show his backswing action. Note that he can get the back of his left wrist/hand to be parallel to the inclined plane by his mid-backswing by simply moving his left arm backwards - without needing to use a takeaway swivel action. He then keeps his left arm moving back during his mid-late backswing action while still keeping the back of his left wrist/hand parallel to the inclined plane. Note that his clubface is square to the clubhead arc during his entire backswing action. I think that it requires enormous flexibility of the torso (which has to rotate the left shoulder socket around-to-the-right), and also enormous shoulder joint flexibility, to be able to successfully perform this square technique backswing action.
If Jamie Sadlowski didn't have to rotate his clubface open during the backswing, and if he kept the clubface square to his clubhead arc during his entire backswing action, then he will obviously not have to counterotate his left arm, and therefore clubhead/clubface, in the opposite direction during his downswing action.
Consider Jamie Sadlowski's late downswing action.
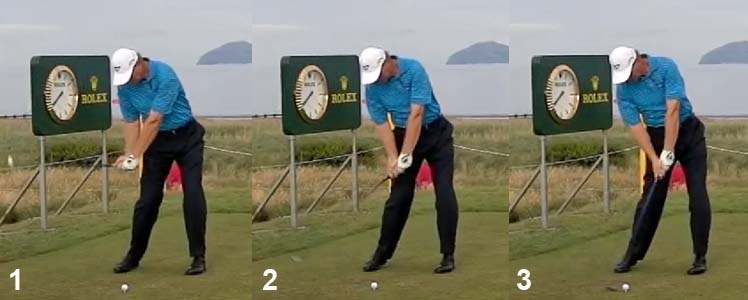
Jamie Sadlowski's late downswing action - capture images from his swing video [5]
Image 1 shows him at the P6 position (delivery position) and image 4 shows him at the P7 position (impact). Note that the back of his left forearm/left wrist/left hand remains roughly parallel to the ball-target line between P6 and P7, and this ensures that his clubface remains square to the clubhead arc during this entire time period. Note that the ulnar border of his left wrist/hand (and not the back of his FLW) is facing the target at impact. Kelvin Miyahira refers to this as a knife-edge release action, which is an appropriately-descriptive term, and it's as if Jamie Sadlowski is performing a karate-chop with the ulnar border of his left wrist/hand unit (in the direction of the target) at impact. Note that if Jamie Sadlowski can perfect his club release phenomenon so that the clubhead catches-up to his hands by impact, then his clubface will automatically be square to the target at impact, and he doesn't have to perform a rotary hand release action (release swivel action) between P6.5 and P7.Consider Jamie Sadlowski's hand release action after impact.
Jamie Sadlowski's followthrough action - capture images from his swing video [5]
Note that Jamie Sadlowki doesn't allow the clubhead to pass his left hand in his early followthrough (image 1 and image 2 - between P7 and P7.2) and he therefore has an intact LAFW where the clubshaft and left arm have a straight-line relationship. Note that his right wrist has straightened during his early followthrough, but it hasn't caused any flip-bending of his left wrist (image 1 and image 2). Note that his left wrist only bends more backwards in his later followthrough (image 3).
If you follow Jamie Sadlowski's swing sequence, you can see that he maintains an intact LAFW throughout his backswing, downswing and early followthrough swing action, and the club releases in the plane of his LAFW in the mid-late downswing. In the immediate impact zone, (between P6.9 - P7.2) Jamie Sadlowski maintains an intact LAFW (even though the back of his left wrist is not facing the target) and his clubface is square to the target during this entire time period. There is no rolling rotational motion of his forearms/hands through the impact zone, which makes this technique easier to time.Now, although this square technique is mechanically very advantageous, the majority of professional and good amateur golfers do not use this technique - presumably because it is biomechanically too difficult and too uncomfortable to perform this square technique. The majority of professional golfers adopt a *neutral left arm and neutral grip at address, and that means that they must roll their hands into impact in the late downswing in order to square the clubface.
(* I define a neutral left arm as a situation where the left humerus is neutral [not significantly internally or externally rotated at address] and the left forearm is neutral [left forearm is not significantly pronated or supinated at address] and I define a neutral grip as being either weak [1-knuckle grip] or neutral [2-knuckle grip] or slightly strong [3-knuckle grip])
As an example of a golfer, who uses a neutral left arm and neutral grip - let's consider the swing action of Ernie Els.
Consider this Ernie Els swing video - http://www.youtube.com/watch?v=m5cK-INFcCc
Ernie Els' backswing action - capture images from his swing video
Image 1 shows Ernie Els at address (P1 position). Note that his left arm/forearm is neutral at address and that the back of his flat left wrist (FLW) faces the target. Note that his clubface is straight-in-line/parallel to the back of his FLW.Image 2 shows Ernie Els at his end-takeaway position (P2 position). Note that he has rotated the back of his FLW about 90 degrees to get the toe of the club pointing upwards - and, from a biomechanical perspective, this biomechanical action is due to some internal rotation of the left humerus (while the left shoulder socket is moving downwards-and-backwards due to rotation of his upper torso around his rightwards-tilted spine) and due to some left forearm pronation.
Image 3 shows him in his mid-backswing when the left arm is parallel to the ground (P3 position). Note that the back of his FLW is parallel to the inclined plane - and note that it requires further clockwise rotation of the left arm/forearm to get the back of the FLW to lie parallel to the surface of the inclined plane.
Image 4 shows him at the end-backswing postion (P4 position). Note that the back of his FLW is still parallel to the inclined plane.
Note that Ernie Els never allows his left wrist to bend (dorsiflex) during his backswing action, and his clubface is always parallel (straight-in-line) to the back of his FLW throughout his backswing action. Note that his clubshaft is also always straight-in-line with his left arm from the P2 position to the P4 position - which means that he has an intact LAFW during his backswing action.
As a general rule (for a golfer who adopts a neutral left arm/forearm at address), the amount of clockwise rotation of the left arm/forearm required to get from the P1 position to the P4 position depends on the shallowness of the backswing's inclined plane - a golfer whose hands go up a shallower inclined plane will have to use more clockwise rotation of the left arm/forearm than a golfer whose hands go up a steeper inclined plane.
Note that the clubface is opening to the clubhead arc during the backswing action, and that it is roughly parallel to the inclined plane during the mid-backswing. The clubface may become even more open to the clubhead arc if a golfer employs an additional swivel action at the end of his backswing action in order to get the clubshaft to become parallel to the ball-target line at the end-backswing position.
What happens in the downswing? It is obvious that the biomechanical process must reverse itself so that the back of the FLW, and therefore clubface, can face the target at impact - and that means that there must be a counterclockwise rotation of the left arm/forearm in the downswing. But when does it occur? It is important for a golfer to understand that most of the counterclockwise rotation of the left arm/forearm only occurs between the P6.5 position and impact (P7 position). In the early-mid downswing (between the P4 position and the P6 position), the FLW will remain parallel to the inclined plane, which means that there is very little counterclockwise rotation of the left arm/forearm occurring during this phase of the downswing. What happens after the P6 position?
Ernie Els' swing action between the P6 position and the P7 position - capture images from his swing video
Image 1 - P6 position - note that Ernie Els' FLW is parallel to the inclined plane, which explains why his clubface is also parallel to the inclined plane and why the clubface is open to the clubhead arc. Ernie Els still has to rotate his intact LAFW, and therefore clubface, to get the clubface square by impact.
Image 2 shows Ernie at the P6.5 position. Note that the club has released, and that it has released in the plane of the LAFW. In other words, Ernie Els has released PA#2 by ~75%, but he has still not started to release PA#3 (note that the back of his left wrist/hand is still roughly parallel to the inclined plane).
Image 3 shows Ernie Els at impact (P7 position) with a clubface that is square to the clubhead arc, and both the back of his FLW and clubface face the target. To get from the P6.5 position to the P7 position, he needed to perform a release swivel action (release of PA#3) that is biomechanically due to a left forearm supination movement combined with external rotation of the left humerus (while the left shoulder socket continues to rotate up-and-away). This is the key biomechanical maneuver that all swingers have to execute between P6.5 and P7 in order to square the clubface by impact, and it also represents the rotation of an intact LAFW into impact (while the club completes its CF-release action within the plane of the LAFW).
The following diagram shows how the clubface rotates from an open (to the clubhead arc) alignment in the first half of the late downswing to a square alignment by impact.
Rotation of the clubface between the P6 position and the P7 position
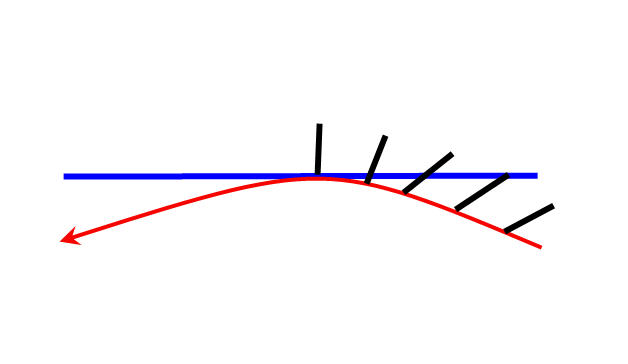
Note that the clubface is open to the clubhead arc between the P6 position and the P6.5 position, and it rotates to square between the P6.5 position and the P7 position due to the biomechanical actions that are responsible for the release of PA#3 (release swivel action). These biomechanical actions can happen automatically/naturally and they do not necessarily require conscious thought.Note how Ernie Els' right arm also straightens during the late downswing, and note how the right palm faces the target at impact. This right arm straightening action causes the right forearm to paddlewheel into impact, and that right forearm paddlewheeling motion synergistically assists in the smooth release of PA#3 if it is perfectly timed. It is critical that a golfer doesn't straighten the right arm too actively in the late downswing, which can interefere with the smooth release of either PA#2 or PA#3. A golfer should have the distinct "feeling" that both hands are moving at the same speed between the P6 position and impact.
How should a golfer transition through impact? What are the hand release actions that must occur between the P7 position and the P7.5 position (defined as the end of the followthrough - when both arms are fully straight)?
There are three hand release actions that are frequently used by skilled professional golfers between the P7 position and the P7.5 position (or even up to the P8 position) in a full golf swing - i) a full-roll hand release action; ii) a no-roll hand release action; or a iii) reverse-roll hand release action.
I will start by describing the full-roll hand release action, which is the most frequent hand release action used by PGA tour golfers (who are primarily swingers).
Full-roll hand release action
Consider what happens to Ernie Els' hands and clubface between the P7 position and the P8 position.

Ernie Els' followthrough/finish action - capture images from his swing video
Image 1 shows Ernie Els at impact (P7 position). Note that the back of his FLW and clubface are both facing the target.Image 2 shows Ernie Els at the P7.2 position - note that his FLW and clubface are still approximately square to the target, which means that he hasn't yet started to perform his full roll hand release action. Note that the clubhead has not flipped past his left arm, which means that he still has an intact LAFW. This critical period (between the P6.9 position and the P7.2 position) is a non-roll transition period that occurs between the rolling action of a release swivel action (release of PA#3 which happens between P6.5 and P7) and the rolling action of a full roll hand release action (which happens between P7.2 and P7.5/P8), and mastering this non-roll transition period allows a golfer (who is a swinger) to keep the clubface square to the clubhead arc and target for about 6-12" through the immediate impact zone. Keeping the clubface square to the target during the clubhead's travel period through the immediate impact zone is very useful, because it allows a golfer to consistently hit straight shots without having to worry about perfectly timing any rolling motion of the clubface so that it precisely square to the target at the exact moment of impact.
Image 3 shows Ernie Els reaching near the P8 position - note that he has fully completed a full-roll hand release action and note that the back of his FLW and clubface are roughly parallel to the ball-target line. That means that he has rotated his clubface ~90 degrees, and it is now closed to the clubhead arc. It is important to realize that there should be no bending (dorsiflexion) of the left wrist during a full roll hand release action. A golfer should optimally retain a FLW and intact LAFW during this time period - despite the right arm becoming fully straight and the right wrist also becoming fully straight/flat (with the straight right arm and straightened/flattened right wrist both becoming straight-in-line with the clubshaft by the P8 position).
Image 4 and image 5 show Ernie Els performing a finish swivel action where he rotates the clubshaft so that it lies parallel to the inclined plane by the P9 position. During a finish swivel action, it is very likely that the left wrist will bend slightly - because it is biomechanically very difficult to maintain a FLW when swiveling the clubshaft onto the inclined plane so that it becomes "on-plane" (image 5 - "on-plane" is defined as the situation where an imaginary line drawn from the butt end of the club points at the ball-target line).
It is obviously impossible to prove that Ernie Els' left wrist is flat in image 3 - because his left wrist/hand is hidden behind his straightened right wrist/hand in a face-on (caddy view) photo. I will therefore use an upline video of Ernie Els' swing to demonstrate what actually happens to the left wrist during the optimum biomechanical execution of a full-roll hand release action.
Ernie Els upline swing video - http://www.youtube.com/watch?v=ZbIojZSIR_4
Here are capture images from that swing video.
Ernie Els followthrough action - capture images from his swing video
Image 1 shows Ernie Els at impact - the back of his FLW/clubface is facing the target.
Image 2 shows Ernie Els slightly after impact - when the ball is already >12" away from impact. Note that his FLW/clubface is still facing the target, and he hasn't yet started to roll his FLW counterclockwise.
Image 3 shows that his FLW/clubface is starting to rotate counterclockwise and that represents the start of his full-roll hand release action.
Image 4 and 5 show the completion of his full-roll hand release action. Note that he maintains a FLW throughout his followthrough action and that during the FLW's rolling motion the FLW is perpendicular to the ground, and not perpendicular to the inclined plane (which happens in a no-roll hand release action). That is a defining difference between a full-roll hand release action and a no-roll hand release action - based on the 3-D motion of the FLW in 3-D space.
Note that the biomechanical reason for the FLW's 3-D rolling motion in space in Ernie Els' followthrough action is readily apparent when looking at his swing video - he uses a CF-arm release action, and the roll of his FLW is mainly due to a rotary motion of his left arm/forearm and only minimally due to a continued rotary motion of the pelvis and mid-upper torso (as occurs in golfers who use a no-roll hand release action).
The same biomechanical phenomena can be seen in another golfer who also uses a full-roll hand release action for his driver swing - Tiger Woods.
Here is a capture image from an upline video of Tiger Woods driver swing [6].
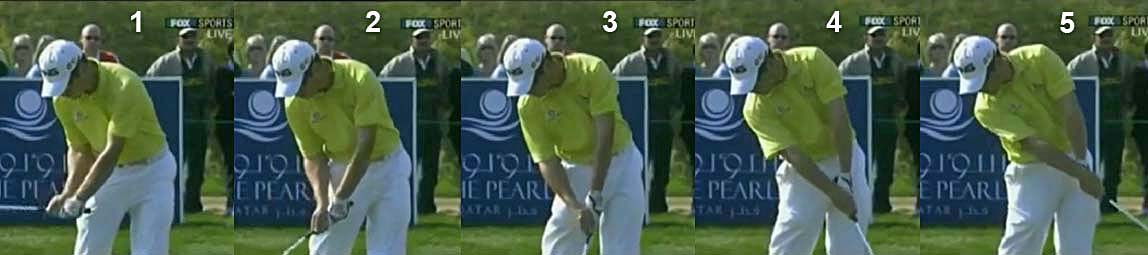
Tiger Woods' full-roll hand release action - capture image from his swing video [6]
Image 1 shows Tiger Woods at impact (P7 position). Note that he has a FLW, which is facing the target.Image 2 shows him as he bypasses the P7.2 position and starts to roll his FLW, and therefore clubface, counterclockwise. This represents the start of his full-roll hand release action.
Image 3 shows him at the P7.5 position. Note that he still has a FLW, which he has rolled even more counterclockwise, thereby causing the clubface to become more closed to the clubhead arc.
Image 4 shows Tiger Woods approaching the P8 position. Note that he still has a FLW that has rolled ~ 90 degrees so that the back of his FLW, and clubface, at the P8 position will be parallel to the ball-target line.
If one looks at all these sequential images, one will note that his FLW has remained perpendicular to the ground during his full-roll hand release action. Homer Kelley referred to this action as a horizontal hinging action [4]. Note that the club has not passed his left arm/FLW from a rotational perspective - and that means that he has maintained an intact LAFW. Many uninformed golfers will note that the clubshaft is not in a straight-line relationship with the left arm as viewed from a face-on (caddy view) perspective - see image 3 in the Ernie Els sequence - and they will incorrectly conclude that the LAFW is not intact and they will presume that the club has flipped passed the left arm. However, they are not taking into account the fact that the FLW (and therefore intact LAFW) is rolling counterclockwise during the followthrough and they should therefore view the rolling FLW/LAFW from the "correct" viewing perspective - using either an upline viewing or a birds-eye viewing perspective. It can clearly be seen in image 5 of Ernie Els' upline sequence, and in image 4 of Tiger Woods' upline sequence, that the clubshaft has not passed their left arm (from a rotational perspective) and that both Ernie Els and Tiger Woods still have a FLW - despite the fact that the clubshaft is straight-in-line with their straight right arm and flattened right wrist.
In other words, the use of a full-roll hand release action allows a golfer to maintain a FLW and intact LAFW during the roll release action, and the left wrist usually only bends after the P7.5+ position when the golfer performs a finish swivel action that rolls the clubshaft onto the inclined plane.
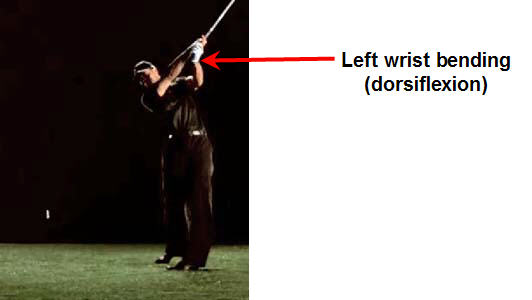
Tiger Woods performing a finish swivel action between the P8 position and the P9 position - capture image from his swing video [6]
Note that Tiger Woods is allowing his left elbow to bend while he swivels the clubshaft onto the inclined plane so that it remains on-plane (imaginary line extending from the butt end of his club will point at the ball-target line if his clubshaft is on-plane). Note that his left wrist bends (dorsiflexes) during this time period.The use of a finish swivel action is optional in a swinger, and it only occurs after the completion of a full roll hand release action. Many professional golfers (who are swingers) often keep both arms extended in the general direction of the target after completion of a full-roll release action, and they can sometimes maintain a FLW/intact LAFW well beyond the P7.5+ position if they avoid using a finish swivel action.
Many uninformed golfers believe that using a full-roll hand release action is a non-optimum technique of performing a hand release action through the impact zone - because they incorrectly believe that it will invariably cause the clubface to roll closed too soon after impact, and they also incorrectly believe that it requires perfect timing to ensure that the clubface is square at the exact moment of impact if they are continuously rolling their clubface through the impact zone. I believe that their opinion is wrong-headed because they do not understand how to ensure that there is a non-roll transition period between the completion of the release swivel action (which occurs pre-impact) and the start of the full-roll hand release action (which occurs post-impact). The use of a non-roll transition period allows a golfer to ensure that the clubface is square to the clubhead arc/target throughout the immediate impact zone (between P6.9 and P7.1/7.2) and it will more likely ensure that the clubface is consistently square to the target at impact.
The following diagram shows how the clubface is square to the target for a travel distance of approximately 6-12" during its travel through the immediate impact zone - from roughly the P6.9 position to roughly the P7.1/7.2 position.
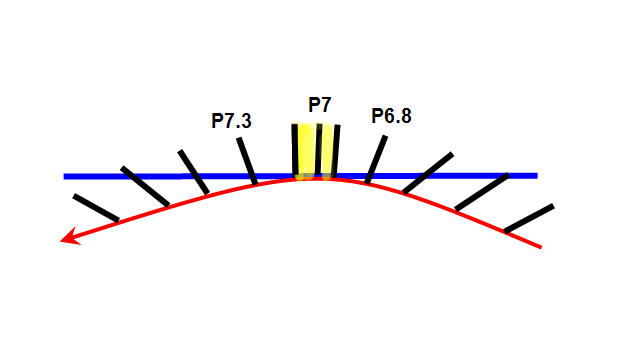
Diagram showing the clubface orientation relative to the clubhead arc through the impact zone
Note that the clubface is relatively square to the target and clubhead arc in the immediate impact zone - yellow-colored zone - and that zone can be considered to be a * flat spot in the clubhead arc (* think of the "flat spot" as being a slight flattening of the curvacture of the clubhead arc through the immediate impact zone so that the clubhead arc doesn't move inside-left immediately after impact).To better understand how to ensure that you have a non-roll transition period in your golf swing's immediate impact zone - presuming that you decide to use a full-roll hand release action - I am going to discuss the biomechanics/mechanics of the full roll hand release action in greater detail. I will also provide a number of golf tips ("do" and "don't do" golf tips) that can help you refine your full roll hand release action through the impact zone.
I have created this animated gif by combining 7 capture images from different time points in the general impact zone (P6 to P7.5) of Ernie Els' swing video.
Animated gif image of Ernie Els' motion through the impact zone (from the P6 position to the P7.5 position)
Each capture image lasts about 1 second before transitioning to the next capture image. Watch the animated sequence over-and-over, so that you can clearly see what is happening from a biomechanical/mechanical perspective as the hands/club move from the P6 position to the P7.5 position.The first three images show the hand/club motion from the P6 to the P6.8 position, and you can see the club releasing (within the plane of the LAFW). From the P6.8 position to impact, note how Ernie Els supinates his left forearm and externally rotates his left humerus (while the left shoulder socket moves up-and-away from the ball) and note how these biomechanical motions square the clubface by impact (P7 position).
Most importantly, note what happens to Ernie's' FLW and left arm in the immediate impact zone - between the P6.9 position and the P7.2 position. Note that his FLW is facing the target at impact and note that it continues to face the target from the P7 position to the P7.2 position and that " biomechanical fact" allows Ernie Els to keep his clubface square to the target during that time period. What biomechanical actions allow the clubface to remain square to the target in the immediate impact zone?
Note that Ernie's left forearm stops supinating when his left arm becomes neutral at impact with the back of his FLW facing the target. Note that his FLW moves targetwards (from P7 to P7.2) without any additional left forearm supination and without any additional external rotation of the left humerus. It "appears" as if Ernie Els is simply pulling the back of his FLW in the direction of the target as his FLW moves through the immediate impact zone. Watch carefully how fast Ernie's right arm straightens and how fast Ernie's right wrist straightens/flattens in that same immediate impact zone time period - between the P7 position and the P7.2 position - and note that the right arm/wrist do not straighten too fast, so that they will cause his FLW to flip-bend soon after impact or cause his FLW to start rolling counterclockwise too soon after impact. In other words, Ernie is moving his FLW targetwards at a speed that is fast enough to prevent any left wrist bending/club flipping action soon after impact, and fast enough to prevent any premature counterclockwise rolling of his FLW - despite an actively straightening right arm/wrist.
Note how the right arm becomes fully straight and the right wrist fully straightened/flattened between the P7.2 position and the P7.5 position (end of the followthrough position). However, and most importantly, note that this right arm/wrist straightening action doesn't flip-bend his FLW during this time period because his FLW is starting to rotate counterclockwise during that time period due to the fact that his left arm/forearm is starting to rotate counterclockwise at the same rpm as the rotating clubshaft. From a face-on view, it "appears" that the clubshaft has passed his FLW and it "appears" that he cannot have an intact LAFW at the P7.5 position (when his clubshaft appears to be in a straight line relationship with his straight right arm). However, his LAFW is still intact from a rotational perspective - as I demonstrated in the upline capture image from his swing. In other words, a golfer can maintain an intact FLW/LAFW (when performing a full-roll hand release action) by optimally controlling the speed of roll of his FLW in his mid-late followthrough action.
Here is an excellent upline view of Dustin Johnson's swing that clearly shows all the relevant biomechanical phenomena that happen in the general impact zone (between the P6 position and the P8 position).
Here is my detailed explanation.
Starting with the P6 to P7 sequence
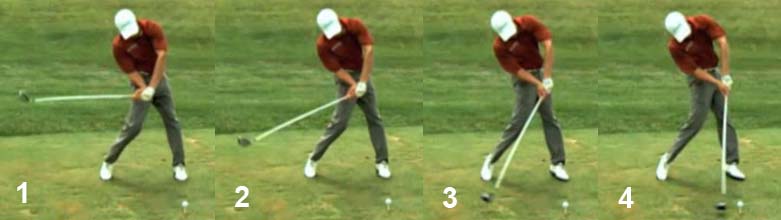
Dustin Johnson from the P6 position to the P7 position - capture images from the upline video sequence
Image 1 is the P6 position. Dustin Johnson's FLW is parallel to the ball-target line. He still has at least ~90 degree of clubshaft lag.Image 2 is at the P6.5 position. He has lost most of his lag due to the release of PA#2. Note that the clubshaft is releasing within the plane of his LAFW.
Image 3 show him at the P6.9 position. Note that he has squared the clubface to the clubhead arc by releasing PA#3 (biomechanically due to a left forearm supinatory motion combined with external rotation of his left humerus).
Image 4 shows him at the P7 position. His FLW, and therefore clubface, is facing the target.
Here is the P7 to P8 sequence
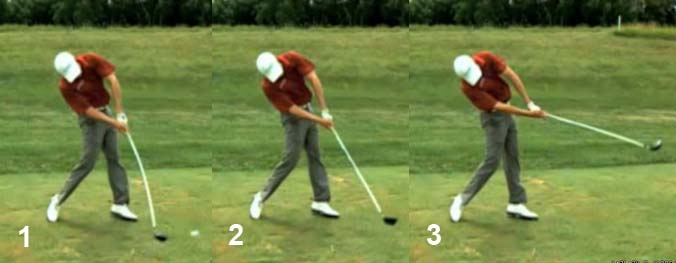
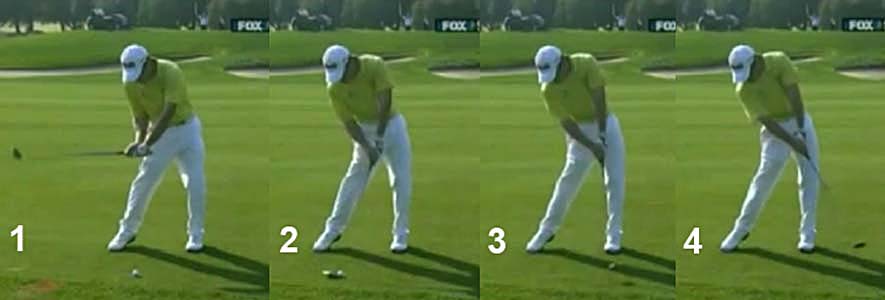
Dustin Johnson from the P7 position to the P8 position - capture images from his upline video sequence
Image 1 show him at the P7 position. His FLW, and therefore clubface, is facing the target.Image 2 shows him at the P7.1/7.2 position. His FLW, and therefore clubface, still face the target because he has not yet started to perform a full-roll hand release action.
Image 3 shows him at the P7.3/7.4 position. He has started to roll his FLW and intact LAFW counterclockwise.
Image 4 shows him at the P7.6/7.7 position. He is actively rolling his FLW/intact LAFW counterclockwise.
Image 5 shows him at the P8 position. He still has a FLW and intact LAFW.
Note that Dustin Johnson never flip-bends his left wrist between the P7 position and the P8 position, and the clubshaft never passes his FLW/left arm (from a rotational perspective) during his full roll hand release action, which means that he has an intact LAFW throughout his followthrough swing action.
I think that a full-roll hand release action becomes biomechanically easier to optimally execute if a golfer maintains an intact LAFW/FLW throughout the entire downswing/followthrough swing action - and a golfer must learn how to master the full-roll hand release action by mastering the timing and rate of roll of an intact LAFW/FLW through the impact zone.
In one of my swing video lessons, I demonstrated the motion of swinging an intact LAFW/FLW through the impact zone using a badminton raquet.
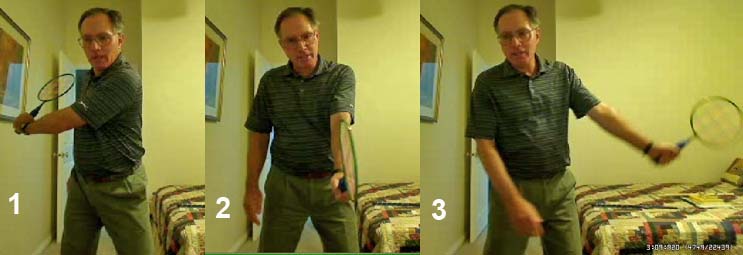
Author swinging an intact LAFW through the impact zone - capture images from his swing video lesson
In this photo sequence, I am demonstrating the left arm/hand motions performed by a tennis player who performs a back-handed tennis stroke action.Image 1 shows how I start the back-handed tennis stroke action from the P5.5 position - with an intact LAFW/FLW. Between image 1 and image 2 (ball impact position - P7 position) I have simply rotated the intact LAFW/FLW (left arm + badminton racquet that are in a straight-line relationship) into impact using the biomechanical motions that underlie a release swivel action (release of PA#3). Image 3 shows that I have still maintained an intact LAFW/FLW at the P8 position and I used the biomechanical actions that underlie a full-roll hand release action to get from the P7 position to the P8 position. Note that there is no bending (dorsiflexion) of the FLW during this back-handed tennis stroke action and no flipping of the racquet passed the left arm.
I would recommend that beginner golfers practice this back-handed tennis stroke action in order to acquire the "feel" of swinging the left arm through the general impact zone while maintaining an intact LAFW/FLW. Note that one has to maintain a small amount of "firmness of the left wrist" during the back-handed swing action in order to avoid excessive left wrist floppiness (in a horizontal range of motion), and if one maintains this "firmness of the left wrist" throughout the entire swing action then one will more likely prevent the racquet face from flipping passed the left arm through impact. Note that it doesn't require a lot of negative wrist torque (biomechanically due to using a lot of isometric flexor muscular force) to maintain a FLW during the entire back-handed swing action if one utilises two swing fundamentals - i) maintaining a "feel" of the left arm/hand leading the racquet through the impact zone and ii) maintaining a constant (or accelerating) speed of motion of the intact LAFW through the impact zone, thereby avoiding any stalling/slowing of motion of the intact LAFW/FLW at any time point during its forward motion through the impact zone. In other words, one doesn't have to "artificially" make the FLW increasingly firm at impact by biomechanically adding some supplementary left forearm isometric muscular activity as one approaches the moment of ball impact - if one keeps the left arm/FLW moving fluidly (non-stop) through the impact zone and if one avoids any slowing of the left arm/FLW at impact.
After acquiring the correct "feel" of swinging an intact LAFW/FLW through the impact zone (from the P5.5 position to the P8 position) concentrate your efforts on ensuring that the back of the FLW (and therefore racquet face) keeps facing the target for about 6-12" through impact (between the P6.9 position to the P7.2 position). Don't do this in an artificial manner by trying to "steer" the racquet face in a straight line towards the target. Try to maintain the "feel" of swinging the left arm in a rotary manner in an inside-left direction after bypassing the P7 position, but simply try to acquire the "added feel" of minimally flattening the racquet face's arc-of-motion between the P6.9 position and the P7.2 position - as if one is consciously attempting to create a 6-12" flat spot through the immediate impact zone. You should discover that it is easy to create this "flat spot" in a biomechanically comfortable/natural manner when the neutral left arm is directly opposite the left shoulder socket - because the left humeral head is neutrally aligned in the left shoulder socket joint at that time point (see image 2).
After you have mastered the intact LAFW/ FLW swing action using a badminton/tennis racquet, then I would recommend that you perform Hogan's "two-handed basketball pass action from the right side towards a target on the left side".
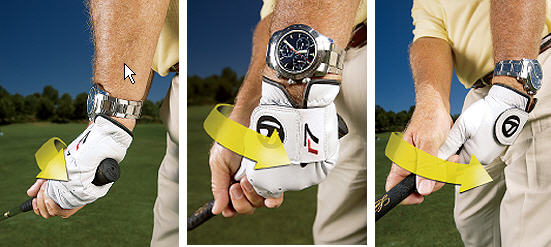
In his famous golf intructional book [7], Ben Hogan stated that the "feel" of the hand release action action through the impact zone can best be represented by the sport analogy of a "two-handed basketball pass from the right side towards a target on the left side" throw action.

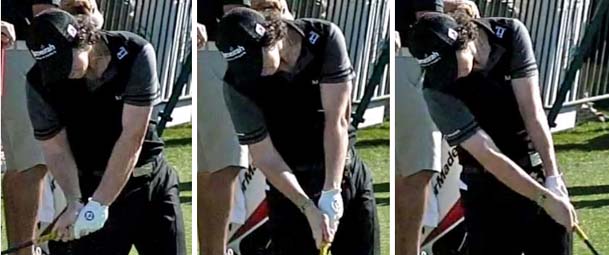
Hogan's two-handed basketball pass throw action - diagrammatic photo from reference number [7]
Image 1 shows the ball thrower's hands at the P6 position and image 3 shows the ball thrower's hands as they bypass the P7 position.Note that the two-handed throw motion involves some torso rotation and also a synchronous/coordinated movement of the two arms (with respect to the torso motion) so that the two arms both rotate across the front of the body at the same speed as the rotating torso (which fits in with my personal definition of "swinging-with-rhythm"). Note that the right palm faces the left palm across the equator of the ball, and note that there is no left wrist horizontal hinging motion (left wrist dorsiflexing motion) during the two-handed ball throwing motion and no independent left forearm supinating motion (or right forearm pronating motion) that will cause the back of the FLW to face groundwards after the hands bypass the P7 position.
Note that the right palm and back of the FLW face the target in image 3 - because the two-handed ball thrower is directing the ball towards the target. In other words, there must be a short period of time in this rotary two-handed ball throwing motion when the FLW (and right palm) face the target - if one hopes to accurately throw the ball straight towards the bulls-eye of the target.
How does one prevent any left wrist bending (left wrist dorsiflexion) during this two-handed throw motion? I believe that it is readily possible if one follows three biomechanical fundamentals - i) keep the FLW moving fluidly (non-stop) and avoid any slowing/stalling of motion of the FLW during the throw motion; ii) don't allow the right hand to move faster than the left hand (even if the right wrist straightens/flattens between the P7 position and the P7.5 position) and iii) keep the FLW leading the ball/right hand throughout the throw motion.
Consider what Ben Hogan wrote in his book [7] regarding the value of thinking about this two-handed basketball pass action.
On page 98 of his soft-edition book, Hogan stated-: "As in the old two-hand basketball pass, the left arm and hand lead the right arm and hand. Be sure you hit through with the left as hard as with the right. On page 100 of his soft-edition book, Hogan stated-: "The great value, as I see it, of thinking in terms of this two-hand action is that it keeps the left hand driving all the time".
I think that Hogan is correct to think in this manner, and if a golfer (who is a swinger) thinks in terms of i) leading with the left arm/hand and ii) keeping the left hand driving all the time, then it is much more likely that he will ensure that he maintains an *intact LFW/FLW as he swings his arms/club through the impact zone.
(* for much more golf instructional information on playing golf with an intact LAFW see the two listed videos in reference number [8])
Consider this wonderful swing video where the owner-originator superimposed the Hogan-two-handed ball throwing action on top of an underlying swing video of Ben Hogan's swing.
http://www.youtube.com/watch?v=4RpArp8XIbw
I have captured a few images from that video.
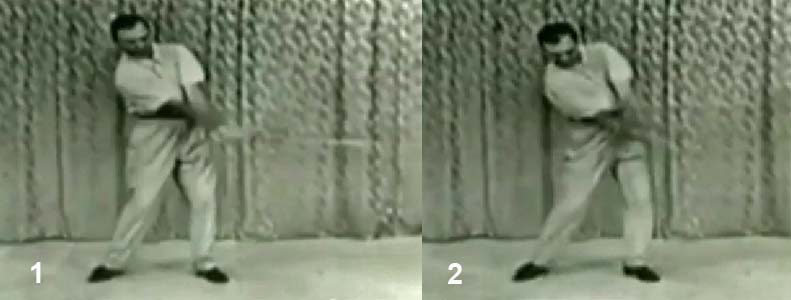
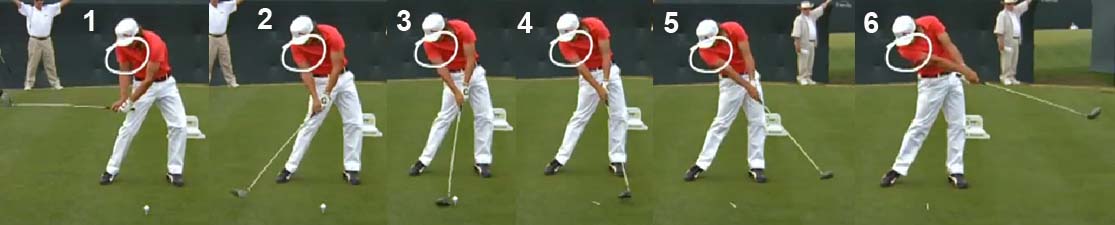
Ben Hogan's hand release action through the impact zone - capture images from the swing video
Image 1 shows Hogan's hand alignment at impact (P7 position). Note that his hands are like clamps on both sides of the ball (grip) and that the back of his FLW and right palm will both be facing the target.Image 2 shows how he releases his hands in such a way that he is throwing the ball straight towards the target. Note that he still has a FLW that is leading and that there is no left wrist bending/flipping motion soon after impact. Note that his right hand is moving at the same speed as his left hand through the impact zone (even though the right wrist is straightening/flattening after bypassing the P7 position). Note how his left shoulder is moving up-and-away while his right shoulder is moving downplane - and that his shoulder motion is more vertically-oriented (more like a ferris-wheel motion rather than a merry-go-round motion) between P7 and P7.2. That more-verticalised shoulder motion allows him to more easily keep the hands moving targetwards during the two-hands' travel-time through the immediate impact zone.
Image 3 shows that his hands have disappeared from view - because Hogan frequently used a CP-arm release action that moved his hands inside-left relatively soon after impact. However, he obviously still succeeded in keeping his FLW and right palm facing the target during that critical time period - the time period of the immediate impact zone - and that allowed him to keep his clubface facing the target through the immediate impact zone.
I think that there is another mental image that can help a golfer, who uses a full-roll hand release action, keep the clubface temporarily facing the target for a few more inches through the immediate impact zone (between the P6.9 position and the P7.2 position). If a golfer uses a neutral left arm/neutral grip at address, then the back of his FLW must face the target at impact (if the clubface faces the target at impact). If one is leading with the FLW (as Hogan advised), then it should give a golfer a "feeling" that he is slapping the ball with the back of his FLW through impact. A golfer can try and create the "feel" of slapping the back of his FLW straight towards the target through impact and that "feel" may keep the FLW facing the target for a few more inches between P7 and P7.2. This must only be a "feel" and a golfer should avoid "steering" the FLW in a straight-line direction towards the target, and he must avoid directing the arms outwards (away from the body in the direction of the ball-target line). The hand arc path is always naturally curved due to the fact that the torso/arm rotation is a rotary motion, and one should never try to get the FLW, and clubface, to travel in a perfectly straight line direction. It's more a "feel" of slightly flattening the clubhead arc's path for a short period between P6.9 and P7.2 as one transitions between a release swivel action and a full-roll hand release action.
Next issue - fully releasing the clubhead through impact.
There are some golfers who believe that maintaining a FLW/intact LAFW from impact to the P8 position impedes the free release of the clubhead through impact and they imply that this represents a huge power leak problem. They believe that the right wrist must fully straighten through impact to allow the clubhead to release freely and maximize clubhead speed through impact. They also believe that a fully straightening right arm and fully straightening right wrist through impact will naturally bend the left wrist after impact, and they believe that it is a huge power leak to keep the left wrist flat after impact by maintaining an intact LAFW/FLW. I think that their "belief" is totally unfounded.
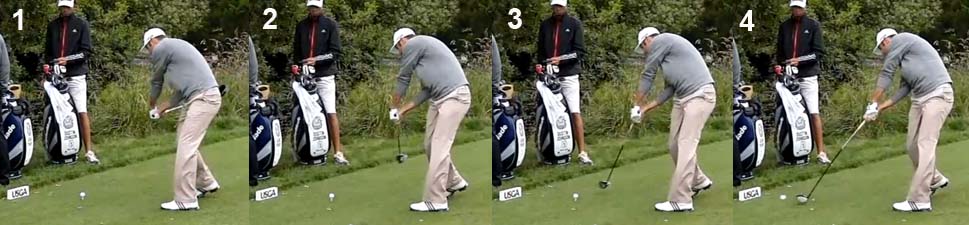
Consider Rickie Fowler's swing action - http://www.youtube.com/watch?v=iMyGoUN_lmU
If you watch his swing action a few times, you will presumably agree that he releases his clubhead freely through impact without any restriction/impedance. Note how fully he straightens his right arm and right wrist through impact. It almost "appears" that he is actively straightening his right arm through impact. Let's presume, for argument sake, that he is actively straightening his right arm and right wrist through impact. Is that disadvantageous and should it be avoided?
I think that it is perfectly acceptable to actively straighten the right arm/wrist through impact if one can still maintain an intact LAFW/FLW through impact - like Rickie Fowler.
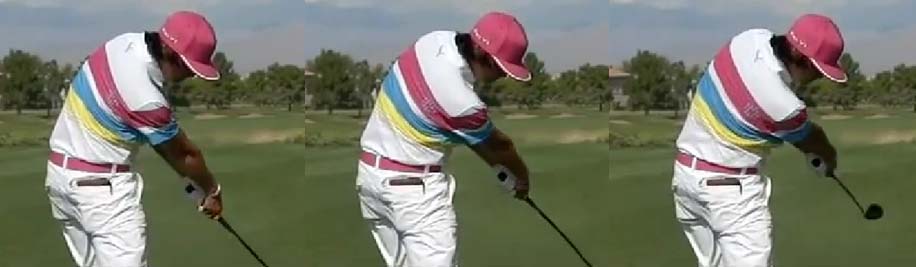
Here are capture images of Rickie Fowler through the impact zone - from a face-on swing video - http://www.youtube.com/watch?v=JEQwhJdflZY
Rickie Fowler's impact zone sequence (from P6 to P7.5) - capture images from his swing video
One can see that Rickie Fowler is using a full roll hand release action from impact to the P7.5 position. Note how straight his right arm/wrist is between P7.2 and P7.5 and note that he has freely released the clubhead through impact. When watching the swing video at a normal swing speed, note that Rickie Fowler freely releases his clubhead through impact. Does he have to bend his left wrist after impact (between the P7 postion and the P7.5 postion) in order to freely release his clubhead?The answer is no!
Here is a DTL swing video of Rickie Fowler's hand release action through the impact zone - http://www.youtube.com/watch?v=iMyGoUN_lmU
Here are capture images from his swing video.
Rickie Fowler's full-roll hand release action - capture images from his swing video
Note that Rickie Fowler is performing a full roll hand release action and that he is maintaining a FLW and intact LAFW (clubshaft is not passing his left arm from a rotational perspective) between the P7.2 position and the P7.5 position. In other words, if one rolls the FLW out-of-the-way with perfect timing and speed during the execution of a full roll hand release action, then one can actively straighten the right arm/wrist without breaking down the FLW and flip-bending the left wrist. The key "swing thought" that a golfer should harbor in order to prevent flip-bending the left wrist after impact is the "swing thought" of leading with the FLW and ensuring that the FLW is always leading the right wrist/hand through the impact zone. One must never slow down (stall) the FLW's forward motion through the impact zone - in other words, one must always remember the sound advice found in Hogan's book [7] - "keep the left hand driving all the time" and also "be sure you hit through with the left as hard as with the right".
The most frequent cause of flipping after impact (when a golfer uses a full-roll hand release action) is the combination of an over-active right arm/wrist straightening action combined with a slowing of the left hand's forward motion through impact.
Consider an example of a professional golfer, who sometimes flips after impact due to the combination of i) lead hand slowing and an ii) over-assertive right arm/wrist straightening action - Louis Oosthuizen.
Louis Oosthuizen's swing video - http://www.youtube.com/watch?v=HgBw5Ggj9Do
Here are capture images from his second swing which focuses on his hand motion.
Louis Oosthuizen's hand action through impact - capture images from his second swing sequence
If you watch the first two recorded swing sequences in his swing video at normal speed, you should note how actively Louis Oosthuizen snaps his right arm straight in his late downswing/early followthrough and you should also note how his left hand slows down at impact.Image 3 shows him at impact. Note that he has standard impact alignments - straight left arm and FLW, slightly bent right elbow and slightly bent (dorsiflexed) right wrist.
Image 4 shows how quickly his right arm has straightened, and how quickly his right wrist has flattened, through impact. Note that it is causing the club to flip passed his FLW. Note that his left forearm has also supinated slightly during that time period and that has allowed his right hand to pronate over the top of his grip. In other words, it is likely that Louis is starting to roll his left wrist very soon after impact (when his clubhead is still in the immediate impact zone).
Image 5 shows that his club has flipped passed his left wrist, which is probably bent.
In other words, the biomechanical combination of i) slowing of the forward motion of his FLW combined with an ii) over-active right arm/wrist straightening action has caused him to flip soon after impact.
Compare that second recorded swing action to his third recorded swing action.
Louis Oosthuizen's hand action through impact - capture images from his third swing sequence
Image 2 shows him at impact. Note that he has standard impact alignments - a FLW and a small amount of forward shaft lean, a slightly bent right elbow and slightly bent (dorsiflexed) right wrist.Image 3 shows him when his clubhead is approximately 12" post-impact. Note that his FLW is still facing the target and he has not yet started to roll his FLW counterclockwise. Note that his clubshaft is straight-in-line with his left arm, which means that he has not flipped after impact. The reason why he could maintain an intact LAFW/FLW in this particular swing action can be readily discerned by looking at the relevant biomechanical elements that can predispose to flipping. Note that his FLW has moved significantly forward from its impact position (in image 2) to a position closer to his left thigh in image 3 - which means that there has been no slowing/stalling of the forward motion of his FLW. Note that he still has nearly the same amount of right elbow bend and right wrist bend (dorsiflexion) in image 3 - relative to image 2 (impact) - and he has not straightened his right arm/wrist too fast through impact. In fact, you can even see that his right elbow is still not fully straight in image 4 (which is well after impact).
In other words, Louis Oosthuizen does not have the two biomechanical elements that predispose to flipping through impact in his third recorded swing, and he therefore can maintain an intact LAFW/FLW throughout the entire immediate impact zone.
The amount of flipping that Louis Oosthuizen manifested in his second recorded swing was not that large, and it also happened after impact, so it may not have negatively affected his ball flight. However, this same biomechanical problem can produce pre-impact flipping, or flipping during impact, if it gets significantly greater in degree, and it would obviously negatively affect his ball flight pattern under those circumstances. Hooking the ball, and/or pull-hooking the ball left, is a common problem that affects many golfers - even PGA tour golfers - and flipping through impact is a common causative factor. Some professional golfers are so conscious of their propensity to hook the ball left (due to flipping through impact) that they deliberately allow their right palm to lose contact with the left hand (at PP#1) through impact. The three PGA tour golfers who particularly manifest this biomechanical idiosyncracy are Phil Mickelson, VJ Singh and Freddie Couples.
Here is an example - VJ Singh.
http://www.youtube.com/watch?v=gBKc7u0Fxho
Here is a capture image of of VJ Singh's hand action through impact.
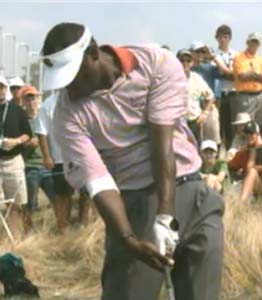
VJ Singh through impact - capture image from his swing video
Note how VJ Singh's right palm is totally separated from his left thumb through impact. Note that he has no flipping of the club through impact - he has a FLW and an intact LAFW (clubshaft is straight-in-line with his left arm). Note how far his right shoulder is back at the exact moment of impact, and note that his right arm is significantly straight, which suggests that he is not actively driving his right shoulder/right arm through the impact zone.VJ Singh is a quintessential TGM-swinger, and I think that it perfectly acceptable (although not necessarily optimal) for a TGM-swinger to allow the right hand to lose contact with PP#1 during the left hand's passage through the immediate impact zone. The reason why it doesn't negatively affect ball carry distance/ball flight is that a traditional TGM swinger is essentially a golfer who powers the swing by propelling the left arm across the front of the rotating torso, and he doesn't need supplementary swing power from the right arm/hand to make the grip end of the club maintain its travel-speed through the impact zone.
Consider again Hogan's two-handed basketball pass analogy.
In this personal demonstration, taken from my swing video lesson [9], I have placed a handle on the basketball, which allows me to slip my flat left wrist/hand under the handle (made of bicyle tire tubing, which is then attached to the ball with duct tape). That allows me to pull the ball forward using the left arm/hand.
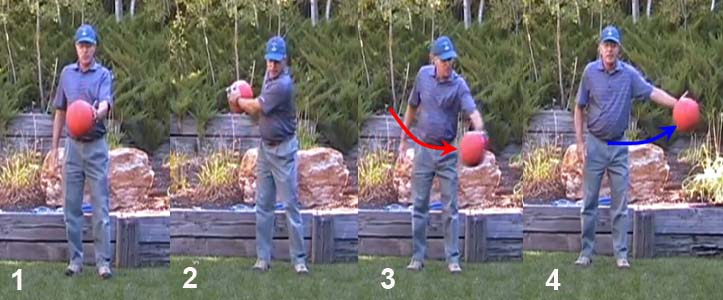
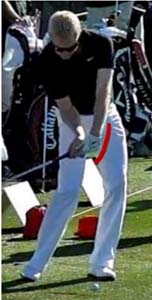
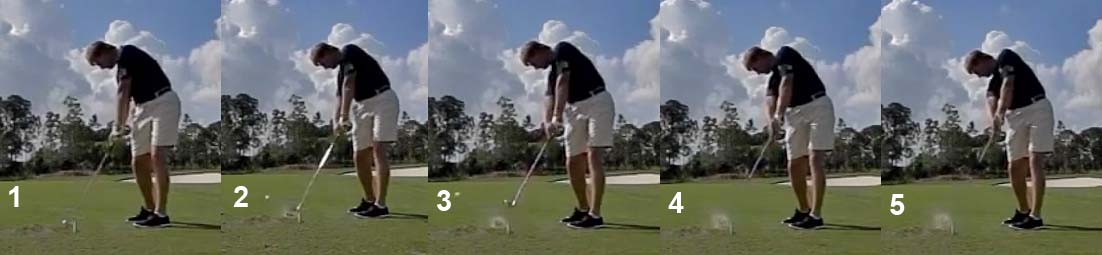
Author demonstrating a "basketball throw action from the right side towards a target on the left side" - capture images from his swing video [9]
Image 1 shows me with my flat left wrist/hand under the handle, which is attached to the basketball. Note that my left arm/forearm is neutral at address.
Image 2 shows that I need to internally rotate my left humerus and pronate my left forearm to get my left hand back to the start of the ball-throwing position (roughly at the P5.5 position).
Image 3 shows how I am swinging the left arm through the immediate impact zone in a continuous/fluid/non-stop motion. Note that I obviously had to perform a release swivel action (release of PA#3) between the P6.5 position and the P7 position to get my FLW to face the target at the P7 position. The swing power that moves the left arm is derived from two biomechanical sources - the rotating upper torso which rotates the left shoulder socket forward (and secondarily pulls the left humeral head along with it), and the left shoulder girdle muscles which simultaneously pull on my left humerus at their attachment point on the upper left humerus.
Inage 4 shows how I have pulled the ball from the P7 position to the P8 position while maintaining a FLW. During this time period (represented by the blue arrow) my FLW has remained perpendicular to the ground because I am performing a horizontal hinging action.
Imagine me repeating the ball-throwing motion while passively placing the right hand on the aft side of the ball during the performance of a two-handed basketball throw action. By "passive", I mean that the right hand stays in contact with the ball during its non-stop motion from the P5.5 to the P8 position, but the right hand does not actively push on the ball in a manner that will make the ball travel faster than the left hand (which is actively pulling the ball and leading the parade). In other words, the right arm can actively straighten and the right wrist can passively straighten/flatten during the ball's travel-time from the P5.5 position to the P8 position - but there must be a distinct "feeling" that the right hand is not applying any push-force on the aft side of the ball that will make the ball travel faster than the left hand (which is pulling the ball) or make both the left hand and ball travel faster. That's a key "feeling" that a swinger needs to ingrain into his swing action - the right hand must not apply any push-force against PP#1 that will make the left hand travel faster between P6 and P7 than it is already traveling as a result of the pivot-induced release of PA#4, and the right hand must not apply a push-force against PP#3 that will cause the club to flip passed the left arm and flip-bend the left wrist. A TGM swinger, who uses a pivot-induced release of PA#4, should "feel" that he is catapulting his left arm downwards-and-forwards in the direction of the ball during his downswing action, and he should "feel" that his left arm is swinging forward with enough swing power to get through the impact zone and reach the P7.5 position without slowing down. A TGM swinger should have the distinct "feeling" that he has swung his left arm targetwards through the impact zone with enough energy/force, that he doesn't need any supplementary push-power from his right arm/hand to ensure that his left hand doesn't slow down between the P7 position and the P7.5 position. If a TGM swinger has the distinct "feeling" that his right arm/hand are pushing the left hand (and/or the club) forward at any time point between the P6 position and the P7.5 position, then it means that he is not efficiently releasing PA#4 with enough power, and he must work on improving his swing dynamics (especially his pivot action if he uses a pivot-induced release of PA#4).
Here is a photo-demonstration of Freddie Couples from two different swings.
Freddie Couples through impact - capture images from two different swings
Image 1 shows Freddie Couples flip-bending his left wrist after impact in this particular swing action. Note that his right palm is still glued to the left thumb at PP#1. The likely cause of his flipping action is due to right arm push-power applying an active push-force at PP#3 through impact +/- a slowing/stalling of the forward motion of his left hand.
Image 2 shows that Freddie Couples has maintained an intact LAFW/FLW in this particular swing action and there is no flipping. Note that his right palm has lost contact with PP#1 (on the left thumb), which suggests that he is not applying any right-sided push-force in this particular swing action. One can even get a "sense" that Freddie Couples is swinging his left arm/hand more efficiently through the impact zone in this particular swing action due to a more efficient release of PA#4 (forward release of the left arm).
Some golf instructors make the huge mistake of recommending an active slap hinge hand release action through impact.
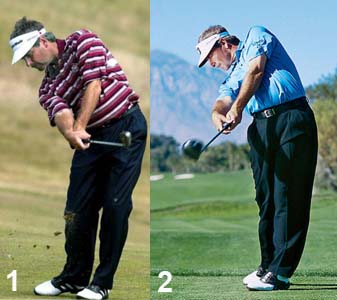
Here is Laird Small demonstrating an active slap hinge hand release action through impact - Laird Small's power release suggestion was published in the 2008 edition of Golf Magazine's soft-cover publication "The Best Golf Instruction Guide Ever", which includes golf tips from the 100 top teachers.
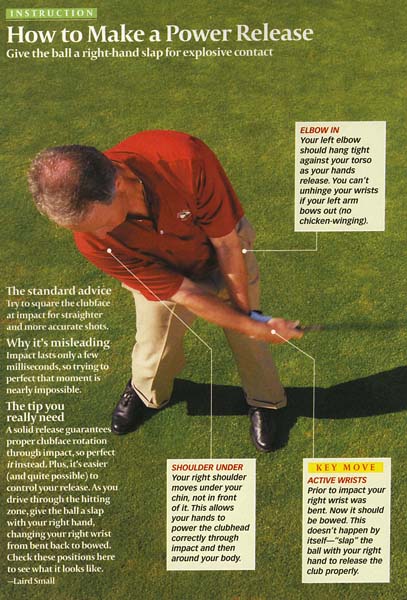
Laird Small demonstrating an active slap hinge release action
Note that Laird Small states that the key move is "active wrists" and he obviously recommends an active wrist flipping motion through impact where the right wrist straightens and the left wrist bends. That's terrible advice!!!! Any active flipping action through impact means that a golfer cannot maintain a stable clubface (that is continuously square to the target) throughout the immediate impact zone (between P6.9 and P7.2). If a golfer follows this "active wrist" recommendation, then the chance of having a square clubface at impact depends on perfect timing and even professional golfers cannot hope to perfectly time a wrist flipping action consistently from swing-to-swing, and that's why most professional golfers avoid any left wrist flipping action by maintaining an intact LAFW/FLW throughout the immediate impact zone (and often throughout the entire impact zone until at least P7.5).I believe that there is no such thing as an usable active left wrist motion through the immediate impact zone. The left wrist must remain flat throughout the immediate impact zone. I will repeat that advice in highlighted red - the left wrist must remain flat throughout the immediate impact zone and there should be no horizontal hinging motion of the left wrist during its travel through the immediate impact zone.
Consider a world class tennis player - Roger Federer - performing a back-handed tennis shot.
U-tube video - http://www.youtube.com/watch?v=zZ2zmsPIMXI
Here are capture images from one of his back-handed tennis stroke actions.

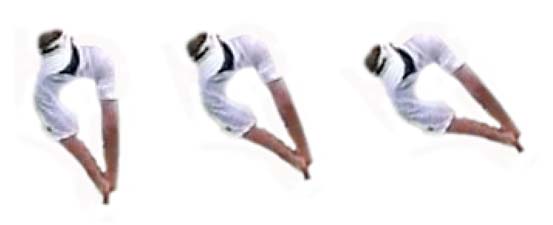
Roger Federer performing a back-handed tennis stroke action - capture images from his swing video
Image 1 shows Roger Federer prepared to start his back-handed tennis stroke action. Note that he has pre-swivelled the racquet grip in his right hand so that the racquet face is 90 degree angled relative to the back of his FLW/back of his right forearm. That is equivalent to a golfer adopting a very strong grip (4-knuckle grip) and that grip choice will allow Roger Federer to perform an arm stroke motion without having to roll his right forearm clockwise during the stroke motion (without having to perform the golfer's equivalent of releasing PA#3) in order to square the racquet face at impact.Images 2, 3 and 4 show how he swings his right arm across the front of his body during his back-handed tennis stroke action. His back-handed tennis swing action is an arm stroke action, and there is only a small amount of wrist motion in the plane of the LAFW (the vertical plane of ulnar/radial deviation) that ends at impact. Image 5 shows how he maintains a FLW well beyond impact and he never allows his right wrist to flip-bend so that the racquet face bypasses his FLW/right arm. That's a very reliable biomechanical technique to ensure that one has maintained a square racquet face through the immediate impact zone if one simply ensures that the ulnar border of the FLW (ulnar border and not the back of the FLW - because he has adopted the equivalent of a very strong 4-knuckle grip) faces the target during its entire travel-time through the immediate impact zone. Any supplementary/additional right wrist motion (superimposed on the arm stroke motion) through impact would make it more difficult for him to consistently ensure that he has a square clubface at impact, and he obviously avoids that situation *if possible. In other words, he gives up a small amount of potential power (that could theoretically be obtained by adding an active flicking wrist motion to his arm motion) in order to avoid any loss of accuracy due to impaired racquet face control.
(* under the competitive stress of reaching for a ball where he doesn't have time to prepare for the performance of an efficient back-handed tennis stroke action, he may use a flicking/flipping motion of his right wrist. However, he then wouldn't expect the tennis ball to consistently go straight towards his desired target because he would naturally realise that he wouldn't be able to guarantee that his racquet face is square to his target at the exact moment of ball impact - if he rapidly flicked his right wrist through impact)
I think that the same principle applies to a full golf swing when performed by a swinger, who primarily powers the swing by releasing PA#4 so that he can swing his left arm across the front of his body. The swinger's action should be thought of as a stroke action using an intact LAFW/FLW through the impact zone and there should be no supplementary wrist flicking/flipping motion involved. This type of release action will promote accuracy due to improved clubface control with little loss of swing power.
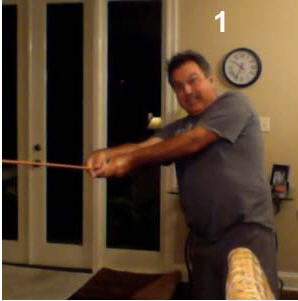
Here (again) is Jamie Sadlowski's release action - when driving a golf ball 350-400 yards.
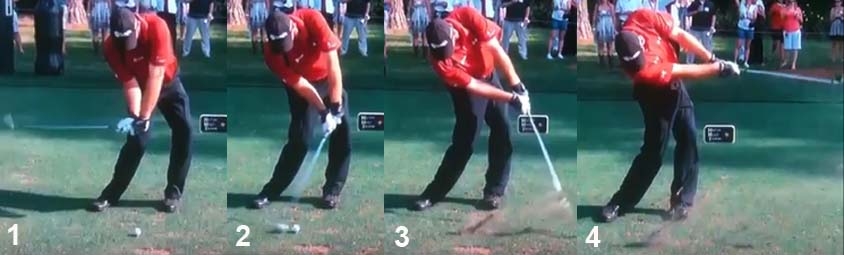
Jamie Sadlowski releasing the club between P7 and P7.8 - capture images from his swing video [5]
Note that he has maintained an intact LAFW (his clubhead has not bypassed his left arm) through the immediate impact zone (image 1) and he has even maintained an intact LAFW to the P7.3 position (image 2) - despite generating a clubhead speed of 140+ mph when hitting drives of 350-400 yards. Note that Jamie Sadlowski doesn't try to generate "extra" clubhead speed by adding the biomechanical mechanism of an active slap hinge wrist action (that bends the left wrist) through impact (during the time period of travel through the immediate impact zone). If Jamie Sadlowski can generate adequate swing power without adding the complicating factor of an active slap hinge wrist action (that bends the left wrist through impact), then you should think twice about the idea of using any active left wrist horizontal hinging action through impact.
The next question becomes - if it is not acceptable to use an active slap hinge release action, it is acceptable for a swinger to allow the right wrist to passively straighten in such a manner that it flip-bends the left wrist soon after impact?
To correctly answer that question, consider the biomechanical/mechanical reasons why the right wrist would passively straighten through impact and flip-bend the left wrist soon after impact.
Watch these two videos produced by Brian Manzella (a New Orleans-based golf instructor).
Charlie Brown and the Golf Swing video - http://vimeo.com/29646505
Two Drills ... again video - http://vimeo.com/33692125
Brian Manzella teaches a hand release action, which he calls the *rotation-about-the-coupling point hand release action.
(* I am not going to discuss his rotation-about-the-coupling point release (RACP) action in great detail in this review paper - because I have now written a review paper specifically dedicated to a detailed analysis of Brian Manzella's release ideas)
Both of those videos show the same characteristic feature of his RACP release action - the idea of inducing a free release of the clubhead through impact. In the first video, he uses the back of a couch chair, and in the second video he uses a plastic bottle (masquerading as a piñata- a piñata is a papier-mâché or other type of container that is decorated).
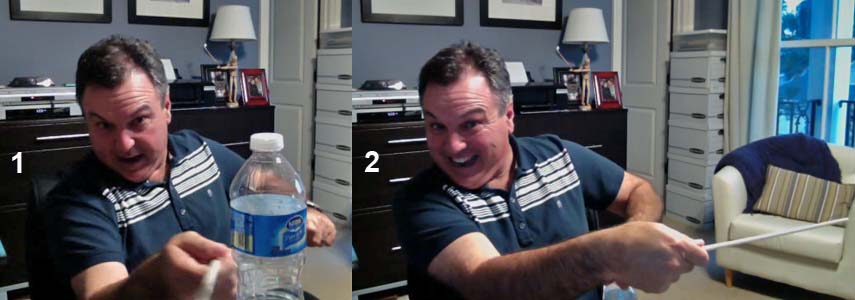
Brian Manzella demonstrating the RACP release action - capture images from his "Two Drills... again" video
In image 1, Brian Manzella asks the question - "what would happen if you gave a person a short stick and asked him to efficiently hit the bottle (actually a piñata) with maximum speed - if you abruptly removed the bottle (actually a piñata) in a Charlie Brown manner"? In image 2, Brian Manzella demonstrates the answer - the right wrist would bend forward (flatten) soon after impact. In other words, if a golfer allows the clubhead to pass through impact at maximum speed due to the free release of the clubhead, then the right wrist would straighten/flatten (palmar flex) soon after impact. In this demonstration, it may look like Brian Manzella is performing an active slap hinge release action, but he claims that he is not actively straightening his right wrist in his RACP-release action - because he wants there to be no "force-across-the-shaft" at the exact moment of impact. The right wrist straightens through impact because it passively follows the forward/gained momentum of the RACP-released club, which has been freely released through impact. Note that he has a bent right wrist at impact (which will ensure a FLW) at impact, and the right wrist only straightens/flattens immediately after impact.If the right wrist straightens passively through impact, what would then happen to the left wrist immediately after impact?
In the first video, Brian Manzella proposes an answer to that question.
Brian Manzella demonstrating the appearance of the left wrist after impact - capture image from his "Charlie Brown and the Golf Swing" video
Note that Brian Manzella has a bent left wrist and a straightened/flattened right wrist in this photo. In the video, Brian Manzella makes the outrageous claim that "nearly all good golfers" look this after impact, which is not true because most professional golfers maintain a FLW until at least the P7.2 position (and often the P7.5 position). He even has a collection of images of great golfers [10], who he claims are using the equivalent of his type of RACP-release action. The first great golfer in his collection is Harry Vardon.
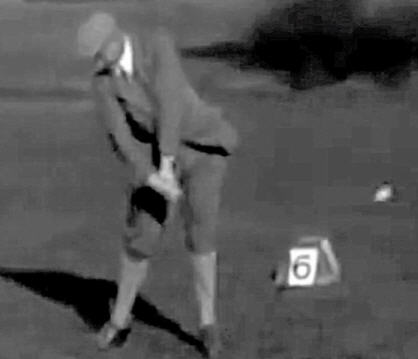
Harry Vardon's hand release action - capture image from Brian Manzella's collection [10]
Note that Harry Vardon has flip-bent his left wrist soon after impact.I believe that any flip-bending of the left wrist very soon after impact can only happen if one-of-two forces are present in a swinger - i) a positive push-force pushing the club forward through impact due to an actively straightening right wrist; or it can be due to ii) the club's gained angular momentum derived from the club release phenomenon (release of PA#2) and where the right wrist passively straightens through impact because it simply keeps up with the released club. The first explanation represents an active slap hinge release action - which Brian Manzella doesn't recommend for his RACP-release action. So, the only rational answer is explanation number 2 - the golfer releases the club with enough forward momentum that it passes through impact with enough gained speed that its passively flip-bends the left wrist soon after impact. If you think about the situation of Brian Manzella's Charlie-Brown piñata demonstration, the likelihood of the left wrist flip-bending very soon after impact is greater if the forward momentum of the left hand between the P7 position and the P7.5 position is slowed. In other words, any slowing/stalling of the forward motion of the left wrist/hand soon after impact will increase the likelihood of the left wrist flip-bending soon after impact and it will increase the likelihood of it happening sooner (for a given amount of "forward momentum power" of the released club through impact). An additional biomechanical factor that plays a supplementary role is the degree of floppiness of the left wrist - any enhanced left wrist floppiness increases the likelhood of the left wrist-flip bending for a given amount of forward-directed force that the club has acquired by the time it reaches impact.
From my perspective, any flip-bending of the left wrist too soon after impact (while the clubface is still within the immediate impact zone between P7 and P7.2) means that a golfer doesn't have a stable clubface throughout the entire immediate impact zone. Kelvin Miyahira refers to flipping soon after impact as a pro-flipper release action [1]. I believe that Brian Manzella's RACP release action (or any equivalent "throwing the clubhead at the ball" release action) predisposes to pro-flipping, which means that obtaining a square clubface at impact requires perfect timing of the flipping action. If the flipping action is perfectly timed so that the clubface is square to the target at impact, then the ball will still go straight - because it doesn't matter if the clubface becomes closed to the clubhead arc after impact due to a left wrist flip-bending phenomenon. However, if the left wrist flip-bending phenomenon occurs too soon and it occurs pre-impact, or during the impact interval, then the clubface will not be square to the target at impact. I do not believe that it is easy to perfectly time a pro-flipping release action consistently from swing-to-swing, and that is why I reject it as a viable hand release option for serious golfers who want to develop a sound golf swing based on sound biomechanical principles. I believe that one should eliminate any horizontal left wrist hinging motion through the immediate impact zone by maintaining a FLW during that entire time period. Playing with an intact LAFW/FLW throughout the entire downswing and followthrough completely eliminates this problem, and I think that it represents the optimum biomechanical/mechanical solution.
Consider a golfer who maintains an intact LAFW/FLW throughout his downswing and followthrough swing action.
Sasho MacKenzie's lead arm-only swing action - http://www.youtube.com/watch?v=GgF_9IfROAU
Sasho MacKenzie is not a professional golfer, and he is a sport-mechanist with a Phd degree. He can generate a clubhead speed of ~95mph with his lead arm-only swing (I use the term lead-arm because he is a lefty) and he can drive the ball >250 yards with his lead arm-only swing.
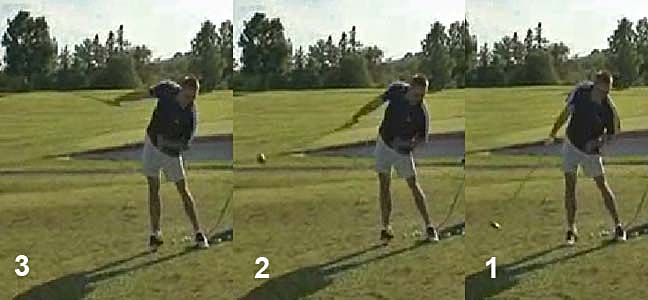
Sasho's followthrough swing action - capture images from his swing video
Because Sasho MacKenzie is a lefty, one has to view his followthrough swing action sequence from right-to-left.Image 1 shows him at the P7.4 position, image 2 shows him at the P7.8 position, and image 3 shows him at the P8+ position. Note that he has maintained an intact LAFW/FlatLeadWrist and the club has not passed his lead arm from a rotational perspective. Note that there is no horizontal motion (flip-bending) of his lead wrist in the post-impact zone. I think that this is the optimal way for a swinger to perform a golf swing that will allow one to consistently maintain a stable clubface (clubface that is square to the target) throughout the immediate impact zone and I would encourage all golfers to adopt this intact LAFW/FLW swing technique.
It is important to realise that it doesn't require some special "negative torque" to maintain a FLW throughout one's downswing/followthrough swing action - other than an ability to maintain a reasonably firm left wrist (to the same degree that it would be required by a back-handed tennis player who strokes the ball). One doesn't have to perform "some" special biomechanical action to firm-up the left wrist for impact - one simply has to maintain a reasonably firm FLW as one swings one's left arm (in a stroke-like manner) through the impact zone. It is much easier to accomplish that goal if one has a intact LAFW/FLW throughout one's backswing, downswing and followthrough swing action.
Here is a golfer who maintains an intact LAFW/FLW throughout his entire downswing/followthrough swing action.
Matt (student of Geoff Jones - aka Slicefixer)
U-tube rear-view overhead video - http://www.youtube.com/watch?v=xkx7k9sAiwU
U-tube front-view overhead video - http://www.youtube.com/watch?v=_7ZoHaDq710
Matt has a superb golf swing and he is perfect role model for developing golfers.

Capture images from his rear-view overhead swing video
Note that Matt has an intact LAFW/FLW at his end-backswing position (image 1), at the P6 position (image 2), at impact (image 3), at the P7.2 position (image 4), at the P7.5 position (image 5) and at the P8 position (image 6). It is not necessary to maintain an intact LAFW/FLW beyond the P7.5 position, and it doesn't really matter if the left wrist bends slightly after it bypasses the P7.5 position. I think that a golfer should mentally picture how he moves his FLW from the P4 position through the impact zone to the P7.5 position - and it should be conceptually similar to performing a back-handed tennis stroke action. I have emphasised the word "stroke" because that is an useful mental image for a golfer - one should think of one's left arm motion through the impact zone as being a *back-handed left arm stroke action, and not a swing-hitting action, or a right arm throwing action or a right/left wrist-flicking action.(* try to mentally picture Matt's swing action by solely concentrating your mental attention on the 3-D motion of his lead arm between the P6 position and the P8 position - you should note how similar it is to Sasho MackKenzie's lead arm motion)
It is important to appreciate the fact that there should be no "feeling" of slowing the forward motion of the left arm/FLW between the P6 position and the P7.5 position, and one should "feel" that one is maintaining the forward speed of the FLW until at least the P7.5 position in an ultra-fluid manner. One should also learn to "feel" that the back of the FLW continuously faces the target between the P6.9 position and the P7.1/7.2 position and one should not prematurely start to perform a full-roll hand release action - note that Matt's FLW, and clubface, is still facing the target in image 4 (P7.2 position) and that he only starts to perform his full-roll hand release action in image 5 (beyond the P7.2 postion).
Consider the swings of two other professional golfers who do an excellent job of maintaining the forward speed of their FLW through the immediate impact zone and who maintain a stable clubface (that is square to the target) throughout the entire immediate impact zone.
Dustin Johnson swing video - http://www.youtube.com/watch?v=vJWVLYKxKIQ
Here are capture images from that swing video.
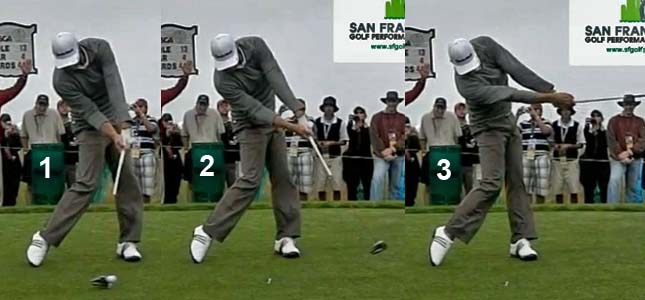
Dustin Johnson's followthrough action - capture images from his swing video
Image 1 shows Dustin Johnson at impact - note that his FLW and clubface is facing the target.Image 2 shows him at the P7.3 position - note that his FLW and clubface is still facing the target, and he hasn't yet started to perform his full-roll hand release action. That allows him to maintain a stable clubface that is square to the target through the immediate impact zone (from the P7 position to the P7.2 position). Note that his clubshaft is straight-in-line with his left arm, which means that he has an intact LAFW.
Image 3 shows him at the P8 position where he has completed his full-roll hand release action. Note that the roll-over of his FLW/clubface between image 2 (P7.3 position) and image 3 (P8 position) is mainly due to a counterclockwise rotation of the left arm/forearm, and there is very little contribution from a continued counterclockwise rotation of the pelvis and mid-torso. That biomechanical phenomenon is a characteristic feature of golfers who use a full-roll hand release action.
Heath Slocum's swing video - http://www.youtube.com/watch?v=FdVcINqxCkU
Here are capture images from that swing video.
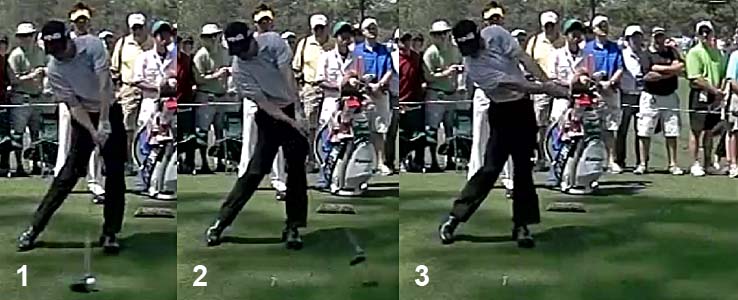
Heath Slocum's followthrough action - capture images from his swing video
Image 1 shows him at impact - note that his FLW and clubface is facing the target.Image 2 shows him at the P7.2+ position - note that his FLW/clubface is still facing the target, and he hasn't yet initiated his full-roll hand release action. Note that his clubshaft is straight-in-line with his left arm, which means that he has an intact LAFW.
Image 3 shows him at the P7.9 position and he has completed his full-roll hand release action. Note that he stalls his pelvis at impact, and he doesn't continue to actively rotate his pelvis counterclockwise during his followthrough action. This pelvic stalling phenomenon is even more apparent when viewing his swing from a DTL viewing perspective.
Heath Slocum DTL swing video - http://www.youtube.com/watch?v=8dahK8isuZg
Here is a capture image from his swing video.

Heath Slocum's followthrough action - capture image from his swing video
Note how his pelvis hasn't continued to rotate counterclockwise, and note that he is using a CF-arm release action.
Note that he has performed a full-roll hand release action, which is *mainly due to a counterclockwise rotation of the left arm/forearm with very little contribution from a counterclockwise rotation of his pelvis and mid-upper torso.
(* in the next section on a no-roll hand release action, one will note that no-roll hand release action golfers pivot much more actively through impact and actively rotate their pelvis and mid-upper torso inside-left after impact - and that allows them to use a no-roll hand release action where the FLW doesn't roll over during their followthrough action and where the FLW remains perpendicular to the inclined plane)
Reconsider this image of Ben Hogan performing his two-handed baseketball pass swing action.
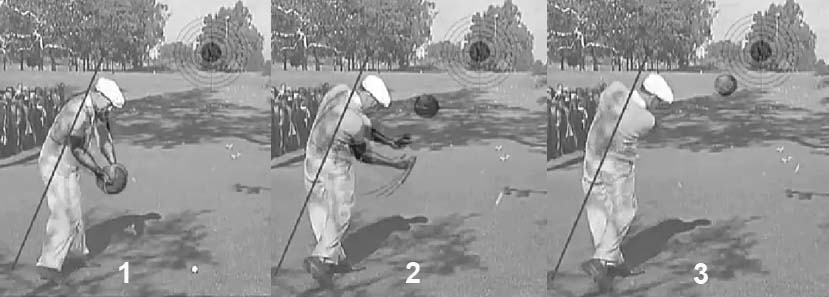
Ben Hogan's hand release action through the impact zone - capture images from a swing video
Image 1 shows Hogan's hands approaching impact and image 2 shows his hands soon afer impact. Note that there is no crossover of the hands - no roll of the right forearm over the left forearm - through the impact zone. Some golf instructors recommend the deliberate use of a hand crossover release action - where the right forearm actively rolls over the left forearm during the hands travel time through the immediate impact zone.AJ Bonar recommends a hand crossover release action through the immediate impact zone.
http://www.golf.com/golf/instruction/article/0,28136,1565175-1,00.html
AJ Bonar explains his "magic move" on page 3 of that article.
This is what AJ Bonar states in that article-: "About two or three feet before your hands reach impact, assertively rotate them toward the target. Imagine you're gripping a screwdriver and turning it counterclockwise. This closes the clubface, generating big-time power." In other words, AJ Bonar is recommending that one actively rotate the hands and clubface through the impact zone. Here is the accompanying photo that he uses to illustrate his advice.
Hand crossover release action - image from AJ Bonar's article
What AJ Bonar is advising is an active left hand rotation movement through the impact zone. The left hand approaches impact with the back of the left hand facing slightly skywards (implying an open clubface) - image 1, then the left hand rotates to being vertical at impact with the back of the left hand facing the target - image 2, then the left hand rotates further so that the back of the left hand faces the ground (supinating left hand) immediately after impact - image 3.This "active left hand rotation" golf tip recommendation is terrible advice, because the success of this "magic move" depends on perfect timing through the impact zone. Professional golfers don't actively/deliberately use this "magic move" maneuver, because they cannot hope to time the move correctly. There should be no rotation of the FLW through the immediate impact zone - from the P6.9 position to the P7.2 position, and the roll of the left hand that occurs due to a full-roll release action should only happen after the hands bypass the immediate impact zone (after the hands bypass the P7.2 postion). It also important to realise that the biomechanics of the "roll" in a full-roll hand release action doesn't occur due to an independent left forearm supination movement, and that it occurs at left shoulder socket level (due to external rotation of the left humeral head within the left shoulder socket while the left shoulder socket is moving inside-left due to the continued pivot-rotation of the upper torso). During the "roll" of a full-roll hand release action, the left upper arm, left forearm, FLW, left hand and clubface should all be rotating at the same rpm, and the left forearm/hand/clubface should not rotate faster than the upper left arm due to an independent left forearm supinatory motion.
A golfer should not only avoid using a hand crossover release action (ala AJ Bonar) - he should also not allow the left forearm to supinate independently/passively after impact. An independent/passive left forearm supinatory motion can occur secondary to the right palm pushing on the left thumb at PP#1 and rolling the left hand over through impact - if the right arm straightens too fast through impact and if it applies a push-pressure against PP#1 in a counterclockwise rotary manner. Kelvin Miyahira refers to this as a roller hand release action [1]. I don't believe that professional golfers deliberately perform a roller release action, and I think that it happens unintentionally in golfers who routinely use a full-roll hand release action, but who sometimes unintentionally use too much right arm push-pressure against PP#1 during their hand release action. That can cause the hands to roll-over too soon through impact, and it can predispose to pull-hooked shots if the clubface is closed at impact. Phil Mickelson is a golfer who often suffers from this problem when hitting his driver shots - because he probably adds too much rear hand action in a swing-hitting manner through the impact zone. That biomechanical phenomenon could explain why he often pull-hooks his driver shots into the rough.
Consider Phil Mickelson's swing action.
Here is an U-tube video consisting of multiple swings - http://www.youtube.com/watch?v=woRsFpkzxZQ
In some of those swings, Phil Mickelson maintains a FLW/clubface that is square to the target throughout its passage through the immediate impact zone (from P6.9 to P7.2), and he successfully delays the start of his full roll hand release action until his hands reach the P7.2 position. However, in other swing actions, he starts his full roll release action too soon and in one swing action he even performs a roller hand release action.
Consider an example of an early start of a full-roll hand release action.
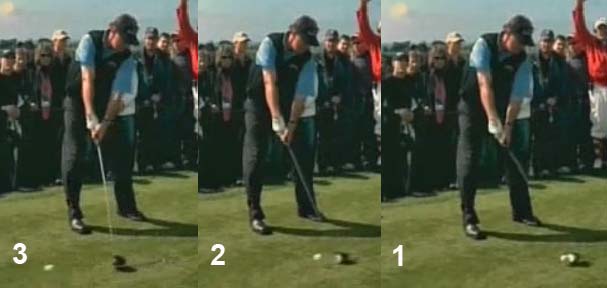
Phil Mickelson's hand release action - capture images from his swing video
Because Phil Mickelson is a lefty, one has to view his followthrough swing action sequence from right-to-left.Image 1 shows Phil Mickelson at impact (P7 position) - his FlatLeadWrist and clubface are square to the target.
Image 2 shows him at the P7.05 position - his FlatLeadWrist and clubface are still "somewhat" square to the target, but they may even be closing already (note that his clubface looks more closed in image 2 compared to image 1).
Image 3 shows him at the P7.15 position and he is well into his roll-execution of his full-roll hand release action.
Phil Mickelson has started his full roll hand release action too soon, but he probably still hit the ball straight because his clubface was probably square to the target through the impact interval.
Consider an example of Phil Mickelson performing a roller hand release action - presented as an animated gif.
Phil Mickelson performing a roller hand release action - capture images from his swing video
One can clearly see Phil Mickelson's hands rolling over too soon through the immediate impact zone, which will cause his clubface to become closed to the target/clubhead arc too soon, and it will produce a pull-hooked shot if the clubface is closed to the clubhead arc/target at impact. Note how his right forearm is independently supinating after impact - at a speed that is faster than the speed of external rotation of his right upper arm. Note how actively his left arm is straightening and how actively his left forearm is pronating through impact - thereby likely causing his right forearm to continue to independently supinate after impact. Phil Mickelson's unintentional roller hand release action is biomechanically similar to AJ Bonar's intentional hand crossover release action, and it should be avoided if you a swinger who prefers to use a full-roll hand release action. The most likely biomechanical cause of the problem is an over-active rear hand push-action at PP#1 through the impact zone, which is why I constantly warn golfers (who are swingers who prefer to use a full-roll hand release action) to avoid any over-active right arm straightening action (active release of PA#1) and/or any active right wrist straightening action through impact. If one wants to be a swinger, who uses a full roll hand release action through the impact zone, then one must lead with the FLW and one must have the distinct "feeling" that one is moving the FLW actively forward between the P6.9 position and the P7.5 position - and one must avoid any left hand stalling action and/or any over-active right arm pushing action through the impact zone. One must also learn to delay the start of the full-roll hand release action and one should not prematurely start to roll the FLW before the FLW/clubface reach the P7.2 position. The FLW/clubface must remain square to target between the P6.9 position and the P7.1/P7.2 position.
No-roll hand release action
Consider again these capture images of Ben Hogan's hand release action through the impact zone.
Hogan's hand release action through the impact zone - capture images from his swing video
Note that there is no evidence of any roll of his hands in image 2, and his hands disappear from view in image 3. So, did Ben Hogan routinely employ a full-roll hand release action between image 2 and image 3, or did he he usually use a no-roll hand release action?The correct answer is that Hogan routinely/usually used a no-roll hand release action through the impact zone - especially in his mid-late professional career. One can find "video evidence" that he often used a full-roll hand release action for his driver swings in his early profesional career (1930s), but in the 1940s-1950s he was routinely using a no-roll hand release action for all his full swing shots.
Here is a photo of Hogan from the early 1930's.
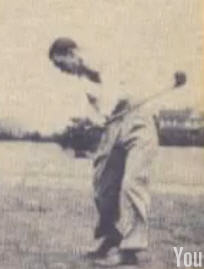
Ben Hogan's early 1930s followthrough
Note that he is using a full-roll hand release action. Note that his pelvis is not very open to the target and his shoulders appear to be square to the ball-target line.Here is a photo of Hogan from 1953.

Ben Hogan's 1953 followthrough
Note that both his pelvis and his shoulders are much more open to the target, and he is swinging his arms more inside-left during his followthrough swing action. He is also using a no-roll hand release action (which one cannot discern in this single image).Here is a swing video example of Ben Hogan performing a no-roll hand release action.
Swing video - http://www.youtube.com/watch?v=LJdChWnxDvU
Here are capture images from that swing video
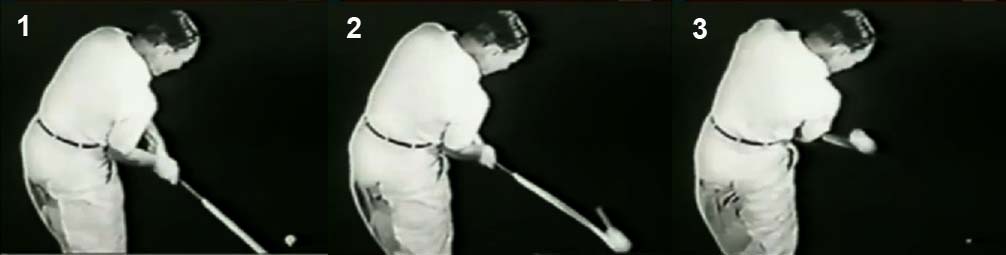
Ben Hogan performing a no-roll hand release action - capture images from his swing video
When a golfer performs a no-roll hand release action between the P7 position and the P7.5 position, he uses an angled hinging action (and not a horizontal hinging action) - and during an AH action the back of the FLW and clubface remain perpendicular to the inclined plane (and they do not move perpendicular to the ground as seen in a full roll hand release action). You can see that phenomenon in image 2 and image 3 - the clubface is perpendicular to the inclined plane, and angled ~45 degrees relative to the ground, and the clubface does not roll-over between the P7.2 position (image 2) and the P7.5 position (image 3) as it would if the golfer used a full roll hand release action between the P7.2 position and the P7.5 position.What biomechanical actions does Ben Hogan employ to allow him to use a no-roll hand release action between impact and the P7.5 position?
The one biomechanical action that Ben Hogan employs is the use of an active/non-stop pivot action where he rotates his upper torso actively/non-stop in an inside-left direction after impact - while keeping his upper arms closely connected to his rotating upper torso. That dual biomechanical action causes his hands to quickly "disappear from view" in a DTL video. In other words, Hogan is releasing his arms inside-left very soon after impact, instead of releasing his arms away from his body in a targetwards, or right-of-targetwards, direction. If one releases the arms inside-left after impact, then it is often arbitrarily referred to as a centripetal arm release action (CP-arm release action) and if one releases the arms away from the rotating torso after impact (in a targetwards or right-of-targetwards direction), then it is often arbitrarily referred to as a center-fleeing/centrifugal arm release action (CF-arm release action).
Here is a photo comparision where John Erickson demonstrates the difference between a CP-arm release action and a CF-arm release action.
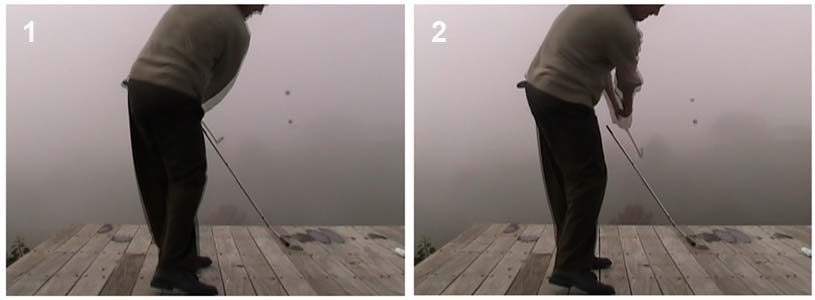
John Erickson demonstrating two different arm release actions after impact - images copied from John Erickson's original images (which were larger)
John Erickson teaches a swing technique called "advanced ball striking" [11] and there is a lot of similarity between his ABS-technique and Ben Hogan's swing - they both use a CP-arm release action and a no-roll hand release action through the impact zone.In image 1, John Erickson is demonstrating his ABS-technique. The rod inserted into his deck represents the angle/position of the inclined plane in the general impact zone. Note that he pivot-rotates very actively through impact and his hands "disappear from view" very quickly because he keeps his upper arms closely connected to his actively rotating upper torso, and this represents a CP-arm release action. One cannot see his hand release action, but one can infer that he is using a no-roll hand release action because his clubface is perpendicular to the inclined plane (and ~45 degree angled relative to the ground).
In image 2, he is demonstrating a traditional swinger's action. Note that he is not rotating his torso actively inside-left after impact and he is allowing his upper arms to separate away from his chest wall as they move in a targetwards direction, and this represents a CF-arm release action. Note that his clubface and FLW have rolled over due to use of a full-roll hand release action.
It is important to understand that an arm release action and a hand release action are not the same biomechanical phenomenon, and the arm release action refers to the 3-D directional motion of the left arm between the P7 position and the P8 position, while the hand release action refers to the rotational motion of the FLW between the P7 position and the P8 position (during which time the FLW can roll, not roll, or reverse roll).
The use of an active rotary pivot action inside-left after impact allows a golfer to more easily perform a CP-arm release action, but for a golfer to also simultaneously perform a no-roll hand release action, the golfer must include other biomechanical phenomena in his dual arm-hand release action. A most important biomechanical phenomenon that golfers, like Ben Hogan and John Erickson and S&T golfers, use in their no-roll hand release action is the biomechanical fact that they keep their right wrist bent (dorsiflexed) through the early-mid (and sometimes even the late) followthrough. They also couple their left upper arm closely to the left upper chest wall as they pivot inside-left through impact and they do not allow the left upper limb to externally rotate during their followthrough (as seen in swingers who use a full roll hand release action). If you think about the involved biomechanics, then you should appreciate the fact that keeping the left upper arm tightly attached to the left armpit area of the left upper chest wall makes it easier for a golfer to avoid externally rotating the left humerus at a rotary speed that is faster than the rotation of the upper torso. Finally, they do not straighten the right arm too actively through impact in such a way that it will push the two hands/grip unit outwards away from the body in a CF-release manner.
Consider John Erickson's swing action as seen from a face-on (caddy) view.
U-tube video of John Erickson demonstrating his "holding the shaft flex" concept - http://www.youtube.com/watch?v=bjvJPeBWJGk
Here are capture images from that swing video
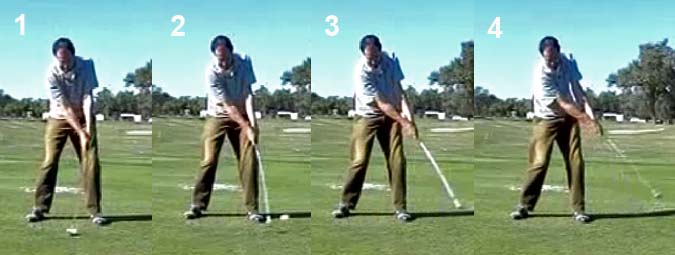
John Erickson's no-roll hand release action from the P7 position to the P7.5 position - capture images from his swing video
Note that John Erickson's FLW and clubface remain perpendicular to the inclined plane as they move from impact (image 1) to the P7.5 position (image 4), and there is no roll of the FLW/clubface during this followthrough time period - and this defines a no-roll hand release action. Note that John Erickson also maintains an intact LAFW/FLW and he doesn't flip-bend the left wrist.
Note that John Erickson doesn't alter the degree of bend of his right elbow, or degree of right wrist bend, during the time period of hand travel between impact (image 1) and the P7.5 position (image 4). Therefore, one could reasonably imagine that the rotating/pivoting torso action is biomechanically supplying the "force" to actively move his two hands through the impact zone, and one can think of his two arms/hands as being levers that allow the pivot action to apply leverage-power to the grip end of the clubshaft. There is no "push-force" being applied by an actively straightening right arm, or an actively straightening right wrist, during this time period. John Erickson thinks of himself as being a hitter (in a non-TGM sense), but what he is really doing biomechanically when he talks of hitting and "holding shaft flex" through impact, is that he is biomechanically allowing his right palm to apply push-pressure against PP#1 and the aft side of the club with the "push-force" being derived from the rotating torso (and not an actively straightening right arm - active release of PA#1), and being mechanically applied by the right arm/hand acting as a transmitting-push-force lever. While this happening, his active pivot action is also pulling his left arm/hand forward through the impact zone, and the grip is therefore also being pulled forward by the left arm/hand mechanically acting as a transmitting-pull-force lever. In other words, his "pivot-power" acts through the two arms - with the left arm pulling the club and the right arm pushing the club. From the mental perspective of Ben Hogan's "two-handed basketball pass from the right side" analogy - one can think of "throwing the ball with the pivot" with the two hands equally transmitting the pivot's rotational motion to the ball (which is conceptually equivalent to the grip end of the club).
Here is a recently produced swing video of John Erickson hitting golf balls off his California home's wooden deck, and this swing video allows you to view John Erickson's swing at a normal swing speed.
http://www.youtube.com/watch?v=GTP7j9fE6D8
There are a number of other golf swing styles that also use pivot-power to move the arms/hands, and therefore the clubshaft, through the impact zone, and where the golfers routinely use a CP-arm release action and a no-roll hand release action. This swing style is particularly seen in Sean Foley-taught golfers and S&T golfers. They all couple their arms very closely to their rotating torso, and they power the golf swing by actively rotating their torso through the impact zone. Consider further details on how they accomplish that goal.
Here is a photo from my review paper on the Sean Foley swing technique .
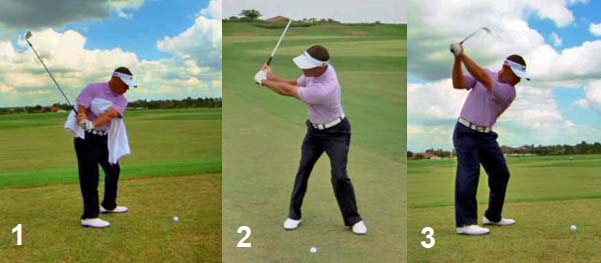
Sean Foley demonstrating his backswing action - capture images from his DVD [12]
Note that Sean Foley has placed a towel under both armpits, and he encourages his golfer-students to not allow the towel to drop at any time point during the backswing or downswing or early followthrough. The other biomechanical feature of his backswing action is the idea of pulling the hands "deep" so that the left upper arm is tightly coupled to the upper torso, while the right upper arm is also held relatively close to the upper torso (with enough close-coupling force that the towel will not fall away from the right armpit). Note that the left arm is never allowed to steepen during the backswing action so that the hands end-up above the shoulder turn angle level, because that biomechanical action would decrease the degree to which the arms are closely coupled to the rotating torso. If a golfer allows the left shoulder socket to protract forward during the backswing action while he rotates his upper torso (and therefore left shoulder socket) away from the target, and if he simultaneously allows the left upper arm to internally rotate to its maximum degree, then he should be able to get his hands to its end-backswing position (see image 2) with very little accompanying left forearm pronation. That means that he will not have to use much left forearm supinatory movement during the late downswing, when he swivels the FLW counterclockwise into impact in order to square the clubface. In other words, the release swivel action (release of PA#3) will be primarily due to a rotary motion of his upper torso (which first moves the left shoulder socket targetwards in the early-mid downswing and then inside-left through impact) combined with external rotation of the left humerus, and there will be very little left forearm supinatory motion involved in the biomechanical process of squaring the clubface between the P6.5 position and impact.During the downswing, a Foley/S&T golfer primarily concentrates on rotating the upper torso and he uses the "feel" of using the rotating upper torso to square the clubface. In my description of the release swivel action, I mentioned that it involves three biomechanical motions - a left forearm supination movement combined with a certain degree of external rotation of the left humerus (while the left shoulder socket continues to rotate up-and-away). In a golfer who uses an active pivot-arm-rotation action to square the clubface there is far less left forearm supination involved and the clubface squaring phenomenon is primarily due to external rotation of the left humerus while the left shoulder socket is first moving targetwards in the early-mid downswing and then up-and-around to the left in the later downswing.
Here is a swing video of Mike Bennett practicing at the S&T Golf Academy - http://www.youtube.com/watch?v=s5Pjp6OZcIY
Here are capture images from his swing video.
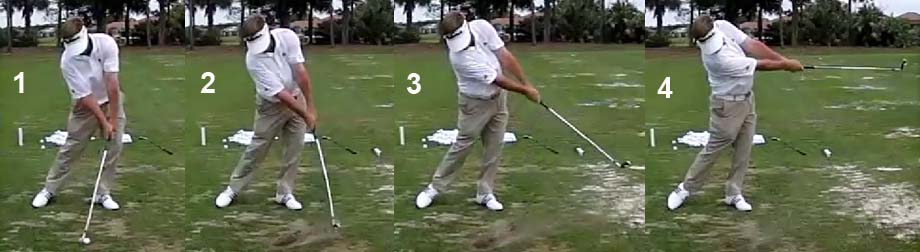
Mike Bennett's no-roll hand release action - capture images from his swing video
One can clearly note how his two upper arms are kept closely coupled to his pivoting/rotating upper torso during the downswing action and followthrough action. One can also note how the right wrist is kept bent into impact and how the FLW leads the clubhead into impact. Note how Mike Bennett maintains his bent right wrist throughout the entire followthrough action to beyond the P7.5 position. That requires an assertive pivot action that moves the right shoulder socket targetwards under the chin - so that he doesn't "run-out-of-right arm". Note how the two arms are moving inside-left in a CP-arm release manner. Note that he is using a no-roll hand release action where the FLW/clubface moves perpendicular to the inclined plane and they are both angled about ~45 degrees to the ground at the P7.5 position (image 3).Here is a swing video of Sean Foley teaching Sean O'Hair how to perform a no-roll release action - http://www.youtube.com/watch?v=w39wGwgmW5k
Capture image from the swing video
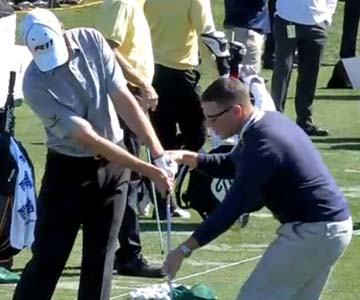
Sean Foley teaching Sean O'Hair how to perform a no-roll hand release action - capture image from the swing video
One can clearly see Sean Foley pulling Sean O'Hair's left arm and club forward in an exaggerated manner - while Sean O'Hair maintains a bent right wrist. To maintain a bent right wrist, and to prevent the right wrist from passively straightening, in a no-roll hand release action, one has to ensure that one does not "run-out-of-right arm", which means that one must be actively driving the right shoulder targetwards under the chin during the followthrough phase of the swing action. A golfer will obviously need the requisite amount of torso flexibility and physical training to perform this action fluidly and efficiently.What are the mechanical/biomechanical advantages that accrue to the use of a no-roll hand release action (relative to the traditional full roll hand release action)?
The first advantage is that if one doesn't ever roll the FLW counterclockwise between the P6.9 position and the P7.5 position, then one has eliminated the timing element that one has to master when performing a full roll hand release action. Secondly, if one maintains a firmly bent right wrist throughout the no-roll hand release action, then it guarantees that one is not going to flip-bend the FLW through the impact zone (as seen in a pro-flipper's hand release action). Thirdly, if the upper arms are closely coupled to the upper torso then it decreases the likelihood of a golfer performing an unintentional roller release action through impact where the clubface rolls over (and closes) during its passage through the immediate impact zone due to an independent left forearm supinatory motion. Finally, maintaining a bent right wrist and applying "some" (finite amount of) positive push-pressure against the aft side of the grip as the hands move through impact *may provide some resistance to any clubface displacement that usually accompanies an off-center hit.
( * see this John Erickson-produced video which suggests that there is less clubface displacement as a result of an off-center ball strike when using his ABS-hitting technique relative to a "dead hands" swinger's technique - http://www.youtube.com/watch?v=aMFxBYxanFA . I have used the word "may" because certain golf physics experts (eg. David Tutelman) have questioned the scientific legitimacy of this very interesting video demonstration because John Erickson did not prove that the degree of off-center hit was the same for the ABS-hitter versus the "dead hands" swinger. Also, John Erickson's "dead hands" swinger probably had a floppy left wrist through impact while I highly recommend a firm left wrist at impact for a swinger, who uses a full-roll hand release action, and there should no "floppiness" of the left wrist at ball impact if a golfer uses my recommended intact LAFW/FLW swing technique - just as there is no "floppiness" of Roger Federer's right wrist at ball impact in his backhanded tennis stroke action)
All these golf teachers (John Erickson, Sean Foley, Mike Bennett/Andy Plummer of S&T fame) have used Ben Hogan as the role model for their "CP-arm release action and no-roll hand release action" swing technique. A question then arises - did Ben Hogan couple his arms very closely to his upper torso and allow his "conjoined pivot-arm" swing action power the swing, or did Ben Hogan simply swing his arms across the front of his rotating torso in perfect synchrony, so that it "appears" that he is solely using "conjoined pivot-arm power" to power his swing action?
Here is an interesting swing video featuring Ben Hogan performing on stage during an Ed Sullivan TV show performance - http://www.youtube.com/watch?v=_AmPuzgBXEM
Watch the video over-and-over, and note that he first coupled his two elbows to the side of his hips (mid-torso) so that there was no independent arm motion, and that means that all rotary motion of the club must be due to the rotating torso's motion (which represents the pivot action). Note that he used a no-roll hand release action during that time period. He then started to swing his arms faster than his rotating torso, and finally he started to also rotate his torso faster while swinging his arms fast across the front of his rotating torso in perfect synchrony with his rotating torso.
Here are two capture images from his swing video
Ben Hogan swinging on the ED Sullivan show - capture images from the swing video
Note that he is performing a full-roll hand release action in image 1 and a no-roll hand release action in image 2 (the images are blurred due to the poor quality of the video which was made from an old film).I think that the cause for this difference is due to the fact that he first started to swing his arms faster than his torso when he stated that one "must lengthen the swing somewhere or other", and that resulted in a full-roll hand release action when his arms started to move faster than his rotating torso - image 1. It took him a few more swings before he became better synchronised in such a way that his pivot's rotational motion and his two-arms' rotational motion became better time-coordinated and in such a way that his pivot's shoulder rotational motion provided the swing power (rather than the arms being swung independently across the front of his rotating torso) and that better-synchronised swing action resulted in a no-roll hand release action - image 2. An important golf instructional point that one should appreciate is that one can more easily perform a no-roll hand release action if one's arms/club move at the same rotational speed as the rotating upper torso (particularly the two rotating shoulder sockets) and if one avoids allowing the club's rotational speed to exceed the speed of rotation of the structural unit consisting of the two shoulder sockets and the two arms. I arbitrarily refer to the two shoulder sockets/two arms structural unit (with the hands held in their impact alignment) as the impact triangle.
Here is an imaginary impact triangle which I created from a Mike Bennett capture image (image 1 above).
Impact triangle - created in Photoshop from a swing video capture image of Mike Bennett
The advantage of mentally/conceptually thinking in terms of the impact triangle is that it allows one to realise that one can swing the impact triangle in a direction that is slightly independent of the direction of rotation of the upper torso. In golfers who use a CP-arm release action, they are swinging the impact triangle inside-left at the same rotational speed as they rotate their upper torso inside-left after impact (and as exemplified by Ben Hogan's, John Erickson's and Mike Bennett's followthrough swing action). However, it is obviously biomechanically possible to decouple the impact triangle's rotational motion from the mid-upper torso's rotational motion to a small degree - because the two humeral heads can move freely/independently in their respective shoulder socket joints.Here is Charlie Hoffmann demonstrating that biomechanical phenomenon.
Charlie Hoffmann's no-roll hand release action through the impact zone - capture images from a swing video
One can clearly see that Charlie Hoffmann is using a no-roll hand release action between impact (image 1) and the P7.5+ position (image 3) - note that his FLW and clubface are perpendicular to the inclined plane, and angled roughly 45 degrees to the ground, in image 3. Note that he maintains an intact LAFW/FLW to beyond the P7.5 position, and he never flip-bends the left wrist after impact.Note that he is releasing his impact triangle more towards the target in a CF-arm release manner, and that allowed him to generate an in-to-out clubhead path through impact and hit a push-draw shot. Note how actively he straightened his right elbow through impact, and that swing-hitting action pushed his hands outwards away from his body in a CF-release manner (the active right arm straightening action is more clearly perceptible when viewing his swing action at a normal video speed - but unfortunately the U-tube swing video is no longer publically available).
There are many golfers who cannot resisist using an active right arm straightening action (active release of PA#1) in their late downswing - even though they are primarily swingers who power their swing primarily via an active release of PA#4. As swing-hitters, they get into trouble when using a full-roll hand release action because they often unintentionally become pro-flippers or rollers as a result of their consciously/unconsciously adding a right arm push-action motion through impact. I think that they would probably do better using a no-roll hand release action (like Charlie Hoffmann) because they will be less likely to flip, or roll, the clubface through impact.
Golfers who are *TGM hitters will naturally/automatically use a no-roll hand release action through impact because they use a "frozen" right wrist action and they drive-load the clubshaft through impact.
(* see the following two review papers for more information on the fundamentals of the TGM hitting technique - i) How to Power the Golf Swing and ii) Power Mechanics of Swinging, Hitting and Swing-hitting)
I think that Lee Trevino used a TGM hitting technique, and here is a video of him performing a TGM hitting action - http://www.youtube.com/watch?v=UYPWkOTvnK8
When viewing the swing video, it may "appear" as if Lee Trevino is using a CP-arm release action. However, he has a very open stance, and relative to his stance line he is actually directing his arms slightly to the right-of-his-stance line in a CF-arm release manner. Lee Trevino often talked about "aiming left, and swinging right".
Here is a DTL photo of Lee Trevino from a magazine article that clearly shows how Lee Trevino released his arms in a CF-arm release manner (relative to his open stance line).
Lee Trevino's no-roll hand release action - from reference number [13]
Note that he is using a no-roll hand release action - his clubface is angled ~45 degrees relative to the ground.Note that he is also using a CF-arm release action relative to his open stance/body line, and he is directing his impact triangle away from his torso in a CF-arm release manner.
Here are face-on (caddy) view images of Lee Trevino from an old magazine article.
Lee Trevino's downswing action
Image 10 shows his P7.5 position - note that his FLW/clubface is perpendicular to the inclined plane, and angled 45 degrees relative to the ground, because he has used a no-roll hand release action. Note that he maintains a bent right wrist to the P7.5 position, and that requires that he get his right shoulder well downplane and under his chin during the followthrough. Note that he had an intact LAFW/FLW at the P7.5 position, and that he never flip-bends his left wrist soon after impact.Finally, it is important to understand that a traditional TGM swinger, who routinely uses a full-roll hand release action, can selectively use a no-roll hand release action in order to shape shots. Under normal circumstances, it is biomechanically comfortable for a TGM swinger to allow the left humerus to externally rotate during his followthrough swing action, while he is pivoting inside-left after impact. That biomechanically natural action causes the FLW to roll-over between the P7.2 position and the P7.5/P8 position and that causes the toe of the club to pass the heel of the club. Under certain circumstances, a traditional swinger may decide to prevent the toe of the club from bypassing the heel of the club after impact, and he may decide to "hold-off" the full roll action that he routinely uses in his standard swinger's full-roll hand release action. The most likely reason for deliberately using a "hold-off" hand release action through the impact zone is secondary to the deliberate decision to hit a push-fade shot in order to negotiate a dog leg-right fairway situation, or to left-bypass a tree obstacle using a pull-fade ball flight pattern. During a "hold-off" hand release action, a swinger will not allow the left upper arm to externally rotate during the followthrough phase of his swing action, and he will ensure that the heel of the club leads the toe of the club beyond impact. In other words, he will deliberately convert to using a no-roll hand release action in order to produce a pull-fade, or push-fade, ball flight pattern. Many professional golfers, who are traditional swingers, selectively attempt to periodically use a no-roll hand release pattern by biomechanically adopting this "hold-off" hand release action, but their consistency is not always that good because it is a "feel-based" arm-hand manipulation technique that requires precision timing. I think that if a swinger decides to use a no-roll hand release action, then he should also consider making the appropriate biomechanical changes to his pivot action and arm action (as described at the beginning of this section) so that he can maintain a stable clubface through the immediate impact zone, and he should not rely on a single-manipulative left arm/hand biomechanical maneuver that requires the skillful/practiced use of a graduated degree of external rotation of the left humerus during the followthrough phase of his swing.
Reverse-roll hand release action
Many professional golfers selectively use a reverse-roll hand release action (based on the use of a vertical hinging action) to hit certain short-game shots - flop shots, lob shots, and bunker shots. However, I have only found one PGA tour golfer who also uses this technique for his full golf swing - and that golfer is Tommy Gainey.
Here is a swing video of Tommy Gainey's full swing
Face-on (caddy) view - http://www.youtube.com/watch?v=up2BzkdAZFM
DTL view - http://www.youtube.com/watch?v=MN3HaddAK-8
Here are capture images from the face-on (caddy) view swing video.
Tommy Gainey's swing action through the impact zone - capture images from his swing video
What characterises Tommy Gainey's swing is his marked degree of bent-over spinal posture, and the fact that he rotates his shoulders on a steep arced path (more like a ferris-wheel than a merry-go-round) during his late downswing and followthrough. That swing action allows him to direct his impact triangle more vertically upwards in the direction of the target after impact. Note how the front (ventral aspect) of his right forearm faces skywards at impact (image 2) and also during his followthrough (images 3 and 4). Note that he maintains a bent right wrist and FLW throughout his entire followthrough to the P7.5+ position, and note that he also maintains an intact LAFW (clubshaft never passes his left arm from a rotational perspective and he never flip-bends his left wrist).Note that his clubface still faces the target well after impact (image 3) which is a sign of a very stable clubface through the immediate impact zone. During the later followthrough phase his clubface appears laid-back, and more open to the clubhead arc - and that is due to the fact that he is using a vertical hinging action (it's as if his FLW is moving perpendicular to a vertical wall between the P7 position and the P8 position). The fact that his clubface is becoming more open to the clubhead arc (rather than more closed to the clubhead arc as occurs in a full-roll hand release action) means that he is reversing the roll of his hands during the followthrough phase of his swing - and that defines a reverse-roll hand release action. This type of hand release action keeps the clubface inordinately lofted through the immediate impact zone, and it can result in a higher ball flight trajectory. Note how Tommy Gainey deals with this problem-issue - note that he places the ball further behind low point and closer to the center of his stance, and he gets his hands well ahead of the ball at impact so that he has a lot of forward shaft lean at impact. That swing action delofts his clubface, and successfully counters the lofted clubface-layback effect that occurs due to the use of a reverse-roll hand release action.
I think that it is biomechanically more uncomfortable, and biomechnically more difficult, to rotate one's mid-upper torso in a ferris-wheel manner (rather than in a slighly more horizontal-rotary manner) through the impact zone, and I am not surprised that the majority of professional golfers do not use this swing technique for their full golf shots. Nonetheless, it is a biomechanically valid method of ensuring a stable clubface (that is square to the target) throughout the immediate impact zone (from the P6.9 position to the P7.2 position).
Concluding remarks:
I have described three methods of performing a hand release action through the impact zone - a full-roll hand release action, a no-roll hand release action and a reverse-roll hand release action - and they can all produce a stable clubface (that is square to the target) throughout the clubface's travel time through the immediate impact zone (between the P6.9 position and the P7.2 position) if the golfer maintains a FLW/intact LAFW during this time period. I believe that maintaining a FLW/intact LAFW through the impact zone is the key ingredient that makes these three hand release actions so successful in controlling the clubface throughout the immediate impact zone, and they all avoid the timing problems that would occur if a golfer decides to use a pro-flipping hand release action, or a hand-crossover (roller) hand release action. The question then becomes - which of these three hand release actions is most suitable for an individual golfer. To answer that question, I will offer a few generalisations.
I think that a no-roll hand release action is most suitable for a TGM hitter, or a swing-hitter who uses a four barrel swing-hitting action (active release of PA#4 => active release of PA#1 => drive-hold release of PA#2/PA#3). I think that a full-roll hand release action is most suitable for a "pure" left arm swinger (a TGM swinger who uses the Leslie King method [14] of releasing PA#4 via the use of left shoulder girdle muscle power that pulls the left arm downwards-and-forwards, combined with a reactive pivot action). Those three groups of golfers represent a minority of serious amateur and professional golfers, and I think that the majority of serious amateur and professional golfers are basically swingers, who should independently decide whether to use a full-roll hand release action or a no-roll hand release action. I would encourage all serious amateur golfers, and all professional golfers, to try both hand release techniques in order to determine which technique works best for them on an individual-by-individual basis. A no-roll hand release action is mechanically advantageous, but it requires a greater degree of torso flexibility and athleticism to perform well. An individual golfer may also discover that he has the flexibility/athleticism to efficiently use a no-roll hand release action for short iron shots, but he may independently decide to preferentially use a full-roll hand release action for his driver, fairway woods and long iron shots. It is perfectly acceptable to selectively switch from one type of hand release action to another type of hand release action during a round of golf, and I would advise individual golfers not to assume that they must only use one-of-these-two frequently used hand release techniques. Since Tiger Woods has been taught by Sean Foley, he increasingly seems to be using a no-roll hand release action for his short iron swings, but he still uses a full-roll hand release action for his driver swing. Time will tell whether he also starts to use a no-roll hand hand release action for his driver swing (as can be seen in S&T golfers and ABS-golfers). I have noted that the majority of present-day professional golfers are using a full-roll hand release action for their driver, fairway woods and long iron swings, but that choice doesn't prove that a full-roll hand release action is better than a no-roll hand release action for a driver, fairway woods and long irons. It could simply be a matter of biomechanical comfort or the result of previous golf instructional coaching, and it may not be a conscious choice based on the results of personal experimentation. I would encourage all golfers to adopt an open mind about the conscious choice as to whether they should use a full-roll hand release action (versus a no-roll hand release action) for full golf shots - and I think that they should base their decision on what personally works best for them. I certainly do not recommend that they should solely base their decision on biased advice rendered by close-minded golf instructors, who are ideologically committed to only one of these two optional hand release actions.
Jeffrey Mann.
January 2012.
Topic number 1: Comparison between the author's and Kelvin Miyahara's descriptions of hand release actions through the impact zone.In this section, I will compare my descriptions of hand release actions through the impact zone to Kelvin Miyahira's descriptions [1] and I will point out some of the differences regarding how we think about, and describe, golf swing mechanics/biomechanics.
Kelvin Miyahira divides hand release actions into three major types - i) drive-hold hand release action; ii) roller hand release action and iii) pro-flipper hand release action.
His major category is the drive-hold hand release action, and he seemingly defines it by observing the hands as they move through the immediate impact zone. In his release article, Kelvin Miyahira states-: "The drive/holders (DH) are characterized by an impact position that is steady through post-impact phase. The left wrist remains solid or moves toward a more solid position while the body provides the rotational force through the impact area". This is a very broad category and he presumably includes golfers who use a full-roll hand release action, a no-roll hand release hand action and a reverse-roll hand release action in this broad category. He doesn't distinguish between these three types of hand release actions in this broad category, and he also doesn't differentiate between swingers, swing-hitters or hitters. He states that a drive-hold release golfer is defined by a "steady impact position", but he doesn't explain why he chose to use the term "drive-hold", which is not exactly synonymous with the term "steady". He also doesn't explain for how long a golfer should maintain a "steady impact position" to fit into this overly broad drive-hold hand release category. I think that golfers who maintain a bent right wrist to the P7.2+ position - a category which includes many no-roll hand release action golfers (eg. Mike Bennett and John Erickson and Charlie Hoffmann) and reverse-roll hand release action golfers (eg. Tommy Gainey) - obviously can be considered to be "holding" their impact position and one could even logically argue that they are "driving" the grip end of the club through the impact zone by applying some push-pressure to the aft side of the club. However, I do not think that it is necessarily correct/optimal to label a full-roll hand release action golfer as being a drive-hold hand release action golfer - because they are not really holding a bent right wrist through impact, and they allow the right wrist to passively straighten through impact. They also use an intact LAFW/FLW swing technique throughout their entire downswing/followthrough swing action, which means that their FLW is being maintained throughout the entire downswing/followthrough swing action (from the P4 position to the P7.5+ position) and they do not make the FLW more "steady" for impact by adopting an additional "biomechanical-hold" mechanism as they approach impact. They simply swing their firmly-maintained FLW fluidly/non-stop through the immmediate impact zone, and they optimally delay the start of their full-roll hand release action until they reach the P7.2 position. I also think that the descriptive word "drive" only applies to a full-roll hand release action golfer if one mentally thinks of a driving action as being a FLW that is being actively driven forward through impact due to an active release of PA#4 (which results in a grip-pulling action), and not via some other grip push-driving mechanism (eg. active straightening of the right arm that applies a driving push-force against PP#1) because a TGM swinger, who uses a full-roll hand release action, should not be using any push-force to move his FLW/club through impact faster than it is being pulled by the PA#4-powered left hand.
He also states with respect to his drive-hold hand release action golfers-: "Typically, DH’ers separate their left arm from their chest while also extending their arms in the post impact area. This is especially important since this allows the bottom of the swing arc to be farther in front the ball as well as provide stability for contact." I think that CF-arm release action golfers (who use a drive-hold hand release action) separate their left arm from their chest wall, but I don't think that Kelvin Miyahira's assertion applies to CP-arm release action golfers (who also use a drive-hold hand release action). I also don't think that a CF-arm release action causes the bottom of the swing arc to be farther in front of the ball, and I certainly don't think that it provides greater stability for impact. In fact, I would be much more inclined to believe that a CP-arm release action provides greater stability for impact - because the arms are more closely coupled to the rotating torso through impact.
Kelvin Miyahira divides DHers into three sub-categories - bowed DHers, flat DHers and cupped DHers.
Bowed DHer
Kelvin Miyahira uses Simon Dyson as an example of a golfer who is a bowed DHer, and he has this pre-impact photo of Simon Dyson in his release article.
Simon Dyson pre-impact - adapted from Kelvin Miyahira's original image
Kelvin Miyahira states with respect to the his image-: "Bowed – Simon Dyson above. Notice the appearance of left wrist. It is curved and the palm is beginning to face up or supinate. In addition, he had his left wrist bone beginning to bow or enter into flexion. The bowed position is actually a combination of left wrist flexion and supination. Thus, for the sake of simplicity, the bowed position means a high amount of supination and flexion." Note that he has drawn the red curved line as being "bowed" and he implies that a bowed left wrist at impact is due to a combination of supination and flexion. I think that he is totally wrong! First of all, he has drawn the curved red line parallel to the ulnar border of Simon Dyson's left wrist, when it should be drawn parallel to the dorsum of the left wrist. He is also drawing the curved red line prior to the release of PA#3 (prior to the release swivel action) and one really needs to evaluate the left wrist after the release of PA#3 in order to accurately assess its impact alignment-appearance - after the left forearm has supinated to a neutral left forearm position by impact (presuming, of course, that the golfer adopts a neutral left arm/forearm at address). Then, if the left wrist is palmar flexed at impact to a degree that is greater than the degree that will produce an AFLW, then the left wrist can be accurately labelled as being bowed (arched). In fact, I think that most of the golfers listed in Kevin Miyahira's collection of bowed DHers actually have an AFLW (slightly palmar flexed left wrist) at impact, and not a bowed (significantly palmar flexed) left wrist at impact - and those golfers include Tiger Woods, Ernie Els, Graeme MacDowell, Pablo Martin, Rhys Davies, Bubba Watson, Paul Casey, Stephen Ames, Aaron Baddeley, KJ Choi, Scott Verplank, Stewart Cink, Lucas Glover, Paul Goydos and Robert Allenby. I think that a number of factors affect the degree of left wrist bowing at impact, and a major factor is the degree of forward shaft lean at impact, which is significantly affected by ball position. Golfers who have their ball positioned well behind low point will more likely have a greater degree of forward shaft lean at impact, and therefore a greater amount of left wrist palmar flexion (left wrist bowing) at impact. An increased amount of forward drive of the left arm/forearm through impact combined with a greater degree of laxity of the left wrist may also predispose to a bowed (arched) left wrist at impact.Flat DHer
Kelvin Miyahira states with respect to flat DHers-: "Flat wrist DH’ers supinate their left wrist perhaps only half as much as the bowed DH’ers in the pre-impact phase. Since they don’t supinate much, their clubface gets squared early by releasing their lag earlier. Take notice of the especially good front views of Ryo Ishikawa, Rory McIlroy and Steve Stricker. There’s very little lag when the hands are at the right thigh. Then, in the last few frames, they explode with their left wrist and forearm to keep the club from passing their left forearm or in other words to stop from flipping. This key feature of the flat DH’ers is what allows them to be powerful and accurate."
He uses Rory McIlroy as an example of a flat DHer.
Rory McIlroy through impact - adapted from Kelvin Miyahira's original image
Image 1 shows Rory McIlroy prior to the release of PA#3 (prior to the release swivel action), and image 2 shows him at impact. I think that he used the standard amount of left forearm supination in his PA#3 release action/release swivel action in order to get his FLW, and therefore clubface, to become square to the target by impact. I think that it is nonsensical to state that he squared his clubface by releasing his lag earlier - because the issue of lag relates to clubhead control, and not clubface control. All golfers have to ensure that the clubhead catches up to the hands at low point, and if the clubhead doesn't sufficiently catch-up to the hands then the clubface may be too open at impact, and if the clubhead prematurely bypasses the hands well before impact then the club flipping action will likely produce a closed clubface at impact. However, those clubface misalignment problems are simply due to imperfect clubhead control, and they are not "something" that a skilled golfer deliberately does in his swing action. I also think that it is incorrect to infer that a flat DHer (who transitions from a release swivel action before impact to a full-roll hand release action after impact) is performing his transitional zone club-squaring phase (immediate impact zone phase) action differently than a bowed DHer (who transitions from a release swivel action before impact to a full-roll hand release action after impact). Finally, I think that it is a major mistake to infer that a flat DHer "explodes with their left wrist and forearm" to avoid flipping - because I believe that a skilled golfer should never use any active left wrist/forearm motions through the impact zone. If a skilled golfer (who is a flat DHer like Rory McIlroy) maintains an intact LAFW/FLW from the P6 position to the P7.5 position and avoids flipping through impact, then he is simply performing the "correct" body-arm motions that will avoid flipping. There should be no use of any active left wrist/forearm manipulative maneuvers in the impact zone. I think that a flat DHer golfer, who uses a full-roll hand release action, should simply think of swinging an intact LAFW/FLW through the impact zone using the "correct" body-arm biomechanical movements.Cupped DHer
Kelvin Miyahira states with respect to cupped DHers-: "Knife Edge Strikers use a cupped wrist to employ the Drive/Hold pattern. A strong grip typically yields a more closed clubface position and they square the clubface early just like other DH’ers and this allows them to drive/hold through impact with very little wrist rotation needed to hit it straight".
The term "knife edge" is an useful term to describe golfers who rotate their left arm/forearm 90 degrees at address, so that they adopt a very strong left hand grip (4-knuckle grip) with their left palm placed on the top of the grip (like Jamie Sadlowski) - instead of being in front of the grip (like Rory McIlroy who has a neutral left arm/forearm/grip at adddress). To ensure that their clubface faces the target at impact, they must ensure that the ulnar border of their left hand (and not the back of their left hand) faces the target at impact. In other words, they are moving the ulnar border of their left hand towards the target through the immediate impact zone (which conjures up a mental image of a "knife-edge") - and they must ensure that they do not prematurely ulnar-deviate the left wrist beyond neutral at impact, or very soon after impact, because that would cause the club to flip passed their left arm and prematurely disrupt their intact LAFW.
Consider Jamie Sadlowski through impact.
Jamie Sadlowski through impact - capture images from his swing video
Note that the club has not bypassed Jamie Sadlowski's left forearm/hand in image 1 and image 2. That means that the left wrist will not be cupped/scooped on the ulnar-side of his left wrist during its passage through the immediate impact zone. However, the dorsal surface of his left wrist area will obviously appear cupped as a result of adopting a very strong left hand grip (4-knuckle grip) but the degree of dorsal wrist cupping doesn't change in degree between the P6 position and the P7.5 position - if he doesn't flip his club through the impact zone and increasingly dorsiflex his left wrist.Kelvin's claim that knife-edge strikers "square the clubface early like other DHers" is obviously incorrect because they already have the clubface square to the clubhead arc throughout their entire downswing and they therefore do not have to perform a PA#3 release action/release swivel action (like golfers who have a neutral left arm/forearm/grip alignment at address and at impact).
Rollers
Kelvin Miyahira states the following with respect to rollers-: "Rollers can be in similar positions at impact as the DH’ers. However, the movement pattern here is to roll the left forearm, hands and wrist through the impact zone due to their wrist position or clubface angle being a little more open than at the same location with DH’ers. Consequently, Rollers also have their right hand rolling over their left quicker as well. Clearly, this means the clubface gets closed much faster than if driving and holding the hands/wrists. Tiger 2010 is rolling his arms even faster than in 2009. Rollers need to keep their rhythm and tempo fairly constant so their timing does not become a problem".
Kelvin Miyahira seemingly believes that a skilled golfer, like Tiger Woods, is deliberately using a roller hand release action through impact in order to compensate for a clubface that is too open at a certain pre-impact location. Hmm! I have never seen any "evidence" to support that claim! He also implies that a roller must "keep their rhythm and tempo fairly constant so their timing does not become a problem". I disagree with his overall opinion because it implies that skilled professional golfers consciously choose to use a roller hand release action, and that they consciously attempt to perfect their timing of their hand roll-over release action (as AJ Bonar recommends) so that they can achieve a square clubface at impact! I think that any roller hand release action is a swing technique fault, and I believe that no skilled golfer (even an inordinately skilled professional golfer like Tiger Woods) should try and perfect their timing of a roller hand release action, because the deliberate use of a roller hand release action is far too timing-dependent (and therefore potentially unreliable) - because it is biomechanically dependent on the perfect timing of independent left/right forearm rotary motions through the impact zone. As I have stated repeatedly in the main section of this review paper, I think that a skilled golfer should avoid using any independent left forearm/wrist roll-over motions through the impact zone, and I think that he should maintain an intact LAFW/FLW throughout the entire impact zone (between the P6.5 position and the P7.5 position) by biomechanically perfecting the optimum body-arm motions.
Pro-flippers
Kelvin Miyahira believes that some professional golfers are pro-flippers and he states-: "Also, in order to be a good flipper, you must keep your body quiet. Aggressive hip and leg movements do not mesh well with the flip swing as precise adjustments must be made to flip it straight. This, in addition to the built-in added loft and spin, reduces maximum distance. However, this is an accuracy-only swing". Kelvin Miyahira seemingly believes that pro-flipping is an "accuracy-only swing"! I harbor a totally different opinion, and I think that any pro-flipping action through impact is unlikely to be consistently accurate unless it is perfectly timed - because flipping immediately after impact (while the club is between the P7 position and the P7.2 position) means that the golfer has not ensured that he has stable clubface (that is square to the target) throughout the entire immediate impact zone. I think that most professional golfers who exhibit a pro-flipping action through impact are manifesting an occasional swing fault that is due to left hand slowing/stalling combined with an over-assertive right arm/wrist straightening action through impact. Kelvin Miyahira lists the following professional golfers as being pro-flippers - Martin Kaymer, Lee Westwood, Mike Weir, Louis Oosthuizen, Retief Goosen, Chad Cambell, and Brian Gay. I think that most of those listed golfers actually use an intact LAFW/FLW swing technique for many of their optimally-executed swings and I think that they only exhibit a pro-flipping action when they manifest a swing fault (left hand slowing combined with an over-assertive right arm/wrist straightening action through impact). Among those listed golfers, I suspect that only Lee Westwood and Retief Goosen may be deliberately/consciously using a pro-flipper hand release action for all/most of their full swing shots - based on my impression that they frequently manifest a left arm/hand slowing action through impact combined with a very assertive right arm straightening action. I would encourage all golfers to avoid adopting a pro-flipper hand release action because it cannot consistently guarantee a stable clubface (that is square to the target) throughout the entire immediate impact zone. I would encourage all golfers to maintain a FLW throughout the entire immediate impact zone, and even preferably beyond the P7.2 position to at least the P7.5 position - irrespective of whether they decide to use a full-roll hand release action, or a no-roll hand release action, or a reverse-roll hand release action.
References:
1. Kelvin Miyahira's "PGA Tour Release Styles" article.Available at http://kelvinmiyahira.com/articles/56-2010-09-pga-tour-release-styles
2. Nike commercial video of Tiger Woods' swing.Available at http://www.youtube.com/watch?v=meVTld5GvbM
3. Rod White's description of the double pendulum swing model.Available at http://www.tutelman.com/golf/swing/golfSwingPhysics3a.php#simplemodel
4. The Golfing Machine. Homer Kelley.

5. Jamie Sadlowski swing video.Available at http://www.youtube.com/watch?v=ep-qidwgCII
6. Upline video of Tiger Woods swing.Available at http://www.youtube.com/watch?v=yoTuzAM132Q
7. Ben Hogan's Five Lessons. Ben Hogan.
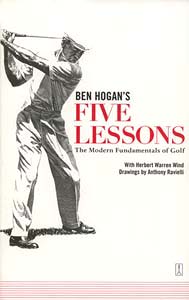
8. Video lessons by the author on playing golf with an intact LAFW.
a. The Virtues of a Left Arm Flying Wedge.Video interview-presentation by the author hosted by Ralph Perez of the Gotham Golf Blog - http://www.youtube.com/watch?v=96quJ-BkfgI
b. Maintaining a flat left wrist post-impact.
Author video presentation - http://www.ustream.tv/recorded/10830713
9. Swing video lesson - Power Mechanics of Swinging and Hitting - part 2.Available at http://www.youtube.com/watch?v=lAIPdhBeHkQ
10. "Rotation About the Coupling Point" video collection. Brian Manzella.
11. John Erickson's Advanced Ball Striking website.http://advancedballstriking.com
12. The Next Generation with Sean Foley DVD.

13. Lee Trevino - Look and Learn. Jim Flick.Golf Digest magazine. October 1971.
14. Leslie King's swing methodology.See http://www.golftoday.co.uk/proshop/tuition/index.html