Click on any of the hyperlinks to rapidly navigate to another section of the review: Homepage (index); overview; address setup; backswing; downswing; impact; followthrough-to-finish
Introduction
Ben Hogan, in his book [1], stated that "golf begins with a good grip". This admonition has been echoed by virtually all golf instructors, who uniformly emphasise the importance of a good grip as being the fundamental keystone of a good golf swing. Why do all golf instructors place major emphasis on a good grip?In the modern, total body golf swing, where the rotating torso is the major power generator of the golf swing, the arms and hands are flung around, and in front, of the rotating body during the downswing. The major function of the hands is to hold firmly onto the golf club - the hands should be thought of as simply being "clamps" that firmly hold onto the club while the club is swung through the impact zone. The hands should not actively manipulate the golf club during the impact zone. David Leadbetter states "that one should think of the hands as conductors through which the speed and power created by the turning motion of your body is transferred to the clubhead" [2].
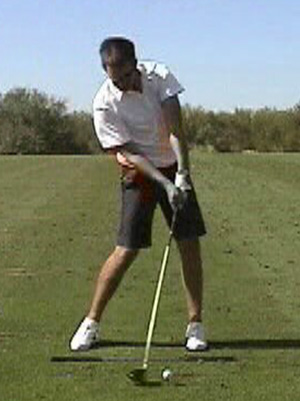
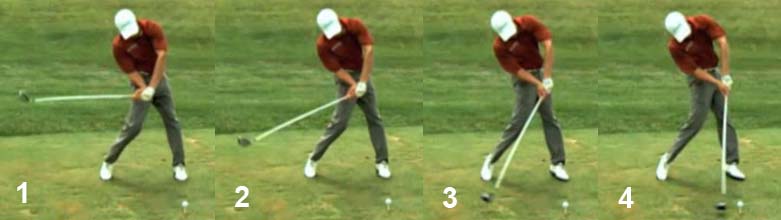
In this photo of Aaron Baddeley near-impact, note that the clubface is approaching the ball so that it will become square to the ball-target line at the time of impact.
Aaron Baddeley - from reference number [3]
The primary function of the hands is to hold onto the clubshaft in such a manner that the clubface will be allowed to become square to the ball-target line at the time of impact, and this feat is best accomplished if the hands are in the neutral position (palms facing each other across the clubshaft, while being square to the target). Consider the fact that the clubhead may be travelling at >100 mph at the time of impact. At such a high velocity, the golfer cannot possibly make small hand adjustments during the late downswing to correct for small imperfections in the alignment of the clubface as the clubhead nears impact, and the golfer has to rely on a good grip that will always allow the clubface to become square to the ball-target line at impact. One of the fundamental feastures of a good grip is a neutral hand position, whereby the hands are placed alongside the clubshaft in such a manner, that they will automatically, and passively, reach the impact position in a consistent manner - such that the back of the left hand, palm of the right hand, and clubface always faces the target at the time of ball impact.
Approach to establishing a good grip
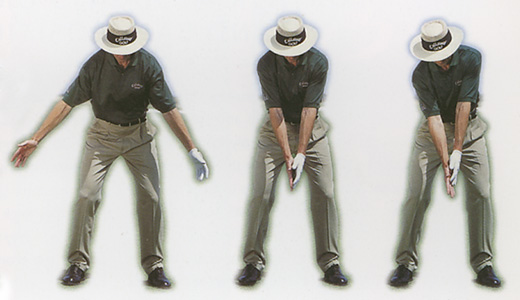
A golfer should start with the hands hanging relaxedly alongside the side of the body. Note that they hang down naturally from the shoulders with the palms facing the body. That is the position that hands should adopt when gripping the club.In this photo, David Leadbetter demonstrates how the palms of the hands should face each other at address. He has tilted his right shoulder down so that the right hand can lie slightly below the left hand (which is the normal situation when gripping a golf club).
Leadbetter hand positioning - from reference number [4]
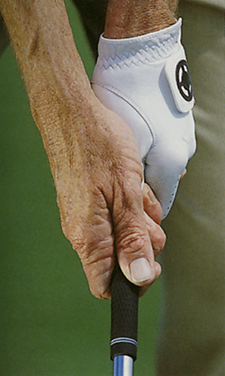
This is the final appearance of a good grip - note that the palms are facing each other across the grip and that the back of the left hand, and palm of the right hand, face the target.
Leadbetter grip - from reference number [4]
To get to that ideal grip position, one should start off with the left hand.
Golf instructors recommend different approaches to gripping the club with the left hand. Some golf instructors recommend holding the golf club directly in front of the chest at a 45 degree angle to the ground (with the right hand holding the clubshaft) and then gripping the club's grip with the left hand. Other golf instructors recommend placing the clubhead on the ground, and tilting the clubshaft 45 degrees to the ground, and then gripping the club.
Adopting a left hand grip - from reference number [5]
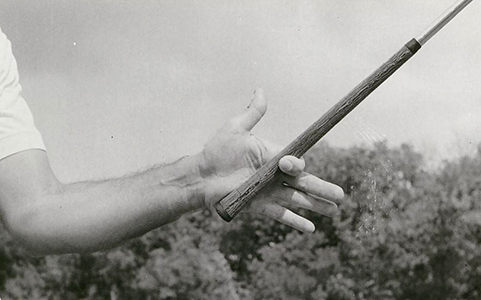
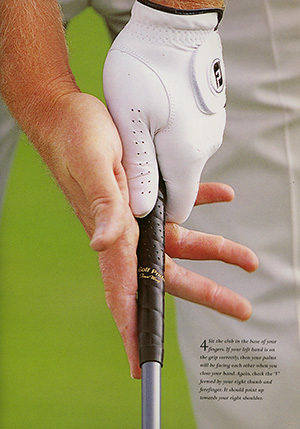
David Leadbetter [5] recommends placing the left forearm horizontal to the ground with the left wrist level (neither upcocked or downcocked) - the top of the left index finger should be straight-in-line with the top of the left forearm. The right hand holds the club at a 45 degree angle to the ground (horizon), so that the grip lies diagonally across the lower palm.It is not critical which approach one adopts as long as the club's grip is placed diagonally along the lower palm of the left hand. The club's grip should not lie solely within the fingers (as would occur if one gripped a vertical flagpole with one's fingers) or across the mid-palm or upper palm.
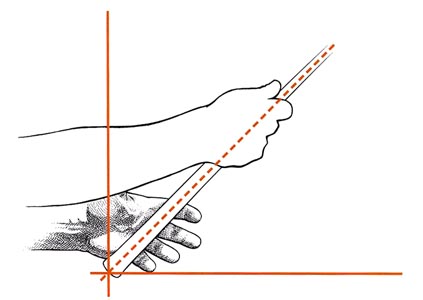
Here is an excellent diagram demonstrating how the grip should be positioned in the left hand.
Hogan grip diagram - from reference number [3]
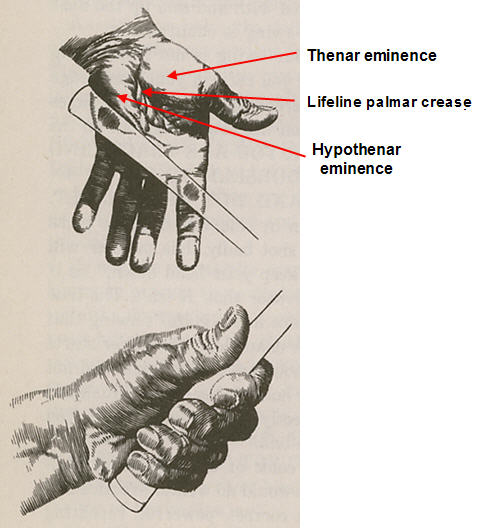
Note that the top of the grip lies below the hypothenar muscle bulge and that it lies in the lower palm between the hypothenar eminence and the base of the 5th finger. Note that the grip lies diagonally across the lower palm so that it crosses the proximal phalanx of the index finger. When the fingers are closed, three fingers of the left hand (3rd, 4th, 5th fingers) are primarily responsible for gripping the club grip firmly in the left hand. The index finger lies more loosely across the grip. Most importantly, one should never let the grip ride high in the palm, so that it is directly over, or inside (above) the hypothenar eminence (along the lifeline palmar crease). One should remember that the left hand golf grip is primarily a three-finger grip, and not a palm grip. The left 3rd, 4th and 5th fingers are primarily responsible for gripping the club, and the grip pressure should be firm - it should not be possible to pull the grip end of the club out of the left hand if another person pulls on the clubhead end of the club, and it should not be possible for that person to twist the club in one's left hand if he attempts to twist the clubhead end of the club. A golfer must maintain a firm left hand grip throughout the swing action so that there is no chance that the grip end of the club will twist within the left hand's grip at any time point during the swing. Some golf instructors state that one should grip the club lightly - as if one was holding a live bird in one's left hand. I strongly disagree with that advice - the left hand grip (using the left 3rd, 4th and 5th fingers) should always be firm.In this famous B&W photo from the 1950s, Ben Hogan demonstrates the position of the grip in the left hand.
Hogan left hand grip - from reference number [5]
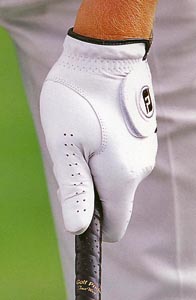
After the club's grip is placed in the correct position across the lower palm, the left hand is closed so that the left thumb lies slightly along the right side of the center of the grip (one o'clock position), but a golfer should avoid allowing the left thumb to slide too far down the right side of the grip so that it lies fully alongside the right side (aft side) of the grip.This is the correct appearance of a neutral left hand grip as seen from above.
Ernie Els' left hand grip - from reference number [6]
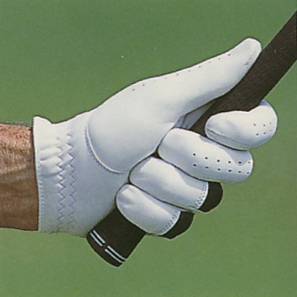
Note that the left thumb does not extend down the center of the grip - it is slightly aft of the grip. Note that the left thumb is relatively tightly opposed to the side of the index finger knuckle, and that the "V" line (formed between the left thumb and left index finger knuckle) points to the right. Note that one can see 2-3 knuckles of the left hand (left 2nd finger knuckle, and left 3rd finger knuckle).When viewed from the side, you should note that the last three fingers (3rd, 4th and 5th fingers) of the left hand are primarily responsible for firmly gripping the club. The tips of the 3rd, 4th and 5th fingers should just touch the side of the base of the thumb (inner side of the thenar eminence) thus effectively trapping the club between the fingers and the lower palm. If the tips of the fingers do not reach the thenar eminence, then the grip's width is too large for the golfer's hand size. If the tips of the fingers slide under the inner edge of the thenar eminence, then the grip's width is too small for the golfer's hand size.
Leadbetter left hand grip - from reference number [4]
After the left hand has been correctly placed on the grip, the golfer should then hold the club at 45 degrees in front of the body, and allow the right hand to approach the grip from the right side.
Els grip - from reference number [6]
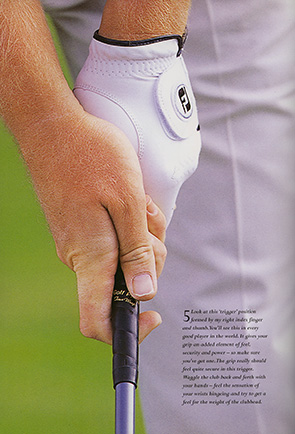
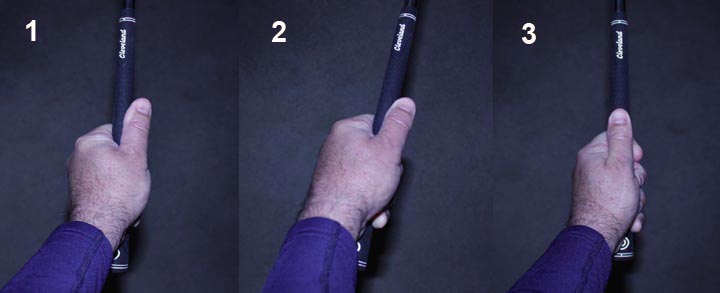
Note that Ernie Els prefers to have his his left thumb slightly to the right of center - which I now believe is the optimum position for the left thumb (rather than down the center of the grip). The left thumb should be slightly aft of the grip end of the shaft. He then places his right palm against the grip so that the palms face each other. He then wraps the right palm over the left thumb so that the lifeline palmar crease ("cup" of the right palm) rests over the right side of the left thumb and slightly over the top of the left thumb. This will cause part of the right thenar eminence to lie on top of the left thumb. Placing the right hand firmly over the left hand in this manner helps to interlink the hands, so that they can better function as a close-knit unit. Also, note that the right 3rd and 4th fingers are used to firmly grasp the club's grip, and that the grip is in the fingers and not the palm of the right hand. The club's grip lies in a finger-channel that is created as the 3rd and 4th fingers curl under the shaft. The 5th right finger lies on the top of the left hand's fingers, in the groove between the left second finger and left third finger (see Vardon grip photo).
Els grip - from reference number [6]
Note that Els separates the right index finger from the other fingers, and that his right thumb lies over the top of the grip and ends just to the left of center. This allows the right index finger and right thumb to grip the club in a pincer-like manner that offers fine control of the clubhead's movements. I highly recommend that beginner golfers grip the club in this manner, because it increases one's "feel" for the weight of the lagging clubhead - one can sense a "feeling" of pressure at the first (proximal ) interphalangeal joint of the right index finger (pressure point #3) as one senses clubhead lag during the downswing. Note that there is no gap between the right index finger's knuckle area and the proximal half of the right thumb, and that they are closely opposed to each other on the top of the grip (a tee placed in the gap between the right thumb and the right second knuckle would not fall out as there is sufficient thumb side-presssure to keep the tee in place). Most importantly, note that the *palms of the left and right hands are facing each other across the grip and that the back of the left hand, and palm of the right hand, are each facing the target -- this is a perfect example of a neutral grip.
(* To be biomechanically precise - it is only the ulnar half of the left palm that is truly facing the ulnar half of the right palm. The radial half of the left palm is lying partly over the top of the grip, and the radial half of the right palm is lying partly over the left thumb)
A strong left hand grip occurs when the left palm slides further to the right over the top of the grip, so that the left palm faces more towards the ground and one can see 3-4 knuckles of the left hand when viewed from above. A weak left hand grip occurs when the left palm slides to the left and one can only see 1-1.5 knuckles of the left hand when viewed from above.
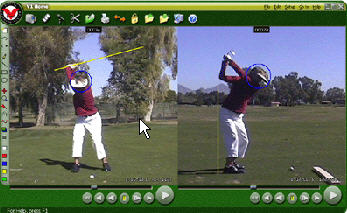
Left hand grip strengths - capture image from a swing video [7]
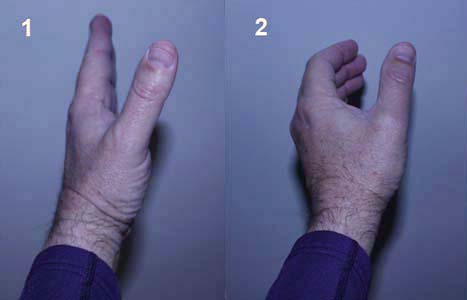
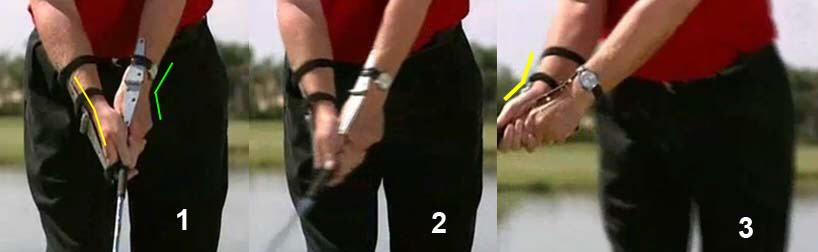
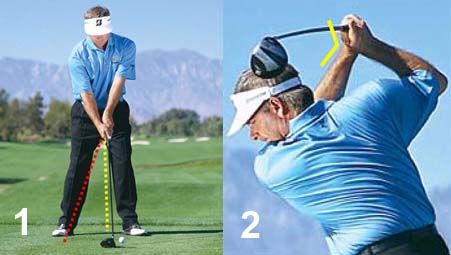
Point X = Anatomical snuff box. Click here to see the definition of the anatomical snuff box.
Image 1 shows a neutral left hand grip. The anatomical snuff box (which lies over the scaphoid bone) is at point X - note that it is straight-in-line with the clubshaft (yellow line). One can see 2-3 knuckles of the left hand when viewing the left hand from above. Note that the left thumb is at 1 o'clock and it lies slightly to the aft side of the grip.Image 2 shows a weak left hand grip. The anatomical snuff box (point X) is aligned to the left of the clubshaft (yellow line). One can see only 1-1.5 knuckles of the left hand when viewing the left hand from above. Note that the left thumb is at the 12 o'clock position and it lies on the top of the grip.
Image 3 shows a strong left hand grip. The anatomical suff box (point X) is aligned to the right of the clubshaft (yellow line). One can see 3-4 knuckles of the left hand when viewing the left hand from above. The left thumb is placed aft of the grip - at the 3 o'clock position.
Note that at address, the V-angle between the left thumb and the left index finger (green arrow) will point at the chin when using a weak left hand grip, at the right shoulder (or outside the right shoulder) when using a strong left hand grip, and roughly between the right ear and the right mid-clavicle when using a neutral grip. However, these V-angle directions are crude and unreliable because they depend on the specific position of the left hand between the thighs at address.
Another good method of learning how to adopt a neutral grip is to follow this next-described sequence.
If a beginner golfer wants to learn how to acquire a neutral left hand grip, then he should start with his straight left arm straight-in-line with his left shoulder socket. He should then bend his left elbow by 90 degrees so that the left forearm is parallel to the ground, while ensuring that the radial border of the left forearm faces the sky. The left forearm should be neutral - neither supinated or pronated. He should then stretch out the left hand's fingers so that the back of the anatomically/visually flat left hand is straight-in-line with the back of the left forearm - see image 1 in the next photo.
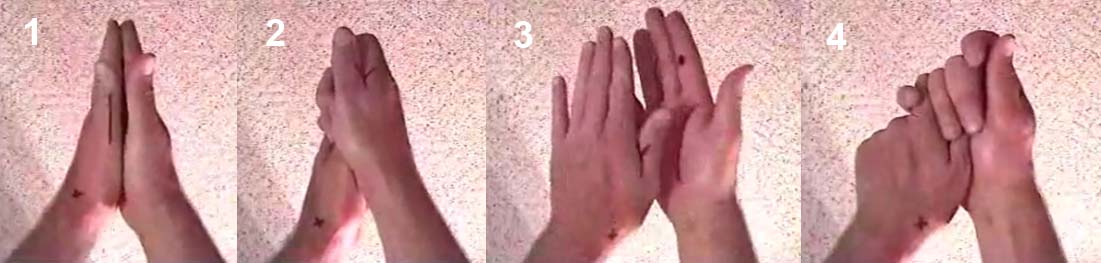
Neutral hand grip attitude when the fingers are actively extended, and when at rest
Image 1 shows a neutral wrist position where the left wrist is flat - neither dorsiflexed (bent backwards) or palmar flexed (bent forwards). Note that the back of the flat left hand is straight-in-line with the back of the left forearm. A line drawn along the top of the left forearm should also be straight-in-line with the top of left index finger, which means that the wrist is level (neither upcocked or downcocked). Note that the back of the flat left wrist is vertical to the ground, which means that the left forearm is neutral (neither supinated or pronated).Image 2 shows how the back of the left wrist automatically/passively becomes scooped/cupped when the left hand (in image 1) is relaxed. This relaxed hand position is called the anatomical position of rest (APOR) of the left hand - and it is due to the effect of the resting muscle tone of the left forearm muscles. When the left hand is in its APOR, the left wrist will become slightly dorsiflexed (cupped), and the fingers will become slightly flexed. The left thumb will become slightly adducted towards the palm. This fist-like appearance of the relaxed left hand will allow one to grip a club in a neutral grip manner - if the club is held straight-in-line with the left forearm and left shoulder socket and the grip end of the club is placed within the grasp of the left hand's fist-like grip. If the clubshaft is straight-in-line with the straight left arm and left shoulder socket, and the golfer has adopted an APOR left hand grip, then he has created what is called a GFLW (geometrically flat left wrist).
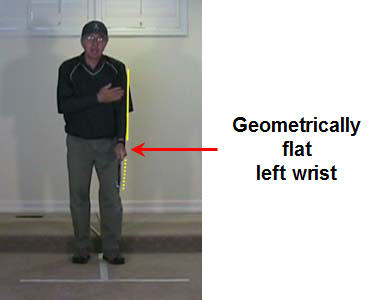
Here is a photo showing a GFLW - note that the left wrist is not visually flat, and that it is slightly cupped (due to being in an APOR state).
Geometrically flat left wrist - capture image from my swing video lesson
If a golfer wants to practice holding a rounded object using a neutral grip, then he should practice the motion of reaching out in a neutral manner, with his left hand in its APOR, in order to grasp a rounded object (eg. plastic pipe or dowel stick) placed directly in front of his extended left forearm (while ensuring that the radial border of the left forearm faces skywards, and while also ensuring that the neutral left forearm is aligned straight-in-line with the left shoulder socket. That is the same type of motion that he should then use to grasp the rounded grip of his club - which is placed directly opposite the left shoulder socket (see above photo). Once a golfer has successfully gripped the club in a neutral manner, then he can move the grip end of the club to an address position between his thighs.
Neutral grip at address, neutral grip at impact, and weak grip at address
Image 1 shows a neutral left hand grip at address (as viewed from a golfer's normal eye position at address). Note that the left wrist is slightly cupped (dorsiflexed) due to the fact that the left hand is grasping a rounded object. Note that the left thumb is placed just to the right of the center of the top-of-the-shaft (slightly aft of the club). Note that one can can clearly see two knuckles of the left hand. The amount of cupping in the left wrist depends on the position of the hands at address - there will naturally be more cupping if the hands move closer to the right leg than the left leg. The degree of cupping will also increase if the clubshaft is held square (perpendicular) to the ball-target line and not in a straight-line relationship with the left arm - because this angled clubshaft alignment relative to the left arm will bend the left wrist, and increase the degree of left wrist cupping.Image 2 shows a neutral left hand grip at impact. Note that there is forward shaft lean (due to the hands being ahead of the clubhead at impact). Note that the left wrist is anatomically/visually flat and not cupped. The left wrist is anatomically/visually flat because the left wrist is slightly palmar flexed (which means that the clubshaft's grip is not in a straight-in-line relationship with the left forearm).
Image 3 shows a weak left hand grip at address. Note that the hand has rotated counterclockwise on the grip so that one can only see one knuckle of the left hand. Note that the thumb is placed straight down the top of the shaft. Note that the left wrist appears less cupped (less dorsiflexed) - compared to image 1.
Therefore, when looking down at one's left hand at address, note that the degree of cupping of the left wrist will depend upon a number of factors-: i) strength of the grip - the degree of cupping will increase when one uses a progressively stronger left hand grip; ii) width of the grip end of the club - the degree of cupping will increase if the gripped object has a wider diameter; iii) the angle of the clubshaft-at-address relative to the straight left arm - the degree of cupping will increase if the left wrist is increasingly bent (this will occur if the clubshaft-at-address is held perpendicular to the ball-target line while the left hand is moved closer to the right thigh, rather than being closer to the left thigh).
Finally, it is important to ensure that the two hands form a cohesive structural unit, so that they can function as a single club-gripping agent. To facilitate that unitary-functioning phenomenon, most good golfers overlap/interlock the two hands in some manner. The two most frequently used overlapping/interlocking grip techniques are the i) Vardon overlap technique (named after the famous British golfer Harry Vardon) and the ii) interlocking technique.
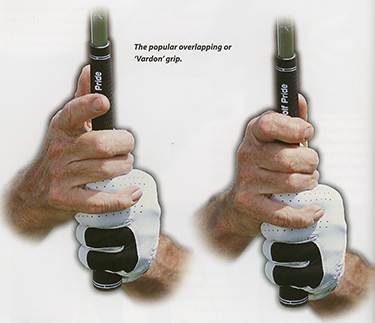
Vardon overlap grip - from reference number [4]
The characteristic feature of the Vardon overlap grip is the overlap of the right 5th finger over the left fingers, usually resting in the groove between the left second finger and left third finger. The gripping action of the 5th right finger helps to keep the two hands together so that they can function as a single, cohesive unit. Some golfers prefer to rest the right 5th finger over the top of the left second finger, rather than nestle the right 5th finger finger in the groove between the left second and third fingers, and that personal grip choice is a perfectly acceptable Vardon grip variant.Golfers with small hands may prefer to use the interlocking grip technique, which is used by a minority of PGA tour players (including Tiger Woods and Jack Nicklaus).
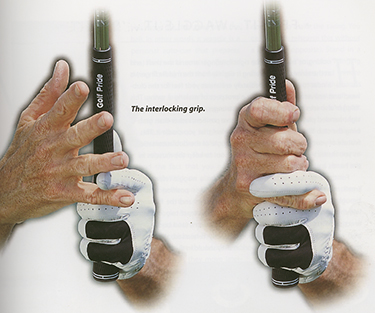
Interlocking grip - from reference number [4]
Golfers using the interlocking grip technique interlock the right 5th finger and the left 2nd finger as demonstrated in the above photo. There is no evidence that the interlocking grip is inferior (or superior) to the Vardon grip. A golfer should choose the grip variant that allows the hands to grip the club securely without any sense of hand/finger discomfort or tension.
Further grip instructional insights - presented in a question and answer format
Question number 1:In your description of a neutral grip, you stated that a golfer should have the palms of the left and right hand facing each other across the grip. If a golfer decides to use a stronger left hand grip (3-4 knuckle grip) when performing a full golf swing, should he simultaneously use a stronger right hand grip - as recommended by this golf instructor in his swing video lesson - see reference number [7]?
Answer:
No.
I think that the right hand grip should preferably be neutral (and the right wrist should be *level and *vertical) - irrespective of the strength of the left hand grip. The idea of the palms facing each other across the grip should only apply to a dual neutral grip - where both the left hand grip is neutral (or weak) and the right hand grip is neutral.
(* See the wrist glossary review paper to better understand what is meant by the terms "level" and vertical").
Consider this capture image from his swing video.
Grip patterns - capture images from a swing video [7]
Image 1 shows the conceptual idea of having the palms of the two hands facing each across the grip - with the back of the left hand, and palm of the right hand, both facing the target.
Image 2 shows a neutral left/right hand grip. Presume that the left hand grip is either weak or neutral (although it actually looks very weak in this photo), and accept that the right hand is placed on the grip as demonstrated in that image - the right hand is vertical (neither rolled over, or under, the grip end of the club) and level (neither upcocked or downcocked). Looking at that two-handed grip - it is obvious that the ulnar half of each hand's palm would be facing each other across the grip. I believe that this two-handed grip pattern represents the biomechanically/mechanically optimum way of holding a golf club grip when performing a full golf swing.
Image 3 shows a situation where the left hand is pronated so that the left palm faces more groundwards. That is the type of motion that a golfer would perform when adopting a strong left hand grip (4-knuckle grip) - and it is biomechanically due to a left forearm pronatory movement. Note that if a golfer wanted to keep the two palms facing each other across the grip, then he would have to roll the right palm under the grip by supinating his right forearm. Image 4 shows the dual-hand grip appearance if a golfer adopted that type of hand-gripping procedure - note that the left hand grip is very strong (4+ knuckle grip) and note that the palm of the right hand is facing skywards (because the right hand's palm is parallel to the left hand's palm). Many beginner golfers adopt this grip pattern - often because it is biomechanically comfortable, or because some uninformed golf instructor thinks that it will help the golfer "correct" a slice problem. Some golf instructors believe that this two-handed grip pattern will help a slicer (who has the problem of an open clubface at impact), because they think that the golfer will automatically/naturally perform a left forearm supinatory action, combined with a right forearm pronatory action, in the late downswing that will roll the hands, and therefore the clubface, into impact. If a golfer actually performed that dual hand roll-over action in his late downswing, just before impact, then that dual hand roll-over action would cause the clubface to close in the late downswing. The clubface at impact may be square to the target if the golfer's timing of his dual hand roll-over action is timed correctly, or it may be slightly open if his timing is slightly slow, or it may be closed if his timing is too fast. I believe that a golfer should never adopt a grip pattern that forces him to use a hand manipulatory technique (hand roll-over technique) - which is critically dependent on "correct" timing in order to square the clubface in the late downswing.
I believe that a golfer should always have a sound biomechanical reason for adopting any particular grip pattern. I stated earlier that the right hand grip should preferably be neutral, and the right wrist wrist should be level and vertical, when adopting a right hand grip - irrespective of the strength of the left hand grip. Why do I believe that this right hand grip pattern represents a biomechanically-sound grip pattern choice? This is where my explanation gets very complicated, because to fully understand my biomechanical/mechanical reasoning, you have to have a good grasp of TGM mechanics/biomechanics [8]. I have described many pertinent TGM concepts in many of my review papers, and I have visually demonstrated the most relevant TGM concept (the concept of the LAFW) in this "live" question-and-answer broadcast.
LAFW is an abbeviation for "left arm flying wedge". Understanding the value of maintaining an intact LAFW throughout the backswing and downswing is a critically important concept for an analytical golfer, who wants to learn the fundamental biomechanics/mechanics underlying the performance of an optimally efficient swinging action. Secondly, one also needs to understand the the concept of the RFFW (right forearm flying wedge) and learn how the RFFW has to support the intact LAFW during the backswing and downswing.
I previously posted a photo of myself holding the clubshaft straight-in-line with the straight left arm/left shoulder socket and under those conditions the LAFW is intact, and the left wrist is defined as being geometrically flat (GFLW). Note that the GFLW has a slightly cupped appearance - due to the fact that the left hand is in its APOR state.
Now consider what happens to the left wrist at address and during the takeaway.
Martin Hall demonstrating the takeaway - capture images from reference number [9]
Note that Martin Hall has placed a door hinge on the back (dorsum) of his right wrist - and that hinge is designed to emphasize the fact that the right wrist should only hinge back (dorsiflex) during the backswing. He has also placed a door hinge on the radial side of his left wrist - and that hinge is designed to emphasize the fact that the left wrist should only cock upwards (radially deviate) in the backswing (and never bend backwards).
Image 1 shows Martin Hall at address. Note that the left wrist is significantly cupped (green angled line). The cupping is greater than the amount of cupping that exists for a GFLW - because the left wrist is slightly bent due to the fact that the clubshaft and left arm are not in a straight line relationship. Note that the right wrist is nearly flat (yellow angle line).
Note what happens at the start of the takeaway - image 2. The right wrist bends backwards (dorsiflexes) and this causes the left arm and clubshaft to become aligned in a straight line relationship - and that constitutes an intact LAFW. The bend in the left wrist disappears and a GFLW is established. From this point onwards, a golfer should start to roll the intact LAFW (and its GFLW) onto the inclined plane. Image 3 shows Martin Hall at the end-takeaway position. Note that his left forearm and GFLW has rotated 90 degrees from its address position. Note that his right wrist has bent back (yellow angle line) more than it was at address.
Now consider what happens in the mid-backswing.
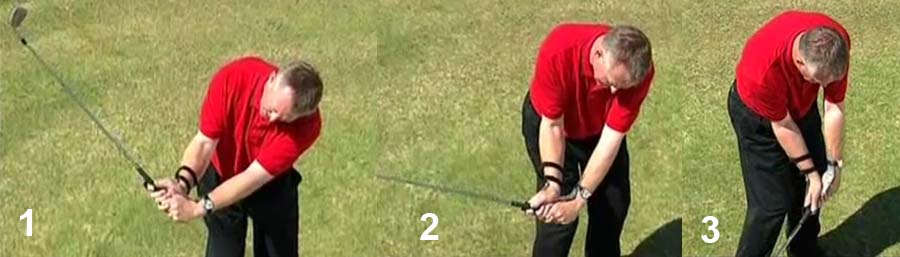
Martin Hall demonstrating the mid-late backswing action - capture images mainly from reference number [9]
Image 1 shows Martin Hall at his end-takeaway position.Image 2 shows Martin Hall at his mid-backswing position. Note that he has continued to rotate his left forearm clockwise and that action allows the intact LAFW (with its GFLW) to rotate onto the surface of the inclined plane.
Images 3 and image 4 show Martin Hall at the top-of-his-backswing (where his hands are opposite his right shoulder socket). Note that his intact LAFW (colored in red in image 4) is lying against the surface of the inclined plane. His left wrist is still geometrically flat (yellow angled line in image 4). Note that the RFFW (consisting of the right forearm and bent right wrist - colored in green in image 4) is roughly at 90 degrees to the LAFW. Note that he has cocked his left wrist upwards by ~90 degrees so that the clubshaft is roughly at a 90 degree angle to his left arm at the top-of-his-backswing. Note that the clubshaft has cocked upwards within the plane of the LAFW. Note that his right wrist only bends backwards, while the left wrist is only cocking upwards - and this phenomenon, where the two wrists move in opposite planes (left wrist is cocking upwards in its vertical plane of motion while the right wrist is bending backwards in its horizontal plane of motion), is biomechanically possible because the right elbow is bending during the backswing action. At the top-of-the-swing, the right palm is under the left hand/shaft and it provides maximum support for the weight of the LAFW.
Now consider what happens in the mid-late downswing.
Martin Hall in the late phase of his mid-downswing and early phase of his late downswing - capture images from reference number [9]
During the early-mid downswing his intact LAFW will come down along the surface of the inclined plane - image 1 shows him in the late phase of his mid-downswing with his intact LAFW still on the surface of the inclined plane. He has still retained a 90 degree angle between his left arm and clubshaft. Note that his right elbow is still bent to a ~90 degree angle, and note that the RFFW is still supporting the intact LAFW (with its GFLW).
Note that the left wrist starts to uncock, and the clubshaft starts to release, in the late phase of the mid-downswing and early phase of the late downswing - images 2 and 3. Note that the left wrist uncocking action occurs within the plane of the LAFW, and he therefore retains a GFLW. Note how he maintains a bent right wrist even while his right elbow is straightening in the late downswing.
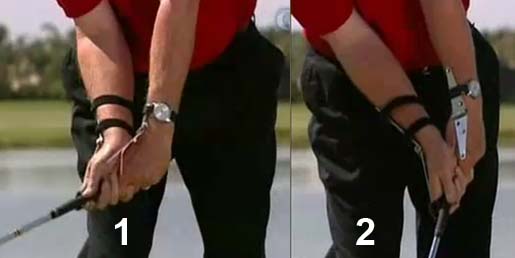
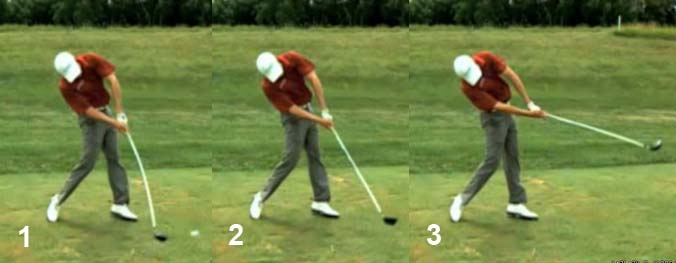
Martin Hall in the late phase of his late downswing - capture images from reference number [9]
Note how his left forearm continues to rotate and how it causes the intact LAFW to rotate into impact thus squaring the clubface by impact. Note that the right elbow straightens during this time period, and note that the right palm is aligned behind the shaft as it moves into impact. In other words, as the right arm straightens in the late downswing, the RFFW is aligned on-plane with the clubshaft and it provides maximum support for the release of PA#3 (rolling of of the intact LAFW into impact) and maximum support for the clubshaft as it nears impact. That's another great advantage of adopting a neutral right hand grip (with a level and vertical right wrist) at address. If a golfer adopted a strong right hand grip - where the right palm is under the grip, rather than behind the grip, at address - then it would alter the internal alignment of the RFFW, and also alter its alignment-relationship with respect to the LAFW, during both the backswing and downswing.I previously mentioned that a golfer should preferably use a neutral right hand - even if he uses a strong left hand grip. Consider a golfer who uses a very strong left hand grip - *Jamie Sadlowski.
(* I have written a review paper on Jamie Sadlowski's swing - click here to access my very detailed review paper)
Jamie Sadlowski - capture images fom different swing videos
Image 1 shows Jamie Sadlowski at address. Note that he has rotated his left forearm clockwise by ~90 degrees and that pronatory left forearm action causes the back of his left wrist/hand to be facing outwards, and to be parallel to the ball-target line - that action produces a very strong left hand grip (4+ knuckle grip). However, note that he has a neutral right hand grip (with a level and vertical left wrist).Image 2 shows Jamie Sadloski at the end-takeaway position. Note that his left wrist is still facing outwards and note that he didn't pronate his left forearm more during his takeaway action. In other words, he doesn't perform a takeaway swivel action. Note how his right wrist has bent backwards (dorsiflexed in its horizontal plane of motion).
Image 3 shows Jamie Sadlowski at his end-backswing position. Note that his right wrist is maximally bent back (dosiflexed). Note how his RFFW is efficiently supporting the weight of his LAFW.
Now consider his late downswing.
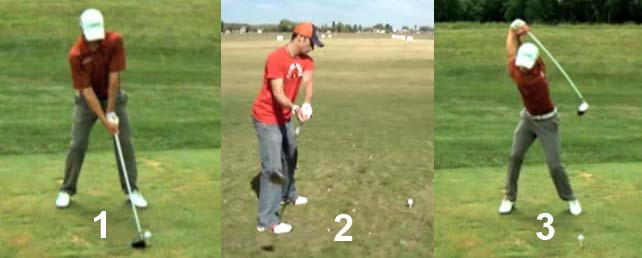
Jamie Sadloski - capture images from a swing video [10]
Image 1 shows Jamie Sadlowski at the delivery position. Note that the back of his left hand is parallel to the ball-target line. Note that his right wrist is still fully bent back (dorsiflexed) and his RFFW still has a ~90 degree relationship to the LAFW.Note how his right palm remains behind the clubshaft while his left wrist uncocks in the late downswing (images 2 - 4) - thus providing maximum support for the releasing club. That is a major advantage of adopting a neutral right hand grip at address. Interestingly, note that the back of his left wrist is still parallel to the ball-target line at impact (image 4) - which means that he doesn't use PA#3, via the biomechanical mechanism of a release swivel action, in his late downswing.
Jamie Sadlowski has a very unusual swing pattern, which is a direct result of the fact that he adopts a very strong left hand (4+ knuckle) grip. I think that regular golfers, who do not want to compete in long-drive competitions, should not routinely use a very strong left hand grip. It makes it very difficult to fluidly/controllably perform a horizontal hinging action in the followthrough, and therefore it is specifically not suitable for a TGM swinger who uses a horizontal hinging action in the followthrough. A TGM hitter can selectively use a strong left hand grip, because he will be drive-loading the club through impact. A strong left hand grip can also be selectively used for certain short game shots eg. lob shots/bunker shots where one uses a vertical hinging action in the followthrough. A strong right hand grip (which requires a supinated right forearm at address) can also be selectively used when a golfer wants to use a VH action in his followthrough.
Question number 2:In his swing video lesson [7], this golf instructor describes three different left palmar locations for the grip when executing a full golf swing. Do you believe that these three palmar locations are all acceptable for use in a full golf swing?
Answer:
No.
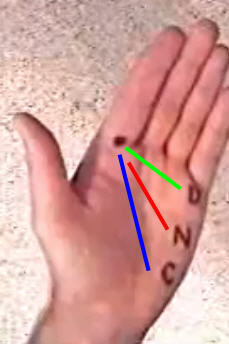
The following diagram shows the three left palmar grip locations that can be used by a golfer.
Grip positions in the left hand - capture image from reference number [7]
The green line represents what he calls a "distance" grip pattern. I refer to this grip pattern as a finger grip pattern.The red line represents what he calls a "neutral grip" pattern. I also refer to this grip pattern as a neutral grip pattern. However, I also call it a low palmar grip pattern, because the grip lies across the low palm, and it is below the hypothenar eminence (heel pad).
The blue line represents what he calls a "control" grip pattern. I refer to this grip pattern as a mid-palmar grip pattern, because it runs across the middle of the left palm, and it lies across/over the hypothenar eminence (heel pad).
Now consider each grip pattern in turn.
Mid-palmar grip pattern
Here is a photo-demonstration of how to adopt a mid-palmar grip.
Adopting a mid-palmar grip - capture images from reference number [7]
I think that a mid-palmar grip markedly restricts the mobility of the left wrist. It also decreases the power accumulator number 3 angle at address, and therefore limits the range of movement of the clubhead during the release of PA#3. I therefore think that it is unsuitable for use in a full golf swing. However, I think that it is a perfectly acceptable left hand grip pattern for putting or short chip shots, where a golfer deliberately wants to limit wrist motions.Low palmar grip pattern
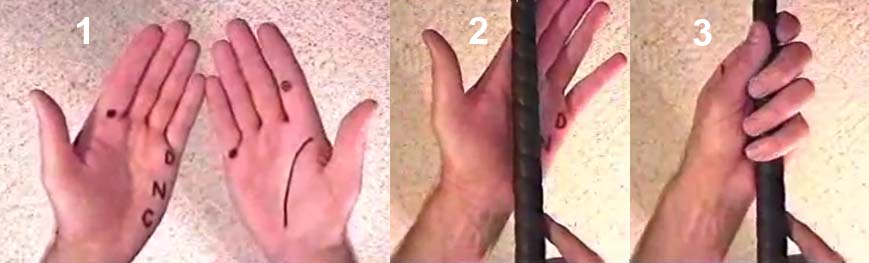
Here is a photo-demonstration of how to adopt a low palmar grip.
Adopting a low palmar grip - capture images from reference number [7]
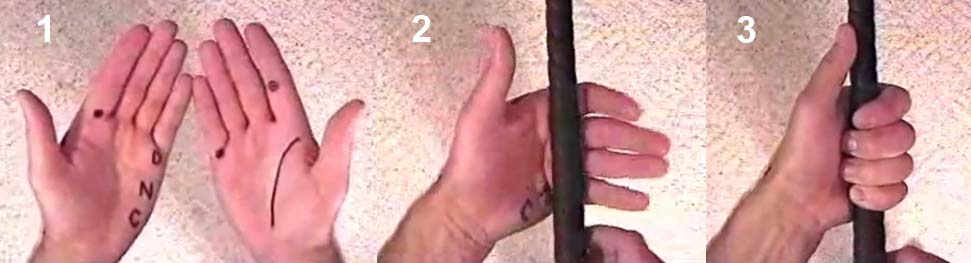
I think that this neutral left hand grip is an ideal grip for a full golf swing. The low palmar position of the grip doesn't restrict wrist motions, but it also doesn't allow for excessive wrist mobility that occurs if the power accumulator number 3 angle becomes too large (as occurs with a finger grip). Note the short thumb position - the end of the left thumb doesn't extend more than one finger's width beyond the left 2nd finger. That's also optimum. Finally, this type of grip pattern can ensure that the grip is held firmly within the left hand - when the left 3rd, 4th and 5th fingers grip the club's grip firmly against the soft tissue of the lower palm - and that action prevents the grip from slipping in one's left hand.Finger grip pattern
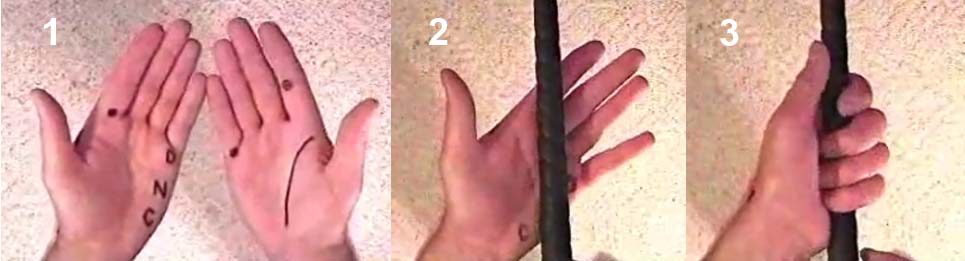
Here is a photo-demonstration of how to adopt a finger grip.
Adopting a finger grip - capture images from reference number [7]
I think that a finger grip offers a golfer the maximum amount of wrist mobility and the maximum amount of clubhead travel during the release of PA#3. Those facts mean that a golfer can increase the amount of swing power that can be derived from the release of PA#2 and PA#3. However, a finger grip (especially if it is associated with a long thumb - see image 3 in the above photo) can create a "floppy" left wrist situation that offers added clubhead speed at the expense of control. It therefore becomes harder to time the club squaring phenomenon (due to the release of PA#3) and the club release phenomenon (due to the release of PA#2) when using a finger grip. Golfers who want to maximize control, at the expense of maximum clubhead speed, should preferably use a neutral, low palmar grip. Another disadvantage of a finger grip is that it is more difficult to securely hold the grip without the club slipping in the left hand during the swing action.
Question number 3:What is the difference between a long thumb grip and a short thumb grip?
Answer:
A short thumb grip exists when the distance between the tip of the left thumb and the left index finger's metacarpo-phalangeal joint is less than 1 finger's width, and a long thumb grip exists when that distance is >2-3 fingers width.
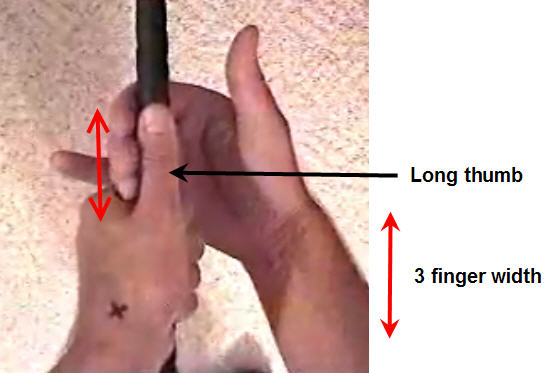
Here is an example of a long thumb grip situation.
Long thumb grip is produced when adopting a left hand finger grip pattern - capture image from reference number [7]
Note that there is distance of 3 fingers width between the tip of the left thumb and the 2nd MP joint (or 2nd finger). If the thumb is that extended on the grip, it allows the wrist to upcock (radially deviate) more at the end-backswing position and it predisposes to over-swinging. To avoid that problem, a golfer should retract the left thumb, which closes the gap area between the left thumb and the 2nd finger's MP joint - thereby creating a short thumb grip scenario.
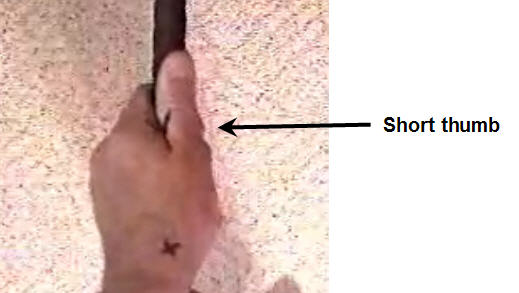
Short thumb grip - capture image from reference number [7]
Note that there is only a distance of ~1 finger's width between the tip of the thumb and the index finger. That action of retracting the left thumb creates a wrist that is less mobile - from an upcocking perspective.A long thumb situation will not naturally occur if a golfer adopts a low palmar grip or a mid-palmar grip, and it's only a potential problem if a golfer uses a finger grip.
Question number 4:How firmly should a golfer grip the club with his left hand?
Answer:
In my first version of this chapter, I advised golfers to adopt a non-firm left hand grip (eg. 4-5 on a scale of 1-to-10). Some golf instructors advise a golfer to adopt an an even looser left hand grip - using the analogy of holding a live bird in one's hand and making sure that the left hand grip is never firm enough to harm the live bird. Another similar analogy used by golf instructors is the mental idea of gripping an open tube of toothpaste, and not gripping the tube so tightly that it will cause toothpaste to ooze out of the tube. The primary reason for advocating a loose left hand grip was to discourage a golfer from acquiring a tense left wrist that doesn't cock-and-uncock easily during the swing. I now believe that it is a major mistake to have a loose left hand grip. I presently believe that the grip should be firm enough, so that it becomes i) impossible for a golfer friend to pull the club out of your hand and ii) impossible for him to cause the grip to twist in your left hand when he attempts to twist the clubhead to-and-fro with his dominant hand. That requires a firm left hand grip.
I believe that the best method of adopting a firm left hand grip (without needing to over-tense the finger flexor muscles) is to use a low palmar left hand grip, and to use the left 3rd, 4th and 5th fingers to grip the club (against the lower palmar area). The grip should "feel" locked-in between those 3 fingers and the lower palm. The left index finger and left thumb play no role in achieving a firm grip. If a golfer only uses the left 3rd, 4th and 5th fingers to firmly grip the club, then it should not create any untoward tension in the wrist flexor muscles and it should not negatively affect the ease-of-motion (looseness) of the left wrist's hinging and/or cocking motions.
Question number 5:Why don't you recommend the baseball grip, where all 10 fingers hold onto the grip?
Answer:
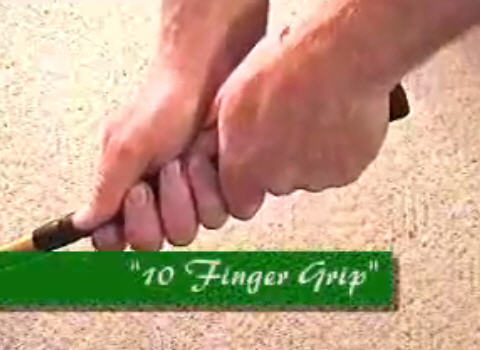
A golfer who uses a baseball grip is using all 10 fingers of the left/right hand to hold onto the grip.
Baseball grip - capture image from reference number [7]
Many golf instructors recommend a baseball grip for children, senior golfers or female golfers. They believe that it creates the possibility of a golfer getting greater leverage. However, the idea of getting greater leverage in that manner encourages a golfer to deliberately straighten the right wrist in the late downswing in an attempt to hit the ball further. That right hand push-action promotes flipping in the late downswing, which is a major swing fault. I think that all golfers should avoid using a baseball grip. I believe that the "correct" grip is a grip where the two hands are held togther in a closely-knit manner, so that they can function as a single grip-clamping unit.
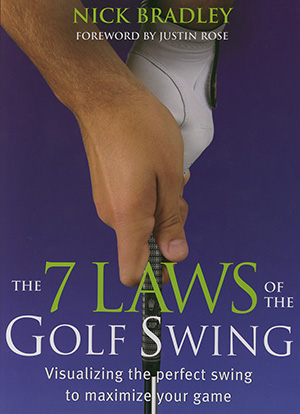
Nick Bradley's image of an ideal two-handed golf grip - from reference number [11]
Note how the right hand is bonded to the left hand at PP#1 (where the nail penetrates the dorsum of the left thumb). That's my idea of a good grip!
Question number 6:Should the degree of left wrist cupping at the end-backswing position be the same as it was at address - as recommended by Jim Flick in this Golf Digest tip.
http://www.golfdigest.com/golf-instruction/2010-01/jim_flick_wrist
Answer:
No.
The left wrist is bent at address when the clubshaft is held centralised between the feet, with the clubshaft perpendicular to the ball-target line. That causes the left arm and clubshaft to not be in a straight line relationship, which means that the LAFW is disrupted and not intact.
Fred Couples left wrist alignment - capture image from the GD article
Image 1 shows Fred Couples at address. Note that he holds his clubshaft perpendicular to the ball-target line (yellow dotted line). That disrupts his LAFW. If his LAFW was intact, then the clubshaft would be straight-in-line with his left arm (red dotted line) and he would have a GFLW (which is less visually cupped than a bent left wrist).Image 2 shows that Fred Couples still has a bent left wrist at his end-backswing position (yellow angle line). That causes his club to cross the line and point to the right-of-the-target.
I believe that it is optimum to establish an intact LAFW during the early takeaway (by dorsiflexing the right wrist, which eliminates the bend in the left wrist - as described in question number 1). A golfer should then maintain an intact LAFW throughout the remainder of the backswing. An the end-backswing position, a golfer should optimally have an intact LAFW and a GFLW (which is only slightly cupped).
Question number 7:In question number 1, you stated that a swinger, who uses a HH action in his followthrough, should not use a strong left hand grip (4 knuckle grip). Could you provide more details as to why you do not recommend a strong left hand grip for a swinger who uses a roll-over release action through impact?
Answer:
The advantage of a strong left hand grip is that one has to adopt a pronated left forearm at address to acquire a strong left hand grip (4 knuckle grip). That means that one does not roll the left forearm more during the backswing action via the mechanism of a left forearm pronatory motion. There is still a small amount of clockwise rotation of the left hand in the backswing action to get the left hand to its end-backswing position, but that is due to internal rotation of the left humerus in the left shoulder socket, while the left shoulder socket moves back-and-inside as a result of the rotation of the upper torso. If there is no left forearm pronation in the backswing, then one doesn't have to reverse the process in the late downswing by performing a left forearm supination motion (which consititutes the biomechanics underlying the release swivel action - release of PA#3). Jamie Sadlowski is an example of a golfer who has a very strong left hand grip, and he therefore doesn't use a release swivel action in his late downswing.
Jamie Sadlowski's late downswing - capture images from his swing video [10]
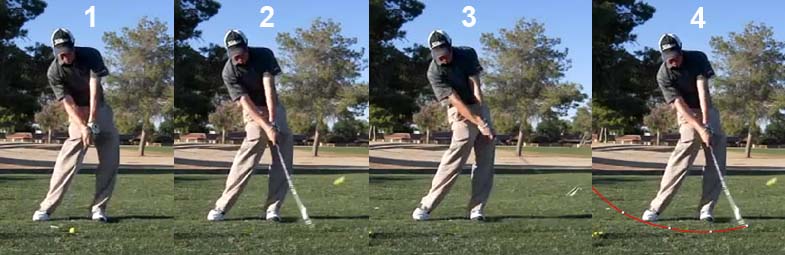
Note that the back of his left hand and back of his left forearm is parallel to the ball-target line at the delivery position (image 1) and at impact (image 4). That means that he doesn't have to roll his left hand into impact via a left forearm supination action in order to square the clubface - note that the clubface is relatively square to the clubhead arc throughout the late downswing. Note that his left forearm is pronated at impact - to the same degree that it was at address.Now consider what happens in his followthrough.
Jamie Sadlowski's followthrough - capture images from his swing video
Note that Jamie Sadlowski still maintains a pronated left forearm throughout the early followthrough (images 1 and 2) and that allows him to keep his clubface relatively square to the clubhead arc for >12" after impact. In other words, Jamie Sadlowski is not employing a roll-over release action and a HH action in his early followthrough. Jamie Sadlowski is employing a drive-hold release action through impact where he keeps his clubface relatively square to the clubhead arc through impact, and he therefore doesn't have to time-coordinate a roll-over release action after impact.
Now consider another golfer, who also uses a strong left hand grip, but who utilises a roll-over release action after impact.
JK's swing video using a strong left hand grip - http://www.youtube.com/watch?v=-Dv2suorUZw
He uses a strong left hand grip (4 knuckle grip) but he also utilises a roll-over release action through impact.
JK's roll-over release action using a strong left hand grip - capture images from his swing videos
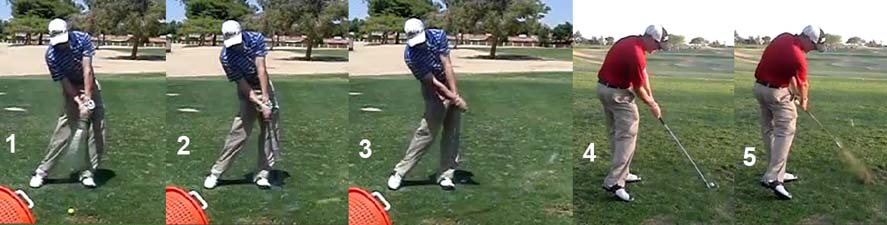
Image 1 shows his impact alignments - note that his left forearm is pronated at impact, which ensures that the back of his left hand is roughly parallel to the ball-target line.Image 2 & 3 shows how he starts to supinate his left forearm, and externally rotate his left humerus, soon after impact - which causes his clubface to roll-over very quickly after impact. I have added two DTL images (images 4 & 5) from another swing video, which shows that his clubface closes by ~90 degrees within 18" after impact. That abrupt roll-over release action creates a timing problem, and if the roll-over occurs too soon (pre-impact) it will deleteriously affect his ability to ensure that he reliably squares the clubface at impact and reliably maintains a square clubface for at least a few inches after impact.
JK has since converted to a neutral grip, and he can now maintain a square clubface more reliably through impact and for many inches after impact.
JK's swing video using a neutral left hand grip - http://www.youtube.com/watch?v=YNk8e6OyFzI
JK's roll-over release action using a neutral left hand grip - capture images from his swing video
Image 1 shows his impact aligments - note that his FLW is facing the target, and that his left forearm is neutral (neither supinated or pronated). Image 2 shows that he can maintain a clubface that is relatively square to the clubhead arc for at least 12" after impact, and that he can now delay his roll-over release action to a later stage of his followthrough (image 3). When he previously used a pronated left forearm (and strong left hand grip), he couldn't avoid having an abrupt roll-over release action soon after impact - primarily due to an uncontrolled left forearm supination action immediately after impact.The important lesson to learn is that a strong left hand grip (which requires a pronated left forearm at address/impact) can create a potential timing problem in a swinger because of the high rate of clubface closure through the impact zone if the golfer has an uncontrolled roll-over release action through impact. A strong left hand grip (as an optional grip approach) is more suitable for golfers who use a drive-hold release action through impact (eg. a swing-hitter like Jamie Sadlowski, or a hitter like Lee Trevino), and it can (non-optimally) be utilised by golfers who use a delayed rollover release action where the roll-over release action occurs well after impact.
Jeff Mann.
Original version: December 2006.
First major revision: December 2010.
References:
1. Ben Hogan's Five Lessons: The Modern Fundamentals of Golf. Ben Hogan.
2. The Golf Swing. David Leadbetter.
3. V1 Home website. http://v2.v1home.com
4. 100% Golf: Unlocking Your True Golf Potential. David Leadbetter.
5. The Fundamentals of Hogan. David Leadbetter.
6. How to Build a Classic Swing. Ernie Els.
7. A Game Golf Intruction Video - How to Grip The Club Like Tiger Woods.Available at http://www.youtube.com/watch?v=oYYYfFDTZrk
8. The Golfing Machine. Homer Kelley.
9. Martin Hall Swing video lesson.
Available at http://www.youtube.com/watch?v=44fev4wqC6U
10. Jamie Sadlowski swing video.
Available at http://www.youtube.com/watch?v=ep-qidwgCII
11. The 7 Laws of the Golf Swing. Nick Bradley.