Impact and Followthrough
Click on any of the hyperlinks to rapidly navigate to another section of the review: Homepage (index); overview; grip; address setup; backswing; downswing; followthrough-to-finish
Introduction
This paper represents the second major revision of my "impact and followthrough chapter" and it includes my latest insights regarding optimum golf swing biomechanics/mechanics as it applies to a golfer's swing action through the impact zone.
I have three different practical definitions regarding the definitional concept of the "impact zone".
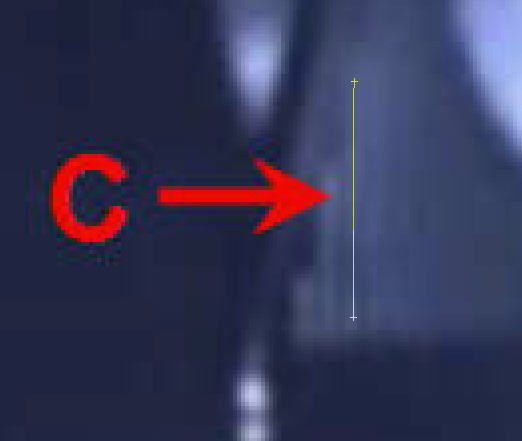
First definition - general impact zone
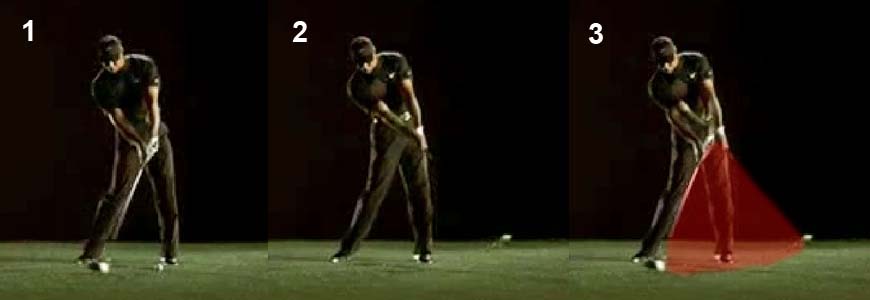
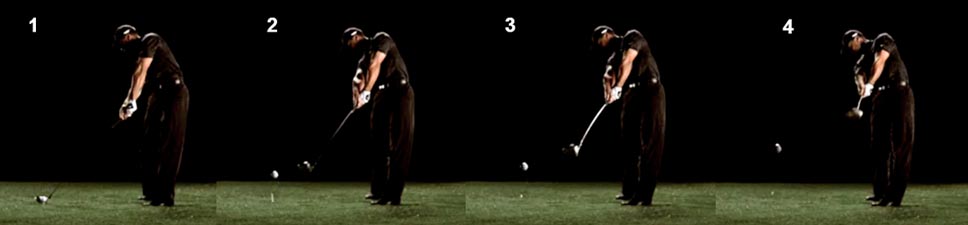
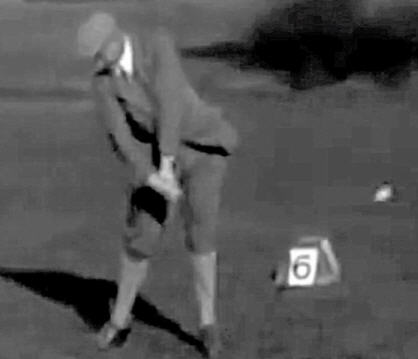
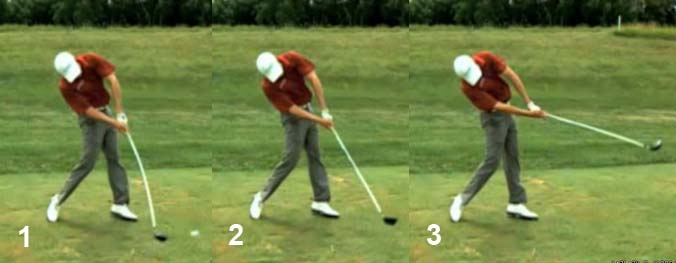
Capture images from the famous Nike commercial video of Tiger Woods' swing [1]
Image 1 shows Tiger's clubshaft being parallel to the ground at the end of the mid-downswing. That position is often referred to as the delivery position, or the 3rd parallel position, or the *P6 position.
(* I have recently decided to use the P classication system for describing a golfer's arm/club positions - see my wrist glossary and P system of classifying a golfer's positions review paper for more details. The P system allows me to more precisely describe a golfer's position - for example, the P6.5 position is halfway between a P6 position and a P7 position while a P6.8 position is 80% of the way between a P6 position and a P7 position)
Image 2 shows Tiger's clubshaft being parallel to the ground after impact, and that is called the 4th parallel position or the P8 position (impact is the P7 position).
The yellow-colored area in image 3 (the composite image) represents the general impact zone and it is the zone between the P6 position and the P8 position.
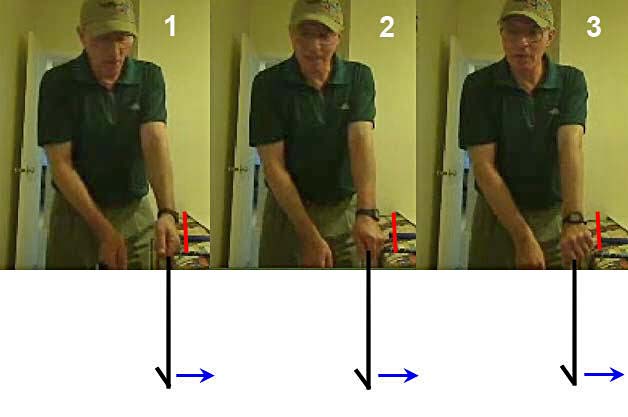
Second definition - impact zone
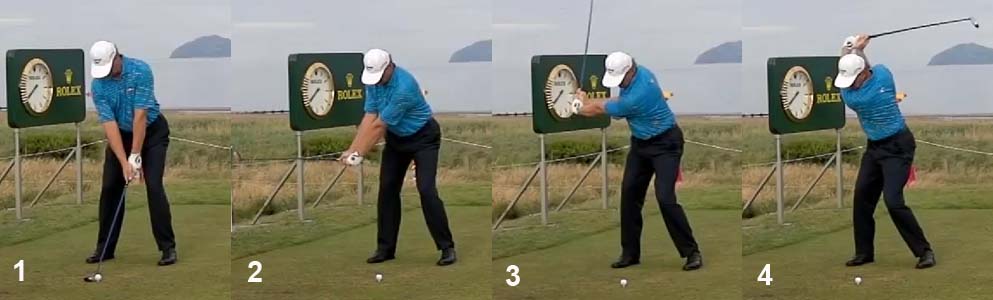
Capture images from the famous Nike commercial video of Tiger Woods' swing [1]
The impact zone starts approximately 18" before impact (roughly at the P6.7 position) - see image 1. Note that the clubface is slightly open to the clubhead arc and target at this time point.
The impact zone ends approximately 18" after impact when both arms are straight (roughly at the P7.3 position) - see image 2. Note that the clubface is slightly closed to the clubhead arc and target at this time point.
Image 3 (the composite image) shows the impact zone as the red-colored area, and this is the zone where the relevant hand release actions happen. In a traditional swinger's action, the relevant hand release actions usually include the pre-impact release swivel action (release of PA#3) and the initial phase of the post-impact no-roll (or roll) hand release action. Between these two biomechanical actions there is a transition zone where the clubface should be square to the clubhead arc and the target, and impact must occur within this transition zone so that the clubface is square to the target at impact - if one wants to hit the ball straight at the target.
Third definition - immediate impact zone
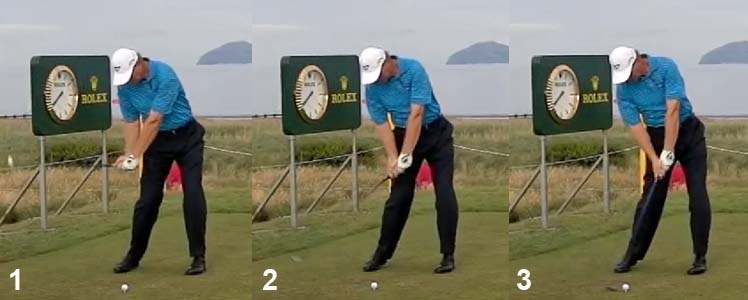
Capture images from the famous Nike commercial video of Tiger Woods' swing [1]
Image 1 shows the clubhead approximately 6" before impact (roughly at the P6.9 position). Note that the back of Tiger's FLW and clubface are both facing the target.
Image 2 shows the clubhead approximately 6-9" after impact (roughly at the P7.1 position). Note that the back of Tiger's FLW and clubface are both facing the target.
Image 3 (the composite image) shows the immediate impact zone as the orange-colored area, and impact should occur within this zone - when the clubface is square to the clubhead arc and also square to the target. This square clubface alignment will ensure a straight ball flight (presuming a level strike on the sweetspot of the clubface) if the clubhead path at impact is also directed at the target. I will later describe the optimum hand release action that will most likely create these ideal clubface-alignment conditions in the immediate impact zone. The primary purpose of the optimum hand release action is to control the clubhead path and clubface through the immediate impact zone so that a golfer can hit the ball straight, and that means that any optimum hand release action must ensure that the FLW/clubface both continue to face the target during their entire passage through the immediate impact zone.
To complement the text information provided in this chapter, I have also produced a 68 minute instructional video on hand release actions through the impact zone, which I have posted on you-tube.
you-tube video - http://www.youtube.com/watch?v=LAJZuwD3jNw
I have also produced many capture images from that swing video, and I have used those capture images in this chapter.
Hand release actions through the impact zone
Before I describe the optimum hand release actions through the impact zone (for a swinger), I would like to take a step backwards and describe the problems that a golfer needs to solve in order to hit the ball straight.
I believe that a golfer needs to control the i) clubshaft, the ii) clubhead and the iii) clubface during the club's passage through the impact zone in order to hit the ball straight, and a beginner golfer needs to learn these three club control-issues in that sequential order.
Starting with clubshaft control.
I believe that optimum clubshaft control for a straight ball flight pattern will ensure that the clubshaft travels parallel to the surface of the impact zone's inclined plane, and that the generated clubhead arc is symmetrical to the ball-target line, so that the clubhead can be located on the ball-target line at impact (or low point if the ball is placed at low point) and be traveling in the direction of the target during impact.
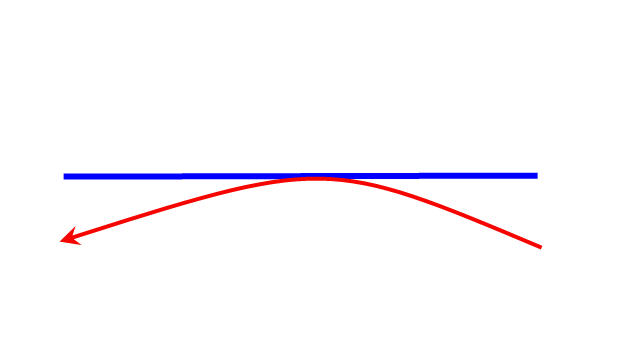
Optimum in-to-square-to-in clubhead path for a straight ball flight
The blue line represents the ball-target line and the curved red arrowed line represents the clubhead arc through the impact zone. Note the symmetry of the clubhead arc to the ball-target line. To create a clubhead arc that is symmetrical to the ball-target line, a beginner golfer needs to learn *how to trace a straight plane line (SPL) and he also needs to learn how to keep the clubshaft on-plane during his downswing/followthrough swing action. I have discussed this issue in great depth in a number of my review papers, and I will not repeat the instructional information in this review paper.
(* to see Martin Hall tracing a SPL with a Smartstick training tool, you can view his video at - http://smartstickgolf.com/why-it-works/plane . Click on the button to view the Martin Hall video)
Presuming that a beginner golfer has already learned clubshaft control, he then has to ensure that he sucessfully learns how to control the clubhead. A golfer, who is a swinger, has successfully learned how to control the clubhead if he can ensure that he reaches impact with his hands marginally ahead of the clubhead, so that there is small amount of forward clubshaft lean at impact. The amount of forward shaft lean at impact depends on ball position. The further behind low point (and the closer to the center of the stance) a golfer places the ball, the more forward shaft lean one would expect to see at impact - if the hands are in the same impact location. Many golfers usually place the ball further behind low point for short iron shots (relative to long iron shots). The clubshaft should only become straight-in-line with the left arm (as seen from a face-on perspective) at the low point (nadir) of the clubhead arc, which is usually located a few inches ahead of impact when hitting irons, and it is at a time point when the clubshaft is roughly vertically aligned with the left shoulder socket. When hitting a driver, a golfer may choose to place the ball behind low point (for a downward strike), at low point (for a level strike), or ahead of low point (for an upward strike).
To master clubhead control, a beginner golfer needs to learn how to master the club release phenomenon. The club release phenomenon in a swinger works according to the principle of a driven double pendulum swing model [2].
Here is an animated gif of the driven double pendulum swing model
Animated gif of a driven double pendulum swing model - from reference number [2]
When viewing the driven double pendulum swing model, note that the central arm (representing the left arm) doesn't slow down as the peripheral arm (representing the clubshaft) releases. Note that the clubshaft (peripheral arm) releases passively/automatically and it doesn't require positive torque (from muscular forces) to induce a successful club release phenomenon where the clubhead reaches low point at the same time as the left wrist/hand (peripheral hinge point) and straight left arm (central arm). I usually refer to this passive club release phenomenon - which Homer Kelley called the passive release of PA#2 [4] - as a centrifugal-release action (CF-release action). Although I will continue to use the term "CF-release action" for convenience sake, website visitors must realize that there is no such phenomenon as a centrifugal force, and the physics responsible for the club release phenomenon is actually due to the effect of a changing hand arc path's direction-of-motion on the club. When the *hands constantly change their direction of motion in the downswing, transcribing a circular (or near-circular) path in space, the circular path motion of the left wrist/hand induces the club to release.(* To better understand the mathematical principles describing the club release phenomenon, a website visitor can read this short article by nmgolfer)
In the driven double pendulum swing model, the peripheral hinge point (representing the left wrist) travels in a circular direction because the central arm (representing the left arm) has a "fixed" fulcrum point. In a "real life" golf swing, the left shoulder socket (which is the fulcrum point for the left arm) is in constant motion during the downswing, so the hand arc path is not perfectly circular, and it is more U-shaped in appearance. Golfers produce varying U-shaped hand arc paths, and therefore they produce different club release patterns. Each individual golfer needs to learn how to shape his U-shaped hand arc path, and he also needs to learn how to modulate the speed of left wrist/hand motion during its downswing passage along his U-shaped hand arc path, in order to ensure that the clubhead reaches impact with "correct" (optimum) timing. I have previously described the process of the club release phenomenon in great detail in many of my previous review papers, and I will not repeat that instructional information in this review paper.
Presuming that a golfer has succesfully learned how to control the clubshaft, and also learned how to control his clubhead, then he needs to learn how to control his clubface through the impact zone so that he can consistently achieve a square clubface through the immediate impact zone (where the clubface is square to the clubhead arc and also square to the target). To learn how to achieve that goal, he needs to learn how to optimise his hand release action through the impact zone.
What represents the optimum hand release action pattern through the impact zone - a hand release action that will allow a golfer to consistently achieve a square clubface through the immediate impact zone?
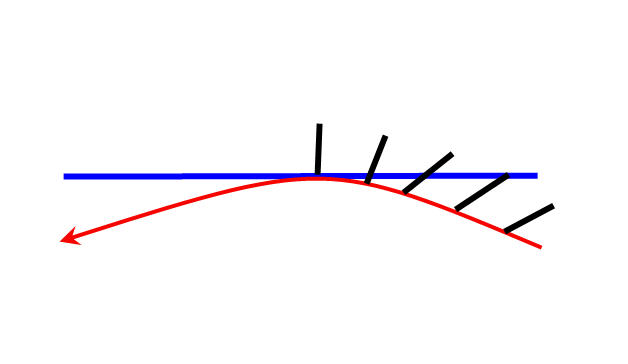
I think that, from a purely theoretical perspective, that the optimum way for a golfer a to control the clubface through the impact zone is to simply keep the clubface square to the clubhead arc throughout the entire downswing action, so that the golfer doen't have to rotate the clubface to square during the later downswing (between P6 and P7). That will avoid a timing-issue problem that is intrinsic to the biomechanical process of having to rotate the clubface to square in the late downswing using the biomechanical mechanism of a release swivel action - what Homer Kelley called the release of PA#3 [3].
The following diagram shows a clubface that it square to the clubhead arc through the impact zone (between P6.5 and P7.5).
Diagram showing a clubface that is square to the clubhead arc throughout the impact zone
The straight/short black line represents the clubface, and I have drawn the clubface as being square to the clubhead arc during the entire passage of the clubhead through the impact zone. If the clubface is square to the clubhead arc throughout the entire downswing, and therefore during its entire passage through the general impact zone, then the clubface will automatically be square to the target at impact if the golfer has perfect clubshaft/clubhead control and the clubhead path at impact is directed towards the target. Note that the clubface will also be perpendicular to the surface of the inclined plane if it remains square to the clubhead arc - because the clubhead arc lies against the surface of the inclined plane throughout the entire impact zone. Who uses this technique?There are a few professional golfers who use this technique, and prime examples include two long-drive competitors (Jamie Sadlowski and Dominic Mazza) and one PGA tour golfer (David Duval). There are a number of other professional golfers who also use this technique, but it is not frequently seen because it is biomechanically very difficult to efficiently use this technique in a "real life" golf swing.
To use this technique (often called the square technique because the clubface is square to the clubhead arc throughout the entire backswing/downswing/early followthrough), a golfer needs to adopt a very strong left hand grip (4 knuckle grip) at address. I will demonstrate the biomechanics of this square technique using Jamie Sadlowski as a role model.
Here is Jamie Sadlowski's swing action.
Jamie Sadlowski's backswing action - capture images from his swing video [4]
Image 1 shows Jamie Sadlowski at address - note that he has internally rotated his left humerus and fully pronated his left forearm so that he can place his left palm directly over the top of his grip - this represents a very strong left hand grip (4-knuckle grip). Note that the back of his left wrist/hand is roughly parallel to the ball-target line at address, and that the ulnar border of his left hand faces the target.
Images 2-6 show his backswing action. Note that he can get the back of his left wrist/hand to be parallel to the inclined plane by his mid-backswing by simply moving his left arm backwards - without needing to use a takeaway swivel action. He then keeps his left arm moving back during his mid-late backswing action while still keeping the back of his left wrist/hand parallel to the inclined plane. Note that his clubface is square to the clubhead arc during his entire backswing action. I think that it requires enormous flexibility of the torso amd left scapula (which has to rotate the left shoulder socket around-to-the-right), and also enormous left internal shoulder joint flexibility, to be able to successfully perform this square technique backswing action.
If Jamie Sadlowski didn't have to rotate his clubface open during the backswing, and if he kept the clubface square to his clubhead arc during his entire backswing action, then he will obviously not have to counter-rotate his left arm, and therefore the clubhead/clubface, in the opposite direction during his downswing action.
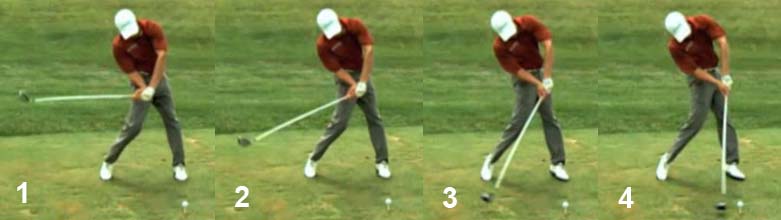
Consider Jamie Sadlowski's late downswing action.
Jamie Sadlowski's late downswing action - capture images from his swing video [4]
Image 1 shows him at the P6 position (delivery position) and image 4 shows him at the P7 position (impact). Note that the back of his left lower forearm/left wrist/left hand remains roughly parallel to the ball-target line between P6 and P7, and this ensures that his clubface remains square to the clubhead arc during this entire time period. Note that the ulnar border of his left wrist/hand (and not the back of his FLW) is facing the target at impact. Note that if Jamie Sadlowski can perfect his club release phenomenon so that the clubhead catches-up to his hands by impact, then his clubface will automatically be square to the target at impact, and he doesn't have to perform a rotary pre-impact hand release action (release swivel action) between P6.5 and P7. Image 4 shows that Jamie Sadlowski's left forearm is straight-in-line with his clubshaft at impact and he therefore has a *functionally flat left wrist at impact (which is also low point because he has placed his ball at low point).
A *functionally flat left wrist at impact (or low point) is defined as a left wrist alignment where the clubshaft is straight-in-line with the left arm, and where there is no flipping of the clubshaft passed the left wrist/hand. If the clubshaft has not flipped passed the left arm, then the LAFW is still intact. The physical appearance of a functionally flat left wrist at impact/low point primarily depends on left hand grip strength.
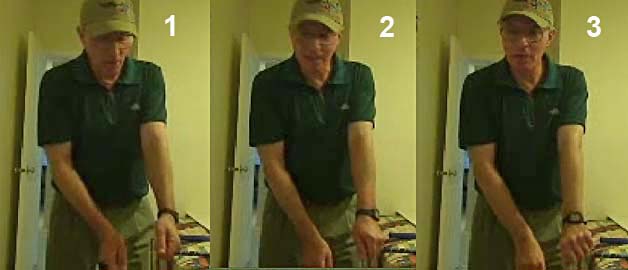
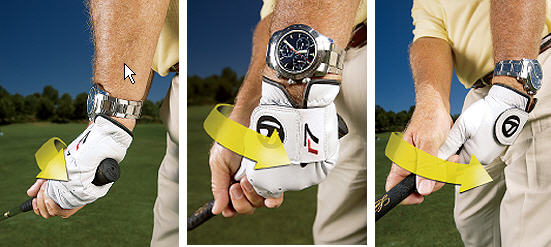
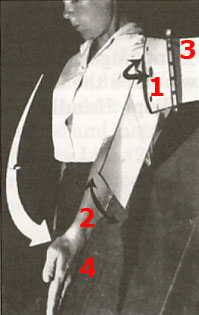
Author demonstrating three left hand grip strength variations - capture images from his swing video
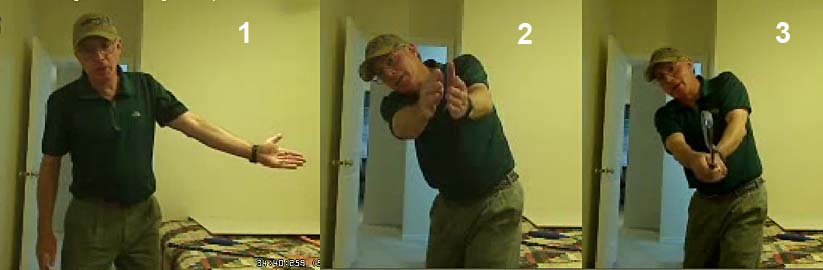
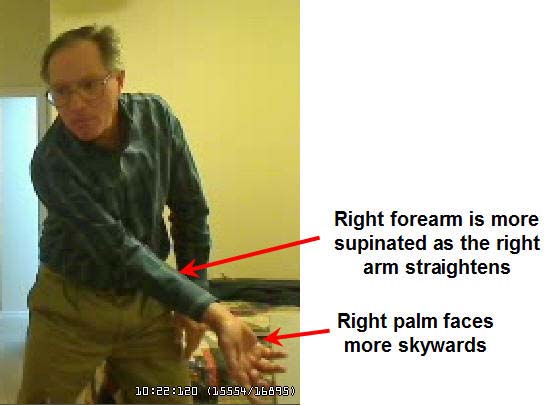
In this series of images, I am demonstrating three variable degrees of left hand grip strength - without a golf club.Image 1 shows a weak left hand grip. This represents a 1-knuckle left hand grip. Note that the left humerus is minimally internally-rotated so that the left antecubital fossa (elbow pit) faces slightly away from the target. Note that the left forearm is neutral - neither pronated or supinated - and that my watchface faces the target. Note that the left thumb would lie at the 12 o'clock position on the grip. Note that the back of the left hand is minimally cupped/scooped and that the back of the left hand/wrist faces the target.
Image 2 shows a slightly strong left hand grip. This represents a 2-3 knuckle left hand grip. Note that the left humerus is not more internally rotated, but the left forearm is more pronated, thereby causing the left thumb to be situated at the 1 o'clock position on the grip (as viewed from above). Note that the back of the left wrist is more cupped/scooped, and that the back of the left wrist/hand and watchface on my lower forearm is angled about 45 degrees relative to the target.
Image 3 shows a very strong left hand grip. This represents a 4+ knuckle left hand grip. Note that the left humerus is more internally rotated, so that the left antecubital fossa (elbow pit) faces away from the target. Note that the left forearm is fully pronated so that the watchface faces skywards and it is roughly parallel to the inclined plane and it is also roughly parallel to the ball-target line. Note that the left thumb would be situated at the 3 o'clock position on the grip (when viewed from above).
Consider the situation at low point - when the clubshaft is straight-in-line with the straight left arm.
Modified capture image series - showing the appearance of the left wrist/hand at low point
Note that I have drawn an imaginary clubshaft that is straight-in-line with the left arm at low point - see black line-drawing showing that the clubface faces the target at low point (blue arrows). The red line represents a functionally flat left wrist and intact LAFW (where the clubshaft and straight left arm are aligned in a straight line relationship). The red line faces the target, thereby implying that the back of the functionally flat left wrist must face the target at low point to ensure that the clubface faces the target. However, it is only in image 1 that the back of the left wrist visually appears to be facing the target - so that the visual appearance of the back of a FLW facing the target at impact/low point only exists if a golfer adopts a weak left hand grip. If a golfer adopts a very strong left hand grip (image 3), it is the ulnar border of the left wrist/hand that will face the target - if the back of the functionally flat left wrist faces the target at impact/low point. If a golfer adopts a slightly strong left hand grip (image 2), then the back of the left wrist/hand will be angled at ~45 degrees relative to the target - even if the back of the golfer's functionally flat left wrist faces the target. As long as the clubshaft is straight-in-line with the straight left arm at low point and the clubface faces the target, then the functionally flat left wrist can be deemed to be facing the target and the LAFW can be deemed to be intact - although the visual appareance of the functionally flat left wrist will depend on left hand grip strength.I believe that a golfer must optimally have an intact LAFW/FLW as the club bypasses the P7 position and that the left wrist must never prematurely bend after impact. Note that when I use the abbreviation FLW in this chapter (and in my many review papers), that I am generally referring to a functionally-flat left wrist, and not necessarily an anatomically/visually flat left wrist (AFLW). I believe that there should be no flipping of the clubshaft passed the straight left arm in the immediate impact zone or too soon after impact, and there also should be no rolling motion of the left arm/clubshaft (intact LAFW) during this time period - if one wants to guarantee that one has a stable clubface that faces the target during its entire passage of the clubface through the immediate impact zone.
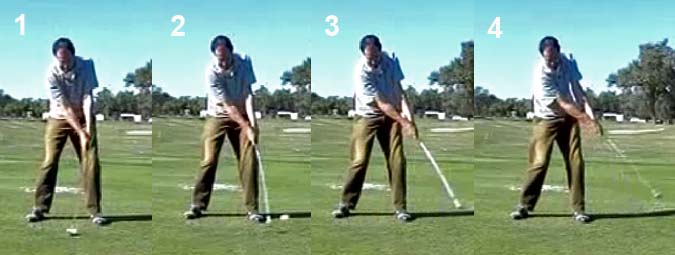
Consider Jamie Sadlowski's hand release action after impact.
Jamie Sadlowski's followthrough action - capture images from his swing video [4]
Note that Jamie Sadlowki doesn't allow the clubhead to pass his left hand in his early followthrough (between P7 and P7.2) - images 1 and 2. That means that he maintains an intact LAFW (where the clubshaft and left arm have a straight-line relationship and where there is no left wrist flipping action) in his early followthrough, and that he also maintains a functionally-flat left wrist (FLW). Note that the back of his left wrist/hand remains roughly parallel to the inclined plane between P7 and P7.2, and that he avoids any rolling motion of his FLW/clubface through impact and the early followthrough.
Note that his right wrist has straightened during his early followthrough, but it hasn't caused any flip-bending of his left wrist (image 1 and image 2). Note that his left wrist only bends more backwards in his later followthrough (image 3) - because he doesn't use a full-roll hand release action (which I will discuss at a later stage).
If you follow Jamie Sadlowski's swing sequence, you can see that he maintains an intact LAFW/FLW throughout his backswing, downswing and early followthrough swing action, and the club releases in the plane of his LAFW in the mid-late downswing. In the immediate impact zone, (between P6.9 - P7.2) Jamie Sadlowski maintains an intact LAFW (even though the back of his left wrist is not facing the target) and his clubface is square to the target during this entire time period. There is also no rolling rotational motion of his forearms/hands through the impact zone, which makes this technique easier to time.Now, although this square technique is mechanically very advantageous, the majority of professional and good amateur golfers do not use this technique - presumably because it is biomechanically too difficult and too uncomfortable to perform this square technique. The majority of professional golfers adopt a *neutral left arm and neutral left hand grip at address, and that means that they must roll their left hand and club into impact in the late downswing in order to square the clubface.
(* I define a neutral left arm as a situation where the left humerus is neutral [not significantly internally or externally rotated at address] and the left forearm is neutral [left forearm is not markedly pronated or supinated at address] and I define a neutral left hand grip as being either weak [1-knuckle grip] or neutral [2-knuckle grip] or even slightly strong [3-knuckle grip])
Consider this diagram showing the motion of the clubface in the late downswing in a golfer who uses a neutral left hand grip.
Rotation of the clubface between the P6 position and the P7 position
Note that the clubface is open to the clubhead arc between the P6 position and the P6.5 position, and it rotates to square between the P6.5 position and the P7 position due to the biomechanical actions that are responsible for the release of PA#3 (release swivel action). These biomechanical actions can happen automatically/naturally and they do not necessarily require conscious thought. The amount of PA#3 rotary release action used by a golfer between P6.5 and P7 primarily depends on left hand grip strength - being greater for a golfer who uses a weak (1-knuckle) left hand grip compared to a golfer who uses a neutral-to-slightly strong (2-3 knuckle) left hand grip. All golfers, who use a neutral left arm/neutral left hand grip, must perform this pre-impact rotary motion of the clubface in order to square the clubface by P6.9. The question then becomes - what should happen through impact and during the followthrough (between the P6.9 position and the P7.2 position) from a biomechanical perspective? I believe that there are two major options for a swinger who adopts a neutral left arm/forearm and neutral left hand grip at address - i) a no-roll hand release action or ii) a full-roll hand release action. I will start off by first describing the no-roll hand release action.
No-roll hand release action
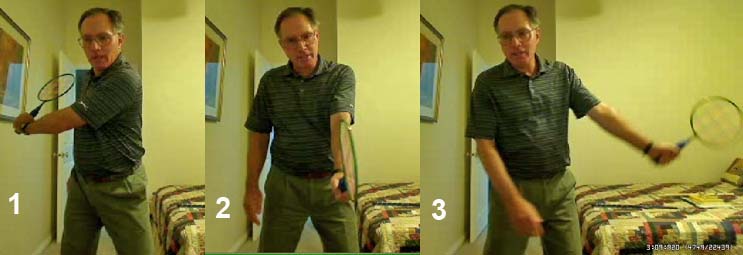
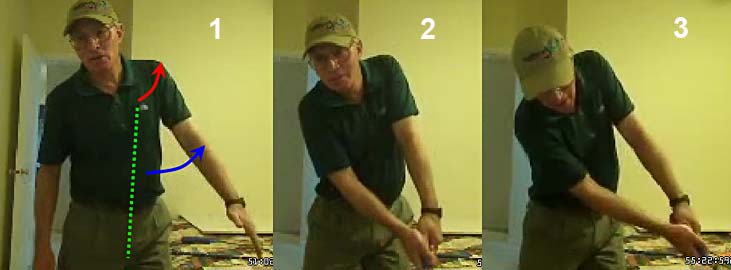
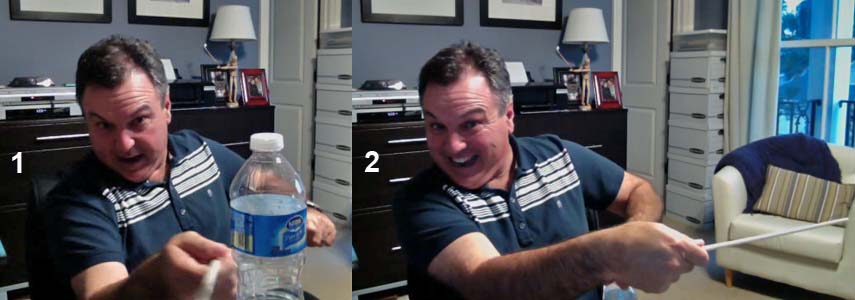
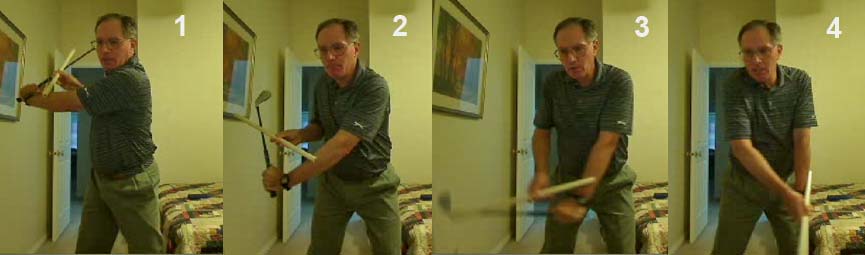
A no-roll hand release action can be described as a hand release action where a golfer maintains an intact LAFW/FLW from impact to P7.2 and preferably to the end of the followthrough (approximately to the P7.3-P7.5 position) where the back of the FLW, and therefore clubface, remains perpendicular to the surface of the inclined plane. Consider this demonstration - where I use a badminton racquet.
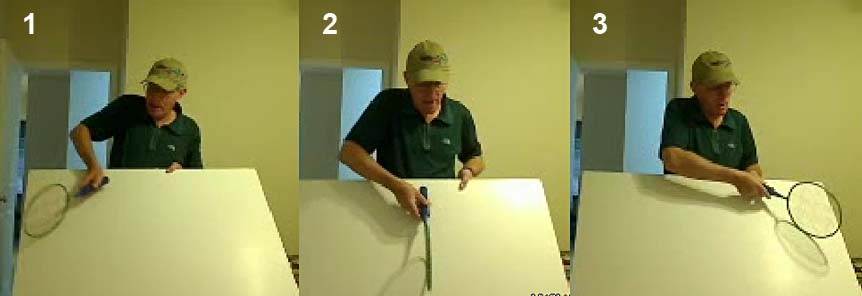
No-roll motion of a racquet through the impact zone - capture images from my swing video
Note that the racquetface remains perpendicular to the surface of the inclined plane board (which I have held at about a 45 degree angle relative to the ground) throughout the late downswing action (image 1), through impact (image 2), and throughout the followthrough (image 3). Note that there is no rolling motion of the clubface (relative to the inclined plane board) between impact (P7 position) and the end of the followthrough (P7.5 position). To efficiently achieve that goal of performing a no-roll motion of the clubface between the P7 position and the P7.5 position, while constantly maintaining an intact LAFW/FLW, a golfer has to perfect the rotary motion of his torso/arms during this time period.Here are capture images from my swing video - where I demonstrate the required body/arm motion using a badminton racquet.
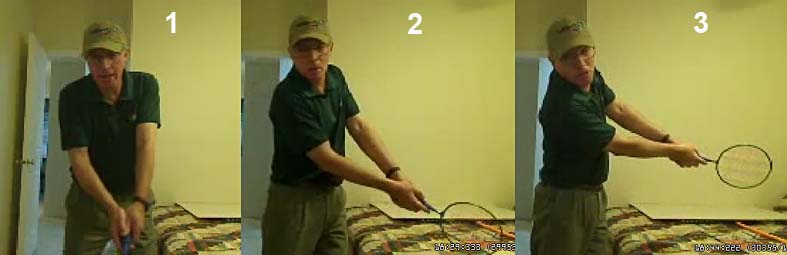
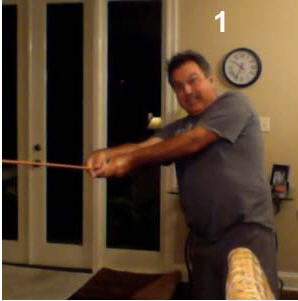
Author demonstrating a no-roll hand release action using a racquet - capture images from his swing video
Image 1 shows the author at the impact location - note the straight left arm, FLW with an intact LAFW (racquetshaft is straight-in-line with my left arm, and there is no flipping), bent right wrist.Image 2 shows me at the P7.5 position - note that I still have a FLW and intact LAFW, and a bent right wrist. Note that my left arm has not externally rotated and my left forearm has not supinated - I have maintained the same left arm/forearm alignment that existed at impact. Note how much I have rotated my torso so that I can keep the butt end of the club pointing in the general direction of my mid-torso. Note that the clubface is perpendicular to the inclined plane, which means that I am using a no-roll hand release action.
Image 3 shows that if I continue to rotate my torso while keeping the racquet in front of my rotating torso, that I can even still maintain a FLW/intact LAFW and bent right wrist at the P8 position.
Note how much my left arm/hand has moved inside-left after impact - this represents a CP-arm release action. CP is an abbreviation for "centripetal", and it signifies that I am keeping my left arm close to my left upper chest wall, so that the left arm rotates inside-left together with the rotating upper torso as it rotates inside-left after impact. There is no separation of my left arm away from my chest wall that would allow my left arm to move outwards away from my torso.
Consider the appearance of a CP-arm release action that is combined with a no-roll hand release action from different viewing angles.
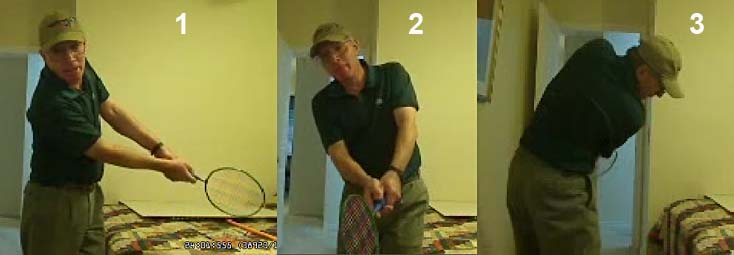
CP-arm release action combined with a no-roll hand release action - capture images from my swing video
Image 3 shows how quickly the hands disappear from view when a golfer uses a CP-arm release action - as viewed from a DTL viewing perspective.Image 1 and 2 shows how the arms are rotating at the same rpm as the rotating torso and there is no independent rotation of the left-and-right arms/forearms. Also, note how the impact alignment of a "FLW/intact LAFW and bent right wrist" is kept structurally intact during the followthrough.
To perform this combined CP-arm release action + no-roll hand release action fluidly and efficiently, a golfer must actively rotate the lower-mid torso through impact and after impact. That type of arm/hand release action requires a lot of flexibility/mobility of the lower-mid torso.
Consider my definition of the upper-mid-lower torso.
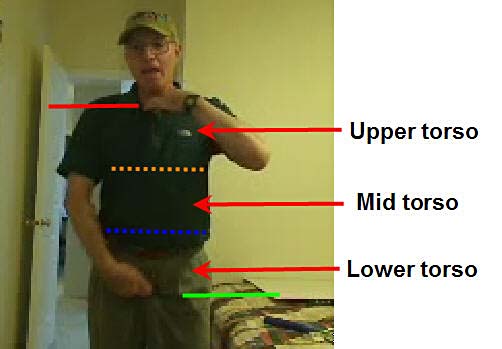
Torso zones - capture image from my swing video
Note that I am holding my left hand at the level of the upper end of the sternum (which is level with the clavicles and the upper limit of the shoulder sockets) and that represents the upper limit of the torso (solid red line). Note that I am holding my right hand at the level of my symphysis pubis, which is the bony part of the pubic bone just above the base of the penis, and that represents the lower limit of the torso (solid green line).If one divides the torso into three roughly equal zones, then the three torso segments are as follows-:
1) Upper torso - between the solid red line and the orange dotted line (which is at the level of the lower end of the sternum) - and this zone extends between the 1st thoracic vertebra and the 6th thoracic vertebra.
2) Mid torso - between the dotted orange line and the dotted blue line (which is at the level of the posterior pelvic crest) and that dotted blue line is a few inches below the navel - and this zone extends from the 6th thoracic vertebra to the 2nd lumbar vertebra.
3) Lower torso - between the dotted blue line and the solid green line - and this zone extends down from the 2nd lumbar vertebra to just below the 5th sacral vertebra- and this zone represents the pelvis and hip joints.
To perform a combined CP-arm release action fluidly and efficiently, a golfer needs to fluidly rotate the lower-mid torso through impact, so that the impact triangle (which I will discuss next) is kept in front of the rotating torso.
Consider Mike Bennett's swing action - http://www.youtube.com/watch?v=s5Pjp6OZcIY
Here are capture images from his swing video.
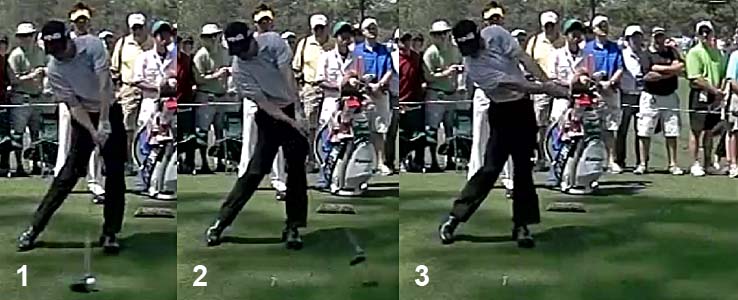
Mike Bennett's combined CP-arm release and no-roll hand release action - capture images from his swing video
Note that Mike Bennett has continued to rotate his lower-mid torso through impact so that he can move his arms/club inside-left after impact while keeping the arms/club in front of the rotating torso.Note that he maintains a FLW/intact LAFW and bent right wrist throughout this followthrough action. Note that his clubface is perpendicular to the inclined plane in images 1, 2 and 3 - which means that he is using a no-roll hand release action between impact and the P7.5 position (end of the followthrough position - when both arms are fully straight).
Note that Mike Bennett's left upper arm is slightly internally rotated at impact, so that the left antecubital fossa (elbow pit) is angled away from the target, and note that the left forearm is slightly pronated at impact. Also, note that the right forearm is neutral at impact (neither pronated or supinated). Note that Mike Bennett maintains these left arm and right arm rotary alignments during the followthrough, and there is no independent counterclockwise rotation of the two arms/forearms during the followthrough. Note how Mike Bennett keeps his two upper arms closely/tightly connected to his chest wall throughout his followthrough action.
It is useful to mentally think of this combined arm/hand release action as being the rotary motion of an intact impact triangle, where there is virtually no internal motion involving the primary structures of the impact triangle (other than a straightening of the right elbow).
Consider the impact triangle.
The impact triangle - adapted from a Mike Bennett capture image
One can think of the impact triangle as being a triangular structure consisting of three sides - i) the right arm/forearm (right elbow can be slightly bent or fully straight) and the bent right wrist; ii) the straight left arm and forearm and the FLW; and iii) an imaginary line drawn between the two shoulder sockets at the level of the clavicles.During the followthrough, a golfer who uses this combined CP-arm release action + no-roll hand release action will be swinging the intact impact triangle inside-left during the followthrough secondary to an active rotation of the lower-mid torso. The amount that the impact triangle moves inside-left during the followthrough depends on the amount of counterclockwise rotation of the lower-mid torso that occurs during that time period. It is even possible for the impact triangle to move less inside-left after impact if the golfer wants to hit a push-draw shot where the clubhead path is in-to-out through the immediate impact zone. Consider an example of Charley Hoffmann hitting a push-draw shot.

Charley Hoffmann hitting a push-draw shot - capture images from a swing video
Note that Charley Hoffmann's clubface is perpendicular to the inclined plane in images 1, 2 and 3 - which means that he is using a no-roll hand release action. Note how he maintains a FLW and intact LAFW (clubshaft doesn't bypass his left arm) and bent right wrist throughout his followthrough action, and there is no left wrist flipping action or any rolling motion of the FLW during his followthrough action.Note how much he rotates his lower-mid torso counterclockwise during his followthrough action, which allows him to keep the butt end of the club pointing in the general direction of his mid-torso at the P7.8 position (image 3).
Note that he keeps the impact triangle structurally intact throughout his followthrough action - even though the impact triangle is being directed slightly more towards the target (and less inside-left) during the followthrough.
I think that a great advantage of this intact impact triangle release technique is that it creates great structural rigidity to the arms/wrists/hands through impact - equivalent to a tennis player performing a two-handed backhanded tennis stroke, rather than an one-handed backhanded tennis stroke involving only the lead arm. If a golfer applies push-pressure with the right arm/hand against the aft side of the grip and also against PP#1 through impact, then it theoretically gives the two hands (holding the grip) greater rigidity through impact, and it decreases the likelihood of left wrist breakdown (flipping) and it also decreases the likelihood of any rolling of the FLW through impact.
Consider a golfer who deliberately chooses to use push-pressure with his right palm against the aft side of the club and against PP#1 through impact, and he continues this action during the entire followthrough action (while he is simultaneously pulling his FLW forward at the same time). John Erickson is a professional golfer who teaches a swing technique, which he calls Advanced Ball Striking (ABS). One of the main tenets of his ABS technique is the idea of maintaining what he calls "shaft flex" through impact by ensuring that he is applying push-pressure with his right palm against the aft side of the club through impact (in a similar manner that a tennis player would apply push-pressure with the rear palm against the aft side of the tennis racquet grip in a two-handed backhanded tennis stroke).
Consider John Erickson's swing action as seen from a face-on (caddy) view.
You-tube video of John Erickson demonstrating his "holding the shaft flex" concept - http://www.youtube.com/watch?v=bjvJPeBWJGk
Here are capture images from that swing video.
John Erickson performing a no-roll hand release action - capture images from his swing video
Note that John Erickson's FLW and clubface remain perpendicular to the inclined plane as they move from impact (image 1) to the P7.5 position (image 4), and there is no counterclockwise roll of the FLW/clubface during this followthrough time period - and this defines a no-roll hand release action. Note that John Erickson also maintains an intact LAFW/FLW and he doesn't flip-bend the left wrist.Note that John Erickson doesn't alter the degree of bend of his right elbow, or degree of right wrist bend, during the time period of hand travel between impact (image 1) and the P7.5 position (image 4). Therefore, one could reasonably imagine that the rotating/pivoting torso action is biomechanically supplying the "force" to actively move his two arms and two hands through the impact zone, and one can think of his two arms/hands as being levers that allow the pivot action to apply leverage-power to the grip end of the clubshaft. There is no "push-force" being applied by an actively straightening right arm, or an actively straightening right wrist, during this time period. John Erickson thinks of himself as being a hitter (in a non-TGM sense), but what he is really doing biomechanically when he talks of hitting and "holding shaft flex" through impact, is that he is biomechanically allowing his right palm to apply push-pressure against PP#1 and the aft side of the club with the "push-force" being derived from the rotating torso (and not an actively straightening right arm - active release of PA#1), and being mechanically applied by the right arm/hand acting as a transmitting-push-force lever. While this is happening, his active pivot action is also pulling his left arm/hand forward through the impact zone, and the club's grip is therefore also being pulled forward by the left arm/hand mechanically acting as a transmitting-pull-force lever. In other words, his "pivot-power" acts through the two arms - with the left arm pulling the club and the right arm pushing the club. Expressed differently, one can think of John Erickson propelling the impact triangle inside-left after impact by continuing to rotate his torso counterclockwise through impact and continuing this rotary torso motion throughout the entire followthrough.
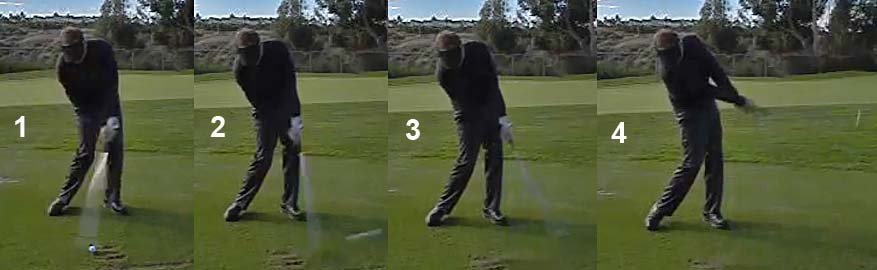
Here is a recently produced swing video of John Erickson hitting golf balls off his California home's wooden deck, and this swing video allows you to view John Erickson's swing at a normal swing speed.
http://www.youtube.com/watch?v=GTP7j9fE6D8
Note how well he rotates his lower-mid torso from P7 to beyond the P8 position, and note how he uses a CP-arm release action when he moves his impact triangle inside-left after impact.
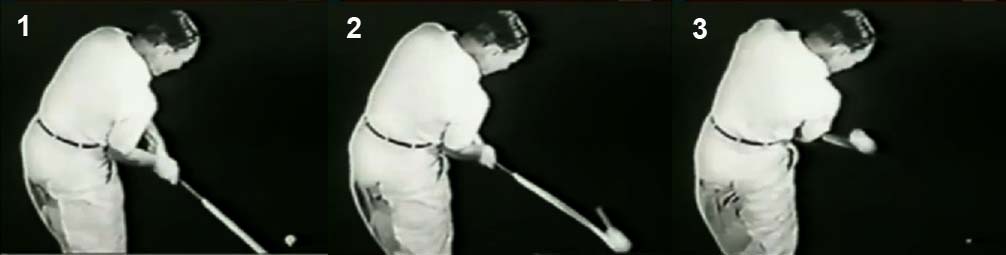
John Erickson uses Ben Hogan as his role-model for a prototypical golfer who uses a "combined CP-arm release action + no-roll hand release action".
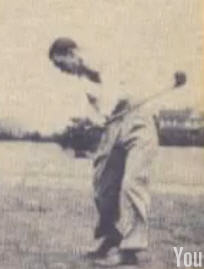
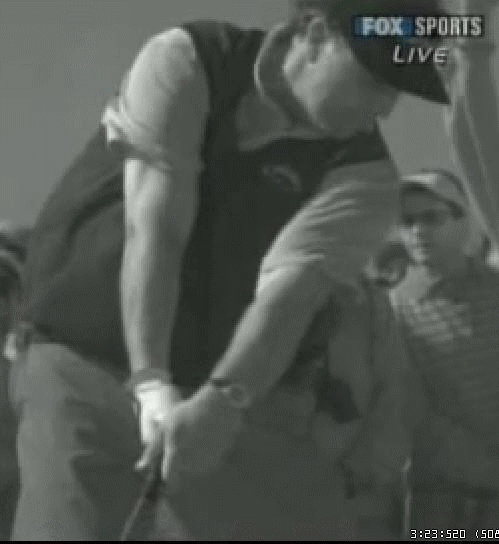
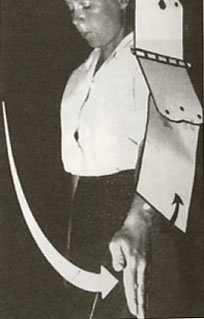
Interestingly, Ben Hogan used a "CF-arm release action + a full-roll hand release action" in his early career, as can be seen in his grainy photographic image from the early 1930s.
Ben Hogan's full-roll hand release action - photo from the early 1930s
Note how static Ben Hogan's pivot motion is during his followthrough action. He is not continuing to actively rotate his lower-mid torso counterclockwise after impact and his hands roll-over as he performs a full-roll hand release action.However, he soon developed his characterististic "combined CP-arm release action + no-roll hand release action" swing pattern that specifically characterised his swing action in his mid-later career.
Here is a photographic image of Ben Hogan from 1953.
Ben Hogan's CP-arm release action - photographic image from 1953
Note how Ben Hogan has rotated his lower-mid torso counterclockwise during his followthrough, and note how his hands are moving inside-left as a result of his CP-arm release action.Here is a swing video which clearly demonstrates how fluidly/efficiently Ben Hogan rotated his lower-mid torso counterclockwise during his followthrough action, and how his hands soon disappear from view as a result of his CP-arm release action.
Ben Hogan swing video - http://www.youtube.com/watch?v=LJdChWnxDvU
Here are capture images from the swing video.
Ben Hogan's combined CP-arm release action + no-roll hand release action - capture images from his swing video
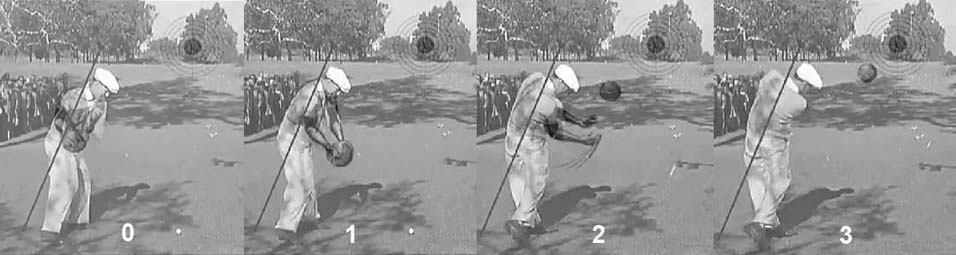
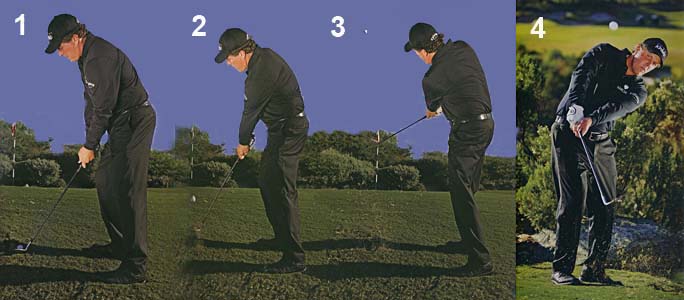
Note how fluidly/efficiently Ben Hogan rotates his lower-mid torso between impact and the P8 position, and note how he moves the entire impact triangle inside-left using a CP-arm release action. Note how he uses a no-roll hand release action that keeps the clubface moving perpendicular to the surface of the inclined plane during his followthrough action.In his landmark golf instructional book [4], Ben Hogan likened the "feel" of his late downswing and followthrough swing action as being equivalent to the "feel" of performing a two-handed basketball pass from the right side.
Here is the diagram from his book [4] showing the two-handed basketball pass action.
Ben Hogan's two-handed basketball pass analogy - diagrammatic drawing from his book [4]
Image 1 shows the ball thrower's hands at the P6 position and image 3 shows the ball thrower's hands as they bypass the P7.5 position.Note that the two-handed throw motion involves a considerable amount of lower-mid torso rotation and also a synchronous/coordinated movement of the two arms (with respect to the torso motion) so that the two arms both move across the front of the body at the same rpm speed as the rotating torso (which fits in with my personal definition of what is meant by the phrase "swinging-with-rhythm"). Note that the right palm faces the left palm across the equator of the ball, and note that there is no left wrist horizontal hinging motion (left wrist dorsiflexing/flipping motion) during the two-handed ball throwing motion and no independent left forearm supinating motion (or right forearm pronating motion) that will cause the back of the FLW to face more groundwards after the hands bypass the P7 position. In other words, there is no rolling motion of the FLW during its passage through the immediate impact zone.
Note that the right palm and back of the FLW face the target in image 3 - because the two-handed ball thrower is directing the ball towards the target. In other words, there must be a short period of time in this rotary two-handed ball throwing motion when the FLW (and right palm) face the target - if one hopes to accurately throw the ball straight towards the bulls-eye of the target. The same principle applies to a golf swing - there must be a moment-in-time when the back of the FLW and right palm must face the target to ensure that the clubhead path and clubface orientation angle are facing the target, and that moment-in-time must occur during the two-hands' travel time through the immediate impact zone.
How does one prevent any left wrist bending (left wrist dorsiflexion) during this two-handed throw motion? I believe that it is readily possible if one follows three biomechanical fundamentals - i) keep the FLW moving fluidly (non-stop) and avoid any slowing/stalling of the forward motion of the FLW during the throw motion; ii) don't allow the right hand to move faster than the left hand (even if the right wrist passively straightens/flattens to a small degree between the P7 position and the P7.5 position) and iii) keep the FLW leading the ball/right hand throughout the throw motion.
Consider what Ben Hogan wrote in his book [7] regarding the value of thinking about this two-handed basketball pass action.
On page 98 of his soft-edition book, Hogan stated-: "As in the old two-hand basketball pass, the left arm and hand lead the right arm and hand. Be sure you hit through with the left as hard as with the right. On page 100 of his soft-edition book, Hogan stated-: "The great value, as I see it, of thinking in terms of this two-hand action is that it keeps the left hand driving all the time". The same thinking should apply to a golfer who moves the impact triangle inside-left in his late downswing and followthrough action - the left hand must be driving forward at a speed that prevents the right hand from moving the grip end of the club faster than the left hand is pulling the grip end of the club. The two hands should move at the same speed when the impact triangle is directed inside-left as a result of the continued counterclockwise rotation of the torso.
Ben Hogan is a great role-model for any golfer who want to use a "combined CP-arm release action + no-roll hand release action" through impact and into the followthrough.
Here is a wonderful swing video where the video-creator superimposed Hogan's two-handed basketball pass action onto a swing video of Hogan's golf swing.
Ben Hogan swing video - http://www.youtube.com/watch?v=4RpArp8XIbw
Here are capture images from that video.
Ben Hogan's arm and hand release actions through the impact zone - capture images from the swing video
Image 1 shows Ben Hogan at impact - the FLW and right palm (with a bent right wrist) will be facing the target.Image 2 shows how Ben Hogan is actively rotating his lower-mid torso, and thereby his impact triangle, counterclockwise after he releases the ball towards the target. The power to release the arms comes from the rotating torso. Note that there is no horizontal flipping motion of the hands or any rolling of the arms counterclockwise during the followthrough (between the P7 position and the P7.5+ position).
Any golfer who wants to use a "combined CP-arm release action + no-roll hand release action" could greatly benefit by studying Ben Hogan's golf swing action through the impact zone - because he is the prototypical role model for this type of arm/hand release action through the impact zone.
To use the "combined CP-arm release action + no-roll hand release action" fluidly and efficiently (like Ben Hogan) for a driver, fairway woods, and long irons, a golfer must have the requisite amount of lower-mid torso rotational mobility and core strength to efficiently/fluidly rotate the torso at a very fast rotational speed between the P6 position and the P8 position to allow for a high clubhead speed through impact. I suspect that many professional golfers cannot perform this torso/pivot rotational motion fast enough when using their driver, so they limit the use of this "combined CP-arm release action + no-roll hand release action" to their short iron swings, and they prefer to use a "combined CF-arm release action + full-roll hand release action" for their driver swings +/- long iron swings. Tiger Woods and Phil Mickelson are examples of golfers who often manifest this variable pattern-of-hand release action-choice when it comes to choosing which hand release action to use when playing competitive golf. Why is it easier to swing faster using a CF-arm release action + full-roll hand release action through the impact zone? The answer can be found in the next section.
Full-roll hand release action
A full-roll hand release action is frequently used by professional golfers, and it is characterised by a rolling motion of the FLW, and therefore clubface, at some time point between the P7 position and the P7.5-8 position - so that the i) back of the FLW becomes roughly vertical to the ground at the P7.5-8 position (presuming a neutral left hand grip) and ii) the toe of the club will be pointing straight-up towards the sky at that P7.5-8 position. The rolling motion of the FLW is due to the fact that the left upper arm is externally rotating in the left shoulder socket while the left arm is abducting away from the torso, and this phenomenon happens while the left shoulder socket is moving inside-left after impact due to the continued counterclockwise rotation of the upper torso.
The primary biomechanical reason that explains why a full-roll hand release action happens after impact is related to the fact that the speed of travel of the LAFW (straight left arm and clubshaft that is maintained in a straight-line relationship with the straight left arm) is faster than the speed of torso rotation. That phenomenon generally causes the left arm/clubshaft to end up traveling in a more targetwards direction, and less inside-left after impact, and that left arm abduction motion (where the left arm separates away from the chest wall) represents a CF-arm release action. CF is an abbreviation for "centrifugal" or center-fleeing" and it implies that the left arm is being abducted away from the body - rather than being kept tightly-connected to the body (as seen in a CP-arm release action). A golfer who uses a full-roll hand release action will often use a CF-arm release action where the left arm is abducted away from the body during the followthrough. During the left arm abduction motion, the left arm will also tend to rotate counterclockwise around its longitudinal axis, and this counterclockwise roll-motion of the left arm, and therefore the FLW and clubface, represents the roll motion that defines a full-roll hand release action. By combining the two biomechanical actions, a golfer will be deemed to be using a combined CF-arm release action + full-roll hand release action.
Consider Roger Federer performing a backhanded tennis stroke action with one arm.
Roger Federer's backhanded tennis stroke action swing video - http://www.youtube.com/watch?v=zZ2zmsPIMXI
Here are capture images from his one-handed backhanded tennis stroke action.
Roger Federer's backhanded tennis stroke action - capture images from his swing video
Note that Roger Federer has adopted a very strong right hand grip, and that his right wrist becomes radially deviated during his backstroke action - image 1. That means that his clubface is perpendicular to the back of his FLW. He still has an intact RAFW because the racquet shaft is still moving within the plane of his right arm (the plane of radial/ulnar deviation). Note how he swings his right arm towards impact so that the back of his FLW is moving roughly parallel to the ball-target line (images 1, 2 and 3), and note that he is progessively losing his lag as the racquet shaft progessively catches up to his right arm. At impact, the racquet shaft has caught up to his straight right arm. and the racquet face path and racquet face orientation angle are both directed towards the target (image 4) and that allows him to hit a straight shot towards his desired target.Most importantly, note what happens during Roger Federer's followthrough action - between impact (image 4) and the P8 position (image 5). Note that the racquet face is parallel to the ball-target line and roughly perpendicular to the ground at the P8 position. To get to that vertical racquetface position at P8, he simply continued to abduct his right arm away from his body (in a CF-arm release manner towards the target) while he simultaneously rotated his straight arm/FLW in a clockwise direction (to a very small degree). Note that he didn't contiue to rotate his torso during his followthrough action, and that means that any clockwise rotation of the racquet face must have involved a clockwise rotation of his right arm/forearm as a single unit secondary to some external rotation of the right humerus in the right shoulder socket, and that rotary motion of his straight right arm/FLW/racquetface represents a roll hand release action. Because Roger Federer uses a very strong right hand grip, he only had to roll his straight right arm/FLW/racquetface to a very small degree during his right arm's abduction motion between P7 (image 4) and P8 (image 5).
Now consider how much more the straight arm/FLW/racquetface would have to roll to get to that same P8 position (where the racquetface is roughly parallel to the ball-target line and vertical to the ground) if one adopted a neutral left hand grip at address.
Here are capture images of me (author) performing a backhanded tennis stroke action using a badminton racquet.
Author demonstrating a backhanded tennis stroke action - capture images from his swing video
Image 2 shows that I have a neutral left arm/forearm and neutral left hand grip at address/impact, and note that the back of my FLW and racquetface will both face the target at impact.Image 1 shows that I had to adduct my straight left arm in my backstroke action. However, I also had to rotate my straight left arm clockwise to get my GFLW, and therefore racquetface, parallel to the inclined plane. That counterclockwise rotation of my straight left arm biomechanically involves a certain degree of internal rotation of the left humerus and a certain degree of left forearm pronation. To get back to a neutral position at impact, where the back of my FLW/racquetface faces the target, I will have to rotate my straight left arm counterclockwise (and that rotary action represents the release swivel action = release of PA#3).
Image 3 shows that the back of my FLW and racquetface is vertical to the ground at the P8 position. Note that the racquet shaft is still in a straight line relationship with my straight left arm at the P8 position and that I have maintained a FLW, which means that I have maintained an intact LAFW/FLW during my entire followthrough action and that I have not allowed my left wrist to breakdown and flip backwards and bend (dorsiflex) at any time point during my followthrough action.
Note that I have rotated my torso very little between impact (image 2) and the P8 position (image 3), which means that any counterclockwise rotation of my straight left arm/FLW/racquetface during this time period is mainly due to external rotation of the left upper arm in the left shoulder socket. This counterclockwise rotary motion motion of my FLW/racquetface represents a full-roll hand release motion. Note that during the roll motion, that my left arm/left forearm/FLW/racquetface are all rotating at the same rpm as a single unit (as a rolling intact LAFW). The amount of external rotation of the left humerus that happens during a full-roll hand release action (presuming a neutral left hand grip) depends on how much the left shoulder socket rotates inside-left during the followthrough action between impact and the P8 position - and the amount of left shoulder socket rotation inside-left depends on the degree of counterclockwise torso rotation. In other words, there is usually an inverse relationship between the required degree of external rotation of the left humerus and the degree of counterclockwise torso rotation that happens between impact and the P8 position - ie. the less one turns one's torso counterclockwise during the followthrough, the more one will have to externally rotate the left humerus, in order to get the back of the FLW/racquetface vertical to the ground at the P8 position.
Consider further images from my swing video showing the biomechanics that underpin a full-roll hand release action.
Author demonstrating a full-roll hand release action - capture images from his swing video
Image 1 shows that the roll motion of the left arm in a full-roll hand release action is mainly due to external rotation of the left humerus in the left shoulder socket - note that I have got the back of my FLW vertical to the ground at the P8 position as a result of this counterclockwise rotation of the entire left arm/forearm (as a single rotary unit). If I simply abducted my left arm without any roll motion, then the back of FLW would be perpendicular to the inclined plane at the P8 position, and not perpendicular to the ground. Note that the left forearm doesn't independently supinate during this roll motion of the left arm, because that would cause the back of the FLW to face more groundwards.Image 2 shows a number of important points. Note that I have rotated my upper torso to a certain degree, but I have not continued to rotate my lower-mid torso actively through impact, and that limited amount of counterclockwise rotation of the torso causes my two arms to be directed more towards the target, and less inside-left, during the followthrough action - and this left arm release action, where the left arm moves away from the body in a more targetwards-direction, represents a CF-arm release action. Note how the upper left arm loses its close contact with the left upper chest wall due to abduction of the left arm away from the upper chest wall - primarily due to the fact that the left arm is moving faster than the upper torso during the followthrough. Note how that left arm abduction phenomenon causes the butt end of the club to point away from the target at the P8 position, and an imaginary line drawn from the butt end of the club doesn't point in the general direction of the mid-torso (as occurs in a CP-arm release action). Note that I had to externally rotate my left arm (in the left shoulder socket) to get the back of the FLW vertical to the ground at the P8 position. Note what naturally happens to the right arm and right wrist during this full-roll hand release action - i) the right arm becomes fully straight and the right upper arm has to internally rotate to a small degree to get the right palm to always face the left palm during the entire duration of the full-roll hand release action. Note how the right wrist becomes fully straight, and this right wrist straightening action should happen passively (and automatically/naturally). Note that the back of the FLW and palm of the right hand move roughly perpendicular to the ground during the roll motion of a full-roll hand release action (and not perpendicular to the inclined plane as occcurs in a no-roll hand release action). Note how this roll-motion phenomenon will cause the toe of the club to point upwards at the P8 position (image 3) and note how the clubface is vertical to the ground at the P8 position (and also parallel to the back of the functionally-FLW).
Note that there should be no breakdown of the left wrist (left wrist bending/dorsiflexion) during the full-roll hand release action - from impact to at least the P7.3-7.5 position. It is perfectly acceptable if the clubshaft slightly bypasses the left arm between P7.5 and P8, thereby causing the left wrist to become slightly bent/dorsiflexed at the P8 position - as can be seen in image 3; but one should optimally maintain a FLW/intact LAFW until at least the P7.3-7.5 position.
Note that the left forearm doesn't continue to independently supinate after impact during the execution of a full-roll hand release action, as any independent left forearm supinatory action would cause the knuckles of the left hand to face more groundwards during the followthrough. The back of the FLW, and therefore the left hand knuckles, should remain perpendicular to the ground during the followthrough action.
To reinforce all these points, consider Tiger Woods' "combined CF-arm release action + full-roll hand release action" as seen from an upline perspective.
Upline video of Tiger Woods' driver swing - http://www.youtube.com/watch?v=yoTuzAM132Q
Here are capture images from the swing video.
Tiger Woods' full-roll hand release action - capture images from his swing video
Image 1 shows Tiger Woods at impact - note that the back of his FLW faces the target.Note that he has limited counterclockwise rotation of his torso, and therefore left shoulder socket, during his followthrough action, and note how that causes him to release his left arm in a more targetwards (and not an inside-left) direction - and this represents a CF-arm release action.
Note how the back of his FLW rotates in a counterclockwise direction during his followthrough action, and note that the back of his FLW is roughly perpendicular to the ground in image 4 and this represents a full-roll hand release action. During a full-roll hand release action, the back of the FLW is rolling counterclockwise relative to the inclined plane, and that roll-motion differentiates it from a no-roll hand release action where the back of the FLW always remain perpendicular to the surface of the inclined plane throughout the followthrough action.
Note how Tiger's right wrist passively straightens during the followthrough - but, most importantly, note that the right wrist straightening action doesn't cause the left wrist to bend (dorsiflex) at any time point during the followthrough, and he doesn't manifest any post-impact flipping action. Note that the right palm remains parallel to the left palm during the entire followthrough action, and note how the toe of the club points skywards in image 3/4 - when the back of the FLW, and therefore clubface, becomes vertical to the ground.
Note that the back of Tiger's FLW, and therefore the knuckles of his left hand, never faces groundwards during his followthrough, which means that he is not independently supinating his left forearm during his full-roll hand release action - note that his left arm and his left forearm and the back of his FLW and clubface are all rotating at the same rpm in a counterclockwise direction.
It is critically important that an analytical golfer (who uses a neutral left hand grip) learns to clearly understand the biomechanical process that explains how a golfer should biomechanically transition between the pre-impact roll motion of the FLW (which is due to a release swivel action - release of PA#3 action) and the post-impact roll motion of the FLW (which is biomechanically due to a full-roll hand release action) - if he wants to learn how to biomechanically ensure that he has a FLW/stable clubface that continues to face the target throughout the immediate impact zone. To make the FLW's biomechanical motion through the impact zone maximally clear to a reader - I will discuss the swing action of Ernie Els in great detail.
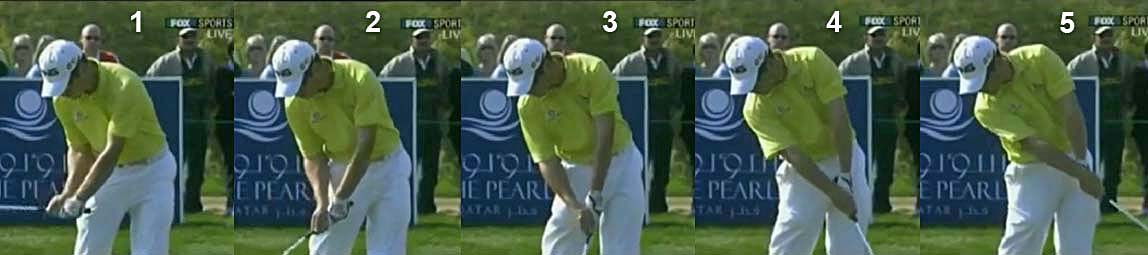
Ernie Els swing action
I am going to describe Ernie Els' entire swing action (backswing, downswing and followthrough) in great detail, so that a reader can clearly understand the rolling motions of the left arm/forearm, FLW and clubface that occur at different time points in the swing action - if a golfer adopts a neutral left arm/forearm and neutral left hand grip at address (like Ernie Els).
Ernie Els swing video - http://www.youtube.com/watch?v=m5cK-INFcCc
Here are capture images of his backswing action.
Ernie Els backswing action - capture images from his swing video
Image 1 shows Ernie Els at address (P1 position). Note that his left arm/forearm is neutral at address and that the back of his flat left wrist (FLW) faces the target. Note that his clubface is straight-in-line/parallel to the back of his FLW.
Image 2 shows Ernie Els at his end-takeaway position (P2 position). Note that he has rotated the back of his FLW about 90 degrees to get the toe of the club pointing upwards - and, from a biomechanical perspective, this biomechanical action is due to some internal rotation of the left humerus (while the left shoulder socket is moving downwards-and-backwards due to rotation of his upper torso around his rightwards-tilted spine) and due to some left forearm pronation.
Image 3 shows him in his mid-backswing when the left arm is parallel to the ground (P3 position). Note that the back of his FLW is parallel to the inclined plane - and note that it requires further clockwise rotation of the left arm/forearm to get the back of the FLW to lie parallel to the surface of the inclined plane.
Image 4 shows him at the end-backswing postion (P4 position). Note that the back of his FLW is still parallel to the inclined plane.
Note that Ernie Els never allows his left wrist to bend (dorsiflex) during his backswing action, and his clubface is always parallel (straight-in-line) to the back of his FLW throughout his backswing action. Note that his clubshaft is also always straight-in-line with his left arm from the P2 position to the P4 position - which means that he has an intact LAFW during his backswing action.
As a general rule (for a golfer who adopts a neutral left arm/forearm at address and a neutral left hand grip), the amount of clockwise rotation of the left arm/forearm required to get from the P1 position to the P4 position depends on the shallowness of the backswing's inclined plane - a golfer whose hands go up a shallower inclined plane will have to use more clockwise rotation of the left arm/forearm than a golfer whose hands go up a steeper inclined plane.
Note that the clubface is opening to the clubhead arc during the backswing action, and that it is roughly parallel to the inclined plane during the mid-backswing. The clubface may become even more open to the clubhead arc if a golfer employs an additional swivel action at the end of his backswing action in order to get the clubshaft to become parallel to the ball-target line at the end-backswing position.
What happens in the downswing? It is obvious that the biomechanical process must reverse itself so that the back of the FLW, and therefore clubface, can face the target at impact - and that means that there must be a counterclockwise rotation of the left arm/forearm in the downswing. But when does it occur? It is important for a golfer to understand that most of the counterclockwise rotation of the left arm/forearm only occurs between the P6.5 position and impact (P7 position). In the early-mid downswing (between the P4 position and the P6 position), the FLW will remain parallel to the inclined plane, which means that there is very little counterclockwise rotation of the left arm/forearm occurring during this phase of the downswing. What happens after the P6 position?
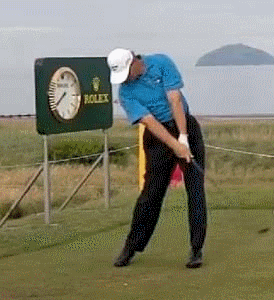
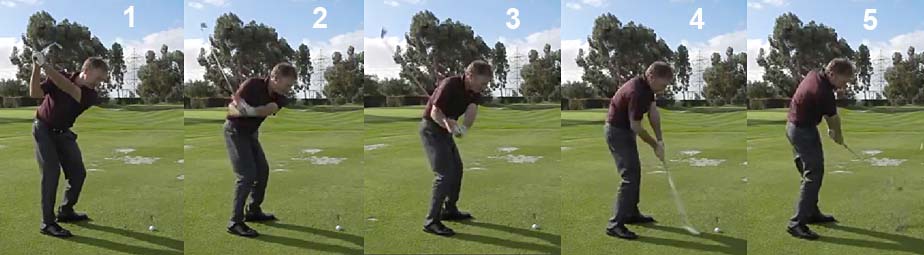
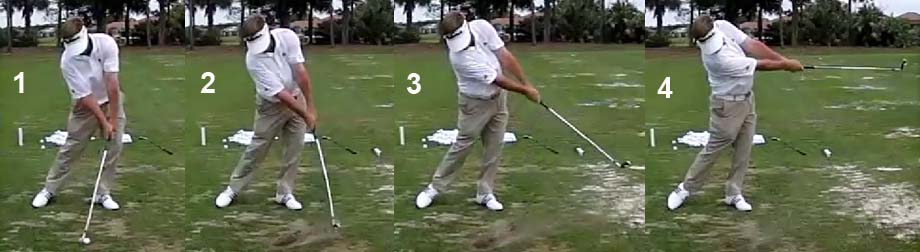
Ernie Els' late downswing action - capture images from his swing video
Image 1 - P6 position - note that Ernie Els' FLW is parallel to the inclined plane, which explains why his clubface is also parallel to the inclined plane and why the clubface is open to the clubhead arc. Ernie Els still has to rotate his intact LAFW, and therefore clubface, counterclockwise to get the clubface square by impact.
Image 2 shows Ernie at the P6.5 position. Note that the club has released, and that it has released in the plane of the LAFW. In other words, Ernie Els has released PA#2 by ~75%, but he has still not started to significantly release PA#3 (note that the back of his left wrist/hand is still angled back relative to the inclined plane).
Image 3 shows Ernie Els at impact (P7 position) with a clubface that is square to the clubhead arc, and both the back of his FLW and clubface face the target. To get from the P6.5 position to the P7 position, he needed to perform a release swivel action (release of PA#3) that is biomechanically due to a left forearm supination movement combined with external rotation of the left humerus (while the left shoulder socket continues to rotate counterclockwise in an up-and-away direction). This is the key biomechanical maneuver that all swingers (who adopt a neutral left hand grip) will have to execute between P6.5 and P7 in order to square the clubface by impact, and it also represents the rotation of an intact LAFW into impact (while the club completes its CF-release action within the plane of the LAFW).
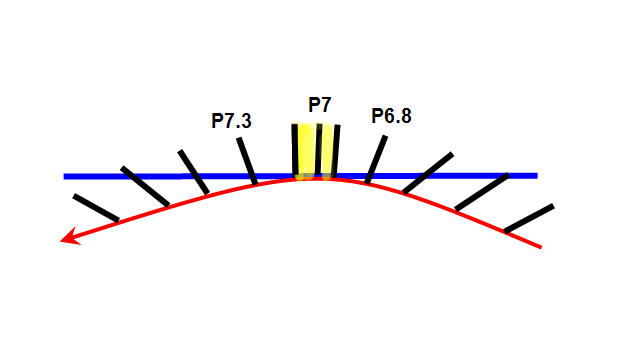
The following diagram shows how the clubface rotates from an open (to the clubhead arc) alignment in the first half of the late downswing to a square alignment by impact.
Rotation of the clubface between the P6 postion and impact
Note that the clubface is open to the clubhead arc between the P6 position and the P6.5 position, and it rotates to square between the P6.5 position and the P7 position due to the biomechanical actions that are responsible for the release of PA#3 (release swivel action). These biomechanical actions can happen automatically/naturally and they do not necessarily require conscious thought.
Note how Ernie Els' right arm also straightens during the late downswing, and note how the right palm faces the target at impact. This right arm straightening action causes the right forearm to paddlewheel into impact, and that right forearm paddlewheeling motion synergistically assists in the smooth release of PA#3 if it is perfectly timed. It is critical that a golfer doesn't straighten the right arm too actively in the late downswing, which can interefere with the smooth release of either PA#2 or PA#3. A golfer should have the distinct "feeling" that both hands are moving at the same speed between the P6 position and impact.
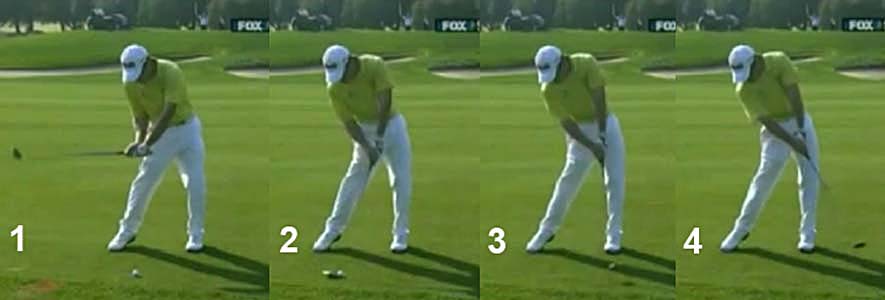
How does Ernie Els transition through impact? What type of hand release action does he use between the P7 position and the P7.3-7.5 position (defined as the end of the followthrough - when both arms are fully straight)?
Consider Ernie Els' followthrough swing action.
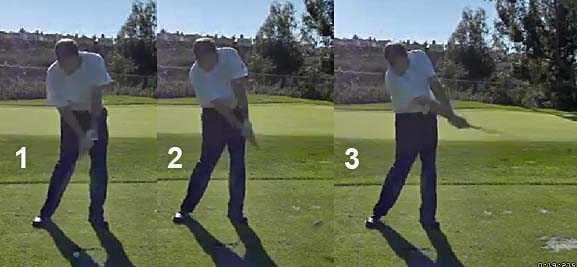
Ernie Els' followthrough/finish swing action - capture images from his swing video
Image 1 shows Ernie Els at impact (P7 position). Note that the back of his FLW and clubface are both facing the target.
Image 2 shows Ernie Els at the P7.2 position - note that his FLW and clubface are still approximately square to the target, which means that he hasn't yet started to perform his full roll hand release action to a significant degree. Note that the clubhead has not flipped past his left arm, which means that he still has an intact LAFW. This critical period (between the P6.9 position and the P7.1-P7.2 position) should optimally be a no-roll transition period that occurs between the rolling action of a release swivel action (release of PA#3 which happens between P6.5 and P7) and the rolling action of a full-roll hand release action (which should optimally happen between P7.2 and P7.5+), and mastering this no-roll transition period allows a golfer (who is a swinger) to keep the clubface square to the clubhead arc and target for at least 3-6" through the immediate impact zone. Keeping the clubface square to the target during the clubhead's travel period through the immediate impact zone is very useful, because it allows a golfer to more consistently hit straight shots without having to worry about perfectly timing any rolling motion of the clubface so that it only becomes precisely square to the target for a fractional moment-in-time at the exact moment of impact.
Image 3 shows Ernie Els reaching near the P8 position - note that he has fully completed a full-roll hand release action and note that the back of his FLW and clubface are roughly parallel to the ball-target line. That means that he has rotated his clubface ~90 degrees, and it is now closed to the clubhead arc. It is important to realize that there should optimally be no bending (dorsiflexion) of the left wrist during a full roll hand release action. A golfer should *optimally retain a FLW and intact LAFW during this time period - despite the right arm becoming fully straight and the right wrist also becoming fully straight/flat (with the straight right arm and straightened/flattened right wrist both becoming straight-in-line with the clubshaft by the P8 position).
(* in "real life" reality, a golfer only needs to maintain an intact LAFW/FLW to about P7.3 and it is perfectly acceptable for the left wrist to bend between P7.3 and P8)
Image 4 and image 5 show Ernie Els performing a finish swivel action where he rotates the clubshaft so that it lies parallel to the inclined plane by the P9 position. During a finish swivel action, it is very likely that the left wrist will bend slightly - because it is biomechanically very difficult to maintain a FLW when swiveling the clubshaft onto the inclined plane so that it becomes "on-plane" (image 5 - "on-plane" is defined as the situation where an imaginary line drawn from the butt end of the club points at the ball-target line).
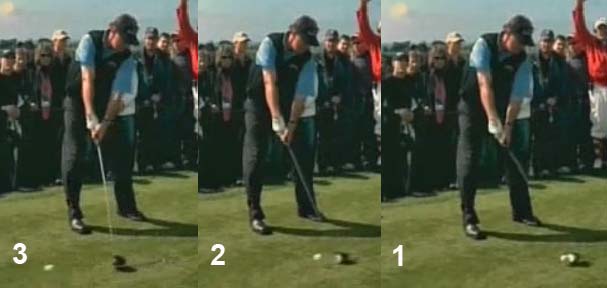
It is obviously impossible to prove that Ernie Els' left wrist is still flat in image 3 - because his left wrist/hand is hidden behind his straightened right wrist/hand in a face-on (caddy view) photo. I will therefore use an upline video of Ernie Els' swing to demonstrate what actually happens to his left wrist during his biomechanical execution of a full-roll hand release action.
Ernie Els upline swing video - http://www.youtube.com/watch?v=ZbIojZSIR_4
Here are capture images from the swing video.
Ernie Els' followthrough action - capture images from his swing video
Image 1 shows Ernie Els at impact - the back of his FLW/clubface is facing the target.
Image 2 shows Ernie Els soon after impact - when the ball is roughly 12" away from impact. Note that his FLW/clubface is still facing the target, and he hasn't yet started to roll his FLW counterclockwise.
Image 3 shows that his FLW/clubface is starting to rotate counterclockwise and that represents the start of his full-roll hand release action.
Image 4 and 5 show the completion of his full-roll hand release action. Note that he maintains a FLW throughout his followthrough action and note that during the FLW's rolling motion the FLW is perpendicular to the ground, and not perpendicular to the inclined plane (which happens in a no-roll hand release action).
Note that the biomechanical reason for the FLW's 3-D rolling motion in space during Ernie Els' followthrough action is readily apparent when looking at his swing video - he uses a CF-arm release action, and the roll of his FLW is mainly due to a rotary motion of his left arm/forearm and only minimally due to a continued rotary motion of the lower-mid torso (which occurs in golfers who use a combined CP-arm release action + no-roll hand release action).
It is very important that one clearly perceive what is happening in the transition zone between the end of the pre-impact release swivel action and the start of the post-impact full-roll hand release action. To make that transition action clearer in Ernie Els' swing action - I have produced this animated gif by combining 7 capture images from different time points in the impact zone of Ernie Els' swing video.
Animated gif image of Ernie Els hand release action through the impact zone
Each capture image lasts about 1 second before transitioning to the next capture image. Watch the animated sequence over-and-over, so that you can clearly see what is happening from a biomechanical/mechanical perspective as the hands/club move from the P6 position to the P7.5 position.
The first three images show the hand/club motion from the P6 to the P6.8 position, and you can see the club releasing (within the plane of the LAFW). From the P6.8 position to impact, note how Ernie Els supinates his left forearm and externally rotates his left humerus (while the left shoulder socket moves up-and-away from the ball) and note how these biomechanical motions square the clubface by impact (P7 position).
Most importantly, note what happens to Ernie's' FLW and left arm in the immediate impact zone - between the P6.9 position and the P7.1 position. Note that his FLW is facing the target at impact and note that it continues to face the target from the P7 position to the P7.1 position and that " biomechanical fact" allows Ernie Els to keep his clubface square to the target during that time period.
The following diagram shows what is happening through the immediate impact zone.
Diagram showing the clubface motion through the immediate impact zone
Note that the clubface continues to face the target in the yellow zone (immediate impact zone).What biomechanical actions allow the clubface to remain square to the target in the immediate impact zone?
Note that Ernie's left forearm stops supinating when his left arm becomes neutral at impact with the back of his FLW facing the target. Note that his FLW moves targetwards (from P7 to P7.1) without any additional left forearm supination and without any additional external rotation of the left humerus. It "appears" as if Ernie Els is simply pulling the back of his FLW in the direction of the target as his FLW moves through the immediate impact zone. Watch carefully to note how fast Ernie's right arm straightens and how fast Ernie's right wrist straightens/flattens in that same immediate impact zone time period - between the P7 position and the P7.2 position - and note that the right arm/wrist do not straighten too fast, so that they will cause his FLW to flip-bend soon after impact or cause his FLW to start rolling counterclockwise too soon after impact. In other words, Ernie is moving his FLW targetwards at a speed that is fast enough to prevent any left wrist bending/club flipping action soon after impact, and fast enough to prevent any premature counterclockwise rolling of his FLW - despite a fast-straightening right arm/wrist.
Although Ernie Els is keeping his clubface square to the target through the impact interval, and for an extra few inches after ball-clubface separation, I think that Ernie Els' FLW is actually starting to rotate counterclockwise too soon after impact. I think that a golfer will benefit by extending the time period that the FLW continues to face the target after impact, which will then ensure that the clubface continues to face the target until at least the P7.2 position. In other words, I believe that it is optimum to delay the start of the counterclockwise roll motion that characterises the full-roll hand release action for a few more inches after impact. How is that biomechanically possible?
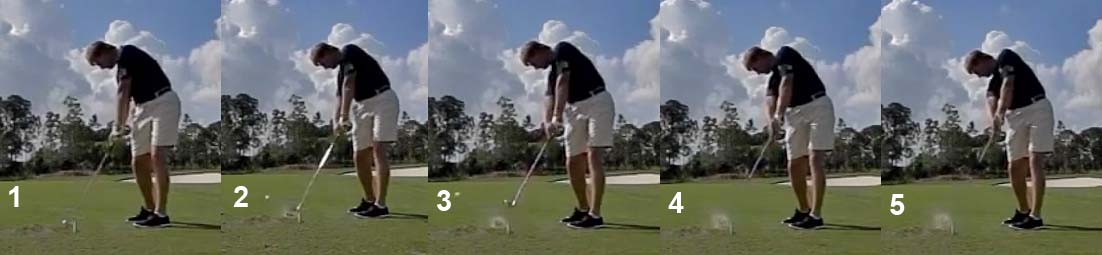
Consider the biomechanical actions that are happening in the immediate impact zone.
Author's left arm motion during the early followthrough - capture images from his swing video
The green-dotted line in image 1 represents the position of the stright left arm at impact. During the impact and immediate post-impact time period, the left shoulder socket is moving up-and-away in a direction that is slightly left of the target (and its direction-of-motion is represented by the curved red arrow). If a golfer is using a CF-arm release action, the left arm will be abducted away from the torso in the general direction of the target (and its direction-of-motion is represented by the curved blue arrow). I have previously stated that there will be a natural/automatic tendency for the left arm to externally rotate (roll counterclockwise) during this left arm abduction process, but it doesn't necessarily have to happen very soon after impact. It is biomechanically feasible for a golfer to easily resist any left arm roll-phenomenon between the P7 position and the P7.2 position, so that the back of FLW continues to face the target during the early followthrough action - see images 2 and 3. Note that the back of my FLW, and watchface area of my left lower forearm, continues to face towards the target during the first 6-12" of left arm abduction travel-distance after impact. The right wrist will often straighten passively during this time period, and the timing and degree of right wrist straightening depends on whether the golfer runs-out-of-right arm (which depends on the degree of forward motion of the right shoulder and the degree of right elbow straightening that is happening during this time period). The advantage of this hand release technique (that delays the onset of the roll motion of the full-roll hand release action) is that it guarantees that the back of the FLW, and therefore clubface, will face the target for slightly longer through the immediate impact zone, and it will likely decrease the frequency of flipping or rolling through impact.Consider two professional golfers who use this delayed full-roll hand release swing action.
Dustin Johnson swing video - http://www.youtube.com/watch?v=vJWVLYKxKIQ
Here are capture images from the swing video.
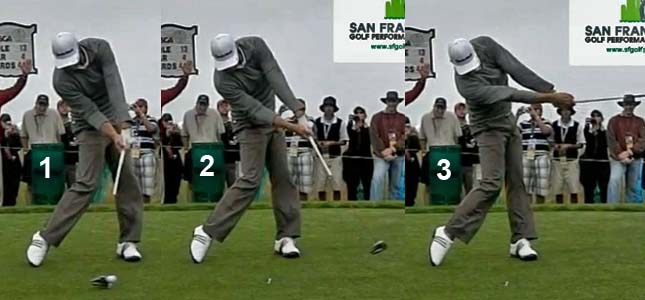
Dustin Johnson's followthrough action - capture images from his swing video
Image 1 shows Dustin Johnson at impact - note that the back of his FLW and clubface is facing the target.
Image 2 shows him at the P7.3 position - note that his FLW and clubface is still facing the target, and he hasn't yet started to perform his full-roll hand release action. The delay in the start of the counterclockwise roll motion of his FLW allows him to maintain a stable clubface that is square to the target through the immediate impact zone (from the P7 position to the P7.2 position). Note that his clubshaft is straight-in-line with his left arm, which means that he has an intact LAFW and that he has avoided flipping through impact.
Image 3 shows him at the P8 position where he has completed his full-roll hand release action. In other words, he has performed a combined CF-arm release action + full-roll hand release action, but he has delayed the onset of the roll-motion of the left arm so that it doesn't happen too soon after impact.
Heath Slocum
Heath Slocum swing video - http://www.youtube.com/watch?v=FdVcINqxCkU
Here are capture images from the swing video.
Heath Slocum's followthrough action - capture images from his swing video
Image 1 shows Heath Slocum at impact - note that the back of his FLW and clubface is facing the target.
Image 2 shows him at the P7.2+ position - note that his FLW/clubface is still facing the target, and he hasn't yet significantly rolled his FLW in a counterclockwise direction. Note that his clubshaft is straight-in-line with his left arm, which means that he has an intact LAFW and that he is not flipping through impact.
Image 3 shows him at the P7.9 position and he has completed his full-roll hand release action.
If you look carefully at the back of Dustin Johnson's and Health Slocum's FLW in the P7 to P7.2 zone, you will note that they are actually rotating their FLW counterclockwise to a very small degree - and that is due to the fact that they are both rotating their left shoulder socket counterclockwise during that time period, and that counterclockwise left shoulder rotary movement will obviously induce the left arm to also rotate slightly counterclockwise (even if there is no external rotation of the left humerus in the left shoulder socket). This phenomenon is biomechanically natural, and a golfer should not try and artificially move the back of the FLW in a perfectly straight-line direction towards the target, and he should rather ingrain the "feel" of delaying any roll-motion of the left arm.
A premature roll motion of the left arm too soon after impact is a common phenomenon that plagues even professional golfers. In terms of its effect on ball flight, it obviously doesn't matter if the roll motion happens after ball-clubface separation, but it will deleteriously affect ball flight if it happens during the impact interval. Even professional golfers (who routinely use a full-roll hand release action) often manifest this premature roll-phenomenon, which has been labelled a roller release action [6].
Consider two professional golfers who manifest this roller release action swing fault, which can often occur in association with a through-impact flipping swing fault, to produce a combination flip-roller swing fault.
Louis Oosthuizen
Louis Oosthuizen swing video (containing multiple swings) - http://www.youtube.com/watch?v=HgBw5Ggj9Do
Here are capture images from his second swing action.
Louis Oosthuizen's hand release action through the impact zone - capture images from his swing video
If you watch the first two recorded swing sequences in his swing video at normal speed, you should be able to clearly note that Louis Oosthuizen has a natural tendency to actively snap his right arm straight in his late downswing/early followthrough and you should also note how his left hand slows down at impact.
Image 3 shows him at impact. Note that he has standard impact alignments - a straight left arm and FLW (which is facing the target), a slightly bent right elbow and a slightly bent (dorsiflexed) right wrist.
Image 4 shows how quickly his right arm has straightened, and how quickly his right wrist has flattened, through impact. Note that it is likely causing the club to flip passed his left arm and slightly bend the left wrist. Note that his left forearm has also rotated counterclockwise slightly during that time period and that his right hand is simultaneously pronating over the top of his grip. In other words, Louis Oosthuizen is starting to flip-roll very soon after impact (when his clubhead is still in the vicinity of the immediate impact zone). The presence of any significant left wrist dorsiflexion defines a flipping action, and if it is simultaneously associated with any counterclockwise roll of the left forearm, then the golfer can be deemed to be a flip-roller.
Image 5 shows that his club has flipped well passed his left wrist, which is probably significantly bent (dorsiflexed) - although the left wrist is obviously obscured in this face-on view image. However, a clue to the presence of left wrist bending is the fact that the clubshaft has flipped well passed the left forearm, but there is very little counterclockwise roll-rotation of his left wrist that can account for that marked degree of angular clubshaft-flipping motion between image 4 and image 5.
Sometimes, overt left wrist dorsiflexion is clearly visible in a flip-roller when viewed from a face-on perspective. Consider a capture image from a Brandt Snedeker swing video.
Brandt Snedeker flip-roll action - from reference number [6]
Image 1 shows Brandt Snedeker at impact - note his FLW.
Image 2 shows him at P7.4 with a bent/dorsiflexed left wrist (red angle) which indicates an element of flipping, combined with a small amount of counterclockwise rotation of his left lower forearm/left hand, which indicates an element of rolling. The combination of flipping and rolling represents a flip-roll hand release action.
From a biomechanical perspective, the biomechanical combination of i) slowing of the forward motion of his left arm combined with an ii) over-active right arm/wrist straightening and right forearm pronating action could be the likely reason why he is flip-rolling soon after impact.
Now, compare that second recorded Louis Ooosthuizen swing action to his third recorded swing action.
Louis Oosthuizen's hand release action through the impact zone - capture images from his swing video
Image 2 shows him at impact. Note that he has standard impact alignments - a FLW (which is facing the target) and a small amount of forward shaft lean, a slightly bent right elbow and a slightly bent (dorsiflexed) right wrist.Image 3 shows him when his clubhead is approximately 12" post-impact (between the P7.1 - P7.2 position). Note that his FLW is still facing the target and he has not yet started to significantly roll his FLW counterclockwise. Note that his clubshaft is straight-in-line with his left arm, which means that he has an intact LAFW and that he has not flipped after impact. The reason why he could maintain an intact LAFW/FLW in this particular swing action can be readily discerned by looking at the relevant biomechanical elements that can predispose to flipping. Note that his FLW has moved significantly forward from its impact position (in image 2) to a position closer to his left thigh in image 3 - which means that there has been no slowing/stalling of the forward motion of his FLW. Note that he still has nearly the same amount of right elbow bend and right wrist bend (dorsiflexion) in image 3 - relative to image 2 (impact) - and he has not straightened his right arm/wrist too fast through impact. In fact, you can even see that his right elbow is still not fully straight in image 4 (which is well after impact).
In other words, Louis Oosthuizen does not manifest the two biomechanical factors that predispose to flip-rolling through impact in his third recorded swing, and he therefore can maintain an intact LAFW/FLW and stable clubface throughout the entire immediate impact zone.
The amount of flip-rolling that Louis Oosthuizen manifested in his second recorded swing was not that large, and it also happened after impact, so it may not have negatively affected his ball flight. However, these same biomechanical swing faults (slowing down of the forward motion of the FLW in a targetwards-direction + over-active right arm/right wrist straightening through impact) can produce pre-impact flip-rolling, or flip-rolling during impact, if it gets significantly greater in degree, and his ball flight results would be negatively affected by those circumstances.
Phil Mickelson
Phil Mickelson swing video (contaning multiple swings) - http://www.youtube.com/watch?v=woRsFpkzxZQ
In some of those swings, Phil Mickelson maintains a FlatLeadWrist/clubface that is square to the target throughout its passage through the immediate impact zone (from P6.9 to P7.2), and he successfully delays the start of the roll-motion of his full-roll hand release action until his hands reach the P7.2 position. However, in other swing actions, he starts his full-roll hand release action too soon and in one swing action he even performs an uncontrolled roller hand release action.
Consider an example of a premature start of a full-roll hand release action.
Phil Mickelson's hand release action through the impact zone - capture images from his swing video
Because Phil Mickelson is a lefty, one has to view his followthrough swing action sequence from right-to-left.Image 1 shows Phil Mickelson at impact (P7 position) - his FlatLeadWrist and clubface are square to the target.
Image 2 shows him at the P7.05 position - his FlatLeadWrist and clubface are still "somewhat" square to the target, but they may even be rolling clockwise already (note that his clubface looks more closed in image 2 compared to image 1).
Image 3 shows him at the P7.15 position and he is well into the roll-motion of his full-roll hand release action.
Phil Mickelson has started the roll-motion of his full-roll hand release action too soon, but he may still have hit the ball straight because his clubface was probably square to the target throughout the impact interval.
Consider an example of Phil Mickelson performing a roller hand release action - presented as an animated gif.
Phil Mickelson's roller release action - created from multiple capture images from his swing video
One can clearly see Phil Mickelson's hands rolling over too soon through the immediate impact zone, which will cause his clubface to become closed to the target/clubhead arc too soon, and it will produce a pull-hooked shot if the clubface is closed to the clubhead arc/target at impact. Note how his right forearm is independently supinating after impact - at a speed that is faster than the speed of external rotation of his right upper arm. Note how actively his left arm is straightening and how actively his left forearm is pronating through impact - thereby likely causing his right forearm to continue to independently supinate after impact (as a result of a rotary push-pressure being applied at PP#1 by the left palm). Phil Mickelson's unintentional roller hand release action is a major swing fault and it is biomechanically similar to AJ Bonar's intentional hand crossover release action - and the only difference is that a roller release action is unintentional/non-deliberate, while AJ Bonar's cross-over hand release action is an intentional/deliberate choice.Consider AJ Bonar's crossover hand release action through the impact zone.
AJ Bonar article - http://www.golf.com/golf/instruction/article/0,28136,1565175-1,00.html
AJ Bonar explains his "magic move" on page 3 of that article.
This is what AJ Bonar states in that article-: "About two or three feet before your hands reach impact, assertively rotate them toward the target. Imagine you're gripping a screwdriver and turning it counterclockwise. This closes the clubface, generating big-time power." In other words, AJ Bonar is recommending that one actively rotate the hands and clubface through the impact zone. Here is the accompanying photo that he uses to illustrate his advice.
AJ Bonar's crossover hand release action - image adapted from his article
What AJ Bonar is advising is an active/deliberate left hand counterclockwise rotary movement through the immediate impact zone - combined with an active/deliberate pronation of the right forearm that rotates the right palm counterclockwise through impact. The FLW/left hand approaches impact with the back of the left hand facing slightly skywards (implying an open clubface) - image 1, then the left hand rotates counterclockwise to become vertical at impact with the back of the left hand facing the target - image 2, then the left hand rotates further so that the back of the left hand faces the ground (supinating left hand) immediately after impact - image 3.This "active left hand rotation" golf tip recommendation is terrible advice, because the success of this "magic move" depends on perfect timing through the impact zone. Professional golfers don't actively/deliberately use this "magic move" maneuver, because they cannot hope to time the move correctly. There should be no deliberate, or non-deliberate, counterclockwise rotation of the FLW through the immediate impact zone - from the P6.9 position to the P7.2 position - and the roll-motion of the FLW/left hand that occurs naturally when a golfer uses a full-roll hand release action should optimally happen only after the hands bypass the immediate impact zone (after the hands bypass the P7.1-7.2 position).
Further golf instructional insights regarding the topic of impact/followthrough (presented in question and answer format):
Question number 1:
What do you think of Laird Small's power release suggestion?
Answer:
Laird Small's power release suggestion was published in the 2008 edition of Golf Magazine's soft-cover publication "The Best Golf Instruction Guide Ever", which includes golf tips from the 100 top teachers.
This is the photographic image demonstrating his suggestion.
Laird Small's power release action
Note that Laird Small states that the key move is "active wrists" and he obviously recommends an active slap-hinge wrist flipping motion through impact where the right wrist actively straightens and the left wrist bends. That's terrible advice!!!! Any left wrist flipping action through impact means that a golfer cannot maintain a stable clubface (that is continuously square to the target) throughout the immediate impact zone (between P6.9 and P7.2). If a golfer follows this "active right wrist straightening action" recommendation, then the chance of having a square clubface at impact depends on perfect timing, and even professional golfers cannot hope to perfectly time a wrist flipping action consistently from swing-to-swing, and that's why most professional golfers avoid any left wrist flipping action by maintaining an intact LAFW/FLW throughout the immediate impact zone (and often throughout the entire impact zone until at least P7.3-7.5).I believe that there is no such thing as an usable left wrist horizontal hinging motion through the immediate impact zone. I believe that the left wrist must remain functionally flat throughout the immediate impact zone. I will repeat that advice in bold and and highlight it in yellow - a golfer must maintain a FLW throughout the immediate impact zone and avoid any left wrist flipping motion.
The second important point a golfer needs to understand is that any attempt to actively straighten the right wrist through impact will not significantly accelerate the club and increase clubhead speed at impact. David Tutelman discussed this issue in his article on accelerating the club through impact [7]. He concluded that attempting to accelerate a club through impact would only increase clubhead speed from 100mph (clubhead speed pre-impact prior to the application of an accelerating force) to 100.14mph and that would only result in an extra 15" of driving distance. I think that a golfer would be irrational to use an active right wrist straightening action through impact (which markedly decreases the likelihood of a golfer having a stable square clubface throughout the immediate impact zone) - if it can only result in an extra 15" gain in potential driving distance.
Question number 2:If active right wrist straightening through impact is contraindicated, how about any passive right wrist straightening action through impact - if it causes the left wrist to bend soon after impact (an after-impact flipping action that is recommended by Brian Manzella)?
Answer:
Watch these two videos produced by Brian Manzella (a New Orleans-based golf instructor).
Charlie Brown and the Golf Swing video - http://vimeo.com/29646505
Two Drills ... again video - http://vimeo.com/33692125
Brian Manzella teaches a hand release action, which he calls the *rotation-about-the-coupling point hand release action.
(* I am not going to discuss his rotation-about-the-coupling point release (RACP) action in great detail in this review paper - because I have written a review paper Critical Review: Brian Manzella's Release Ideas, that is specifically dedicated to analysing Brian Manzella's release ideas)
Both of those videos show the same characteristic feature of his RACP release action - the idea of inducing a free release of the clubhead through impact. In the first video, he uses the back of a couch chair, and in the second video he uses a plastic bottle (masquerading as a piñata- a piñata is a papier-mâché or other type of container that is decorated).
Brian Manzella demonstrating the RACP release action - capture images from his "Two Drills... again" video
In image 1, Brian Manzella asks the question - "what would happen if you gave a person a short stick and asked him to efficiently hit the bottle (actually a piñata) with maximum speed - if you abruptly removed the bottle (actually a piñata) in a Charlie Brown manner"? In image 2, Brian Manzella demonstrates the answer - the right wrist would bend forward (flatten) soon after impact. In other words, if a golfer allows the clubhead to pass through impact at maximum speed due to the free release of the clubhead, then the right wrist would straighten/flatten (palmar flex) soon after impact. In this demonstration, it may look like Brian Manzella is performing an active slap hinge release action, but he claims that he is not actively straightening his right wrist in his RACP-release action - because he wants there to be no "force-across-the-shaft" at the exact moment of impact. The right wrist straightens through impact because it passively follows the forward/gained momentum of the RACP-released club, which has been freely released through impact. Note that he has a bent right wrist at impact (which will ensure a FLW) at impact, and the right wrist only straightens/flattens immediately after impact.If the right wrist straightens passively through impact, what would then happen to the left wrist immediately after impact?
In the first video, Brian Manzella proposes an answer to that question.
Brian Manzella demonstrating the appearance of the left wrist after impact - capture image from his "Charlie Brown and the Golf Swing" video
Note that Brian Manzella has a bent left wrist and a straightened/flattened right wrist in this photo. In the video, Brian Manzella makes the outrageous claim that "nearly all good golfers" look this after impact, which is not true because most professional golfers maintain a FLW until at least the P7.2 position (and often until the P7.5 position). He even has a collection of images of great golfers [8], who he claims are using the equivalent of his type of RACP-release action. The first great golfer in his collection is Harry Vardon.
Harry Vardon's hand release action - capture image from Brian Manzella's collection [8]
Note that Harry Vardon has flip-bent his left wrist soon after impact.I believe that any flip-bending of the left wrist very soon after impact can only happen if one-of-two forces are present in a swinger - i) a positive push-force pushing the club forward through impact due to an actively straightening right wrist; or it can be due to ii) the club's gained angular momentum derived from the club release phenomenon (release of PA#2) and where the right wrist passively straightens through impact because it simply keeps up with the released club. The first explanation represents an active slap hinge release action - which Brian Manzella doesn't recommend for his RACP-release action. So, the only rational answer is explanation number 2 - the golfer releases the club with enough forward momentum that it passes through impact with enough gained speed that its passively flip-bends the left wrist soon after impact. If you think about the situation of Brian Manzella's Charlie-Brown piñata demonstration, the likelihood of the left wrist flip-bending very soon after impact is greater if the forward momentum of the left hand between the P7 position and the P7.5 position is slowed. In other words, any slowing/stalling of the forward motion of the left wrist/hand soon after impact will increase the likelihood of the left wrist flip-bending soon after impact and it will increase the likelihood of it happening sooner (for a given amount of "forward momentum power" of the released club through impact). An additional biomechanical factor that plays a supplementary role is the degree of floppiness of the left wrist - any enhanced left wrist floppiness increases the likelhood of the left wrist flip-bending in response to a "fixed" amount of forward-directed mementum that the club has acquired by the time it reaches impact.
From my perspective, any flip-bending of the left wrist too soon after impact (while the clubface is still within the immediate impact zone between P7 and P7.2) means that a golfer doesn't have a stable clubface throughout the entire immediate impact zone. Kelvin Miyahira refers to flipping soon after impact as a pro-flipper release action [6]. I believe that Brian Manzella's RACP release action (or any equivalent "throwing the clubhead at the ball" release action) predisposes to pro-flipping, which means that obtaining a square clubface at impact requires perfect timing of the flipping action. If the flipping action is perfectly timed so that the clubface is square to the target at impact, then the ball will still go straight - because it doesn't matter if the clubface becomes closed to the clubhead arc after impact due to a left wrist flip-bending phenomenon. However, if the left wrist flip-bending phenomenon occurs too soon and it occurs pre-impact, or during the impact interval, then the clubface will not be square to the target at impact. I do not believe that it is easy to perfectly time a pro-flipping release action consistently from swing-to-swing, and that is why I reject it as a viable hand release option for serious golfers who want to develop a sound golf swing based on sound biomechanical principles. I believe that one should eliminate any horizontal left wrist hinging motion through the immediate impact zone by maintaining a FLW during that entire time period. Playing with an intact LAFW/FLW throughout the entire downswing and followthrough completely eliminates this problem, and I think that it represents the optimum biomechanical/mechanical solution.
Question number 3:You believe that maintaining an intact LAFW/FLW throughout the downswing and followthrough increases the likelihood of a golfer maintaining a stable clubface (that faces the target) throughout the immediate impact zone, and that it decreases the likelihood of flipping through impact. Could you expand on the virtues of playing golf with an intact LAFW/FLW?
Answer:
I have discussed the virtues of playing golf with an intact LAFW/FLW in a 1h37m video-interview [9] produced by Ralph Perez (host of the Gotham Golf Blog) and also in a short self-made 15 minute video that I have posted on you-tube [10], so I will only discuss a few major points in this answer.
In my 15 minute video, I used a badminton racquet to demonstrate how a skilled tennis/badminton player would perform a backhanded tennis stroke action. In a backhanded tennis stroke action, one is constantly pulling the grip end of the tennis/badminton racquet through impact while maintaining a FLW. In other words, one doesn't have to artificially create a FLW at the exact moment of ball impact (as a result of some independent left wrist muscular action) if one has efficiently maintained a FLW throughout the entire backstroke/downstroke/followthrough swing action, and a FLW-through-impact occurs automatically if one maintains an intact LAFW throughout the entire backstroke/downstroke/followthrough action.
Consider a backhanded tennis stroke action - using a neutral left hand grip.
Author demonstrating a backhanded tennis stroke action - capture images from my video [10]
When one performs a backhanded tennis stroke action, one takes the tennis racquet back while keeping the left wrist functionally flat, so that the racquet face remains straight-in-line with the back of the left forearm - see image 1. One would not allow the left wrist to bend during this backstroke action. If the tennis racquet face is straight-in-line with the left forearm, and the left wrist is functionally flat, then that intact left arm-racquet alignment creates a wedge-shaped structure, which we call the LAFW (left arm flying wedge). During the downstroke action, one rotates the entire intact LAFW as a single unit - without allowing the left wrist to bend - so that the racquet face can face the target at the exact moment of ball impact (see image 2). Note that the racquet face is still straight-in-line with the left forearm at impact, and that means that the left wrist must still be geometrically, and functionally, flat. During the followthrough action, one should optimally maintain an intact LAFW and FLW throughout the entire followthrough action - see image 3. During a backhanded tennis stroke action, the left wrist should never bend. If the left wrist bends (dorsiflexes), it will allow the racquet face to bypass the left hand, and it will disrupt the LAFW, and result in flipping. To avoid flipping, a tennis player has to learn to stroke the ball (using an arm motion) and he should avoid using any active/independent horizontal wrist hinging action that will dorsiflex the left wrist at any time-point during the execution of his backhanded arm motion.The same principle applies to a full golf swing - if a golfer adopts a neutral left hand grip. A golfer must think of his left arm and clubshaft as being a LAFW structure, that is swung through the impact zone while remaining structurally intact.
Author demonstrating an intact LAFW using a child-sized golf club - capture images from my swing video [10]
Image 1 shows the author performing a backswing action using a short (child-sized) golf club- the straight piece of plastic pipe is being held across the left forearm and clubshaft (using the right arm/hand) to demonstrate that the clubshaft is straight-in-line with the left forearm. That straight left arm-clubshaft alignment represents an intact LAFW and the left wrist will therefore be geometrically/functionally flat under those conditions. During the downswing, a golfer should pull the intact LAFW down the surface of the inclined plane while keeping the back of the FLW/clubface parallel to the surface of the inclined plane - see image 2. Image 3 shows the club releasing within the plane of the LAFW due to the release of PA#2. In the late downswing, a golfer should rotate the intact LAFW (while the club continues to release within the plane of the LAFW) into impact via the mechanism of a release swivel action (release of PA#3), so that the clubface is square at impact and the back of the FLW faces the target - see image 4. Note that the left wrist remains flat during the entire downstroke action, and it should never bend at any time point in the downswing or early followthrough. The left wrist will therefore be geometrically/functionally flat at impact if the ball is placed at low point and the clubshaft is vertical at impact. After impact, one should simply continue to swing the intact LAFW/FLW to the P7.3-7.5+ position while avoiding any left wrist flipping motion - and this swing action is achieved by biomechanically maintaining non-stop the forward motion of the intact LAFW/FLW (which means that one is avoiding any stalling of the forward motion of the intact LAFW/FLW unit during the followthrough).
Question number 4:In your description of the followthrough action as it applies to a golfer who uses a full-roll hand release action, you stated that a golfer must roll the intact LAFW/FLW counterclockwise during the followthrough action. However, you recommended that a golfer delay the onset of the roll motion of the FLW, so that the FLW/clubface can face the target for a few more inches during its passage through the immediate impact zone. How easy is it for a golfer to learn how to delay the followthrough's roll-motion of the intact LAFW/FLW, so that it doesn't happen too soon after impact?
Answer:
I think that it is surprisingly easy to modify one's swing action in order to prevent a premature rolling motion (or flip-rolling motion) of the FLW soon after impact - by deliberately delaying the onset of the roll motion that is intrinsically part-and-parcel of a full-roll hand release action.
Consider how an anonymous skilled golfer (a golfer who has played professionally at tour level) learned how to delay the onset of his roll motion in his personal full-roll hand release action.
The anonymous skilled golfer posted a swing video of his swing in a golf discussion forum.
Anonymous golfer's swing video (face-on view) - http://www.youtube.com/watch?v=4gCpwLlFtX0
Anonymous golfer's swing video (DTL view) - http://www.youtube.com/watch?v=_eGggM6Lqeg
One can clearly see that he is a superb ball-striker who is capable of consistently hitting the ball well.
Here are capture images from his DLT video.
Anonymous skilled golfer's downswing and followthrough action - capture images from his swing video
I think that he has a superb golf swing and I think that he is a poster-child example of a golfer who can swing well while maintaining a FLW/intact LAFW throughout his downswing and followthrough.Note that he has a FLW and intact LAFW at his end-backswing position - image 1. Note how he maintains a FLW and intact LAFW during his early-mid downswing (images 2 & 3) while he slots his intact power package. Note how he releases his club within the plane of his LAFW between P5.5 and P6.6 and there is no tumbling motion of his FLW/club during this PA#2 release time period (image 4). Note how he "seemingly" maintains a FLW/intact LAFW through impact to at least the P7.4 position (image 5) and there is no "apparent" pre-impact, through-impact, or post-impact flipping action.
However, when I viewed capture images of his face-on view video, I noted that he had a very small degree of flip-rolling soon after impact.
Here are capture images from the anonymous skilled golfer's face-on view swing video.
Anonymous skilled golfer's followthrough action - capture images from his swing video
Image 1 shows that he has perfect impact alignments - FLW and a small degree of forward shaft lean, and a bent right wrist.Image 2 shows that he is pro-flipper, and his clubshaft has bypassed his left arm by the P7.3 position. Note that he has also rotated his FLW counterclockwise to a small degree, so he could therefore be labelled a flip-roller. However, because the flip-rolling phenomenon happens beyond the P7.1 limits of the immediate impact zone, it doesn't negatively affect his ball-striking and ball flight results.
Image 3 shows that he has completed his full-roll hand release action by P7.8.
I then asked the anonymous skilled golfer to try an experiment and try and delay his roll-motion by simply pulling the back of his FLW in a targetwards direction after impact (as previously described), so that he could mimic Dustin Johnson's delayed full-roll hand release action.
Here again are capture images showing Dustin Johnson's delayed full-roll hand release action.
Dustin Johnson's delayed full-roll hand release action - capture images from his swing video
It took only one short practice session for the anonymous skilled golfer to self-teach himself how to perform a delayed full-roll hand release action (like Dustin Johnson).Face-on video - http://www.youtube.com/watch?v=yC9dhFyIsqY
Here are capture images from his swing video.
Anonymous skilled golfer's delayed full-roll hand release action - capture images from his swing video
Image 1 shows him at the P6.9 (start of the immediate impact zone) position. He has perfect impact alignments - a FLW facing the target, a bent right wrist and forward shaft lean.Image 2 shows him at the P7.1 (end of the immediate impact zone) position. He stlll has a FLW facing the target and an intact LAFW (clubshaft has not bypassed his left arm). That means that he has ensured a stable clubface through the immediate impact zone, where the clubface should be facing the target for many inches between P6.9 and P7.1.
Image 3 shows that his still has a FLW facing the target and an intact LAFW (where the clubshaft has not bypassed his left arm) at the P7.3 position. That's a true testament to how well he was drive-holding his FLW/intact LAFW to well beyond impact and delaying the onset of the roll-motion of his full-roll hand release action - just like Dustin Johnson.
I think that, after a single, short practice session, he has become a role-model (poster child) example of a golfer who can maintain a stable CH path/CF throughout the immediate impact zone, and who can avoid any flipping action through/after impact, and who can also avoid any premature rolling motion of the FLW/clubface anywhere near the vicinity of the immediate impact zone - without manifesting any apparent *disadvantages secondary to using a delayed full-roll hand release action.
(* The anonymous skilled golfer reported the same ball flight accuracy, same ball flight distance and the same consistency of obtaining excellent Trackman readings for clubhead path, clubface orientation angle and clubhead angle-of-attack - as compared to his standard full-roll hand release action swing)
Question number 5:You use the term "drive-holding" to describe a golfer's hand release action through the immediate impact zone. Where did you first learn of this term, and does it apply to golfers who use a full-roll hand release action and also equally apply to golfers who use a no-roll hand release action?
Answer:
I first came across the term "drive-holding" when I studied Homer Kelley's TGM concepts [3], and I noted that the term was only used to describe a TGM hitter's swing action through impact - where the TGM hitter uses a PA#1 release action (active right arm straghtening action) to drive a "frozen" ("fixedly" bent) right wrist through impact by applying push-pressure against both PP#1 and PP#3 through impact with the right hand. The left wrist remains flat through impact because the right wrist remains "fixedly" bent through impact, and that represents a "holding" action with respect to the FLW.
TGMers never applied the term drive-holding to a TGM swinger's action. However, I noted that Kevin Miyahira also used the term "drive-holding" in his article on PGA tour golfers' release styles [6]. I noted that he didn't describe the biomechanics that produce a drive-holding release action in his article, and I noted that he also used the term with respect to golfers who maintain ("hold") a FLW through impact - irrespective of whether they are swingers, or hitters. I now also prefer to use the term "drive-holding" with respect to a swinger's hand release action - as long as he continuously "holds" (maintains) a FLW/intact LAFW throughout the immediate impact zone. To explain the "drive" component and the "hold" component as it applies to swingers (or swing-hitters), who continuously maintain a FLW/intact LAFW throughout the entire immediate impact zone (and sometimes even to the P7.2-7.3 position, or even beyond that position), I have produced my own biomechanical explanations to explain the "drive" and "hold" components of a swinger's drive-hold hand release action through the impact zone.
When it comes to golfers who use a "combined CP-arm release + no-roll hand release action", and who keep the impact triangle intact through impact to P7.1-7.3+, I perceive that they are "driving" their FLW and bent right wrist through impact using pivot power to move their intact impact triangle through the immediate impact zone. The left hand is pulling and the right hand is pushing, and they are "holding" their impact alignments because the two hands are working in perfect synchrony. A good analogy is a tennis player who uses two hands to perform a two-handed backhanded tennis shot. The lead hand is pulling the racquet handle targetwards while the rear hand is pushing against the aft side of the racquet handle at the same time. If the two hands work in perfect synchrony then the impact alignment of a FlatLeadWrist/bent rear wrist will be "held" intact through impact. The theoretical advantage of this two-handed backhanded tennis action is that it steadies the racquet handle through impact and creates a more rigid "handle-holding structure", that probably decreases the amount of racquet face twisting that occurs with off-center strikes. Would that scenario apply to a golfer who is a swing-hitter, and who keeps his impact triangle rigidly intact through impact? It may - based on a limited amount of video-evidence.
John Erickson posted a video on you-tube - http://www.youtube.com/watch?v=aMFxBYxanFA - captured at 1,000 frames per second that demonstrates that there is less clubface deflection, and less secondary curved ball flight, due to an off-center toe hit when using his ABS swing-hitting technique, compared to an off-center toe hit using his "dead-hands" technique (standard left arm swinger's technique).
Here is a comparison photo of John Erickson demonstrating his ABS swing-hitting technique versus a standard left arm swinger's swinging technique.
John Erickson demonstrating two different swing techniques - smaller image adapted from JE's larger image
In image 1, he is using his ABS swing-hitting action - which involves a "combined CP-arm release action + no roll hand release action". Note that the peripheral end of the club is pointing at the base of the inclined plane (represented by that shaft embedded in his deck) which means that he is on-plane. However, the clubface is angled perpendicular to the inclined plane, which means that he is using a no-roll hand release action.In image 2, he is using a standard left arm swinger's action (that he calls a "dead hands" swinging technique) - which involves a "combined CF-arm release action + full-roll hand release action". Note that the peripheral end of the club points at the base of the inclined plane (represented by that shaft embedded in his deck) which means that he is on-plane. However, the clubface is angled perpendicular to the ground, which means that he is using a full-roll hand release action.
John Erickson believes that there is less clubface deflection with off-center strikes (when using his ABS swing-hitting technique) because he is applying a push-force against the aft side of the club through impact using his right hand, which allows him to resist any twisting of the clubface through impact. That's equivalent to a two-handed backhanded tennis shot where the rear hand helps to stabilize the racquet handle through impact and resist any tendency for the racquet face to twist in response to off-center strikes. The problem with John Erickson's video-demonstration is that one cannot be sure that the degree of off-center toe strike is equivalent. He would need to repeat the "experiment" using impact tape and a Phantom camera system that allows for more precise measurements. Optimally, we also need golf researchers to embed pressure sensors in the grip end of the club, so that they can accurately measure the amount of push-pressure being exerted by the rear hand throughout the immediate impact zone to resolve this quandary. In the meantime, we are only guessing as to whether a golfer is applying a grip-stabilising action ("holding" action) with the rear hand when he uses a "combined CP-arm release action + no-roll hand release action" (like Ben Hogan and John Erickson).
I have postulated that a golfer who uses a "combined CP-arm release action + no-roll hand release action" is probably using both hands to "hold" a FLW/intact LAFW throughout the immediate impact zone and thereby avoid any flip-rolling swing fault - by biomechanically "holding" the impact triangle intact (as previously described). A golfer, who is a left arm swinger, and who uses a "combined CF-arm release action + full-roll hand release action", can only "hold" (stabilise) the FLW/intact LAFW through impact using one hand (the lead hand) when he drives the left arm through impact (secondary to the release of PA#4). I previously stated that the FLW remains functionally-flat throughout the immediate impact zone because the golfer is maintaining a FLW/intact LAFW throughout the entire swing action, and that he simply swings the FLW/intact LAFW through impact without adding any additional stabilising force ("holding" force) - in a similar manner to a tennis player performing an one-handed backhanded tennis stroke action. That explanation theoretically means that a left arm swinger cannot stabilise ("hold") the FLW/intact LAFW as firmly through impact (compared to a two-handed stabilising action), and he will therefore be more prone to flip-rolling through impact. I think that's a definite disadvantage related to using a "combined CF-arm release action + full-roll hand release action" swing technique, and I believe that any golfer, who uses that standard left arm swinger's technique, should optimally make a special effort to avoid flip-rolling the FLW through impact by biomechanically optimising his hand release action - via the the subtle modification of using a delayed full-roll hand release action (as previously described). One must also ensure that one is "driving" the FLW targetwards through impact to the P7.3 position, and even beyond that P7.3 position if one has the requisite flexibility, because that onward-driving action also gives the FLW its "holding" stability through the immediate impact zone, and thereby prevents flipping.
Question number 6:In the previous revision of this chapter, you frequently referred to Homer Kelley's TGM hinging action concept, and you frequently used the term "horizontal hinging action" and "angled hinging action". Seeing that you are no longer using those hinging action terms, does that mean that you no longer believe in the validity/utility of the TGM hinging concept that is based on Homer Kelley's TGM 1L-Machine Model?
Answer:
Yes - I no longer believe in the validity/utility of the 1L-Machine Model, which is the major TGM keystone of Homer Kelley's conceptual thinking regarding the golf swing [3].
I will explain why I no longer believe in the utility of the TGM Machine Model and why I believe that it can lead to wrong-headed golf swing biomechanics.
Here is the 1-L Machine Model diagram from Homer Kelley's TGM book [3].
The Basic Golfing Machine Model - image from the TGM book [3]
Note that there is a central stationary post (which Homer Kelley actually claims is the golfer's stationary head) and Homer Kelley believes that it allows the golfer to accurately return the clubhead to the ball during the to-and-fro motion of the lever assembly. In actuality, when TGM instructors describe hinging actions of the two hinge joints attached to that stationary post as they pertain to the hinging actions happening during the clubhead's travel time period through the immediate impact zone, they are really referring to the left shoulder socket area of the torso as being the stationary area where the hinging actions are operant.Note that the lever assembly (equivalent to the straight left arm and clubshaft that is straight in line with the left arm - thereby representing an intact LAFW) moves full length on the flat, tilted plane - which represents the inclined plane of the general impact zone.
The arrangement of the two hinges, which are attached to that stationary post, control the clubface alignment during the to-and-fro motion of the lever assembly/clubhead. As I will soon demonstrate, different arrangements of those two hinges allow the clubface to travel in different rotational alignments relative to the surface of the inclined plane during the to-and-fro motion of the lever assembly (intact LAFW).
Homer Kelley states that for a straight ball flight down the desired line-of-flight, the clubface needs to only be square to the line-of-flight at the exact moment of ball-clubface separation. The desired line-of-flight is drawn parallel to the base of the inclined plane, and I commonly refer to the line-of-flight as the ball-target line if a golfer wants to hit the ball straight towards the target. Note that the clubface can only be perfectly square to the target at one exact moment in time - because the lever assembly is hinged around a stationary post. In this Machine Model hinge-arrangement it is not possible to keep the FLW/clubface facing the target for many inches during the clubhead's travel-time through the immediate impact zone.
To better understand Homer Kelley's Machine Model's hinging actions, watch these two videos.
The Golfing Machine - Hinging Actions - http://www.youtube.com/watch?v=Ka8uHmYkWig
The Golfing Machine Main Concept - http://www.youtube.com/watch?v=5-6WxJXFKF4
Pay special attention to the arrangement of the two hinges for a dual-horizontal hinging action - a hinging arragement that causes the clubface to open (relative to the surface of the inclined plane) in the backswing movement of the lever assembly away from the *ball position (and also immediately pre-impact when the lever assembly returns back to the ball position), and that causes the clubface to close (relative to the surface of the inclined plane) immediatetely after impact (immediately after ball-clubface separation).
(* ball position is presumed to be at low point - the nadir point of the clubhead arc when the clubhead touches the ground)
Consider these two capture image photos presented as a composite photo.
Dual-horizontal hinging action - capture images from the two videos
Image 1 (captured from the first video) shows the arrangement of the two hinges that allow for a horizontal hinging action. During a horizontal hinging action, the clubface closes immediately after the exact moment-in-time when it becomes perfectly square to the target (and hopefully it becomes perfectly square at impact if one desires a straight ball flight as a result of a level strike on the sweetspot of the clubface - because both the clubface and clubhead path must be directed at the target at impact to ensure a straight ball flight).Image 2 (captured from the second video) shows Lynn Blake (TGM instructor) demonstrating a horizontal hinging action where the lever assembly (straight left arm and clubshaft straight-in-line with the straight left arm in an intact LAFW alignment) rotates counterclockwise (like a door opening) during the followthrough. Note that the stationary fulcrum point for the "door-opening" followthrough swing action of the intact LAFW is the left shoulder socket.
Here is the photo from Homer Kelley's TGM book [3] showing the horizontal hinging action scenario.
Horizontal hinging action - modified photo from the TGM book [3]
Note that two imaginary hinges are mounted at the level of the left shoulder socket, which can be considered to be the stationary fulcrum point for the movement of the entire lever assembly (LAFW).The top hinge (labelled 3) is mounted vertically and it causes the entire lever assembly to move like a door opening - where the top-front plate of the upper hinge assembly will always have to be moving vertical to the ground during the impact interval, and also immediately after the impact interval(from P7 to P7.1+). The second hinge (labelled 1) allows the lever assembly to be moved up-and-down at an angled hinge, so that the Machine Model can be arranged to ensure that the lever assembly (clubshaft) always travels on the surface of the inclined plane during its to-and-fro motion (especially between P7 and P7.5 in the context of the followthrough phase of the swing). Note that the door-opening motion of the top hinge (labelled 3) will cause the back of the left lower forearm (labelled 2), and the back of the FLW (labelled 4), and therefore the clubface (end of the lever assembly) which is naturally arranged to be straight-in-line with the FLW, to rotate closed relative to the surface of the inclined plane immediately after impact (ball-clubface separation) due to this dual-horizontal hinge setup arrangement.
In other words, TGM literalists believe that the clubface is closing from open-to-square from the moment of first ball contact to the moment of ball-clubface separation, which takes about 1/4,000th second, and during this very short impact interval time period the clubhead travels about 0.75". Then, they imagine that the clubface is continuing to close immediately after ball-clubface separation, and that closing motion of the clubface is mechanically/biomechanically equivalent to the roll motion of the entire lever assembly (intact LAFW) that will occur naturally in a full-roll hand release action - except that the closing of the clubface will happen CONTINUOUSLY throughout the impact interval and also CONTINUOUSLY throughout the early followthrough action in a horizontal hinging action. By contrast, in a delayed full-roll hand release action, a golfer is delaying the roll motion of the FLW/clubface so that the clubface can remain square to the target for a few inches during impact, and immediately after impact.
There are two major problems with this horizontal hinging action conceptual scenario.
First of all, to get a desired straight ball flight from a level strike on the sweetspot of the clubface - the timing of clubhead/clubface motion through the immediate impact zone would have to be precisely timed so that the clubface orientation angle and clubhead path can both be square to the target at impact, and according to Homer Kelley's Machine Model, that can only happen at one exact moment-in-time. I believe that it is very difficult for a golfer to time a golf swing action that precisely on a consistent basis, and the "real world" reality is that even professional golfers cannot expect to achieve that goal.
The second reason for rejecting the validity of the horizontal hinging action that supposedly causes the clubface to be always closing through the immediate impact zone (as predicted by the Machine Model) is that slow-motion videos taken at very high speeds show that the clubface actually remains square to the target for many inches during the clubhead's travel through the immediate impact zone (between P6.9 and P7.1). Homer Kelley devised his theoretical TGM concept of the Machine Model over 60 years ago - when high speed video was not available.
Here is a high speed video taken at 10,000 frames/second with a Photon Ultima APX camera.
http://www.youtube.com/watch?v=2Y57pw_iWlk
I believe that it clearly demonstrates that the clubface is not closing during the impact interval or immediately post-impact.
Here are capture images from a Photon camera video.
Clubface motion during the immediate impact zone - capture images from a slow-motion video
One can see that the clubface is not progessively closing from its pre-impact position (image 1), during the impact interval (images 2 and 3) and immediately after ball-clubface separation (images 4 and 5).Here are capture images from a SwingVision video of Trevor Immelman's driver swing, and he is a golfer who routinely uses a non-delayed full-roll hand release action.
Driver clubface motion through impact - capture images from a swing video
I can see no evidence of the clubface closing in that photo-sequence.
Here is a target-line video of a straight shot taken My Kelvin Miyahira - using his Phantom slow-motion camera.
http://www.youtube.com/watch?v=aXJqkMkpor8
If you look at the video, you can see that the clubhead is approaching the ball from the inside, becomes square to the target just before impact, and then moves inside again after impact.
Capture images from the video show that the clubhead path, and clubface, are both facing the target for many inches during the immediate impact zone.
Capture images from Kelvin Miyahira's video of a straight ball flight
This is a video of a straight ball flight. Because I was informed that the flight is straight, I could draw the red line accurately to represent the ball-target line (BT line).There is a black linear mark on the top of the clubface that acts as a reference.
Image 1 - the black mark is ~1/4" inside the BT line.
Image 2 - the black mark is ~1/8" inside the BT line.
Image 3 - the black mark is on the BT line, and I guess that's about 1" before ball contact.
Image 4 - the black mark is still on the BT line at the moment of first ball contact.
Image 5 - the black mark is still on the BT line at the moment of ball-face separation.
Image 6 - the black mark is ~1/8" inside the BT line.
Image 7 - the black mark is ~1/2" inside the BT line.
I think that the clubhead path and clubface are facing the target immediately pre-impact and throughout the entire impact interval.
Here is yet another slow motion video of a clubface moving through impact - http://www.youtube.com/watch?v=mEp0yAj7IYQ
I examined the video in detail using my V1 Home swing analyser program, and I captured the following capture images from that swing video.
Clubface-ball contact - capture images from the swing video
I used very large capture images of the swing video which I then imported into Photoshop, and I then used Photoshop's angle measuring tool to measure each of the first 4 white lines (along the top edge of the clubface). Image 1 shows the exact moment of first clubface-ball contact, and image 2 shows the exact moment of clubface-ball separation. The clubface has traveled a distance of ~0.6" during this time period.
I first verified that the left edge of the image was vertical (A and B on each left side) and I got figures of 90.2 degrees for the left edge of image 1 (between A and B) and 90.3 degrees for the left edge of image 2 (between A and B).
I then measured the angle of each of the top 4 white lines - which are clearly visible (eg. point C and D each point at the second white line). All my readings were within 0.5 degrees of 90 degrees.
Magnified image of my measuring technique
The white line is Photoshop's measuring tool line overlying the third white line. It gave a measurement of 89.7 degrees.
Most importantly, watch the video (at its natural recorded speed) and note how the clubface continues to face the target for a few inches after impact and note that there is no "apparent" counterclockwise rolling of the clubface - which is incompatible with a horizontal hinging action (based on the Machine Model), where the clubface continues to continuously close through impact and immediately after impact.
Finally, here is a Kelvin Miyahira video of a driver-clubhead moving through impact - taken at an amazingly high (100,000 frames-per-second) frame rate.
http://www.youtube.com/watch?v=-bj2sWHW1Mg
Here are capture images from the swing video - where the golfer hit the ball straight.
Clubhead travel through the immediate impact zone - capture images from the swing video
Images 1 and 2 show the clubface angle 1-2" pre-impact. Image 3 shows the clubface angle at first ball contact. Image 4 shows the clubface angle at the exact moment of ball-clubface separation. Image 5 shows the clubface angle immediately after impact. I measured the clubface angle of markedly enlarged versions of these images using Photoshop's measure tool and I found that the clubface angle didn't close during this time period.I think that it clearly shows that a skilled golfer can keep the clubface square to the target for many inches through the immediate impact zone.
As I have previously explained, keeping the FLW/clubface square to the target for many inches through the immediate impact zone is biomechanically possible because of two synergistic biomechanical phenomena - i) The left shoulder socket is not rigidly stationary (rigidly "fixed" in space) and ii) the left arm can move independently in the left shoulder socket and it can temporarily move in a desired direction towards the target for a very short time period; and this dual-biomechanical combination can easily allow a golfer to move the FLW, and therefore the clubface, straight towards the target for a few inches during the immediate impact zone. There is no biomechanical imperative that mandates that the FLW/clubface must be continuously closing between P7 and P7.1 - which is a mandatory imperative in a horizontal hinging action (that is purely based on Homer Kelley's Machine Model). I therefore think that the concept of a horizontal hinging action has no "real life" utility when trying to understand the practical behaviour of the clubhead/clubface during impact and the immediate followthrough time period.
There is another belief that is common among TGM literalists, and that is the belief that different hinging actions can produce a different ball flight pattern due to variable degrees of closing of the clubface during the impact interval.
Consider Homer Kelley's description of an angled hinging action.
Angled hinging action - image copied from the TGM book [3]
Note that both imaginary hinges are aligned so that they are perpendicular to the inclined plane and angled relative to the ground, and that dual-hinge arrangment allows the clubface to remain perpendicular to the surface of the inclined plane during the to-and-fro motion of the lever assembly (intact LAFW). That means that there is no roll motion of the clubface through impact and during the early followthrough action. That hinging action is mechanically/biomechanically equivalent to the no-roll motion seen in a no-roll hand release action. However, TGM literalists believe that the no-roll motion of the clubface occurs during the impact interval, while the clubface is still in contact with the ball, and that it will produce ball slippage on the clubface (equivalent to a slice spin shot). They therefore often believe that a golfer should use an angled hinging action when he wants to produce a "straightish" ball flight where the ball tends to fade towards the end of the ball flight, and that a golfer should use a horizontal hinging action to produce a "straightish" ball flight where the ball tends to draw towards the end of the ball flight. They imagine that they can produce these different hinging actions by varying the amount of external rotation of the left humerus that occurs during impact and during the early followthrough action (without necessarily changing their pivot action or CF-arm release action), and they believe that this variable degree of rotation of the left arm through the impact zone represents a left arm manipulation technique designed to control the clubface through the impact zone. I believe that there is no scientific evidence to support the "belief" that there is any difference in the rate of closing-of-the-clubface during the impact interval (which only lasts 1/4,000th/second) when a golfer switches from an angled hinging action to a horizontal hinging action, and I believe that any obtained difference in ball flight pattern is more likely due to changes in pre-impact biomechanics that produce very small alterations in the clubface angle as the clubhead approaches impact (between P6.9 and P7) - the clubface being slightly more open when they intend to use an angled hinging action, and slightly more closed when they intend to use a horizontal hinging action. The major problem relating to the use of this left arm manipulation technique (in order to intentionally shape the ball flight) is that it is a timing-dependent technique, and it may not be consistently successful. Professional golfers often use a similar left arm manipulation technique when they intentionally want to generate a fade/slice or draw/hook ball flight pattern, but any avid golfer who frequently watches PGA tour golf competitions on TV will realise that they are often not successful when they use an arm manipulation technique through the impact zone. I think that there is an alternative approach to producing a curved ball flight that is not dependent on an added left arm manipulation technique to control the clubface through the impact zone. Consider this optional technique.Imagine that a golfer wants to hit the ball towards the green that is 200 yards away, but where there is an obstructing tree in front of his ball that prevents him from hitting a straight shot towards the green. How should be resolve this course management predicament?
Here is a diagram showing this course management predicament.
Course management predicament
Imagine that the ball is located just off the right edge of the fairway at point X (red "x" in image 1), and imagine that there is a tall tree 40 yards straight ahead of the ball (dark green blob) that will prevent the golfer hitting the ball 200 yards straight towards the hole that is located in the center of the green. There are two course management approaches to dealing with this tree obstruction predicament - see image 2. One could try to hit a push-draw shot (orange curved ball flight path), but that is a risky choice, because if the ball goes unintentionally straight it will land in the lake (colored in blue). A safer approach would be to try to hit a pull-fade shot (yellow curved ball flight). If the ball unintentionally goes straight, it will likely land in the bunker (colored brown) to the left of green or it will land in the rough to the left of that bunker, which is a better end-result than landing in the lake.Now, in order to hit a pull-fade shot (see red-dotted path in image 3), a golfer has to generate a clubhead path at impact that is well to the left of the tree (see straight yellow arrow in image 3) and a clubface orientation angle at impact that is slightly open to the path (see straight orange arrow in image 3) and that is also aimed slightly to the left of the tree. According to the new ball flight laws, the ball will start-off in a direction that is about 80% in the direction of the clubface angle, and then curve to the right (with the degree of fade curve being directly proportional to the degree of divergence between the clubhead path and clubface orientation angle at impact). There are two biomechanical/mechanical swing approaches to generating this desired pull-fade ball flight.
Approach number 1: A golfer could aim his body to the left of the tree and swing his club in a direction that is also to the left of the tree (see yellow arrow in image 3) and then try and keep his clubface orientation angle open to the clubhead path through the immediate impact zone by using a left arm manipulation technique (often called "holding the clubface off") where one controls the degree of rotation of the left arm through the late downswing and early followthrough (roughly between P6.5 and P7.5) via a deliberate left arm manipulation maneuver. In other words, the golfer will be relying on the left arm manipulation technique to generate the exact amount of divergence between the clubhead path and clubface angle at impact to produce the required amount of fade spin, and he also has to simultaneously ensure that the left arm manipulation technique guarantees that the cluface is directed in the direction of the orange arrow at impact.
Approach number 2: A golfer could maintain his standard swing approach where he traces the straight plane line of the inclined plane's baseline (which is usually the ball-target line for a straight shot) thereby generating a symmetrical in-to-square-to-in clubhead arc where the clubhead becomes square to the baseline-of-the-inclined plane at impact, and he could also use his standard delayed full-roll hand release technique where the back of the FLW is kept square to the baseline-of-the-inclined plane throughout the immediate impact zone (between P6.9 and P7.1). However, to generate that required pull-fade shot - he needs to make two changes. First of all, he needs to move the baseline of his inclined plane leftwards so that it is in the direction of that yellow arrow (see image 3). That would represent his "new" imaginary ball-target line, and he would then stand parallel to that line and swing in his usual manner so that he can trace the SPL of the "new" imaginary ball-target line. That swing action should generate a clubhead arc that is symmetrical to the "new" imaginary ball-target line (straight yellow arrow in image 3) and a clubhead path at impact that is in the direction of that straight yellow arrow if the clubhead becomes square to the "new" imaginary ball-target line at impact. Secondly, he needs to open his clubface (relative to the back of his FLW) at address by a certain amount - in order to generate the required degree of fade spin. That means that if he uses his standard swing action (delayed full-roll hand release action where the back of his FLW is square to the yellow-arrowed line at impact), then the clubface should be facing in the direction of the orange arrow (see image 3) at impact - because he opened the clubface relative to the back of his FLW (at address) by an amount that is equal to the degree of divergence between the yellow arrow and the orange arrow. The advantage of this approach is that its success doesn't depend on the perfect execution of an added left arm manipulation technique (which is infrequently used), and it only depends on the perfect execution of his standard swing action (which is routinely used).
Each individual golfer can obviously experiment with these two different swing techniques when learning how to master the generation of a controlled-curve ball flight, and he can then independently decide to use the swing technique that will most likely work best for him on the golf course (when he only gets one opportunity to execute the shot).
Question number 7:Does a skilled golfer have to use the reverse-roll maneuver, that underlies a vertical hinging action, in order to keep the clubface open throughout the immediate impact zone - when hitting specialised shots eg. bunker shots and lob/flop shots?
Answer:
Yes - a skilled golfer needs to use the reverse-roll biomechanical maneuver that underlies a vertical hinging action, but he doesn't have to believe that the clubface is opening more during the impact interval (as predicted by Homer Kelley's 1-L Machine Model). The reverse-roll biomechanical maneuver is simply required to maintain the wide-open clubface unchanged during its passage through the immediate impact zone to at least the P7.1 position, and preferably to the P7.3+ position.
Here is a vertical hinging action as described in Homer Kelley's TGM book [3].
Vertical hinging action - image copied from the TGM book [3]
Note that the top hinge is mounted horizontally, and that causes the left arm to abduct upwards away from the body - like the back door of a hatchback car. Note that the lower hinge is angled in order to keep the left arm and clubshaft on the surface of the inclined plane during the followthrough action. Note that the back of the FLW, and therefore clubface, will roll open (relative to inclined plane) during the execution of a vertical hinging action (which is opposite in direction to the roll motion found in a horizontal hinging action and that's why it is referred to as a reverse-roll motion). During a reverse-roll motion, the left arm has to roll clockwise (and not counterclockwise - as occurs in a horizontal hinging action).Consider Phil Mickelson hitting a flop shot from just off the green.
Phil Mickelson hitting a flop shot - images copied from his book [11]
Note how Phil Mickelson is opening the clubface of his lob wedge so that it lays wide-open flat against the ground at address - image 1.To optimally execute his flop shot as planned, he wants to maintain the clubface wide-open throughout the immediate impact zone and early followthrough, and avoid any possibility of the clubface closing through impact.
Image 2 & 3 show that he successfully achieves his goal - note that his clubface is still wide-open in image 3 and the clubface is still facing skywards (as it was at address).
Image 4 shows how quickly the ball rises in the air as a result of a strike with a wide-open (laid-back) clubface. It also demonstrates two biomechanical phenomenon that underlie the execution of a reverse-roll maneuver - i) his rear forearm supinates during the rear arm straightening action and ii) the lead forearm is held in slight pronation through-impact, and after-impact, so that the FlatLeadWrist faces more skywards during the execution of the reverse-roll maneuver. The term "reverse-roll" indicates that the FLW is rolling in the opposite direction. In a full-roll hand release action, any roll motion of the FLW, and therefore the clubface, will be in a counterclockwise direction (in a right-handed golfer). In a reverse-roll maneuver, any roll motion of the FLW must be in a clockwise direction (in a right-handed golfer), which doesn't happen automatically/naturally, and a golfer has to deliberately/intentionally enact this reverse-roll maneuver during his followthrough action. In the TGM book, where Homer Kelley describes the vertical hinging action as happening during-and-after impact, he doesn't discuss the pre-impact biomechanics, and I believe that a golfer has to alter his pre-impact biomechanics as well in order to efficiently/fluidly perform a reverse-roll maneuver after impact.
I discussed how a golfer must alter the biomechanical motion of his right forearm during the pre-impact right arm straightening action (which starts in the late downswing, and continues non-stop during the early followthrough) in question-and-answer number 18 of my "downswing chapter".
Here is the photograph that I used in that chapter.
Right forearm motion required during the execution of a flop shot - capture image from a swing video lesson
During the right arm straightening action, that happens during the right forearm paddlewheeling action between P6 and P7.3, the right elbow will be straightening - but the right forearm must also be supinating if a golfer wants the right palm to face more skywards through impact and immediately after impact. This right forearm supinating motion will then synergistically assist the golfer in keeping the clubface wide-open throughout the immediate impact zone. At the same time, the golfer must avoid allowing his left forearm to rotate counterclockwise after impact and he must deliberately/intentionally keep his left forearm slightly pronated through impact, thereby ensuring that the back of the FLW faces slightly more skywards throughout the reverse-roll maneuver. I believe that the biomechanical motions needed to efficiently/fluidly keep the clubface wide-open during the optimal execution of a flop shot involve both pre-impact and after-impact biomechanical motions, blended as a continuous biomechanical motion, and a golfer must not think that he is actually altering the clubface motion during the impact interval that only lasts 1/4,000th of a second.Here is a Kelvin Miyahira slow motion video (at 24,000 frames/second) of a lob shot - http://www.youtube.com/watch?v=AoaXBFqwsJk
Here are capture images from the video.
Lob shot - capture images from the video
Note how the clubface remains wide-open throughout the pre-impact (image 1), exact moment of first ball contact (image 2), exact moment of ball-clubface separation (image 3) and post-impact (image 4) phases of the lob shot, and there is no change in the degree of openess of the clubface during the impact interval. A skilled golfer needs to learn how to efficiently/fluidly perform all the pre-impact, through-impact, and post-impact (reverse-roll) biomechanics needed to optimally execute this shot - if he hopes to perform it as well as Phil Mickelson.
Question number 8:A golfer posted capture images of three professional golfers who are flipping after impact, and he claimed that the flipping was due to stalling of the pelvic motion at impact. Do you believe that pelvic stalling at impact is causally responsible for the pro-flipping phenomenon in those three golfers?
Answer:
No!
Here are the three professional golfers who manifest flipping after impact.
Three professional golfers flipping after impact - capture images from swing videos
Image 1 is Luke Donald, image 2 is Mark Wilson, and image 3 is Rickie Fowler.All of these three golfers routinely use a "combined CF-arm release action + full-roll hand release action" and it is very common for professional golfers (who use that technique) to stall their pelvic motion at impact, and they do not continue to actively rotate their lower-mid torso through impact (a biomechanical phenomenon which is much more frequently seen in golfers who use a "combined CP-arm release action + no-roll hand release action). However, I don't believe that the pelvic stalling phenomenon is causally responsible for their propensity to occasionally flip through impact, or flip immediately after impact. I believe that pro-flipping (flipping immediately after impact) is primarily due to slowing of the forward motion of the left arm/FLW through impact and/or due to an over-active right arm straightening action, or any active right wrist straightening action (active slap-hinge action). To avoid flipping through impact, or flipping immediately after impact, a golfer needs to maintain the forward motion of the left arm/FLW between impact and P7.3+, so that he can maintain an intact LAFW to P7.3+. He also needs to ensure that there is no over-active right arm straightening action, or any active right wrist straightening action (active slap-hinge action), that will cause the right index finger to apply push-pressure against the aft side of the club at PP#3 and flip the club.
A secondary biomechanical factor that allows a golfer to maintain the forward momentum of the left arm/FLW through impact to P7.3+, and thereby maintain an intact LAFW, is the biomechanical factor of the golfer continuing to continuously rotate the upper torso, and therefore the shoulder sockets, actively through impact.
Consider upline side-view capture images of Dustin Johnson's swing.
Dustin Johnson's followthrough action - capture images from a swing video
Note that he has a relatively open pelvic alignment at impact (image 1), but he doesn't continue to rotate his pelvis more open during the followthrough action. Note that he maintains a FLW and intact LAFW from impact to P7.5+ while allowing his right arm to straighten and his right wrist to straighten.
Note that he continues to rotate his shoulders counterclockwise during the followthrough. That allows his right shoulder to move under his chin, and get closer to the target, so that he doesn't run-out-of-right arm when his right arm straightens. When his right arm straightens it may cause the right palm to apply a push-pressure against PP#1 (over the left thumb) that helps him maintain the forward speed of the FLW and intact LAFW during his followthrough action. However, the speed of right arm straightening (or right wrist straightening) must not be too fast, because it may cause the right hand (especially the right index trigger finger) to produce push-pressure against the aft side of the club at PP#3 and induce flipping. Most importantly, the FLW must be leading the right hand through impact and during the followthrough if a golfer wants to maintain a FLW/intact LAFW to P7.3+ and avoid flipping, and that means that the forward speed of motion of the FLW cannot be less than the forward speed of motion of the right palm (which may be applying push-pressure against the aft side of the grip below the coupling point) and right index finger (which may also be applying push-pressure to the aft side of the grip below the coupling point).
The biomechanics/mechanics that best explain why an individual skilled golfer doesn't flip through impact (and maintains a FLW/intact LAFW to P7.3+), or alternatively flips through impact, primarily resides in the interaction of the two arms/hands and the golf club, and they do not primarily reside in the body's pivot motion, which plays a secondary role.
Question number 9:You frequently refer to a dual combination of a specific arm release action (eg. CP-arm release action) combined with a specific hand release action (eg. no-roll hand release action) that produces a dual "combined CP-arm release action + no-roll hand release action. Alternatively, you frequently refer to a dual combination of a "combined CF-arm release action + full-roll hand release action". Can these arm-release and hand-release combinations be altered/switched?
Answer:
Yes.
Consider two different combinations where I have switched the usual combinations.
1) Combined CF-arm release action + no-roll hand release action.
Most golfers, who use a no-roll hand release action, also use a CP-arm release action, but it is not obligatory from a biomechanical perspective - because it is possible to direct an intact impact triangle away from the body in a center-fleeing (CF) manner, while still keeping the impact triangle intact. The main biomechanical feature that signifies that the impact triangle is still intact after impact is the fact that the right wrist remains bent (as it was at impact).
Consider Lee Trevino's swing action.
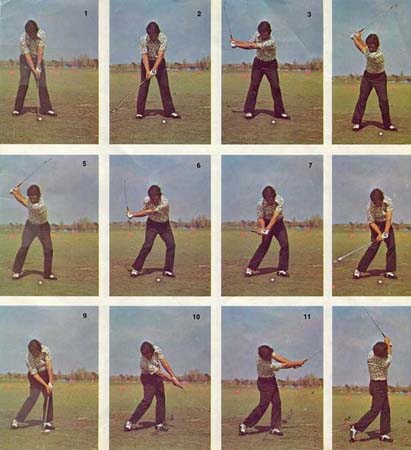
Lee Trevino's downswing/followthrough action - image copied from a magazine article
One can clearly note that Lee Trevino has maintained a bent right wrist from impact to the P7.5+ position - see image 10 - and that means that he has maintained an intact impact triangle throughout the followthrough phase of his swing. However, one cannot determine whether he is directing his arms/hands inwards (in a CP-release manner) or outwards (in a CF-release manner) from a face-on (caddy) viewing perspective. One needs a DTL viewing perspective to better determine whether he uses a CP-or-CF-arm release action.Here is a still photo taken from a DTL viewing perspective.

Lee Trevino's CF-arm release action - image copied from a magazine article
One can clearly see that Lee Trevino is directing his arms away from his body, and he is therefore using a CF-arm release action (in combination with a no-roll hand release action). Lee Trevino always stated that he "aimed left and swung right" - which means that he aligned his feet/torso in a direction that was left of his desired target (well open to the target) and he then swung his arms/hands outwards (away from his body) in a targetwards direction. That was a deliberate/intentional choice, which enabled him to more easily hit his standard shot - which was a mini push-fade ball flight shot rather than a straight ball flight shot. The ball tended to fade because his clubhead path was directed towards the target at impact, but his clubface orientation angle was slightly open to his clubhead path at impact. Some professional golfers actually use a CF-arm release action (in combination with a no-roll hand release action) to hit a push-draw shot, but then they have to either close the clubface at address (relative to the back of their FLW), or roll their FLW counterclockwise just before impact while still swinging their arms in-to-out through impact, so that their clubface orientation angle at impact is closed to their clubhead path (which is directed slightly 'in-to-out' relative to the ball-target line).2) Combined CP-arm release action + full-roll hand release action.
This combination is frequently seen in golfers who unintentionally swing over-the-top (OTT swing action). If a golfer swings OTT in the early downswing, then he will likely generate an 'out-to-in' clubhead path through impact, and his two arms will move inside-left (relative to the ball-target line) during his followthrough action, and that represents a CP-arm release action. If he is a left arm swinger, who uses a full-roll hand release action, then he will be using a combined CP-arm release action + full-roll hand release action.

Anonymous golfer's OTT swing action - capture images from his swing video
Note that the anonymous golfer is coming OTT in image 1, and that OTT move causes his hands to move away from his body in his mid-downswing (image 2). He then directs his hands inwards towards his body in his late downswing, which causes his clubhead path to be 'out-to-in' through impact and his followthrough arm release action to be a more center-directed, CP-arm release action (images 3 & 4). Note that he uses a full-roll hand release action where his right wrist straightens fully during his followthrough action.It is also important to realize (from a biomechanical perspective), that one can have a roll action that is intermediate-in-degree between a full-roll and a no-roll during one's hand release action, and that the degree of roll of the FLW, and timing of the roll of the FLW, during the followthrough action significantly depends on the degree-and-speed of rotation of the entire torso during one's followthrough action. The more one rotates one's entire torso counterclockwise after impact, the more likely that one will have less roll motion of the FLW between P7 and P7.5 if one swings with very good rthythm (keeping one's arms steadily in front of the rotating torso). In that scenario, the arm release action may also be intermediate-in-degree between a CP-arm release action and a CF-arm release action. In other words, there is no "fixed" rule that dictates how much roll motion of the FLW a golfer should have between P7 and P7.5, and/or how much the arms should be directed inside-left during the followthrough stage of the swing.
Question number 10:Many golf instructors state that the back of the FLW, and knuckles of the left hand, should face groundwards soon after impact - and, from a biomechanical perspective, that counterclockwise rotation of the FLW is biomechanically due to a left forearm supination action. You have repeatedly stated that rolling the FLW counterclockwise through impact (as recommended by AJ Bonar) is a major swing fault. However, is it acceptable to use left forearm supination to roll the FLW over so that the knuckles of the left hand face groundwards at a much later stage of the followthrough?
Answer:
Yes.
Watch this slow-motion video of Kellie Oride's swing.
http://www.youtube.com/watch?v=p7hBadAiMcA
Here are capture images of her followthrough action.
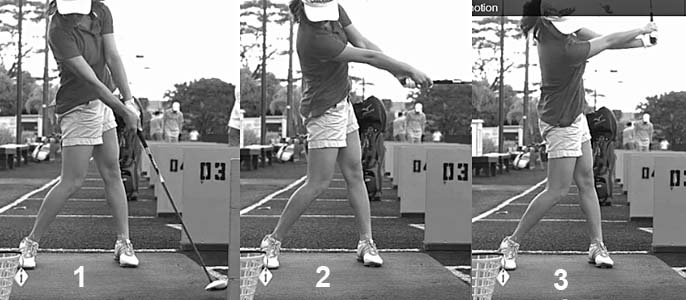
Kellie Oride's followthrough and finish action - capture images from her swing video
Image 1 is at the P7.3 position - note that she has a FLW/intact LAFW and note that the back of her FLW is still facing the target, which means that she is delaying the roll motion that she will perform at a later stage of the followthrough. At this time point of the followthrough, she looks very similar to Dustin Johnson who also uses a delayed full-roll hand release action.Image 2 is at P8 position (when the clubshaft is parallel to the ground) - note that she still has a FLW, but the back of her FLW is facing groundwards. To perform that large degree of roll motion of her FLW, she not only had to externally rotate her left humerus in her left shoulder, she also had to fully supinate her left forearm (note the position of the left thumb relative to her left antecubital fossa in image 2 - compared to its relative position in image 1). Image 3 shows that her clubshaft is parallel to the surface of the inclined plane, and the butt end of the club is pointing at the ball-target line, which means that she is on-plane. Note that she still has a FLW, and note that she never bends her FLW at any time point from impact to the P9 position.
The great advantage of Kevin Miyahira's Phantom camera, which is capable of producing videos at a very slow frame rate of 5,000-100,000 frames/second, is that it allows one to clearly see what is happening biomechanically during a golfer's hand release action. Note that Kellie's left forearm is neutral at the P7.3 position (image 1) and the back of her FLW is still facing the target, which explains why she is capable of keeping the clubface continuously facing the target during the early followthrough. Then, one can see that her FLW rotates counterclockwise very quickly between the P7.3 position and the P8 position (image 8). If one watches her video very carefully, one can clearly see how she first starts to roll her FLW counterclockwise due to external rotation of the left humerus in the left shoulder socket, and this represents the roll motion of her full-roll hand release action, Then, she immediately transitions into a finish swivel action that causes the back of her FLW to face groundwards by the P8 position - by secondarily allowing her left forearm to fully supinate.
Here are capture images from the time period P7.5 to P8 that demonstrate how she transitions seamlessly from a full-roll hand release action to a finish swivel action.
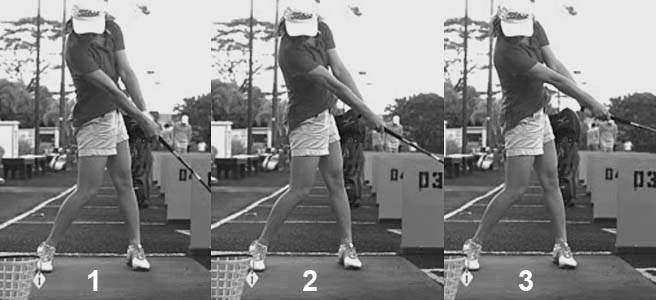
Kellie's late followthrough and early finish phase action - capture images from the swing video
Image 1 is at the P7.6 position, image 2 is at the P7.8 position and image 3 is at the P7.9 position. Note what is happening during this time period - i) her left forearm is supinating and that causes her FLW to rotate counterclockwise so that the back of her FLW will become parallel to the inclined plane by the P7.9 position; and ii) her right arm and right wrist fully straighten and her right forearm starts pronating so that her right palm can rotate over the left hand during the finish swivel action. These biomechanical phenomena are the same biomechanical phenomena that happen in a roller hand release action, but they are happening after the clubshaft bypasses the P7.5 position. That's the critical golf instructional point that a developing golfer needs to learn - to ensure a stable clubface, where the FLW and clubface continuously face the target throughout the immediate impact zone, a golfer must ensure that any roll motion of the clubface (whether it is due to external rotation of the left humerus or left forearm supination) doesn't occur too soon after impact, and a golfer should optimally delay any roll motion of the FLW until the later followthrough-finish phase of the swing.
Question number 11:What biomechanical factors allow a golfer to maintain a FLW during the late followthrough and during the finish swivel action that characterises the transition from the followthrough phase to the finish phase of the swing?
Answer:
I think that it is much easier to maintain a FLW during the late followthrough +/- during the finish swivel action if a golfer uses a CP-arm release action where the arms and club are directed inside-left during the followthrough.
Consider Tiger Woods' wedge shot where he uses a combined "CP-arm release + no-roll hand release action".
Tiger Woods' wedge swing action - http://www.youtube.com/watch?v=NSEfbgRheEA
Here are capture images from the swing video.
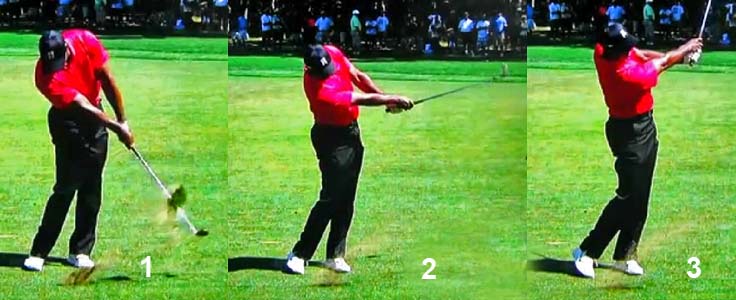
Tiger Woods' followthrough/finish action - capture images from his swing video
Image 1 shows Tiger Woods at the P7.5 position - note that he still has a FLW/intact LAFW. Note that he still has a bent right wrist and an intact impact triangle, and that he is directing the impact triangle inside-left after impact secondary to a continued rotation of his lower-mid torso. Note that his clubface is perpendicular to the inclined plane, which indicates that he is using a no-roll hand release action.Image 2 shows how he starts to transition into a finish swivel action where he i) supinates his left forearm and that causes the knuckles of his left hand to eventually become parallel to the inclined plane. Note how his ii) right wrist simultaneously straightens and note how his iii) right palm rotates over his left hand secondary to a right forearm pronatory motion - and these three biomechanical actions constitute the finish swivel action that will allow him to swing the clubshaft onto the inclined plane between the P8 position (image 2) and the P9 position (image 3). Note how he maintains a FLW during the finish swivel action (images 2 & 3).
Note how much Tiger Woods has rotated his torso counterclockwise during his execution of a combined "CP-arm release action + no-roll hand release action". Tiger Woods has been increasingly using this arm/hand release combination for his short iron shots in the last 12 months (2012 and early 2013 - under the influence of his present golf instructor, Sean Foley) and I think that it is the optimum biomechanical release technique for consistently controllable accuracy. In the past two decades, Tiger Woods used a combined "CF-arm release action + full-hand release action" for his short iron shots as well as his long irons, fairway woods and driver, and he doesn't rotate his torso as actively through impact when he uses that combined arm/hand release action.
Consider a recent Tiger Woods driver swing from January 2013 - http://www.youtube.com/watch?v=1I6x03_9AsM
Here are capture images from the swing video.

Tiger Woods' followthrough action - capture images from his swing video
Note that Tiger Woods is not rotating his pelvis and torso actively through impact and his torso motion has essentially stalled, thereby causing him to swing his arms/club in a targetwards direction along his toe line, and this arm release action represents a CF-arm release action. Note that he maintains a FLW until the P7.3 position (image 3), but his left wrist starts to bend in image 4 and it is obviously significantly bent back in image 5 when he reaches the P8 position. This bending back of the FLW is a very common biomechanical phenomenon in golfers who use a CF-arm release action, and it is no biomechanical importance if it doesn't happen anywhere near the immediate impact zone. It is perfectly acceptable to allow the left wrist to bend back after the club bypasses the P7.2 position, but it is important to maintain a FLW/intact LAFW between impact and the P7.2 position if one wants to ensure that one is using a DH-release action throughout the immediate impact zone. If the FLW bends between impact and the P7.2 position, then it suggests that the golfer is using a slap-hinge release action and that he is a pro-flipper. I have previously advised developing golfers to avoid using a slap hinge release action (which is very wristy hand release action) because it requires perfect timing of a superadded horizontal wrist motion to avoid flipping-through-impact (rather than after impact).Note that if the left wrist bends back in the late followthrough, then it will likely also be bent back during the finish swivel action and during the finish phase of the swing.
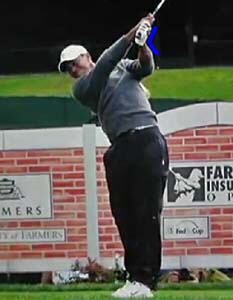
Tiger Woods finish swivel action - capture image from his swing video
Note that Tiger Woods is performing a finish swivel action and he has swung his clubshaft onto the inclined plane. Note that he has a markedly bent left wrist (blue-angled line) at this stage of the finish phase of his swing action. Bending of the left wrist is of no biomechanical consequence if it happens after the P7.2 position, and my constant advice to maintain a FLW/intact LAFW during the followthrough only applies to the early followthrough phase of the swing action. It is an optional choice (and not a mandatory requirement) when it comes to the "issue" as to whether a skilled golfer should maintain a FLW during the later followthrough and finish phase of the swing action.
Jeffrey Mann.
First version of this chapter: January 2007.
First major revision of this chapter: June 2008.
Second major revision of this chapter: February 2013.
References:
1. Nike commercial video of Tiger Woods' swing.
Available at http://www.youtube.com/watch?v=meVTld5GvbM
2. Rod White's description of the double pendulum swing model.Available at http://www.tutelman.com/golf/swing/golfSwingPhysics3a.php#simplemodel
3. The Golfing Machine. Homer Kelley.
4. Jamie Sadlowski swing video.Available at http://www.youtube.com/watch?v=ep-qidwgCII
5. Ben Hogan's Five Lessons. Ben Hogan.
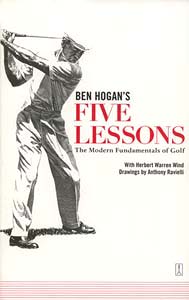
6. Kelvin Miyahira's "PGA Tour Release Styles" article.Available at http://www.aroundhawaii.com/lifestyle/health_and_fitness/2010-09-pga-tour-release-styles.html
7. Accelerating the Club Through Impact: Mandate or Myth! David Tutelman.Available at http://www.tutelman.com/golf/swing/accelerateThru.php
8. "Rotation About the Coupling Point" video collection. Brian Manzella.
9. The Virtues of a Left Arm Flying Wedge. A 1h37m video-interview with the Author produced by Ralph Perez of the Gotham Golf Blog.Available at http://www.youtube.com/watch?v=96quJ-BkfgI
10. Maintaining a Flat Left Wrist Post-Impact. A 15 minute video created by the Author.Available at http://youtu.be/Pbd-ktp0P1w
11. Secrets of the Short Game. Phil Mickelson.