Critical Review: David Leadbetter's A Swing
Click here to go back to the home page.
Introduction:
David Leadbetter has developed an alternative technique of performing a full golf swing, which he has called the A Swing, and he first published his book [1] on the A Swing in May 2015. He has also posted two you-tube videos [2] [3] on the A Swing online, where he introduces the A Swing to the public. The term "A" refers to the word "Alternative" and it represents an alternative way of performing the full golf swing. David Leadbetter states in his video that he has been teaching the golf swing for 40 years and he asserted that he last wrote a golf instructional book approximately 10 years ago because he didn't have anything "new" to say about the full golf swing until recently. He also stated that his "new" ideas on how best to perform a full golf swing are an evolution of his previous thinking and he claims that he has tested his "new" ideas during the past two years to ensure that they pass the experimental test of improving the golf swing of an unspecified number of amateur golfers. He also stated in his book that his target audience is primarily amateur golfers (rather than professional golfers) because they are far more likely to have difficulty performing the "standard" golf swing, and he particularly thinks that they usually have major difficulty in consistently performing a "good" quality backswing action. Therefore, the major golf swing change that he introduces in his A Swing book primarily relates to an "alternative" way of performing the backswing action, and he wrongheadedly believes that the downswing is mainly "reactive" and that it will automatically occur in an efficiently natural manner if the backswing action is perfected. Now, although David Leadbetter states that his A Swing simply offers golfers an alternative method of performing the full golf swing, he also implies (in a less than tongue-in-cheek manner) that the A Swing should be called the "Accuracy" swing because he believes that it will result in more accurate ball-striking results than the "standard" golf swing. I, by contrast, totally disagree with his claim and I believe that his A Swing is far less mechanically/biomechanically efficacious when compared to the "standard" golf swing used by most professional golfers. I will specifically demonstrate in this review paper that it will likely create significant biomechanical problems when it comes to performing an efficient PA#3 release action and an efficient drive-hold (DH) hand release action through impact.
I will not describe the methodology of performing all aspects of the A Swing in great detail in this critical review paper, and interested golfers are free to purchase David Leadbetter's book and watch his you-tube videos if they want to learn how to perform the A Swing. I will not describe many aspects of the A Swing methodology because they are not critical elements that are distinctively different to the "standard" golf swing. However, I will describe certain aspects of the A Swing in much greater detail because they are critically different to the "standard" golf swing, and I believe that they can potentially create significant biomechanical problems that will oblige a golfer to significantly modulate his swing action in order to get a square clubface by impact.
Methodology of performing the A Swing:
Grip:
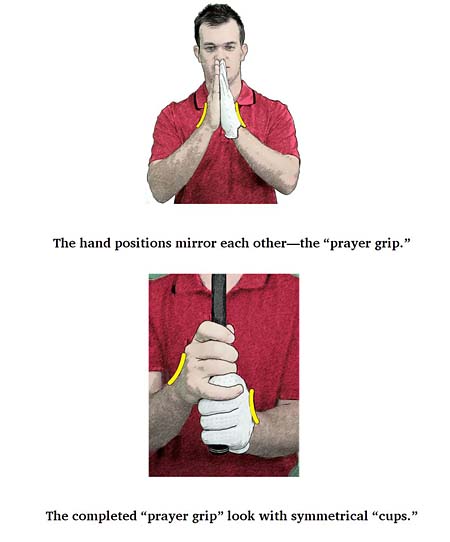
David Leadbetter specifies a very specific grip pattern for his A Swing technique, and he calls it the "prayer" grip".
Here is a capture image from his book showing his preferred grip pattern.
He states that the hands should be symmetrical across
the grip with an equal amount of cupping
(dorsiflexion) of the back of the two hands when they are positioned on the grip.
He prefers a finger grip style (rather than a low palmar grip style) for the
left hand, which accounts for the fact that the finger knuckles of the left 3rd,
4th and 5th fingers appear to be oriented perpendicular relative to the
longitudinal axis of the grip (rather than being diagonally oriented across the
grip as would occur if a golfer adopted a low palmar left hand grip). He
believes that his "prayer" grip will allow both wrists to more easily move
radially in a symmetrically upcocking manner during the
*P3-to-P4 time period, so that the clubshaft can be angled towards the ball-target line in an
across-the-line manner at the end-backswing position.
(* See this review paper if you don't understand the P system of classifying a golfer's position - Glossary of Wrist Movements and the P System of Classifying a Golfers' Swing positions)
The A Swing technique seemingly precludes the use of a very strong (4+ knuckle) left hand grip, which is the left hand grip choice preferred by a subset of serious amateur and professional golfers.
Backswing pivot action in the A Swing:
Consider this capture image of David Leadbetter's preferred backswing pivot
action for his A Swing.
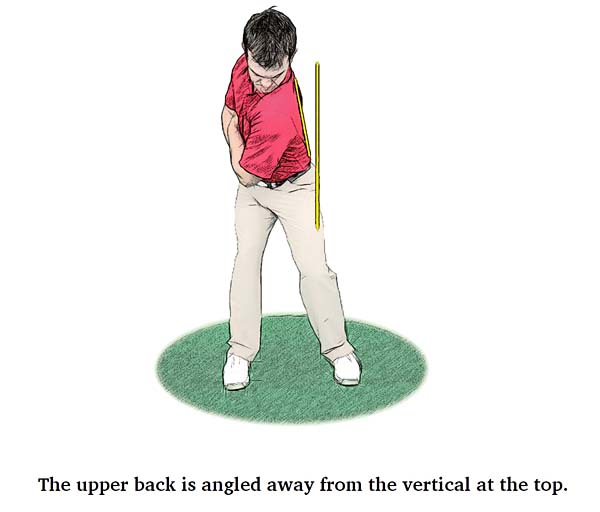
Note that the head is roughly centralised between the feet with very little tilt of the thoracic-lumbar spine away from the target. This represents a near-vertical-centralised backswing action.
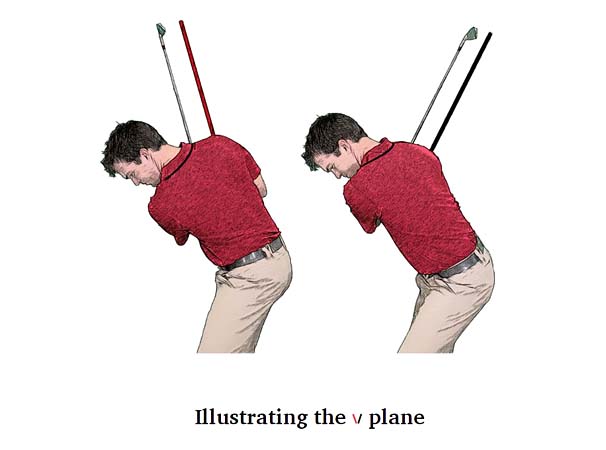
Here is a composite image - which is a modified image of an original capture image that I copied from Mike Bennett's and Andy Plummer's "Stack and Tilt Swing" book [4] - that I often use to show various patterns of the backswing pivot action that relate to the specific topic of classifying variable degrees of tilt of the upper torso that can happen during the backswing's pivot action.
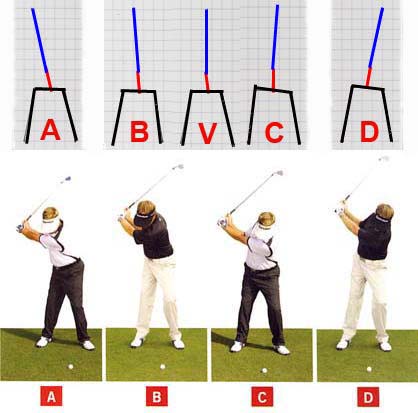
The blue line in the diagram represents the thoracic spine, the red line represents the lumbar spine and the black lines represent the pelvis and two legs.
The lower 4 golfer images show the different degrees of upper torso tilt at the end-backswing (P4 position) of 4 golfers.
A represents a rightwards-tilted backswing action where the upper torso is tilted significantly rightwards and where the head is positioned over the right foot at the end-backswing position.
B represents a rightwards-centralised backswing action where there is less rightwards-tilt of the upper torso due to the biomechanical use of a small degree of "arch-extension" of the thoracic spine.
(* I have described how the use of an arch-extension maneuver during the backswing action changes the degree of rightwards tilt of the upper torso in this short video - http://www.youtube.com/watch?v=BPd5hSGuikg - and I have also discussed the underlying biomechanics in Q&A number 9 of my backswing chapter, which is available at http://perfectgolfswingreview.net/backswing.htm )
C represents a leftwards-centralised backswing action where there is a small degree of leftwards tilt of the upper torso due to the use of a much greater degree of "arch-extension" of the thoracic spine (as seen in S&T golfers).
D represents a leftwards-tilted backswing action, that is due to an exaggerated use of an "arch-extension" maneuver, and it is often referred to as "reverse-pivoting".
V represents a vertical-centralised backswing action where the thoracic spine is roughly vertical at the end-backswing position - and it is roughly intermediate in degree of upper torso tilt between B and C.
David Leadbetter's A Swing pivot image appears to be roughly between B and V when it comes to the degree of tilt of the upper torso, and it is very similar to that seen in Sean Foley-taught golfers [5] where the shoulder turn angle at the end-backswing position is not horizontal (as seen in image B), but it is angled slightly more steeper, but not necessarily as steep as that seen in a S&T golfer (image C). It is readily understandable why David Leadbetter and Sean Foley choose this particular backswing pattern for their respective swing styles, and it is due to the fact that they both prefer to have the golfer pull the hands much more inwards during the backswing action so that the hands get much deeper inside (further away from the ball-target line) by the mid-backswing - when compared to the "standard" golf swing.
Here is a capture image (from reference number [6]) showing the recommended body alignment at the end-backswing position in David Leadbetter's A Swing.

David Leadbetter (in black) is positioning Andy
Proudman (in white and blue) at the P4 position. David Leadbetter states that he
wants an A Swing golfer to retain some flex in the right knee during the
backswing action, but he wants to get the right pelvis to become slightly more
elevated at the end-backswing position, which means that the right leg has to
straighten more so that the right femoral head (and therefore the right hip
joint) can move further away from the right foot. Note that he wants an A Swing
golfer to have a slightly steeper shoulder plane angle at the end-backswing
position, which will happen naturally if the golfer employs a greater degree of
"arch-extension" during the coiling of the upper torso around a
rightwards-tilted spine. There is nothing unorthodox about David Leadbetter's
choice of a backswing pivot action for his A Swing if you consider his personal
preference about getting the hands
deeper inside by the mid-backswing
position.
Arm and wrist and clubshaft motions during the A Swing's backswing action:
There is a major difference in the A Swing's left
arm/hand and clubshaft motions during the backswing action (when compared to the
"standard" golf swing), so I will describe the A Swing's biomechanical movements
during the backswing in greater detail.
Here is a capture image from David Leadbetter's book [1] showing his recommended takeaway action for the P1 to P2 time period.
Note how he recommends having an A Swing golfer move
the hands more inwards, and closer to the right thigh, during the takeaway -
while keeping the clubshaft outside the hands. This type of takeaway action
necessitates that an A Swing golfer use the following biomechanical actions - i)
increasingly cup (dorsiflex) the left wrist while ii) preventing the left
forearm from pronating and iii) keeping the right elbow above the left elbow by
deliberately avoiding an early right elbow bending action (which normally
happens in a golfer who uses the right forearm takeaway (RFT) technique of
performing the "standard" golf backswing). Note that the A Swing golfer
disrupts his *intact LAFW so
that the clubshaft gets out of its straight-line-relationship with respect to
the left arm during the takeaway action.
(* I have described the intact LAFW/GFLW concept in great detail in the appendix section of this review paper)
Here is a "real life" capture image from reference number [6] showing the same takeaway action.
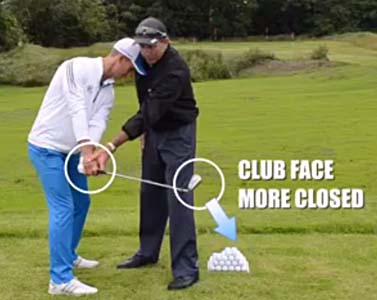
David Leadbetter is instructing Andy Proudman on how
to perform his recommended takeaway action. Note that the clubface "appears" to
be more closed during the takeaway action - because the golfer is preventing the
left forearm from pronating and that deliberate biomechanical action keeps the
clubshaft outside the hands and it prevents the clubshaft from rotating onto the
inclined plane (swingplane) by the P2 position (as generally occurs in the
"standard" golf swing if the golfer uses a RFT).
Consider the recommended position of the A swing golfer at the mid-backswing (P2.5) position (from reference number [1]).
Note how David Leadbetter wants the clubshaft to be angled towards the target line, and he wants the butt end of the club to point well inside the toe line.
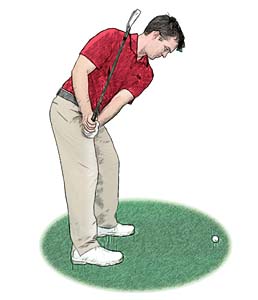
Now, consider his diagrammatic comparison of a "standard" swing golfer versus an A Swing golfer when they are both at the P3 position (when the left arm is parallel to the ground) - image copied from reference number [1].
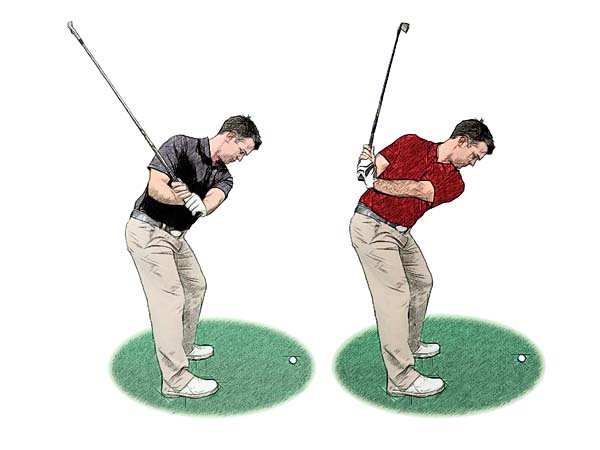
The black-shirted golfer represents a "standard" golf swing golfer at the P3
position. Note that he has pronated his left forearm so that he can get the back
of his left hand (GFLW) and clubshaft parallel to the inclined plane
(swingplane) while ensuring that the clubshaft is simultaneously on-plane (butt end of the club
points at the ball-target line). Note that the hands are not "deep inside" and
they are roughly opposite the lower sternum. Note that the clubshaft is still in
a straight-line relationship with the left arm, which means that the LAFW is
intact.
The red-shirted golfer represents an A swing golfer. Note that the hands are "deeper inside" and opposite the right lateral border of the upper torso (at the level of the mid-sternum) and note that the left arm is already fully adducted. Note that the left wrist is very cupped (dorsiflexed) and note that the clubshaft is angled towards the ball-target line.
Now, consider the recommended motion of the hands/clubshaft during the P3 => P4 time period in an A Swing golfer.
Image of an A Swing golfer at the end-backswing position [from reference number 1]
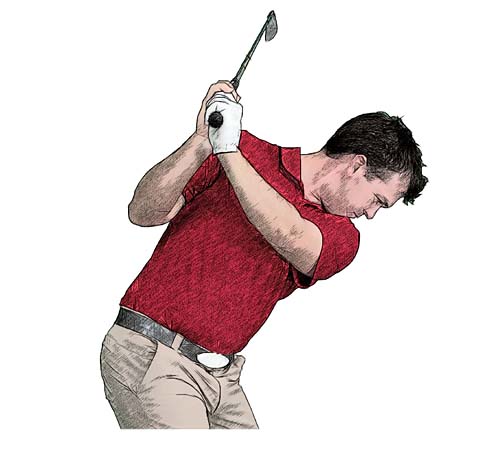
Note how the A swing golfer has simply elevated his already-adducted left arm while still keeping
the right upper arm closely approximated to the right side of his upper torso.
Note how the clubshaft is angled across-the-line at the end-backswing position.
Note that the left wrist is very cupped (very dorsiflexed). Note that the left
arm and clubshaft are not in a straight-line relationship,
which means that the LAFW is non-intact. Note that the clubface is not parallel
to the back of the left forearm and it is angled more vertical (compared to the
angle of the back of the left arm/forearm).
Here is a "real life" image of the recommended P4
position for an A swing golfer - from reference number [6].
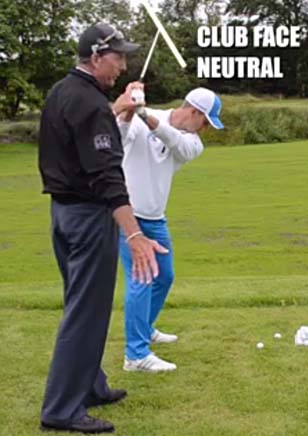
David Leadbetter (in black) has positioned Andy Proudman at his desired
end-backswing position. Note that the left wrist is very cupped (very
dorsiflexed) and note that the clubshaft is angled across-the-line. David
Leadbetter claims that the clubface is neutral - presumably because it is at a
roughly 45 degree angle relative to the ground. I personally believe that it is
a major mistake to use the *ground as a "reference" when classifying whether the
clubface is open, neutral or closed at the P4 position and I personally use the
back of the left forearm as my "reference". If the clubface is parallel to the
back of the left forearm, then it is neutral; if it is more vertical than the
back of the left forearm then it is open; and if it is more horizontal than the
back of the left forearm then it is closed.
(* Interested readers can read topic number 3 in this review paper - http://perfectgolfswingreview.net/2014Revision.htm - if they want to better understand how I specifically define whether the clubface is open, neutral or closed at the end-backswing position).
Arm, wrist and clubshaft motions during the A Swing's downswing action:
As I will soon demonstrate, there are very significant negative biomechanical repercussions that may occur secondary to starting a downswing from a P4 position where the left wrist is markedly cupped and where the clubshaft is positioned across-the-line. Before I discuss these negative biomechanical repercussions, let's first consider how David Leadbetter instructs an A Swing golfer to perform the downswing action.
David Leadbetter wants an A Swing golfer to shallow-out his clubshaft during the early downswing, so that the clubshaft can lie along a shallower clubshaft plane (swingplane) by the end of the early downswing.
Here is a capture image (from reference number [1]) showing the desired clubshaft position at the P5 position.
The A swing golfer on the left is at the P2.5 position (mid-backswing position)
where the clubshaft is angled towards the ball-target line. The
A Swing golfer on the right is at the P5 position and his clubshaft is angled
away from the ball-target line. The difference between the two
clubshaft angles represents the V plane, which is a fundamental A Swing
teaching concept.
Here is another capture image (from reference number [6]) demonstrating the V plane concept.
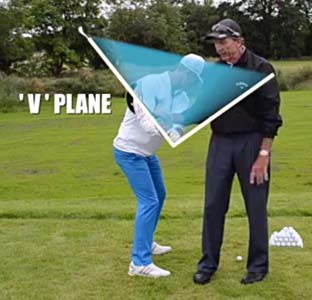
Note that the A swing golfer (Andy Proudman) has his clubshaft on a shallow plane at the P5 position (end of the early downswing position).
How does he shallow-out the clubshaft between P4 and P5?
David Leadbetter states that the clubshaft will automatically fall-back between P4 and P5 if an A Swing golfer starts the downswing with a pelvic slide-rotation movement that gets the pelvis to glide in a direction that is slightly to the right-of-the-target. Many golf instructors harbor a similar "belief" that it is the early downswing's pelvic slide-rotary motion that causes the clubshaft to shallow-out at the start of the transition to the downswing. I believe that this "belief" is over-simplistic because the pelvis is not connected to the arms/clubshaft, and I think that any golfer's biomechnical reasoning is oversimplistic if the golfer posits a causal connection between two time-contiguous events - i) event number 1 being the pelvic slide-rotary motion that happens between P4 and P5 and ii) event number 2 being the shallowing-out of the clubshaft that happens simultaneously between P4 and P5 - simply because both of these events happen simultaneously in a time-contiguous manner. I think that the "correct" causal explanation relates to the biomechanical fact that the left hand (and therefore club handle) starts to move downwards-and-forwards due to the downwards-and-forwards motion of the left arm; and most importantly, I think that any increased degree of clubshaft-shallowing is primarily due to the fact that the golfer is *very actively adducting the right upper arm, which causes the right elbow to drop downwards (groundwards) faster than the left elbow.
(* Readers who are interested in my detailed explanation of the causal biomechanics responsible for the clubshaft-shallowing phenomenon, which happens in some professional golfers between P4 and P5, can read topic number 7 in this review paper - http://perfectgolfswingreview.net/2014Revision.htm )
What happens to the markedly cupped (dorsiflexed) left wrist during the clubshaft-shallowing phase of an A Swing golfer's early downswing action?
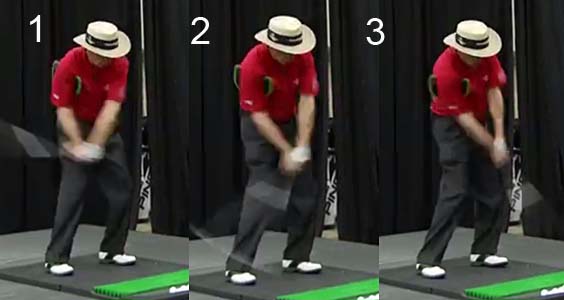
Here is a capture image (from reference number [3]) featuring David Leadbetter instructing an A Swing golfer-student on how to shallow-out the clubshaft between P4 and P5.5.
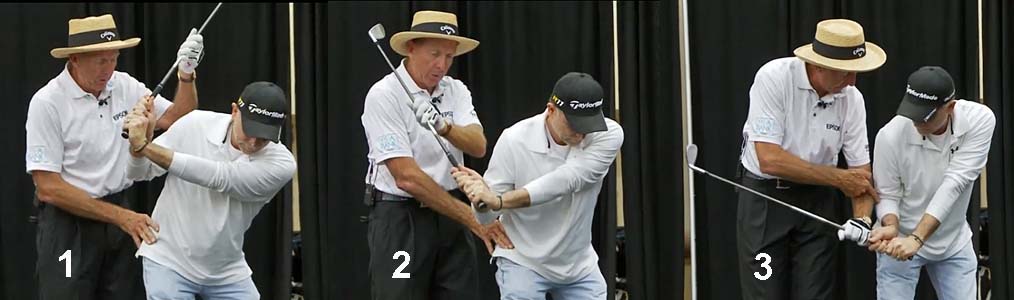
Image 1 shows the A Swing golfer-student at the P4 position. Note that his left
wrist is markedly cupped (dorsiflexed) and the clubshaft is slightly
across-the-line.
Image 2 shows David Leadbetter pushing the A Swing golfer-student's pelvis in a targetwards direction while he simultaneously pulls the clubshaft down to a shallower plane. Note that the left wrist is still markedly cupped (dorsiflexed).
Image 3 shows the A swing golfer-student at the P5.5 position with a significantly shallowed-out clubshaft. Note that the left wrist is still markedly cupped (dorsiflexed).
Most importantly, note how much more pronated the left forearm is at the P5 position compared to the P4 position. This is a key BIOMECHANICAL element that has to happen during an A Swing golfer's clubshaft-shallowing phase that occurs between P4 and P5.
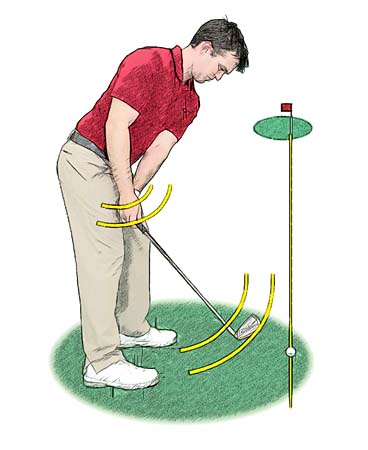
David Leadbetter fully acknowledges the " biomechanical fact" that the left forearm has to pronate (rotate clockwise) to a very significant degree during the early downswing's clubshaft-shallowing phase, and that it is causally responsible for the A Swing's distinctive V plane phenomenon. Here is a capture image from his A Swing book [1] that shows the clockwise rotation (pronation) of the left forearm that has to happen during the early transitional phase of an A Swing golfer's downswing action.
![]()
Note that the curved yellow arrows demonstrate that the left forearm has to
rotate clockwise in a pronatory direction at the start of the downswing if an A
Swing golfer wants to shallow-out the clubshaft and enact the V plane
phenomenon. However, David Leadbetter doesn't discuss the biomechanical
repercussions of an A Swing golfer enacting the V plane phenomenon, which
requires a significant amount of left forearm pronation.
I believe that if a golfer has to perform a large amount of left forearm pronation between P4 and P5.5 that it is becomes much more biomechanically difficult to then subsequently supinate the left forearm by a large amount between P5.5 and impact - because it requires a sudden, and dramatic, reversal of the rotary motion of the left forearm. Why does a golfer have to supinate the left forearm to a significant degree between P5.5 and impact? I will discuss this issue in great detail when I subsequently discuss the biomechanics of the "standard" golf swing (at a later stage in this review paper), but I will now just briefly mention that a golfer (who adopts a neutral left hand grip) usually has to perform i) a slow phase of left forearm supination between P5.5 and P6.5 in order to direct the clubshaft down the inclined plane while the golfer pulls the butt end of the club in a targetwards direction and ii) a rapid phase of left forearm supination between P6.5 and impact in order to release PA#3, which is needed to square the clubface by impact. I strongly suspect that many A Swing golfers are going to have great difficulty performing the standard PA#3 release action using a left forearm supinatory motion (based on either the RYKE effect or an active contraction of the left forearm's supinator muscles) and that they are going to have to use either an active right forearm pronatory action and/or a left wrist circumduction motion (where the left wrist flips in a radial direction before-and-through impact) in order to square the clubface by impact.
I do not presently have access to slow-motion videos of A Swing golfers that will enable me to thoroughly study the motion of their left forearm/wrist between P5.5 and impact, so my present-day personal perspective on this issue should be deemed to be conjectural, rather than definitively accurate. Hopefully, many slow-motion you-tube videoes of A Swing golfers will become available during the next 1-2 years, and I will then be able to study the motion of their left forearm/wrist in great detail using a swing analyser program. In the absence of solid "evidence" from slow-motion videoes, let's look at a few videos of A Swing golfers performing a full golf swing at a normal ("real life") speed.
Dennis Watson (senior PGA tour golfer) assisted David Leadbetter during his video presentations ([2] and [3]) and he performed a few full golf swings using the A Swing technique during the presentation.
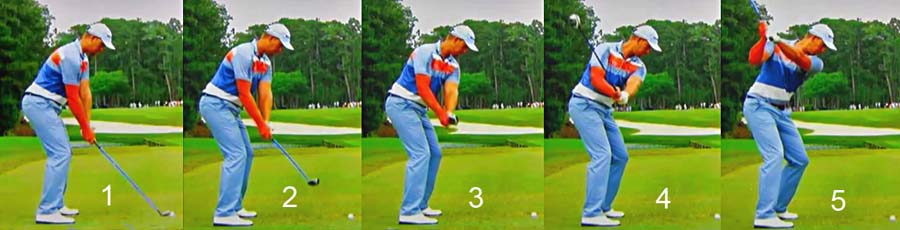
Consider these capture images from one of his full swings [3].
Although the images are very blurred (due to the slow video frame rate and
slow shutter speed), one can note that the back of his left lower forearm (watchface
area) and the back of his left hand is roughly parallel to the inclined plane
(swingplane) at the P6 position (image 1) and at P6.5 (image 2). Also, note that
the back of his left lower forearm (watchface area) and back of his left hand is
not quite facing the target at impact (image 3), which suggests an incomplete
release of PA#3 due to an incomplete left forearm supinatory motion.
Here is another series of capture images from another one of Dennis Watson's full swings [3].
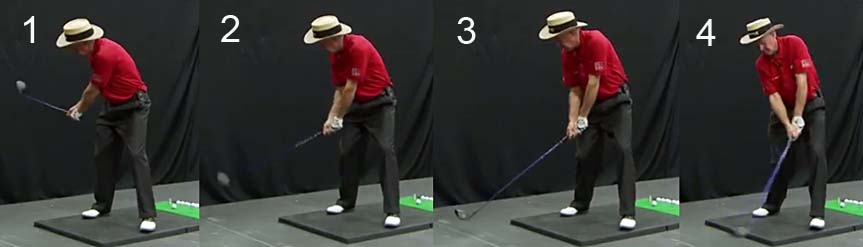
Image 1 is at P6, image 2 is at P6.5, image 3 is at P6.8 and image 4 is at impact. Note that he has an overtly cupped (dorsiflexed) left wrist at P6.8 and at impact. That is not surprising to me because David Leadbetter doesn't describe how it is biomechanically possible for an A Swing golfer to go from having a markedly cupped (dorsiflexed) left wrist at the P5.5 position to having a GFLW (or arched/bowed left wrist) at impact. I personally believe that it is only readily possible to convert from having a markedly cupped (dorsiflexed) left wrist at the P5.5 position to having a bowed/arched left wrist by impact if a golfer uses the biomechanical technique of *"early left forearm supination + left wrist palmar flexion", but I don't believe that it biomechanically possible for an A Swing golfer to easily perform this technique.
(* I have described the swing technique of "early left forearm supination + left wrist palmar flexion" in great detail in topic number 8 of this review paper - http://perfectgolfswingreview.net/2014Revision.htm )
Now, consider these capture images of the same golfer-student (audience member) that David Leadbetter featured in his video presentation [3]. These capture images are derived from the full golf swing action that happened when David Leadbetter told the A Swing golfer-student to just "let it go".
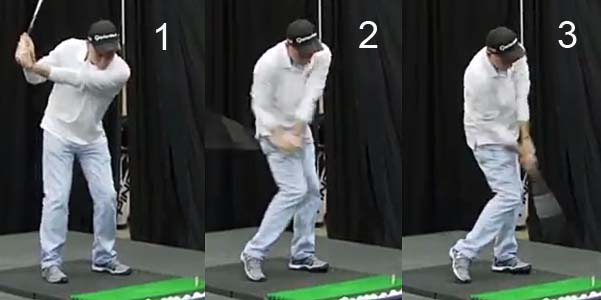
Image 1 is at the P4 position. Note the markedly cupped (dorsiflexed) left wrist.
Image 2 is at the P6 position. Note that the back of his left lower forearm (watchface area) and back of his left hand is parallel to the inclined plane (swingplane). Note that his left wrist is still significantly cupped (dorsiflexed).
Image 3 is at impact. Note that he could not quite complete a left forearm supinatory motion that gets the back of his left lower forearm (watchface area) and the back of his left hand to face the target by impact.
I will later describe how a "standard" swing golfer can more efficiently complete the release of PA#3 by impact - but I will first describe the hand release action that David Leadbetter recommends for his A Swing technique.
Here is a link to a you-tube video produced by David Leadbetter where he shows the A swing's release action.
https://www.youtube.com/watch?v=F_T1biiUHLw
Note that he states that he actively straightens his right arm during the late downswing and then secondarily straightens his right wrist in an underflipping manner through impact.
Here are capture images (from reference number [6]) of David Leadbetter demonstrating his A swing's release action.

Image 1 shows David Leadbetter at the P6 position. Note that the back of his
left lower forearm (watchface area) is roughly parallel to the inclined plane
(swingplane) and it is facing the ball-target line. Note that he has an overtly
cupped (dorsiflexed) left wrist.
Image 2 is near impact. Note that the back of his left lower forearm (watchface area) is still roughly parallel to the inclined plane (swingplane) and it is still facing the ball-target line. Note that he still has an overtly cupped (dorsiflexed) left wrist. There is no evidence that he he is flattening/bowing his left wrist and there is no evidence that he is actively supinating his left forearm in order to enact a PA#3 release action that will square the clubface by impact. I suspect that he is using his right forearm's straightening action and right wrist's straightening action to square the clubface by impact.
Image 3 shows David Leadbetter immediately post-impact. Note that his clubshaft has bypassed his left arm, which means that he is a non-DHer. Note that he doesn't significantly roll his left forearm counterclockwise, but he allows his left wrist to passively bend as he deliberately/actively flips his straightening right wrist/hand under his bending left wrist/hand.
David Leadbetter is using a pro-flipping type (underflip subtype) of hand release action through impact. This type of hand release action is very timing-dependent, which is why most professional golfers do not routinely use it for their full golf swing. Most professional golfers use a drive-hold (DH) hand release action, and they avoid any flipping or rolling motion of their left wrist through impact, so that they can ensure that they have a stable clubface through the immediate impact zone between impact and P7.2.
David Leadbetter also rashly claims that the
straightening right wrist that actively flips the right palm through impact can
ensure that the clubface is still facing the target through impact, and
immediately after impact. However, he is seemingly oblivious of the
biomechanical phenomenon of wrist circumduction that can cause the left hand to
roll clockwise (or anticlockwise) as it is pushed through impact by the
straightening right wrist/hand. If the left hand rolls clockwise (in a radial
deviation direction) while its being extended (bent), then the clubface will
roll closed. If the left hand rolls anticlockwise (in an ulnar deviation
direction) while it is being extended (bent), then the clubface will roll open.
When you consider the very fast speed of hand and club handle motion through
impact in a professional golfer's "real life" driver swing, then it is not
surprising that it will be near-impossible for them to to consistently ensure a
square clubface through impact if they use the type of biomechanically
unreliable non-DH hand release action (pro-flipping type of hand release action)
recommended by David Leadbetter. I will later show how many professional golfers
use a DH-hand release action through impact, which totally eliminates the
problem of left wrist circumduction causing a roll motion of the clubface
through impact.
In summary, I believe that that there are three major swing problems that are causally related to the fundamental biomechanics underlying the A Swing's specific golf swing technique.
The first problem relates to the V-plane philosophy of radically shallowing-out the clubshaft during the early downswing, which necessitates the use of a significant amount of left forearm pronation during the P4 to P5.5 time period. I will soon demonstrate how a professional golfer, who uses the "standard" swing action, doesn't have to significantly shallow-out the clubshaft during the early downswing, which means that he can avoid the problem-issue of having to significantly pronate the left forearm between P4 and P5, which makes it much more difficult to subsequently supinate the left forearm in an efficient manner between P5.5 and impact.
The second problem relates to the markedly cupped (dorsiflexed) left wrist, which disrupts the intact LAFW. I will soon demonstrate how a professional golfer, who uses the "standard" swing action, can maintain an intact LAFW/GFLW throughout the entire backswing and downswing, which means that he doesn't have to change his left wrist alignment throughout the entire downswing action and/or through impact. David Leadbetter has never explained how it is biomechanically possible to easily/naturally convert from having a markedly cupped (dorsiflexed) left wrist at the P5.5 postion to having a FLW or arched/bowed left wrist by impact when using the A Swing methodology.
The third problem relates to David Leadbetter's recommended use of a non-DH type of hand release action through impact, which is very timing-dependent and potentially very unreliable in terms of ensuring a stable clubface during the clubhead's travel time through the immediate impact zone between P6.9 and P7.2.
Biomechanics and mechanics of the "standard" full golf swing that is used by many professional golfers
In this section, I am going to describe the "standard" golf swing that is used
by many professional golfers - using Henrik Stenson as a role model. I am
specifically using Henrik Stenson's golf swing as a prototype because he
perfectly performs all the golf swing actions that I believe are
optimum (for a golfer who chooses to adopt a neutral left hand
grip). These golf swing actions include i) using a right forearm takeaway (RFT)
technique during the backswing, ii) keeping the clubshaft on-plane between P2
and P4, iii) coming down nearly the same swingplane during the downswing as was
used during the backswing so that the backswing's and downswing's clubhead paths
are near-identical, iv) using an active left forearm supinatory action to square the
clubface by impact; iv) maintaining an intact LAFW during the entire backswing
and entire downswing and early followthrough time periods and v) using a DH-hand
release action through impact.
David Leadbetter repeatedly states in his book/videos that he developed his A Swing's distinctive backswing action because it would eliminate swing faults that may occur in golfers who are trying to learn the "standard" golf swing's backswing action. The one type of swing fault (that he refers to) relates to the issue of over-pronating the left forearm during the takeaway action.
Here is a capture image (from reference number [7]) of David Leadbetter demonstrating a left forearm over-pronation swing fault.
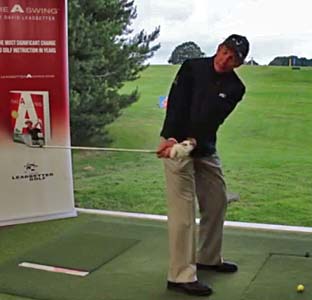
Note that David Leadbetter has over-pronated his left forearm during his
takeaway action, and that causes the clubshaft to become too horizontal, instead
of becoming parallel to the inclined plane (swingplane), during the P2-to-P3
time period. However, that type of swing fault can easily be avoided if the
golfer learns how to perform the *RFT technique of performing the takeaway
action.
(* I have described the RFT technique in great detail in my Backswing Chapter and in my review paper on How to Move the Arms, Wrists and Hands in the Golf Swing)
Learning how to perform a RFT technique is very easy and it allows Henrik Stenson to easily get his clubshaft on-plane during his backswing action, while simultaneously maintaing an intact LAFW/GFLW during his entire backswing action.
Henrik Stenson swing video - https://www.youtube.com/watch?v=OKfe6F8PmUc
Here are capture images of Henrik Stenson's backswing action.
I have red-highlighted Henrik Stenson's right lower arm, right forearm and right
hand so that you can more easily concentrate your mental attention on the motion
of his right arm/forearm/hand during his entire backswing action.
Image 1 shows Henrik Stenson at address. His clubshaft in on the hand plane while his right forearm is angled slightly steeper.
Image 2 shows Henrik Stenson starting his RFT action where he simply moves his right forearm backwards (away from the target) while keeping his right forearm roughly parallel to the elbow plane. Note that he allows his clubface to rotate slightly clockwise by the P1.5 position (image 2) because he allows his left forearm to naturally pronate. Note that he is rotating his pelvis and upper torso simultaneously during his RFT action and note that he maintains an intact LAFW by dorsiflexing his right wrist by the requisite amount that allows him to maintain a GFLW during his takeaway action.
Image 3 shows Henrik Stenson at the end-takeaway position (P2 position). Note that he has in intact LAFW (left arm and clubshaft are in a straight-line relationship) and also a GFLW. Note that the clubshaft is parallel to the ground and also parallel to the ball-target line and note that the toe of the club is pointing upwards (secondary to his left forearm's pronatory motion).
Image 4 shows Henrik Stenson approaching the P3 position. Note that he allows his right elbow to bend while continuing to dorsiflex his right wrist. Note that he still has an intact LAFW/GFLW and his clubshaft is nearly on-plane. Note that he had to pronate his left forearm by a requisite amount if he wants to get his intact LAFW to become angled parallel to the swingplane (inclined plane) by his mid-backswing.
Image 5 shows Henrik Stenson approaching his
end-backswing position (P3.6 position). Note that he is continuing to bend his
right elbow and note that he has his right palm parallel to the undersurface of
the swingplane, and that allows his RFFW (right forearm flying wedge) to support his intact LAFW
(left arm flying wedge), which is
positioned parallel to the swingplane. Note that his clubshaft is on-plane (butt end
of the club *"points" at an extension of the ball-target line).
(* Knowing where the butt end of the club is "pointing" when the clubshaft is
not parallel to the front of the camera lens requires a
mental/visual projection skill that is easily acquired if one frequently
examines 2-D capture images obtained from 2-D swing videos)
Here is a composite capture image that shows Henrik Stenson's clubhead path during the backswing and downswing.
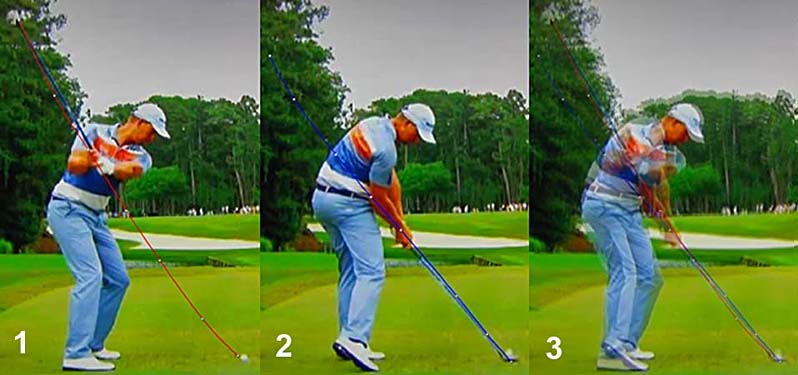
Image 1 shows Henrik Stenson's backswing clubhead path in red, and image 2 shows
his downswing's clubhead path in blue.
Image 3 is a composite image where I have superimposed image 2 on image 1 using Photoshop. Note that his backswing's clubhead path and downswing's clubhead path are near-identical below waist level, and his downswing's clubhead path is only slightly shallower than the backswing's clubhead path during the early downswing time period between P4 and P5.5.
Now, let's consider the biomechanics of Henrik Stenson's clubshaft-shallowing
action, which happens during the early downswing's transition, in greater detail.
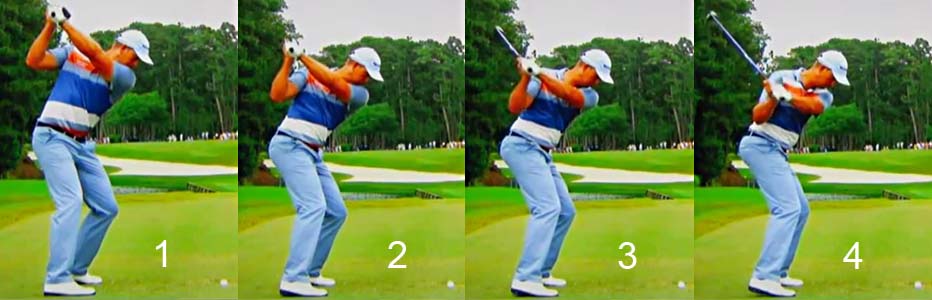
Image 1 shows Henrik Stenson at his end-backswing position where his clubshaft
is pointing slightly left-of-the-target and where it is still on-plane (butt end
of the club points at an extension of the ball-target line). Note that he has an
intact LAFW (left arm and clubshaft are in a straight-line relationship) and a
GFLW (which allows his clubface to be neutral [parallel to the back of his left
lower forearm]).
Image 2, 3 and 4 show how Henrik Stenson's clubshaft shallows-out to a small degree as he starts the downswing. The clubshaft-shallowing phenomenon is due to the fact that he adducts his right upper arm actively at the start of the downswing, which causes the right elbow to drop groundwards slightly faster than the left elbow, and it happens while he simultaneously rotates his pelvis to a square position by P5 (image 4). Note that the amount of clubshaft-shallowing is very small and it doesn't require a lot of clockwise rotation (pronation) of the left forearm (as seen in the A Swing's early downswing time period).
Note that he maintains a GFLW and an intact LAFW (clubshaft and left arm are in a straight-line relationship) during his early downswing and his clubshaft doesn't have to "fall-back" (as seen in the A swing - where the clubshaft is across-the-line at the end-backswing position and where it has to "fall-back" to a shallower plane at the start of the downswing) and this eliminates potential swing problems relating to the clubshaft "fall-back" phenomenon, which can cause the clubshaft/clubhead to wobble or bounce if it is not performed ultra-smoothly. This significant difference between the "standard" golf swing and the A Swing is a huge advantage in favor of the "standard" golf swing where the golfer i) maintains an intact LAFW/GFLW during the transition to the early downswing and ii) where the clubshaft is always on-plane (butt end of the club always points at an extension of the ball-target line) during the early downswing's transitional time period and iii) where there is no clubshaft "fall-back" phenomenon (requiring an exaggerated amount of clockwise rotation of the left forearm in a pronatory direction).
Now, let's consider the P5.5 to impact (P7 position) time period, where the "standard" golf swing golfer has to routinely perform two phases of left forearm supination - i) a slow phase of left forearm supination and ii) a rapid phase of left forearm supination (representing the release of PA#3).
Here is a composite image from Phil Cheetham's PhD dissertation paper [8a] which demonstrates the two phases of left forearm supination that has to happen in a golfer who adopts a neutral left hand grip.
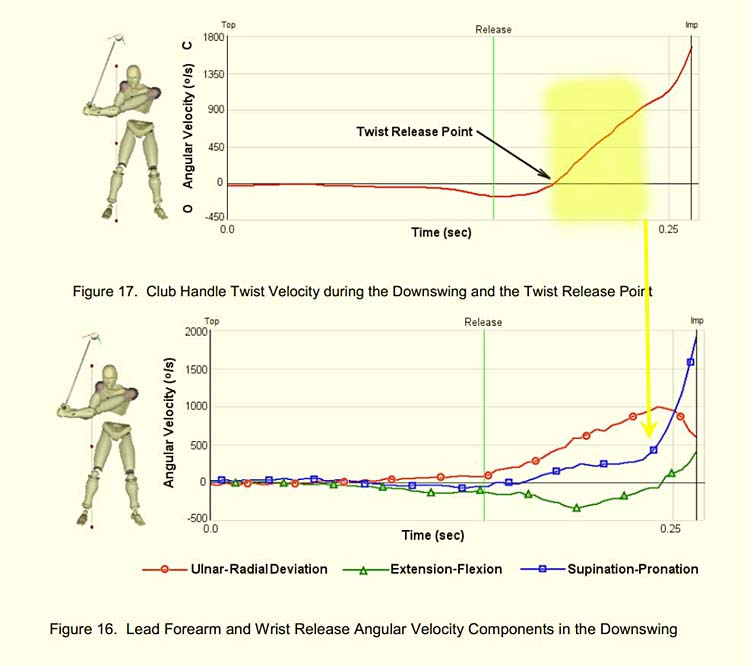
Phil Cheetham measured the speed of hand twist velocity (HTV) that happens in
the mid-late downswing in professional golfers, and the HTV phase starts at the
twist release time point. During the first slow phase of the
handle twist velocity graph, where the HTV is slower and <900 degrees/second
(represented by the solid yellow color block), note that the speed of left
forearm supination is slow. That slow left forearm supination phase happens
between P5.5 and P6.5, and it represents the time period when the hand arc path
transitions from being mainly downwards to being mainly targetwards as the
golfer pulls the butt end of the club more torwards the target. During the
second rapid phase of the handle twist velocity graph (which
happens after the vertical yellow arrow), note that the HTV is much faster and
900-1800 degrees/second, and also note that the speed of left forearm supination
is much more rapid (and this rapid left forearm supination phase causes the
release of PA#3 to happen naturally between P6.5 and impact).
Here are series of capture images demonstrating Henrik
Stenson's slow phase of left forearm supination, which happens
between P5.5 and P6.5.
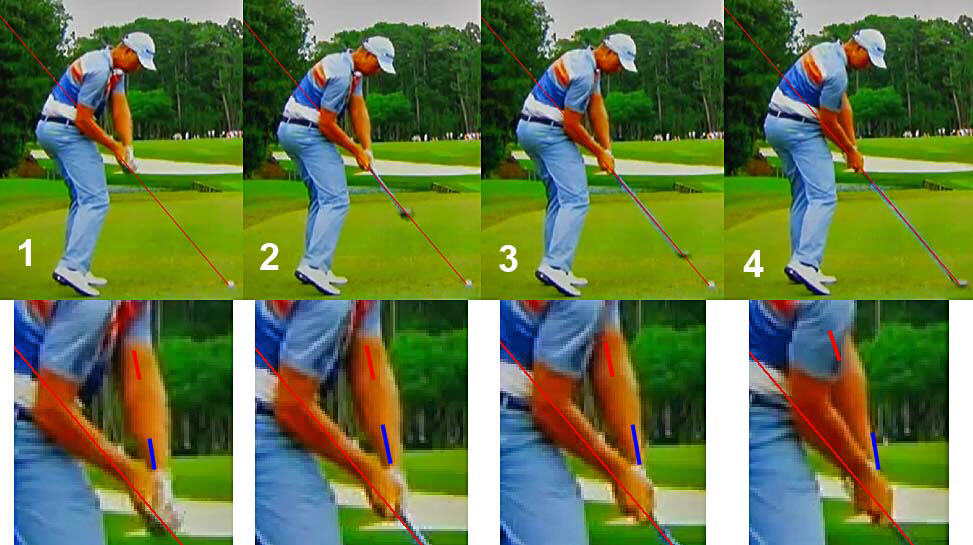
Image 1 shows Henrik Stenson at the P6 position. I have drawn a short red line
down the middle of his left antecubital fossa (elbow pit) and a short blue line
over the peripheral end of his left radial bone just above the level of his left
wrist. Note that the blue line is slightly rotated clockwise relative to
the red line, which is due to the fact that his left forearm is still pronated
at P6.
Image 2 is at P6.2 and image 3 is at P6.5. Note that the blue line is slowly rotating counterclockwise relative to the red line, and this is due to a slow rate of active left forearm supination that happens between P6 and P6.5. Note that it allows Henrik Stenson to keep his clubshaft on-plane on the elbow plane (long angled red line) as his club releases during the P6 to P6.5 time period. Note that Henrik Stenson also maintains an intact LAFW and GFLW during this time period and he therefore doesn't have the unnecessary/added complication of having to transition from having a markedly cupped (bent) left wrist at P5.5 to having a FLW (either a GFLW or a AFLW) by impact (which theoretically has to happen in the A Swing - although David Leadbetter never discusses how a golfer is supposed to accomplish that goal from a biomechanical perspective). Henrik Stenson can easily accomplish the slow active phase of left forearm supination that has to happen between P5.5 and P6.5 because his left forearm is naturally pre-loaded (well pronated) at the P5.5 position with his clubshaft positioned on a shallower plane than his left arm's abduction plane, and he can therefore readily rotate his left forearm counterlockwise in a supinatory direction by activating his left forearm's supinatory muscles. By contrast, performing this active slow phase of left forearm supination between P5.5 and P6.5 is going to be much more biomechanically difficult in an A Swing golfer, because the left forearm was rapidly rotating clockwise in a pronatory direction between P4 and P5.5, and it is biomechanically much more difficult to suddenly reverse its direction of rotation between P5.5 and P6.5.
Now, consider how Henrik Stenson efficiently releases
PA#3 (representing the rapid phase of left forearm supination) between P6.5 and
impact.

Image 1 shows Henrik Stenson at the P6.5 position. Note that the back of his
left lower forearm and back of his GFLW is still facing the camera, and he still
has to perform the rapid phase of left forearm supination (representing the
release of PA#3) between P6.5 and impact.
Image 2 is at P6.75 and image 3 is at impact. Note how he efficiently, and progressively, squares the back of his GFLW and clubface by impact, and note that he doesn't have to actively pronate his right forearm or actively flip-straighten his right wrist in order to accomplish that goal. Note that he still has an intact LAFW/GFLW at impact, and note that he maintained an intact LAFW/GFLW throughout his entire downswing action. By maintaining an intact LAFW/GFLW throughout his entire downswing action, he didn't have to deal with the A Swing's unnecessary/added biomechanical difficulty of efficiently transitioning between having a markedly cupped left wrist at the P5.5 position to having a FLW (either a GFLW or AFLW) by impact.
Now, consider how Henrik Stenson performs a drive-hold (DH) hand release action through impact.
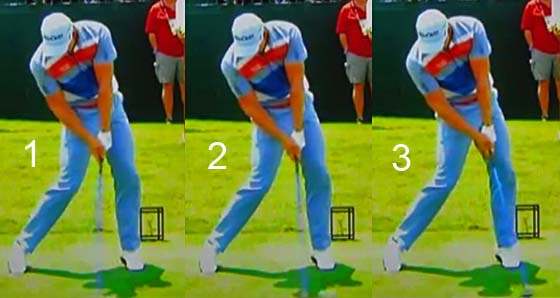
Image 1 shows Henrik Stenson at impact. Unfortunately, one cannot see the
clubhead/ball because it was cropped-out of the swing video. Note that he has a
GFLW and an intact LAFW. Note that his right arm is incompletely straightened
and that his right wrist is slightly bent.
Image 2 shows Henrik Stenson's clubhead about 6" after impact, and his clubface is still square to the target. Note that he still has a GFLW and an intact LAFW. Note that his right arm is still incompletely straightened and that his right wrist is still slightly bent.
Image 3 is at P7.2 (end of the immediate impact zone). Note that he still has a GFLW and an intact LAFW (clubshaft has not bypasssed his left arm). Note that his right arm is still incompletely straightened and that his right wrist is still slightly bent.
The "fact" that the clubshaft is not bypassing his left arm (from an angular rotational perspective) between P7 (impact) and P7.2 proves that he is using a *DH-hand release action, which allows a golfer to efficiently maintain a stable/square clubface throughout the clubhead's travel time between P7 and P7.2.
(* I have described the great advantages, and underlying biomechanics, of a DH-hand release action in great detail in my Impact Chapter and in my review paper on Hand Release Actions Through the Impact Zone)
When a "standard" golf swing golfer, like Henrik Stenson, performs his DH-hand release action (using a delayed full-roll subtype of DH-hand release action), he is simply swinging his intact LAFW through impact in a controlled manner by avoiding any excessive roll of his lead arm/clubshaft unit that can cause the clubshaft to bypass the left arm between impact and P7.2. The key biomechanical elements needed to perform a DH-hand release action through the immediate impact zone between P7 and P7.2 are-: i) the left arm/hand must maintain its forward momentum through impact so that its angular velocity (in a targetwards direction) perfectly matches the forward angular velocity of the clubshaft (in a targetwards direction); ii) there must be no stalling of the forward motion of the left arm that will allow the clubshaft's acquired forward momentum to cause the clubshaft to bypass the left arm and flip-bend the left wrist; iii) any push-pressure applied by an actively straightening right arm must not be applied against the aft side of the club below the coupling point as this may induce left wrist flip-bending; iv) the right wrist must not actively straighten in a slap-hinge manner as this may induce left wrist flip-bending; and v) the left arm-clubshaft unit (intact LAFW) must not roll excessively through impact as this will cause the clubshaft to bypass the left arm. The amount of roll of the intact LAFW betweeen P7 and P7.2 must only be equal to the amount needed to keep the clubface square to the clubhead arc. If a "standard" golf swing golfer consistently achieves these desired goals, then he can consistently ensure that the clubface remains stable and square to the clubhead arc during the clubhead's travel time through the immediate impact zone between impact and P7.2.
By contrast, David Leadbetter's pro-flipping type of hand release action (which he recommends for his A Swing) is a non-DH hand release action that is very timing-dependent, and therefore potentially unreliable in terms of consistently ensuring a stable/square clubface through impact. I firmly believe that any serious golfer should avoid using an active "right arm throw action" (as prescribed by David Leadbetter for his A Swing) because it is very difficult to time the "throw action" so that the clubface can remain square to the target during the clubhead's travel time through the immediate impact zone between P7 and P7.2. I firmly believe that any serious golfer (who uses a TGM lead-arm swinging technique) should preferentially use a DH-hand release action through impact (using either a delayed full-roll subtype or a no-roll subtype), because it can far more reliably ensure a stable and square clubface through impact.
Concluding remarks:
I personally believe that the fundamental biomechanics/mechanics of the "standard" golf swing are far superior in terms of golf swing biomechanical/mechanical efficacy than the fundamental biomechanics/mechanics of the A Swing. However, the basic question remains - would some amateur golfers play golf better using the A Swing technique? I have no doubt that a certain percentage of amateur golfers will strike the ball better using the A Swing technique because they have not been properly taught how to perform the "standard" golf swing in an optimum manner. In fact, I can readily imagine a scenario where they adopt certain biomechanical elements of the A Swing technique that actually allows them to perform certain other elements of their "standard" golf swing better, and they will wrongly ascribe their better overall golf swing performance to learning the A Swing technique.
What is also interesting about David Leadbetter's approach to teaching the A Swing technique is that he is not rigid when it comes to certain fundamental elements of the A Swing technique. For example, he states that he prefers that an A Swing golfer angle the clubshaft towards the ball-target line at the P2.5 position (mid-backswing position), but he also states that is very acceptable to have far less angulation, which means that the clubshaft does not even have to get across-the-line at the end-backswing position. Then, it becomes debatable as to whether the golfer is really using the A Swing technique, rather than a modulated "standard" golf swing technique. Let's consider a "real life" example of that type of scenario.
Here are capture images of Andy Proudman's "standard"
golf swing action - which I captured from reference number [6].

These capture images represent Andy Proudman's "standard" golf swing action - before he was personally taught how to perform the A Swing by David Leadbetter.
Image 1 is at the P1.5 position, and it demonstrates that Andy allows his left forearm to pronate during his takeaway and he doesn't keep the clubface closed (relative to the clubhead arc) during his takeaway action.
Image 2 is at the P3 position. Note that Andy allows his left forearm to continue to pronate so that he gets the clubshaft on-plane (butt end of the club points at the ball-target line) by his mid-backswing position. Note that he has a GFLW and intact LAFW, and note that his intact LAFW is parallel to the swingplane (inclined plane).
Image 3 is at his end-backswing position. Note that his clubshaft is still on-plane, and note that he still has an intact LAFW and GFLW. Note that his clubshaft is pointing slightly left-of-the-target.
Image 4 is captured just after the end of Andy's early downswing (just after he bypasses the P5 position) - note that he is still has an intact LAFW/GFLW and note that his clubshaft is on-plane (where the butt end of the club points at the ball-target line). Note that he had very little clubshaft shallowing between P4 and P5, and there is no clubshaft "fall-back" phenomenon (as occurs in the A Swing).
Image 5 is at impact. Andy's downswing action is very typical of a "standard" golf swing action, although I personally think that he would do better if he had a more open pelvis and a slightly open shoulder alignment at impact (like Henrik Stenson) rather than being square to the ball-target line at impact. He uses a full-roll hand release action through-and-after impact.
Now, let's examine his A swing technique, which he performed after having being personally instructed by David Leadbetter, and also while being personally observed by David Leadbetter.
Starting with his backswing action - here are capture images showing a comparison between his "standard" golf swing (labelled Andy's swing in the capture images) and his A Swing (capture images created from reference number [6]).

These capture images show Andy's takeaway action. In his A Swing image - note how Andy keeps his club outside his hands by avoiding any left forearm pronatory motion and by simultaneously cupping (bending) his left wrist in an exaggerated manner. That also causes his clubface to appear to be more closed at the P1.5 - P2 positions - when compared to his "standard" golf swing.

Note that
Andy has an intact LAFW/GFLW in his "standard" golf swing, and his clubshaft is
on-plane (butt end of the club points at the ball-target line) at the P3
position.
Note that Andy's clubshaft is vertical in his A Swing image, and not angled towards the ball-target line (in the V-plane manner that David Leadbetter recommends for his A Swing technique). Note that he still has a markedly cupped left wrist.

Here are comparative capture images of his end-backswing position. In his
"standard" golf swing, Andy has an intact LAFW and GFLW and his club is pointing
slightly left-of-the-target. However, note that he also has an intact LAFW/GFLW
in his A swing capture image, and his clubshaft is also pointing
left-of-the-target. In other words, Andy does not manifest the two
classical A Swing elements that David Leadbetter recommends for his A swing's
end-backswing position - i) a markedly cupped (bent) left wrist that disrupts an
intact LAFW alignment and ii) a clubshaft that is angled across-the-line.
Therefore, from a biomechanical/mechanical perspective, there is no essential
difference between Andy's "standard" golf swing's end-backswing position and his
A Swing's end-backswing position - because Andy reverted to his "standard" golf
swing action during his late backswing time period between P3 and P4 by i)
acquiring a GFLW and intact LAFW and by ii) ensuring that his clubshaft
shallowed-out from a vertical off-plane position to get back to a shallower
on-plane position (where the butt end of the club points at an extension of the
ball-target line).
Now, let's consider Andy Proudman's downswing action when he performs the A Swing technique (while being directly observed by David Leadbetter).
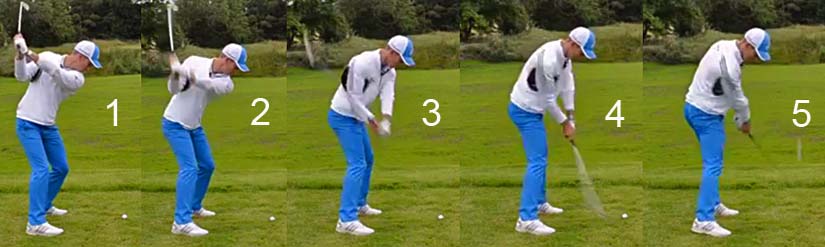
Image 1 shows Andy at the end-backswing position. Note that he has a GFLW and
intact LAFW, and note that his clubshaft is pointing slightly to the
left-of-the-target.
Image 2 shows how Andy transitions to his early downswing and how he minimally shallow-outs his clubshaft during the P4 => P5 time period. Note how he simply pulls his intact LAFW down the inclined plane (down the swingplane). Note that there is no clubshaft "fall-back" phenomenon (as should theoretically happen in the A Swing).
Image 3 is at P5.5 position. Note that he has an intact LAFW/GFLW and note that his clubshaft is on-plane.
Image 4 shows Andy nearing impact and he has successfully completed his PA#3 release action in the "standard" manner that allows him to square the clubface by impact. Andy is using the same biomechanical movements during his slow and rapid phases of left forearm supination that I described when I analysed Henrik Stenson's "standard" downswing action.
Image 5 shows that Andy uses a full-roll hand release action through impact, and he doesn't use the pro-flipping type of non-DH hand release action recommended by David Leadbetter.
In other words, I think that Andy Proudman is really using the biomechanical/mechanical elements for his downswing action and hand release action that are typical of a "standard" golf swing (as performed by Henrik Stenson), and the only part of his A Swing's full golf swing action that is really typical of the A Swing (as described in David Leadbetter's A Swing book) is his backswing action between P1 and P3. What is amazing is that Andy's adulerated A Swing action happened even after he was personally coached by David Leadbetter on how to perform the A Swing and even while he was being directly observed by David Leadbetter, who personally complimented Andy on his performance of his full golf swing action.
I can readily imagine a "scenario" where junior golf instructors in David Leadbetter's many teaching academies around the world, who are less knowledgeable than David Leadbetter regarding the biomechanics of the A Swing, are going to create a variety of adulterated A Swing full golf swing actions in their golf students that will have more biomechanical/mechanical characteristics of the "standard" golf swing than the A Swing!
Consider another example where David Leadbetter's A Swing ideology has merely corrupted (adulterated) the "standard" golf swing action of a professional golfer - by considering how David Leadbetter has modified Lydia Ko's full golf swing action.
Lydia Ko is a phenomenally gifted female golfer who won her first LPGA competition at the age of 14. She was previously coached by Guy Wilson for 11 years (from the age of 4 to the age of 14) before she ditched Guy Wilson. She then apparently came under David Leadbetter's direct influence in early 2014 [9]. If you read that news article, you will note that David Leadbetter made the following comments with respect to Lydia Ko. To quote directly from the news article [9]-: "Lydia Ko's new coach David Leadbetter says he urged the "Mona Lisa'' of women's golf to think carefully about changing coaches because of her great success under former mentor Guy Wilson. --- But Leadbetter said the new coaching regime would not radically change Ko's style. He likened her to the "Mona Lisa... you don't need to repaint that.'' --- Suggestions so far had been "very cosmetic'', including stepping a little closer to the ball and slight adjustments to her grip and a minor correction to a closed club face. --- He described Ko, who "caught on very quickly'' as "a treasure from your part of the world' who would be "treated with kid gloves''.
Even though David Leadbetter described Lydia Ko as the "Mona Lisa of women's golf who didn't need repainting", his ego-driven "belief" in the legitimacy of his A Swing concept has induced him to corrupt Lydia Ko's "standard" golf swing action with biomechanical moves that characterise the A swing.
Here is the "evidence".
Consider Lydia Ko's "standard" golf swing action from 2013 - before she came under David Leadbetter's coaching influence.
Lydia Ko swing video - https://www.youtube.com/watch?v=sMy8BTx0NwM
Here are capture images from the swing video.
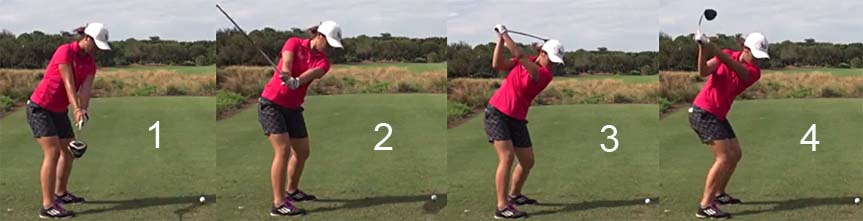
Image 1 is at P2 position where she has a GFLW and intact LAFW and where the toe
of her club is pointing skywards because she allowed her left forearm to
naturally pronate during her takeaway action. Note that the clubshaft is
parallel to the ground and also parallel to the ball-target line.
Image 2 is at the P3 position. Note she has an intact LAFW/GFLW and the clubshaft is on-plane (with the butt end of the club pointing at the ball-target line). Note that she had to continue to pronate her left forearm between P2 and P3 by a requisite amount to get her clubshaft to be on-plane.
Image 3 is at the end-backswing position. Note that she has an intact LAFW/GFLW. She has over-swung slightly, which causes her clubshaft to point slightly to the right-of-the-target. However, the across-the-line clubshaft position at P4 is not due to having a markedly cupped left wrist (as seen in the A Swing).
Image 4 shows how Lydia Ko transitions to the early downswing. Note that she is simply pulling her intact LAFW downplane and note that there is no clubshaft "fall-back" phenomenon because her intact LAFW was never off-plane during her backswing action.
Now, consider Lydia Ko's downswing action in greater
detail.

Image 1 shows Lydia Ko at her end-backswing position. She has over-swung
slightly, which causes her club to point across-the-line, but she still has an
intact LAFW/GFLW which is on-plane.
Image 2 shows the transition to her early downswing. Note that there is no clubshaft "fall back" phenomenon even though she shallows-out her clubshaft. Note that she maintains her intact LAFW/GFLW alignments.
Image 3 is at the P5 position. Note that she has an intact LAFW/GFLW and note that her clubshaft is on-plane (butt end of the club points at the ball-target line).
Image 4 is at the P5.5 position. Lydia Ko is starting to pull the butt end of the club more targetwards and less downwards, and she is therefore starting her slow phase of left forearm supination while she keeps her clubshaft on-plane as the club starts to release (representing the release of PA#2).
Image 5 is at P6.5, which is approximately where she will transition from the slow phase of left forearm supination to the rapid phase of left forearm supination (representing the release of PA#3) so that she can ensure that she has a square clubface by impact (image 6).
Note that she maintains an intact LAFW/GFLW throughout her entire downswing (like Henrik Stenson).
Now, consider how her backswing action has changed under the teaching influence of David Leadbetter.
Lydia Ko 2015 swing video - https://www.youtube.com/watch?v=wRmF6ycMZPg
Here are capture images from a 2015 iron swing video.
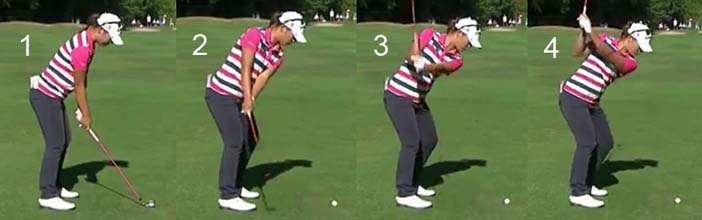
Image 1 is at address. Note that she has a good body posture at address (as seen
in her 2013 swing) and her arms hang
down near-vertically at address.
Image 2 shows how she is using the A Swing takeaway action - by resisting left forearm pronation while she pulls her hands inwards closer to her right thigh. Note that she deliberately keeps the club outside her hands while ensuring that the clubface is closed to the clubhead arc.
Image 3 shows Lydia Ko at the P3 position. Note that she has a cupped left wrist which disrupts her intact LAFW alignment and note that her clubshaft is very off-plane (butt end of the club points at her feet instead of pointing at the ball-target line).
In other words, her P1 => P3 backswing action is very characteristic of David Leadbetter's A Swing technique.
Image 4 is at her end-backswing (P4) position. Note that she has significantly flattened her left wrist between P3 and P4 thereby establishing a GFLW and intact LAFW alignment.
So, instead of maintaining a markedly cupped left wrist and moving her clubshaft across-the-line (as would be seen in David Leadbetter's recommended A Swing technique), she actually flattens her left wrist and shallows-out her clubshaft so that it points slightly left-of-the-target during the P3 => P4 time period.
Consider David Leadbetter's desired end-backswing position for an A Swing golfer (image copied from reference number [1]).
Note that David Leadbetter wants an A Swing golfer to have an equal amount of
cupping of the left and right wrists as the golfer transitions from the P3
position to the P4 position, and this will cause the clubshaft to move
across-the-line as the left arm is elevated to its final end-backswing position.
At that end-backswing position, the LAFW is non-intact (because the club is
angled to the right-of-the-target, secondary to being equally angled relative to
the palms of the two hands which are in a prayer grip alignment) and the clubshaft is off-plane. Lydia Ko,
fortunately, doesn't perform David Leadbetter's recommended P3 => P4
move (as described in his A Swing book and many you-tube videos) and she avoids
the potentially disastrous consequences of being in that sub-optimal
end-backswing position.
Let's consider Lydia Ko's P3 => P4 backswing action in greater detail.
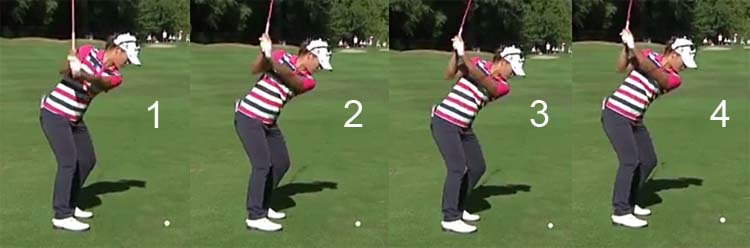
Image 1 shows Lydia Ko at the P3 position - note that her clubshaft is off-plane
(butt end of the club points at her feet) and she has a significantly cupped
(bent) left wrist and disrupted LAFW.
Images 2, 3 and 4 show how she flattens her left wrist between P3 => P4, and she simultaneously allows the clubshaft to fall-back to a shallower end-backswing position where the club points slightly to the left of the target. At the P4 position, she has a GFLW (and not a markedly cupped left wrist) and an intact LAFW, and she is therefore in an end-backswing position that is more characteristic of a "standard" golf swing golfer (like Henrik Stenson). From that end-backswing position, where she has an intact LAFW/GFLW, she can perform an efficient downswing action (as seen in her 2013 swing action) without having to first execute a clubshaft "fall-back" phenomenon that would require a significant degree of clockwise (pronatory) rotation of her left forearm. She also doesn't have the added problem of having to subsequently convert from having a markedly cupped left wrist at the P5.5 position to acquiring a GFLW (or AFLW) by impact.
Although Lydia Ko's end-backswing position is still acceptable (because she has an intact LAFW/GFLW alignment), she had to perform a number of compensatory biomechanical moves between P3 and P4 to get to an "acceptable" end-backswing position. By contrast, she already had a perfect backswing action in 2013 - using an intact LAFW/GFLW technique where she kept the clubshaft on-plane during her backswing action - and she didn't have to perform any compensatory biomechanical actions between P3 => P4 to get to a perfect end-backswing position. Therefore, I personally have no difficulty concluding that her 2013 backswing action is much more efficient than her 2015 backswing action.
But, how does David Leadbetter define "efficiency" when it comes to a golfer's backswing action?
David Leadbetter uses the following analogy in his A Swing book [1]-: "The analogy I like for the efficiency of the A Swing backswing is that it’s like flying from New York to Miami on a direct flight versus heading to Chicago first and then down to Miami. Either way you’ll eventually get to Miami, but one route takes more time and you travel a lot farther to get there. In other words, it’s a lot less efficient. So why fly to Chicago if you don’t have to? The same holds true with the A Swing." I think that David Leadbetter's analogy/argument is ludicrously inept. I agree that the distance that the left hand travels between address and the end-backswing position is shorter in the A Swing than the distance the left hand travels between P1 and P4 in the "standard" golf swing, but I would never think of measuring the efficiency of a golfer's backswing action in that irrelevant manner. I would measure the efficiency of a golfer's backswing action by assessing how effectively he has loaded his power accumulators (PA#4, PA#2 and PA#3) at his end-backswing position while simultaneously assessing whether he has also i) maintained an intact LAFW/GFLW and an ii) on-plane clubshaft during his backswing action. I think that Henrik Stenson and Lydia Ko (in her "old" 2013 swing) were perfectly efficient when assessed from this very relevant biomechanical/mechanical perspective, and I personally think that the A Swing technique cannot be deemed to be efficient when assessed from that same biomechanical/mechanical perspective.
How does David Leadbetter assess the overall efficacy of the A Swing - compared to the "standard" golf swing?
David Leadbetter stated in his book [1] that he had his A Swing evaluated by an "expert" biomechanist (J.J. Rivet based in France) and he even had J.J. Rivet write a chapter in his book [1] that is devoted to the topic of discussing the biomechanical efficacy of the A Swing.
Let's consider some of the claims made by J.J Rivet in chapter 1 of David Leadbetter's A Swing book [1].
Claim number 1: J.J. Rivet made the following claim-: "What my tests proved was that while tour pros, as a result of their talent, skill level, and endless hours of practice, do a wonderful job most of the time of repeatedly delivering the club squarely at speed into the ball with the more traditional approach, the A Swing if used by a similar athlete requires far less energy and motion to achieve comparable results." I think that J.J. Rivet's claim is meaningless because I don't think that it is relevant to measure the amount of "energy" (whatever that vague term is supposed to imply) and the "amount of motion" used by a golfer when comparing two full golf swing techniques. I think that the relevant comparative measurements should be i) clubhead speed at impact for a driver if one wants to compare driving distance and ii) consistent accuracy of ball flight when hitting woods and irons. Also, J.J. Rivet never demonstrated in his written chapter that the tested golfers were performing the "standard" golf swing in the optimum manner, and I am therefore very skeptical of his unscientific claim.
Claim number 2: J.J. Rivet made the following claim without supplying details of the testing procedure or the scientific methodology of measuring "energy" or "wasted motion", and without describing how he scientifically decides whether any golf swing is "simpler" and "requiring less effort"-: "Perhaps the best attribute of the A Swing is its efficiency. It helps golfers get to the top of the backswing— and poised for a good downswing— with the least wasted motion. It does this without losing the potential to build energy and create a powerful hit. My testing proved it requires less energy and movement to produce a shot of similar distance to one hit using a conventional swing. Think of how consistency will improve simply because the rotation of the body and the swinging of the arms and club are simpler and require less effort." I think that all of his claims are meaningless (nonsensical) when assessed from either a scientific, or a "real life" golfer's, perspective.
Claim number 3: J.J. Rivet made the following claim-: "To repeat any movement accurately, the goal is to simplify what is required. Think of a helicopter blade. It has to repeat the same movement up to five hundred times a minute flawlessly or the helicopter might crash. Knowing this, engineers designed the propeller to rotate around a fixed axis— the hub. This fixed point keeps the propeller rotation steady and on a constant path. In other words, it provides incredible consistency to its effective performance. Although the actions of the body and the arms and the club in the golf swing aren’t identical to the action of a helicopter propeller, there are many similarities. I want you to visualize the body as that fixed axis (the hub), and the arms and the club as a propeller blade. Just as in the efficient movement of the blade, the A Swing reduces wasted motion and simplifies what is required of the body to let the arms swing the club around it and produce a solid shot time after time."
I think that this over-simplistic explanation may convince a 10-year old child, but it is meaningless from my personal perspective. I strongly suspect that both J.J. Rivet and David Leadbetter are very ignorant when it comes to the subject of TGM mechanics (as described by Homer Kelley in his "The Golfing Machine" book [9]) and I strongly suspect that they both don't understand the "real life" value of TGM concepts like i) maintaining an intact LAFW/GFLW throughout the backswing's P2 => P4 time period, and specifically during the entire downswing and early followthrough time periods; ii) how to trace a straight plane line during both the backswing and downswing so that the clubshaft will always be on-plane; iii) how to efficiently release PA#2 and PA#3 without any assistance from a right arm's active straightening motion and iv) the "real life" disadvantages of combining TGM swinging and TGM hitting biomechanical motions in the same A Swing action. Also, they are both seemingly oblivious of the value (in terms of consistently ensuring an accurate ball flight) of using a drive-hold hand release action, versus a non-DH hand release action, through the immediate impact zone between P7 and P7.2.
Claim number 4: J.J. Rivet made the following claim-: The coordination of footwork improved. The transfer of weight through the feet during the backswing and through-swing was more symmetrical. The weight of the body was supported in the right heel 45 percent more during the backswing and 45 percent more into the left heel just after impact. This indicates a better rotation of the hips during the downswing, which allows the club to swing on the proper path without being blocked by the body."
How does J.J. Rivet measure "weight transfer"? He doesn't state how he made these measurements and whether he is referring to COM (center-of-mass) measurements or COP (center-of-pressure) measurements. He is also implying that getting more "weight" over the left heel just after impact is advantageous. However, that assertion (if he is referrring to COP measurements) may only apply to a subset of golfers who are *"front-foot" golfers rather than "reverse group" golfers. He has also not demonstrated (from a scientific methodological perspective) how he measures the "coordination of footwork" and why it should be better in an A Swing golfer, and he has not demonstrated why he wrongheadedly believes that an A Swing golfer has a better rotation of the hips during the downswing than a skilled "standard" golf swing golfer like Henrik Stenson and Lydia Ko (2013 swing).
(* See topic number 13 in this review paper - 2014: Revisions and Refinements in my Thinking Regarding Golf Swing Biomechanics/mechanics - if you want to understand the difference between "front foot" golfers and "reverse group" golfers in terms of their footwork and their COP measurements)
Claim number 5: J.J. Rivet made the following claim about the A Swing-: "During the initial move, less energy is needed to engage all the muscles around a stable axis. Using the deep core muscles of the abdomen creates more potential energy for the swing." This is another unscientific claim where we have no idea whether the study's golfers could perform the "standard" golf swing's pivot action efficiently. If they could perform the pivot action as well as "standard" golf swing pro golfers like Henrik Stenson, Jason Day and Adam Scott, then there should be no reason why less energy would be needed to engage "all the muscles around a stable axis" in an A Swing golfer and why A Swing golfers should be able to use their core abdominal muscles more efficiently than "standard" golf swing pro golfers like Henrik Stenson, Jason Day and Adam Scott.
Claim number 6: J.J.Rivet made the following claim about the A Swing-: "The club is in a better position at the top to be swung down on-plane." I disagree 100% with J.J. Rivet's irrational claim! I have repeatedly shown that a "standard" golf swing golfer, who has an intact LAFW/GFLW at the end-backswing position with his clubshaft already on-plane, can simply pull his left arm/clubshaft downplane without any need for any planar shift of the club, and without any need for a club "fall back" phenomenon. By contrast, an A Swing golfer has to move his clubshaft from its off-plane position (which is across-the-line) to an on-plane position, and this requires a biomechanically-disadvantageous compensatory left forearm pronatory motion.
Claim number 7: J.J. Rivet made the following claim about the A Swing -: "There is more time to synchronise the downswing, which means more time to create energy to strike the ball solidly". This irrational claim is so nonsensical that one has to question how anybody could regard J.J. Rivet as being an "expert" biomechanist!
I personally think that readers of this critical review paper should avoid being fooled by the ridiculously over-simplistic opinions expressed by J.J. Rivet and David Leadbetter regarding golf swing biomechanics/mechanics by independently acquiring a better knowledge of sound golf swing biomechanics and TGM mechanics, and I would advise readers to simply use common-sense when independently comparing the biomechanical/mechanical efficacy of the A Swing to the biomechanical/mechanical efficacy of the "standard" golf swing (as exemplified by Henrik Stenson's "standard" golf swing action).
Which golf swing technique represents sound golf swing biomechanics/mechanics from my personal perspective? I believe that the standard/conventional golf swing, using an intact LAFW technique, represents a biomechanically sound way of performing a full golf swing. I do not favor this TGM-based intact LAFW technique because I am a TGM-literalist (who believes that the TGM book [10] is an irrefutable "bible" when it comes to ideas relating to the world of golf instruction). In fact, I actually believe that the TGM golfing machine model is fundamentally flawed because it isn't compatible with the "real life" DH-hand release action used by many modern-day professional golfers. I only believe in the value of a selective number of TGM concepts, such as the intact LAFW swing technique (for a number of reasons already mentioned earlier in this review paper), and I particularly like the "fact" that an intact LAFW swing technique enables a modern-day professional golfer to more efficiently perform a DH-hand release action through impact. My personal benchmark for regarding a particular swing technique as being a very sound golf swing technique (from a ball flight "accuracy" perspective) is based on two factors - i) The one factor is that the particular swing technique must make sense from a biomechanical/mechanical perspective and ii) the second factor is that there must be substantial evidence to show that the particular swing technique is used by many modern-day professional golfers in such a manner that it allows them to improve their ability to consistently generate an accurate/straight ball flight.
What I serendipitously discovered a few years ago is that many professional golfers are using a drive-hold (DH) hand release action through impact (which can keep the clubface square to the target for many inches through impact), and a DH-hand release action is incompatible with Homer Kelley's TGM model. Homer Kelley apparently never realised that a skilled professional golfer is capable of keeping the clubface square to the target for many inches immediately before-and-after impact because he didn't have access to a Phantom camera, which can capture video images at a frame rate of 100,000 frames/second.
(* If you are interesting in understanding why I presently believe that Homer Kelley's TGM model is incompatible with a DH-hand release action - see question & answer number 6 in my Impact and Followthrough Chapter )
Consider this video taken with a Phantom camera at 100,000 frames/second.
https://www.youtube.com/watch?v=-bj2sWHW1Mg
Here are capture images from the video.

Note that the clubface is already square to the target about 2" before ball
impact and that it even remains square after impact. Kelvin Miyahira stopped the
video when the clubhead was about 1.5" after impact, so we do not
know how for long the clubface remained square in this particular recorded
swing.
However, there are many similar high speed videos available on you-tube that show that the clubface remains square to the target for many inches after impact.
Consider another example taken with a Photon Ultima APX camera.
https://www.youtube.com/watch?v=2Y57pw_iWlk
Here are capture images from the video.

Image 1 shows that the clubface is square to the target about 1.5" before impact
and note that it remains square to the target even well after impact. In fact,
if you watch the video, you will observe that the clubface remains square to the
target for about 4" post-impact.
So, how do skilled, modern-day professional golfers keep the clubface square to the target for many inches through impact?
I am writing this review paper in late 2015, and many golf commentators believe that the "best" professional male golfer in 2015 is Jordan Spieth, who won the 2015 FedEx cup.
Consider how Jordan Spieth keeps his clubface square to the target for many inches after impact.
Jordan Spieth video - https://www.youtube.com/watch?v=91pmkKuYZ0A
Here are capture images of his clubface at-and-after impact.
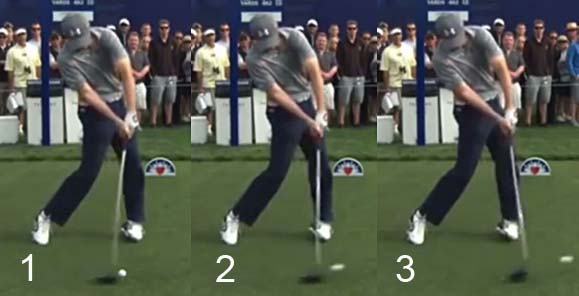
Image 1 is at impact and his clubface is square to the target. Image 2 is
captured at ~3" inches post-impact, and image 3 is captured at ~6" post-impact,
and his clubface is still square to the target.
How does Jordan Spieth achieve that eminently desirable goal of maintaining a stable/square clubface from a biomechanical perspective? Note that he has an AFLW (anatomically flat left wrist) and not a GFLW (geometrically flat left wrist) at impact, and that is due to his left wrist being slightly palmar flexed. That AFLW alignment is actually established during his early backswing (during which time period he converts from having a GFLW => AFLW) so that he already has an AFLW by his end-backswing position. Then, using the same *intact LAFW swing principles as a golfer like Henrik Stenson (who uses an intact LAFW swing technique with an unchanging GFLW) he maintains an unchanging AFLW throughout his entire downswing and early followthrough time periods.
(* From a purist's perspective, it is actually impossible to have an intact LAFW in combination with an AFLW because even a small degree of left wrist palmar flexion will cause the clubshaft to angulate so that it is no longer perfectly straight-in-line with the left arm. However, the degree of angulation is very small and Jordan Spieth's marginally non-intact LAFW structure "flies in space" between P4 => P7.2+ in the same manner as Henrik Stenson's intact LAFW structure. I have labelled Jordan Spieth's LAFW structure as being a marginally non-intact LAFW/AFLW combination rather than being an intact LAFW/GFLW combination (as seen in Henrik Stenson's intact LAFW/GFLW swing action) and I have discussed the minor differences between these two LAFW variations in much greater detail in the appendix section of this review paper)
Note that Jordan Spieth's LAFW/AFLW alignment doesn't change in his early followthrough between P7 and P7.2, and he doesn't even fractionally bend his left wrist or straighten his right wrist, and he also doesn't significantly roll his LAFW (consisting of his left arm and clubshaft) during this time period, so his clubshaft never bypasses his left arm (from an angular rotational perspective). Jordan Spieth is simply swinging his entire LAFW structure through impact in a very stable manner. The fulcrum point for the 3-D motion of his LAFW structure is the left shoulder socket and you can conceptually envisage that he is essentially swinging a ~6 foot long lever through impact in such a controlled manner that he can maintain a stable clubface throughout the clubhead's travel time through the immediate impact zone between P6.9 => P7.2.
Now, consider the non-DH hand release action that David Leadbetter uses for his A Swing.
Note how David Leadbetter's left wrist bends to a significant degree between
image 2 and image 3. That means that the fulcrum point for his club's 3-D motion
during the clubhead's travel time through the immediate impact zone between P6.9
=> P7.2 is at the level of his left wrist, and not at the level of his left
shoulder socket. That also means, from a conceptual perspective, that he has roughly
halved the functional length of the swinging lever (compared to Jordan Spieth's
6' long swinging lever) and it is obviously going to be much more difficult to
keep the clubface continuously square to the target between P6.9 and P7.2 when using a lever
that moves the clubhead along a shorter radial arc.
Most importantly, one also has to take into account the "forces" that are operating on the handle of the club through impact, while simultaneously considering where those forces are applied.
Consider this image (modified from an image of Ernie Els' grip) that shows the position of the coupling point, and pressure points number 1 and 3.
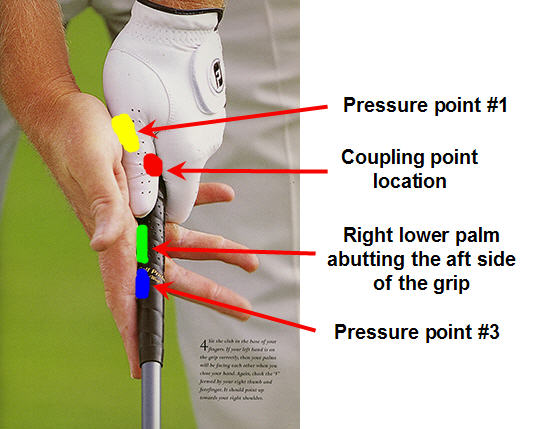
The red dot represents the location of the coupling point - which is located opposite the left index finger knuckle - and it is the point on the grip that is midway between the two hands. Push-pressure applied by the right palm against the left thumb at PP#1 (yellow dot), which is above the coupling point, can help stabilise the club through impact if the amount of push-force is not large. However, if excessive push-pressure is applied by the right palm against PP#1 while the club is moving through the immediate impact zone it may increase the speed of motion of the left hand/club handle through impact - but it will not automatically predispose to flip-bending of the left wrist through impact. By contrast, any push-pressure applied by the right hand (eg. due to an actively straightening right wrist) to the aft side of the grip at or near PP#3 (green and blue dots), which is below the coupling point, will predispose to left wrist flip-bending. David Leadbetter recommends an active right wrist straightening action for his A Swing and it will naturally predispose to left wrist flip-bending. If the left wrist flip-bending phenomenon inadvertently/unintentionally happens pre-impact then the clubface will not likely be square at impact. If the left wrist flip-bending phenomenon occurs immediately post-impact, then the clubface may be square at impact, but not necessarily square for many inches post-impact. By contrast, a DH-hand release action ensures that the left wrist never flip-bends through impact.
When hitting a lob/flop shot, it is useful to keep the clubface square, but laid-back (cluface faces the sky), through the immediate impact zone.
Consider these capture images of a lob shot that were taken with a Phantom camera.
Video - http://www.youtube.com/watch?v=AoaXBFqwsJk
Capture images from the video showing a lob shot hit off a hitting mat.
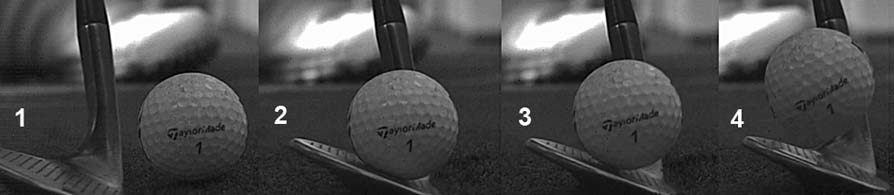
Note that the clubface is square and laid-back pre-impact (image 1), through
impact (images 2 and 3) and post-impact (image 4).
Most amateur golfers (and even some pro golfers) perform a lob/flop shot using an underflipping type of non-DH hand release action, which is a very timing-dependent non-DH hand release action, that cannot guarantee that the clubface will remain square (and laid-back) for many inches post-impact.
By contrast, Phil Mickelson, uses a DH-hand release action (reverse roll subtype) when hitting lob/flop shots.
Here is a capture image of Phil Mickelson hitting a flop shot from just off the green, and where his ball is partly buried in the thick grass.
Capture images from reference number [11].
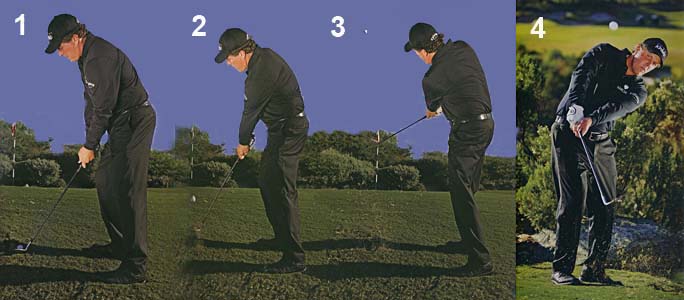
Note that Phil Mickelson is using a DH-hand release action through impact, and his clubshaft never bypasses his lead wrist between impact and P7.5. Note how he maintains an unchanging flat lead wrist, and unchanging bent trailing wrist, throughout the entire P7 => P7.5 time period.
In this review paper, I have presented many reasons why I believe that the "standard" golf swing (based on the intact LAFW swing technique and a DH-hand release action) is more biomechanically/mechanically efficacious than the A Swing. Each reader can independently decide whether my many reasons for preferring the "standard" golf swing constitutes a meritoriously valid argument, and each reader-golfer can independently decide whether to use the "standard" golf swing technique, or the A Swing technique, for his personal full golf swing.
Jeffrey Mann.
First version: November 2015.
Brief summary of Homer Kelley's intact LAFW/GFLW concept:
I think that the flying wedge concept is one of the most useful TGM concepts
that Homer Kelley discussed in his TGM book [10], even though Homer Kelley only
briefly referred to this concept in his TGM book.
The term LAFW refers to the left arm flying wedge and the term GFLW refers to a geometrically flat left wrist, which I have also called a functionally-flat left wrist (f-FLW).
Here is an image of the author demonstrating a GFLW.
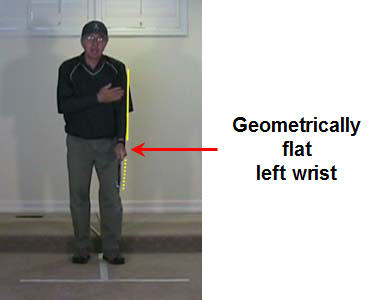
Note that I am holding a short (child-sized) golf club (dotted yellow line) in a straight line relationship with my straight left arm (solid yellow line) and that straight line relationship between the clubshaft and the left arm represents an intact LAFW. Note that the back of my left wrist appears slightly cupped and it does not look visually flat and that is simply due to the fact that I am creating a fist-like hand shape when I grip the rounded handle of the club in my left hand. The degree of cupping of the back of the left hand mainly depends on the strength of a golfer's left hand grip - as demonstrated in the next image.
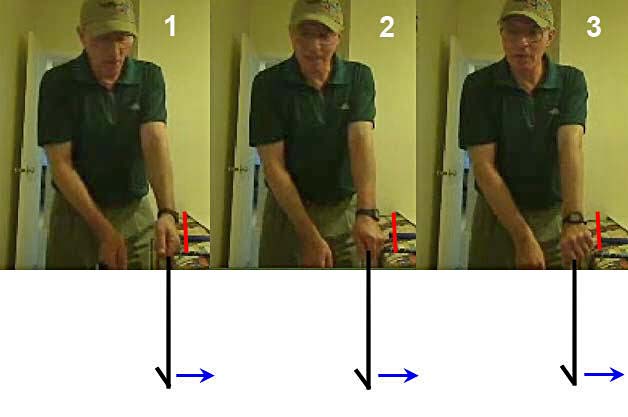
Note that I have drawn in black an imaginary golf club that is straight-in-line with my left arm in all three images, which means that the left wrist is geometrically flat (represented by the short red line) in all three images. The clubface faces the target in all three images (represented by the blue arrow). In image 1, I have adopted a weak (1-knuckle) left hand grip where I have placed my left thumb at the 12 o'clock position on the grip - note that the degree of cupping of the back of the left hand appears to be very small in amount. In image 2, I have pronated my left forearm more (note that the watchface over the dorsum of my left lower forearm has rotated more clockwise) before I grip the handle of the club, and that causes my left thumb to be positioned at the 1:30 o'clock position (when viewed from above) when I grip the club. That represents a slightly strong (2-3 knuckle) left hand grip. Note that my left wrist appears to be more cupped - even though I still have a geometrically flat left wrist. In image 3, I have adopted a very strong (4+ knuckle) left hand grip by pronating my left hand so that my watchface is parallel to the inclined plane before I grip the club, and that positions my left thumb at the 3 o'clock position (when viewed from above). Note that the ulnar border of my left hand faces the target. I still have a GFLW because the clubshaft is still in a straight line relationship with the left arm. Therefore, it is important to realise that the visual appearance of the back of the left wrist/hand in terms of its degree of cupping will vary depending on left hand grip strength - when a golfer adopts a GFLW at address. Note that the clubface will only appear to be roughly parallel to the back of the GFLW/lower left forearm (watchface area) when the golfer adopts a weak left hand grip, and that it appears to be more closed relative to the back of the GFLW/left lower forearm (watchface area) when a golfer adopts a stronger left hand grip. So, for example, if a golfer adopts a slightly strong (3-knuckle) left hand grip at address, then the clubface will be closed by ~30-45 degrees (relative to the back of the GFLW/left lower forearm (watchface area) at address. If that same golfer maintains a GLFW throughout his backswing, downswing and early followthrough action, then the clubface will always be closed relative to the back of his GFLW/left lower forearm (watchface area) by exactly the same amount if he continuously maintains an intact LAFW/GLFW.
Now, let me more thoroughly explain what's a left arm flying wedge.
Consider this DTL view image of the author
demonstrating the intact LAFW concept.
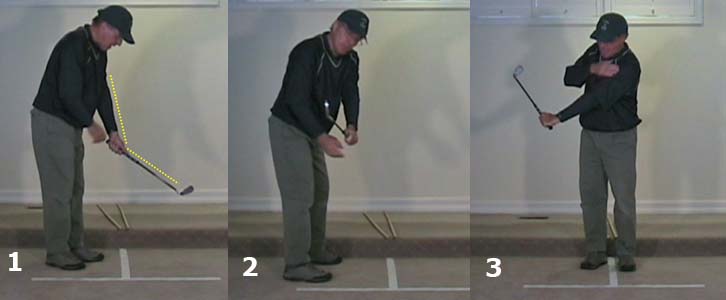
In image 1, I am holding the clubshaft in a straight line relationship with my left arm (when viewed from the face-on viewing perspective) which means that I must have a GFLW. However, note that the clubshaft is not a straight line relationship with the left arm when viewed from a down-the-line (DTL) viewing perspective and that there is an obtuse angle of ~135 degrees between the left arm and clubshaft (angle between the dotted yellow lines). Homer Kelly called that obtuse angle the accumulator #3 angle. The reason why the clubshaft is not in a straight line relationship with the left arm (within the intrinsic plane of the LAFW) at address is due to the way a golfer grips the club in the palm of the left hand. I have adopted a low palmar left hand grip, and not a finger grip, which would cause that accumulator #3 angle angle to be closer to 90 degrees rather than being closer to 180 degrees. By contrast, if a golfer adopts a high palmar left hand grip (where the handle lies over the top of the hypothenar eminence and nearly straight-in-line with the mid-palmar crease), then the accumulator #3 angle at address would be closer to 180 degrees rather than being closer to 90 degrees. That obtuse accumulator #3 angle gives the left arm-clubshaft relationship a wedge-like appearance (V-shaped appearance) and that makes the term "left arm flying wedge" understandable - if you think of that V-shaped (wedge-shaped) structure (representing the unitary structure of the left arm and the clubshaft that are always maintained in a straight line relationship in the plane of the LAFW) being equivalent to an "unitary wedge-shaped planar structure" that is capable of moving (flying) in space (like a wedge-shaped fighter jet airplane). Images 2 and 3 show me (author) performing a backswing action where I maintain a GFLW and intact LAFW (left arm and clubshaft are always in a straight line relationship within the plane of the LAFW) while I allow the intact LAFW to move (fly) 3-dimensionally in space from the P1 position (image 1) to the P2.5 position (image 3). Note that I am upcocking (radially deviating) the left wrist during this early-mid backswing action so that I am closer to having a 90 degree accumulator #3 angle by P2.5 (image 3). However, that left wrist upcocking motion doesn't disrupt my intact LAFW (= straight line relationship between the left arm and clubshaft within the plane of the LAFW) because any left wrist upcocking motions (due to radial deviation of the left wrist) and any left wrist downcocking motions (due to ulnar deviation of the left wrist) only occur within the plane of the LAFW. What would disrupt an intact LAFW alignment is any left wrist bowing (palmar flexion) or left wrist bending (dorsiflexion) motions that would cause the clubshaft to angulate sideways so that it is no longer in a straight line relationship with my left arm.
Here is a link to a short 15 minute you-tube video where I demonstrate the intact LAFW swing technique using a badmintion racquet and a short (child-sized) golf club.
Here are capture images (from the video) of the author demonstrating an intact LAFW swing action using a badminton racquet.
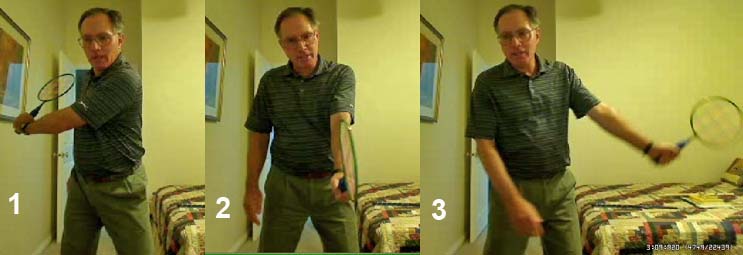
Note that I am performing a backhanded tennis stroke action starting at the P5.5 position (image 1) and ending at the P8 position (image 3). Imagine that ball impact with a tennis ball occurs when the racquetface is square to my intended target (image 2). Note that I am maintaining a GFLW and intact LAFW during the entire backhanded tennis stroke action from P5.5 to P8, which means that I will therefore automatically have a FLW at impact. In other words, I don't need to biomechanically create a FLW by impact by adding some compensatory biomechanical maneuver. By contrast, if I had a markedly cupped left wrist at P5.5 (as seen in David Leadbetter's A Swing), then I would have to add some type of compensatory biomechanical maneuver to convert a bent left wrist (and non-intact LAFW) to becoming a FLW (and intact LAFW) by impact. That's a huge advantage in favor of using an intact LAFW/GFLW technique. One can simply swing the intact LAFW (unitary structure of the left arm-clubshaft) through impact without worrying about the possibility of having a flipped (bent) left wrist at impact if that additional compensatory biomechanical manuever (required to convert a bent left wrist to a FLW) is imperfectly executed between P5.5 and P7.
Here is another set of capture images from that video showing an intact LAFW/GFLW swing action while using a short (child-sized) golf club.
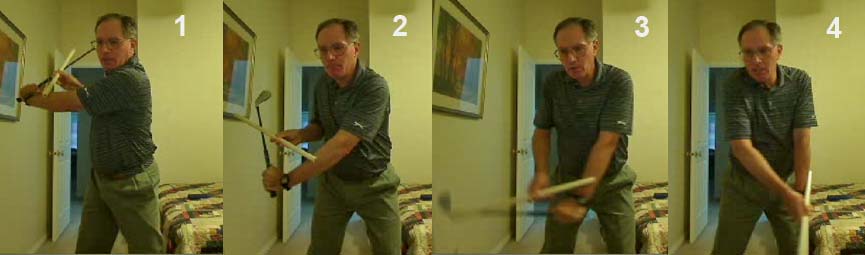
Note that I am holding a short white-colored, plastic irrigation pipe across my left
arm/clubshaft to show that they are always in a straight line relationship
(within the plane of the intact LAFW).
Image 1 is at P3 where I have a intact LAFW/GFLW which is aligned parallel to the inclined plane (swingplane). Image 2 is at P5.5 - note that I have still have an intact LAFW/GFLW and note that I have simply pulled the entire intact LAFW down the surface of the inclined plane (swingplane) from P5 to P5.5 while keeping the clubshaft parallel to the inclined plane (swingplane), which means that the clubshaft is always on-plane.
Image 3 is at P6. Note the club is starting to release, but it releases within the plane of an intact LAFW so it doesn't disrupt the intact LAFW's internal alignment.
Image 4 is at impact where I still have an intact LAFW/GFLW.
Note that the club is progressively releasing between P6 and P7 (representing the release of PA#2) so that the clubshaft can catch-up to the left arm by impact; and note that the clubshaft is simultaneously rotating counterclockwise so that one can also ensure that the clubface is square to the target by impact. How can a golfer efficiently maintain an intact LAFW/GFLW during this late downswing time period when the clubshaft is following a conical pendular path?
Consider Kelli Oride's downswing action - where she maintains an intact LAFW/GFLW throughout her downswing and early followthrough.
Kelli Oride swing video - http://www.youtube.com/watch?v=p7hBadAiMcA
Here are capture images from the swing video.
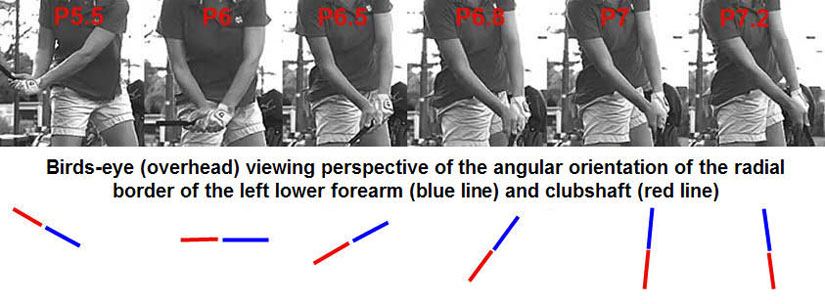
Image 1 shows Kelli Oride at the P5.5 position. Note that she has an intact
LAFW/GFLW. I have drawn a blue line below her photographic image 1 that is
representative of an imaginary straight line that is parallel to the back of her
GFLW/lower left forearm (watchface area). Note that it is straight-in-line with
the red line, which represents the clubshaft, and this straight-in-line
relationship is characteristic of an intact LAFW alignment.
Image 2 is at P6, image 3 is at P6.5, image 4 is at P6.8 and image 5 is at impact (P7). Note that the back of her GFLW is rotating counterclockwise between P6 and impact, and note that she maintains a GFLW/intact LAFW throughout her downswing action (represented by the blue line always being straight-in-line with the red line).
Image 6 is at P7.2 (end of the immediate impact zone), and she still has an intact LAFW/GFLW.
Note that *Kelli Oride has maintained a GFLW all the way from P5.5 to P7.2, and she doesn't have to "artificially" create a FLW-alignment for impact (as is necessary in David Leadbetter's A Swing because an A Swing golfer has to "somehow" convert from having a markedly cupped left wrist at P5.5 to having a FLW by impact).
(* Kelvin Miyahira's slow-motion video of Kelli Oride is taken with a Phantom camera at ~5,000 frames/second and it allows an observer to carefully observe the back of her left hand during her entire downswing and followthrough actions, so that an observer can clearly note that she always has a GFLW, with the same (unchanging) degree of cupping of the back of her left hand, between P5.5 => beyond P7.2)
Maintaining an intact LAFW/GFLW is not only useful in the late downswing (between P5.5 and impact), it is also extremely useful to maintain an intact LAFW/GFLW during the late backswing and transitional time period to the early downswing, so that there is no need for a club "fall back" phenomenon. When I analysed Henrik Stenson's swing and Lydia Ko's 2013 swing, I demonstrated that they can both shallow the clubshaft smoothly during the P4 => P5 time period by swinging their intact LAFW down the surface of the inclined plane (swingplane) without any need to perform a club "fall back" phenomenon, which can potentially cause the clubshaft/clubhead to bounce or wobble.
Finally, if a golfer uses an intact LAFW/GFLW technique throughout the entire downswing and early followthrough time periods, then it is much easier for that golfer to perfectly execute a drive-hold (DH) hand release action through the immediate impact zone between P7 and P7.2.
Consider Kelli Oride's DH-hand release action.
Here are capture images from her swing video.
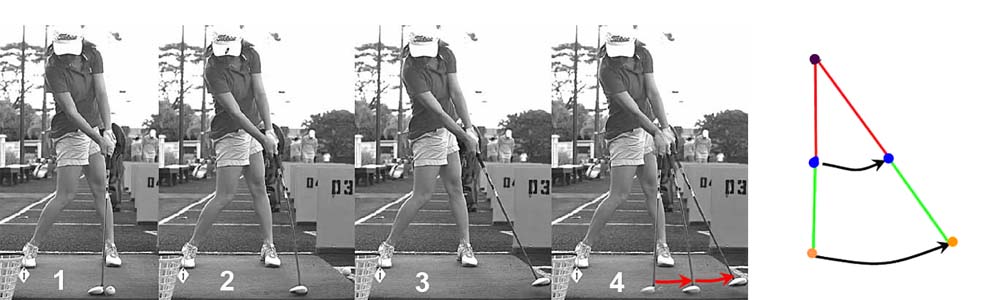
Image 1 shows that Kelli Oride has a square clubface at impact.
Image 2 shows Kelli Oride at the P7.2 position - note that her clubface is still square to the target. Also, note that she still has a GFLW, which proves that she is not flip-bending her left wrist immediately post-impact. Most importantly, note that the clubshaft has not bypassed her left arm from an angular perspective, which means i) that she still has an intact LAFW and ii) that she is not rolling her intact LAFW counterclockwise too fast through the immediate impact zone between P7 and P7.2. That combination represents a drive-hold (DH) hand release action.
Image 3 is at P7.4. Note that the clubhead is ~18" post-impact and Kelli Oride still has an intact LAFW/GFLW. Note that the clubshaft has still not bypassed her left arm from an angular perspective! Kelli Oride is a perfect exemplar of a golfer who can perform a DH-hand release action from P7 to well beyond P7.2!
Image 4 is a composite image (that I produced using Photoshop) of images 1, 2 and 3 and it shows how Kelli Oride keeps her clubface square to the clubhead arc all the way between P7 and P7.4. The accompanying diagram shows her left shoulder socket in black, her left arm in red, her clubshaft in green, her left hand in blue and her clubhead in orange. Note that the angular velocity of her left hand's forward motion is perfectly matched from an angular velocity perspective to the angular velocity of her clubhead's forward motion (even though the linear velocity of her clubhead is much greater than the linear velocity of her left hand), and that characteristic defines a DH-hand release action, which ensures a stable clubface as the clubhead travels through the immediate impact zone from P7 to P7.2+.
Most modern-day professional golfers use an intact LAFW/GFLW swing technique for their full golf swing action, and perfect golfer-exemplars from the 2015 PGA/LPGA tour include Henrik Stenson, Lydia Ko (only her 2013 swing action), Adam Scott, Jason Day, Justin Rose, and Rory McIlroy. There is a slight variation of the intact LAFW/GFLW technique that is so close to being equivalent to an intact LAFW swing technique that I regard it as being mechanically equivalent in terms of its swing efficacy - and that technique varies only because the golfer has an AFLW, and not a GFLW, during the downswing and early followthrough.
An AFLW (anatomically flat left wrist) differs from a GFLW in the sense that the left wrist is slightly palmar flexed so that the back of the left hand looks visually flat, and not slightly cupped.
Here is an image showing Jordan Spieth's AFLW.
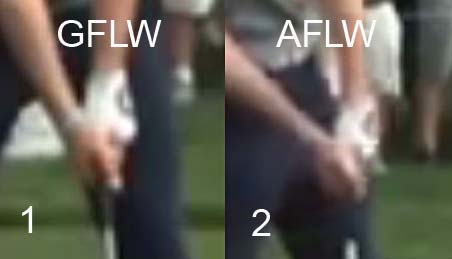
Image 1 shows that Jordan Spieth has a GFLW (slightly cupped left wrist) at
address when the clubshaft is straight-in-line with his left arm.
Image 2 shows that Jordan Spieth has an AFLW at impact - note that the back of his left wrist/hand is visually flat and note that he has a small degree of forward shaft lean with his hands marginally ahead of his clubhead.
Consider Jordan Spieth's full golf swing action with a driver.
Jordan Spieth swing video - https://www.youtube.com/watch?v=_VqJR7gnMHY
Here are capture images from the backswing time period.
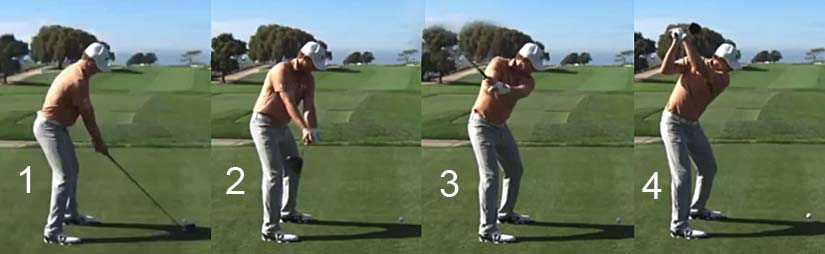
Image 1 shows Jordan Spieth at address. He has a conventional posture for a
professional golfer who is swinging a driver.
Image 2 shows Jordan Spieth at the P2 position where the club is parallel to the ground and also parallel to the ball-target line. He has a GFLW and intact LAFW.
Image 3 is at the P3 position. Note that his clubshaft is on-plane (butt end of the club points at the ball-target line). However, note that his left wrist is slightly palmar flexed giving the back of his left wrist/hand a visually flatter appearance (relative to the appearance of his GFLW).
Image 4 is at his end-backswing position where it is readily apparent that he has a slightly palmar flexed left wrist. Note that his clubshaft is still roughly straight-in-line with his left arm, so his LAFW is only marginally non-intact.
Now, consider Jordan Spieth's downswing action.
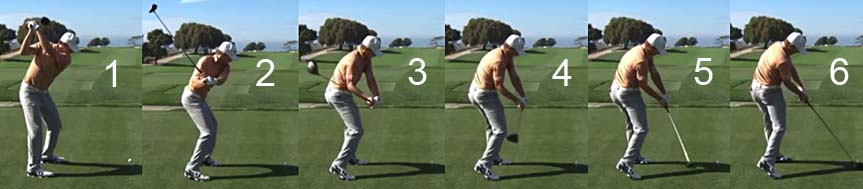
Image 1 is at the end-backswing position where he has an AFLW, and not a GFLW.
Image 2 is at the P5 position. Note that his clubshaft is on-plane and note that he simply pulled his LAFW downplane without needing to execute a club "fall-back" phenomenon during his clubshaft-shallowing action. Note that he still has an AFLW.
Image 3 is at P5.5, image 4 is at P6, image 5 is at P6.5 and image 6 is at impact. Note that he maintains an unchanging AFLW throughout his entire downswing action, and he doesn't have to convert from having a markedly cupped left wrist at P5.5 to having a FLW at impact (as should happen in the A Swing if the A Swing golfer actually manages to convert from having a markedly cupped left wrist at P5.5 to having either a GFLW, or an AFLW, by impact).
Note that having an unchanging AFLW (slightly palmar flexed left wrist) throughout his entire downswing disrupts Jordan Spieth's intact LAFW alignment to a small degree so that his clubshaft is angled slightly backwards (relative to the back of his left forearm) all the time between P4 and P7, and that causes his clubhead to track along a slightly underplane clubhead path (compared to a golfer like Henrik Stenson who maintains an intact LAFW/unchanging GFLW throughout his entire downswing action).
Consider Jordan Spieth's DH-hand release action through impact.
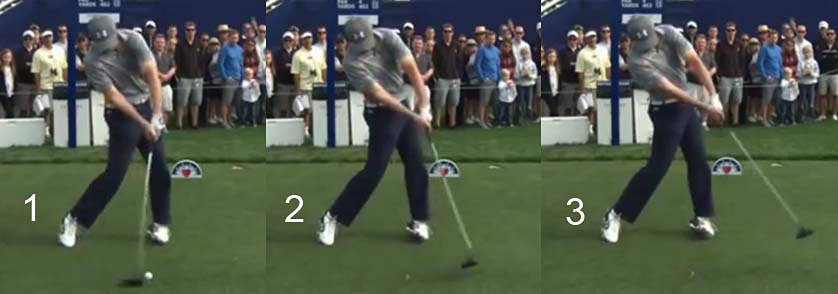
Image 1 is at impact. Note that Jordan Spieth has an AFLW with his hands marginally ahead of his clubhead at impact.
Image 2 is at P7.2 and image 3 is at P7.5. Note that he maintains an unchanging AFLW and bent right wrist throughout his entire followthrough action between impact and P7.5 and his clubshaft never bypasses his left arm (from an angular rotational perspective) and he is therefore a perfect exemplar of a DHer who can maintain a stable clubface throughout the immediate impact zone!
A beginner/developing golfer may wonder what's the best way to learn how to perform a full golf swing using an intact LAFW/GFLW technique. I think that the best way is to first learn how to use a TGM swinging (lead arm swinging) technique, rather than a swing-hitting technique or a hitting technique.
A TGM swinging (lead arm swinging) technique is characterised by the "fact" that a golfer powers the golf swing via a pivot action that first releases PA#4 (loaded left arm that is adducted across the chest), and where PA#2 then secondarily/passively releases according to the laws of physics (law of the double pendulum swing model). The right (trailing) arm is not used to power the release of PA#4 or induce the release of PA#2, although it may be used to synergistically assist in the smooth release of PA#3 - by applying a finite amount of push-pressure against PP#1 (over the left thumb) during the right arm's straightening action between P6 and P7.
Here is a perfect example of a TGM swinging (lead arm swinging) full golf swing action where the golfer maintains an intact LAFW/GFLW throughout his swing action.
Sasho MacKenzie's lead arm-only swing action.
Face-on video - https://www.youtube.com/watch?v=GgF_9IfROAU
DTL video - http://www.youtube.com/watch?v=7JW6A_J4KEA&NR=1
Sasho MacKenzie is a sports biomechanist and a very skilled amateur golfer, who temporarily played golf using only his lead arm for approximately 1 year because he injured his trail arm. Note how he can crisply hit 250 yard drives when performing a lead arm-swinging action (using his right arm, and not his left arm, because he is a "lefty" golfer) - even though he is not using a trailing arm, which could synergistically help him to more smoothly perform a lead arm-swinging action.
Note that he maintains an intact LeadAFW/GFLW throughout his backswing action, dowswing action and followthrough to P7.5+.
Here are capture images showing his DH-hand release action.
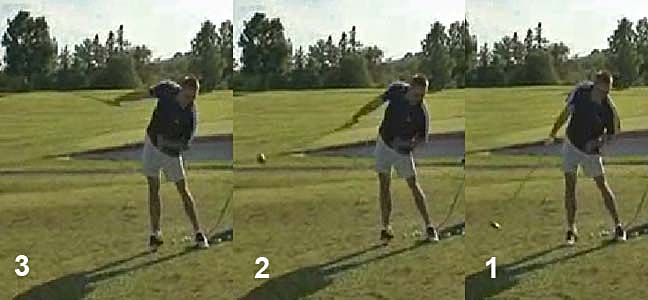
Note how Sasho MacKenzie maintains an intact LeadAFW/GFLW throughout his entire followthrough action, and he never allows the clubshaft to bypass his lead arm (from an angular rotational perspective).
I suspect that most professional golfers are using a TGM
swinging technique (rather than a swing-hitting technique), and I believe that
their trail arm only plays a synergistically supportive role in helping them to
more efficiently maintain/swing an intact LAFW during their backswing action,
downswing action and also during their early followthrough (especially if they
use a no-roll type of DH-hand release action). To understand how to use the
trail arm in an optimally efficient manner when performing a TGM swinging action, a beginner/developing
golfer first needs to understand what's the definition of a RFFW (right
forearm flying wedge) and he then needs to learn how to use his RFFW to
efficiently direct and support the
motion of his intact LAFW during his backswing and downswing actions. I have
described the role of the RFFW in many of my golf website's review papers and interested website readers can study my golf website's review papers if they are
interested in learning how to efficiently perform a full golf swing using an
intact LAFW/GFLW swing technique.
References:
1. The A Swing. David Leadbetter.

2. David Leadbetter - Introduction to The A Swing (live presentation)
video.
Available at https://www.youtube.com/watch?t=2&v=8y3cfaNcBi4
3. David Leadbetter - Leadbetter A Swing presentation at
the PGA Show 2015.
Available at https://www.youtube.com/watch?v=JUzKg4G6bgU
4. The Stack and Tilt Swing. Mike Bennett and Andy Plummer.

5. The Next Generation with Sean Foley DVD.

6. "A Swing" Golf Lesson with Leadbetter - You-tube
video produced by the Impact Show PGA Professionals Piers Ward and Andy Proudman
of MeandMyGolf.com.
Available at https://www.youtube.com/watch?v=uypgmV0YlWY
7. David Leadbetter's A Swing Explained - You-tube video featuring David Leadbetter.
Available at https://www.youtube.com/watch?v=qq_BzCIJ1Sw
8. Phil Cheetham's PhD dissertation paper.
Available at http://www.philcheetham.com/phd-dissertation-and-presentation
8a. Cheetham P. (2014) The relationship of club handle twist velocity to selected biomechanical characteristics of the golf drive. Doctoral dissertation. http://www.philcheetham.com/media/Phillip-Cheetham-Doctoral-Dissertation-2014.pdf
8b. Phil Cheetham's Powerpoint Presentation in Defense of his PhD Dissertation.
http://www.philcheetham.com/media/Phillip-Cheetham-Dissertation-Powerpoint-2014.pdf
9. New Golf Coach Warned Lydia Ko Over Changes.
Article available at http://www.stuff.co.nz/sport/golf/9574147/New-golf-coach-warned-Lydia-Ko-over-changes
10. The Golfing Machine. Homer Kelley.

11. Secrets of the Short Game. Phil Mickelson.