Backswing
Click on any of the hyperlinks to rapidly navigate to another section of the review: Homepage (index); overview; grip; address setup; downswing; impact; followthrough-to-finish
In this section of the critical review, I am going to be using the swing of Aaron Baddeley as an ideal role model for the modern, total body swing. I obtained a video of Aaron Baddeley's swing from the V1 Home swing Analyser website (http://v2.v1home.com) [1]. I then created many screen captures of Aaron Baddeley's swing at different points in his swing, so that I could point-out certain important positions, movements, and swingpaths. However, there is no substitute for seeing a swing evolve in continuous motion, and I cannot do that in this critical review. I, therefore, highly recommend that you visit the V1 Home Swing Analyser website and download their free version of the swing analyser. You can also freely download Aaron Baddeley's swing from the website (the down-the-line Driver video and the face-on Driver video). That will enable you to play back his swing in slow motion, or frame-by-frame, while following this review. It will greatly enhance your ability to learn how to execute a perfect golf swing. I also encourage you to purchase the basic version of the V1 Home Swing Analyser for $39. The basic version has the advantage that you can play back two different versions of a golf swing, side-by-side. If you video your swing, you will then be able to compare your own swing to Aaron Baddeley's (or another PGA tour golfer's) swing at any point in the swing. You will then quickly learn if you are getting into the correct positions, and you may quickly learn what you have to do to improve your swing.
Note - Aaron Baddeley has recently made changes to his swing, and this swing video therefore doesn't necessarily represent his latest swing.
Introduction:
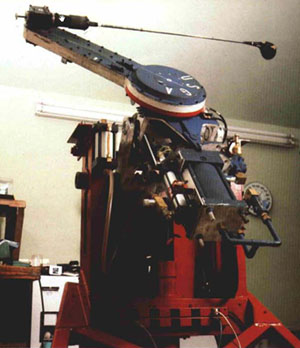
Although one could argue endlessly about the definition of a perfect golf swing, I think that it would be fair to say that a perfect golf swing is a swing that can propel the golf ball accurately towards a distant target with sufficient velocity to carry the distance. A perfect golf swing would also be characteristed by consistency, so that each repeat swing would have the same features - it would propel the golf ball accurately towards a distant target with sufficient velocity to carry the distance. I suspect that many golfers have seen those mechanical golf machines that are designed to have a consistent swingpath so that the clubhead approaches the golf ball in such a manner that the clubface will always be square at impact. Those golf machines are characterised by a fixed swingpath, that is consistently repeatable. Here is an example of a golf machine, called the Iron Byron.
Iron Byron Golf Machine
Because of its design, the Iron Byron has a consistent swingpath, so that the backswing clubhead swingpath is identical to the downswing clubhead swingpath. Can human beings swing a golf club along a consistent swingpath?Starting in 1982, The SLAP researchers [1] started to study the swings of professional golfers using high speed cameras, and they subsequently analysed the filmed swings using sophisticated computers. They eventually constructed a hypothetical golfer model - called the Model Pro - that represented the best "commonality" features of multiple professional golfers. The Model Pro therefore has an idealised swing - a theoretically perfect swing.
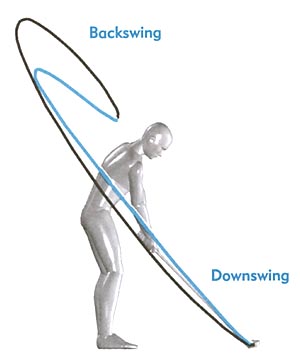
Consider the clubhead swingpath of the ModelPro.
ModelPro clubhead swingpath - from reference number [2]
Note that clubhead passes along a similar swingpath during the backswing and downswing, except for the fact that the downswing clubhead swingpath is slightly steeper and narrower (in blue in the above photo).The SLAP researchers also studied the clubhead swingpath of high handicapper, developing golfers who were learning to play golf, and this is what they found.
Backswing clubhead swingpath - from reference number [2]
They discovered that many developing golfers took the golf club back on a flatter plane, so that the backswing clubhead path was flatter, and more around-the-body, in the early backswing (black path in the above image, blue path is the Model Pro's ideal backswing clubhead swingpath). The clubhead swingpath then climbed steeply at the end of the backswing as the developing golfer eventually lifted his hands. Finally, the clubhead went around the body to cross-the-line and point right of the target.When they studied the downswing clubhead swingpath of those developing golfers, this is what they discovered.
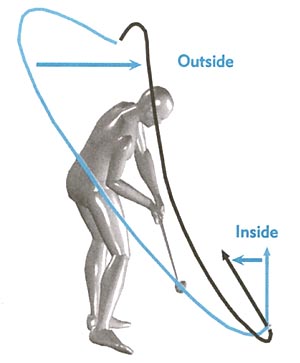
Downswing clubhead swingpath - from reference number [2]
They discovered that many developing golfers produce a very steep downswing clubhead swingpath that causes the clubhead to eventually approach the ball from an outside-in direction (black path in the above photo, blue path is the Model Pro's ideal downswing clubhead swingpath). This type of steep, outside-in clubhead swingpath usually produces a pull-slice ball flight (if the clubface is open at impact), the most frequent ball flight pattern of developing golfers. There are two main reasons for the steep, outside-in downswing clubhead swingpath - i) the developing golfer is in the incorrect end-of-the-backswing position as a result of a too-inside, too-flat backswing; ii) the developing golfer initiates the downswing with a shoulder turn, instead of a pelvic shift- rotation, that causes the clubhead to loop over-the-top and descend steeply down towards the ball.
From these research findings, it is obvious that most developing golfers have to make many swing changes, so that they avoid having a too-flat backswing clubhead swingpath, and avoid having a too-steep downswing clubhead swingpath. This review may help a beginner golfer accomplish that feat.
I think that one of the best ways to learn how to produce a perfect clubhead swingpath is to study the swings of professional golfers who have a perfect clubhead swingpath, like the ModelPro computer-generated model. I reviewed many PGA tour players swings to find an idealised role model, and I eventually selected Aaron Baddeley's swing because he can produce a near-perfect clubhead swingpath.
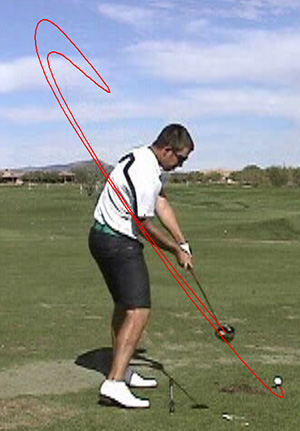
This is the clubhead swingpath of Aaron Baddeley's driver swing.
Clubhead swingpath - from reference number [1]
It is obvious that Aaron Baddeley can produce a near-perfect clubhead swingpath, and I think that he is perfect role model for beginner golfers. How does Aaron Baddeley generate his ner-perfect backswing clubhead swingpath? In the rest of this tutorial, I will examine Aaron Baddeley's backswing in great depth, so that we can better understand his backswing.The rest of this review is divided into into two sections. The first section deals with backswing movements/positions that enable a golfer to produce a perfect backswing clubhead path, and the second section deals with backswing movements/positions that enable a golfer to generate adequate swing power.
Backswing movements and positions that enable a golfer to produce a perfect backswing clubhead swingpath
It is obvious that Aaron Baddeley generates a perfect backswing clubhead swingpath by moving his body in space in some special way. I believe that if a person carefully examines Aaron Baddeley's backswing movements/positions at different points in the backswing, that he may learn how best to produce a perfect backswing clubhead swingpath. I will be producing multiple photographic images of Aaron Baddeley at different points in the backswing, and I will use basic principles, from multiple, highly-regarded golf instructors, to emphasise certain important points.Starting the backswing from the address position
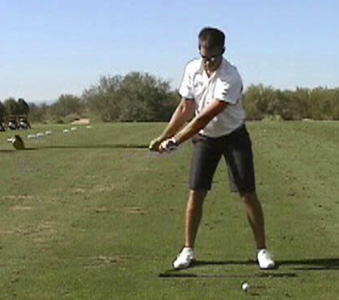
One of the many difficulties that a beginner golfer discovers when first learning to play golf is the unpleasant realisation that one has to start the backswing from a static address position. That creates an enormous problem for certain golfers who have great difficulty initiating a smooth swing from a static position. They often initiate the backswing in a jerky, uncoordinated manner, which ruins their swing from the get-go. I have personally never been severely plagued by this particular problem, so I cannot offer a beginner golfer full-proof advice. I am aware that certain golfers adopt certain mannerisms/movements to break through the barrier of static inertia that is an incontrovertible feature of the golf swing's static starting position. Some golfers rock their body from side-to-side, or twist their torso, to break up tension in their legs and torso muscles just before starting the backswing. Some golfers bounce up-and-down on their knees to release tension in their legs. Some golfers waggle their club slowly back-and-forth before starting the backswing. Some golfers press the club into the ground just behind the ball before starting the backswing, hoping that it will create a small counterforce reaction that will enable the backswing to start in a smooth, coordinated manner. If initiating the backswing in a smooth coordinated fashion from a static position is a problem for a golfer, the golfer should try and experiment with different techniques recommended by fellow golfers. It's very important that a golfer initiate the first part of the backswing - the takeaway - in a very smooth and very coordinated manner.
The Takeaway
The takeaway is the first part of the backswing that starts at the address position, and ends when the club is parallel to the ground, and the hands are at about mid/upper thigh level (8 o'clock position of the left arm). The major body movements that occur during the takeaway is the rotation and lifting of the arms while the shoulders start to rotate around the spinal axis. There is very little wrist movement during the takeaway, and only a small amount of body shift.
This is a photo of Aaron Baddeley's end-takeaway position. You can readily see that the back of his left hand is nearly parallel to the ball-target line, which means that the hands must have rotated nearly 90 degrees (partly due to shoulder rotation around the spine, and partly due to internal rotation of the left humers +/- a small degree of left forearm rotation). You can see that the clubshaft is no longer in line with the left arm, which means that the left wrist must have cocked up and the right wrist hinged back to a very small degree (see the glossary of wrists movements to understand the difference between the terms "cocking" and "hinging").
Aaron Baddeley takeaway - from reference number [1]
It is stunning to realise how many errors can occur during the takeaway. For example, a beginner golfer may move his arms too far from the body, or keep them too close to the body. Or, the beginner golfer may move his arms along a too-inside swingpath or a too-outside swingpath. Or the beginner golfer may lift the arms while tilting, rather than rotating, the shoulders. A beginner golfer may also excessively rotate his hands clockwise and thereby open the clubface during the takeaway, instead of keeping the hands in a neutral position during the takeaway. All these problems, in various combinations, can ruin the backswing, because if a beginner golfer gets into the incorrect position at the end of the takeaway, then it is extremely difficult to recover from that incorrect position during the rest of the backswing.
How should one start the takeaway?
A key learning element that underlies a good takeaway move is the concept of the one-piece takeaway.
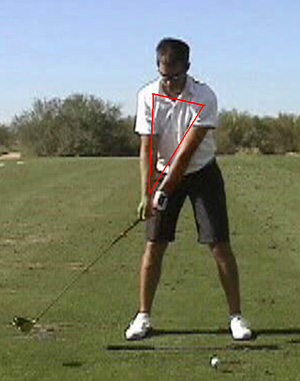
The following photo will demonstrate what's meant by the term one-piece takeaway.
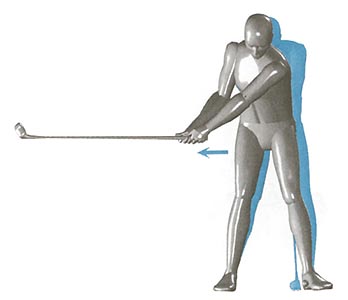
Takeaway triangle - from reference number [1]
The takeaway triangle consists of the two arms and the shoulders. During the takeaway, one must move the two arms and the left shoulder at the same speed so that the dimensions of the red triangle remain essentially unchanged. That explains the term "one-piece". One should think of the shoulder rotation, and movement of the two arms, as the movement of a SINGLE structural unit, which will move as a perfectly coordinated unitary structure in space. The one-piece takeaway starts with the simultaneous movement of the two arms and left shoulder (which moves downwards and backwards away from the target). One should not start the takeaway with the arms alone, or the shoulders alone. They must move synchronously together. Some beginner golfers start the takeaway with an independent wrist/hand movement, and that is a major error. The wrists and hands should be totally passive during the early takeaway, and a golfer should imagine his wrists/hands being encased in a plaster cast, so that there is virtually no independent wrist/hand movements during the initial takeaway.
Another way of thinking of the one piece takeaway is to think of taking the entire club away as a single unit, so that the butt end of the club and the clubhead move away at the same speed.
Here is a link to an excellent swing video by Steve Bishop demonstrating that approach - http://video.google.com/videoplay?docid=1270146191019558558&hl=en
Another important feature of an one-piece takeaway is the fact that the clubhead remains low to the ground during the first 12" of travel. Why does this happen naturally in an one-piece takeaway action?
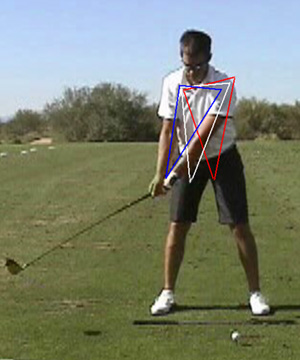
Consider the following photo of the takeaway triangle as it evolves sequentially in time.
Takeaway triangles - from reference number [1]
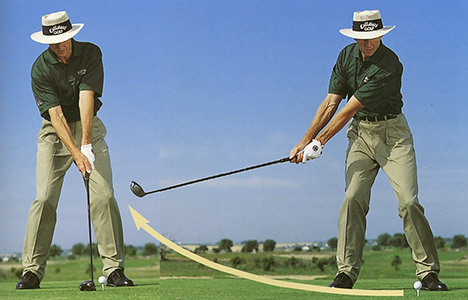
The red triangle represents the address position. Notice that the left upper apex of the triangle is higher than the right upper apex of the triangle - due to the small degree of spinal tilt to the right that should exist at address. The white triangle represents the one piece takeaway after the clubhead has moved approximately 12" in space. Notice that the upper left hand corner of the triangle has moved down and to the right (due to the rotation of the left shoulder, down-and-to-the-right, around the centralised spinal axis) and that the top of the triangle is roughly parallel to the ground. Notice that the bottom apex point of the white triangle is even closer to the ground than the bottom apex point of the red triangle. That means that the clubhead must be be very close to the ground during its first 12" of backswing travel. If the clubhead is high off the ground at this point in the takeaway, it either indicates that the golfer has flexed the arms (instead of keeping them straight), and/or hinged the wrists (instead of keeping them neutral), and/or tilted the upper spine to the left (called a reverse pivot move). The blue triangle represents his present position, and one can see that the clubhead has climbed up to a position approximately 8" from the ground by this point in time.In the following photo from his golf instructional book [3], David Leadbetter advises a golfer to keep the clubhead low to the ground during the takeaway in order to create width in the backswing.
Low takeaway - from reference number [3]
Note three points. First of all, note that Leadbetter's arms are still straight, and that he has kept the takeaway triangle intact. Secondly, note that his right upper arm is no longer closely applied to his chest wall (as it normally is at address) and that there is small degree of seperation between the right upper arm and the chest wall. Thirdly, note that the distance between the butt end of the club and the belt buckle at this point in time is slightly greater than the butt end-belt buckle distance that existed at address (left photo). That is a normal phenomenon in the takeaway and it indicates that one should gradually move the butt end of the club a few inches further away from the body during the takeaway move. This widening movement is a very gradual move that helps to widen the backswing arc during the takeaway, and a golfer needs to avoid a too-narrow, body-hugging backswing arc - note that the right elbow has moved away fom the body and that it doesn't tightly hug the right side of the body. Some developing golfers incorrectly keep the right elbow too tightly close to the torso during the takeaway, and they should be encouraged to allow the right upper arm to seperate slightly from the torso during the takeaway.
In this photo of Leadbetter, it would appear that there is no lateral shift of the hips or thighs during the takeaway. However, that is not true, and a small amount of right lateral shift of the thighs should occur during the takeaway, which indicates that the golfer is starting to shift his weight to the right side.
In the following photo, the SLAP authors demonstrate that a small amount of shift of the thighs to the right should occur during the early backswing (blue image is the body at address).
Shift of the thighs and hips during the early backswing - from reference number [3]
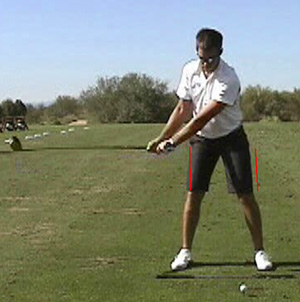
The amount of shift varies between different players, and you can see that Aaron Baddeley has very little shift in the following photo (red lines represent the outer thigh positions at address).
Body shift to the right in the early backswing - from reference number [1]
In the modern, total golf swing, a golfer tries to avoid any swaying of the right thigh to the right by "fixing" the slightly flexed right knee (maintining the same degree of right knee flex unchanged during the takeaway). However, a very small amount of lateral shift is necessary to get the body moving to the right side, so that the upper torso can finally end up in a position where the centre of gravity of the upper torso is centered over a point that is just inside the right foot.From the above photo, you can see that the clubshaft is parallel to the ground. However, how far back around the body (towards the tush line) has the clubshaft moved? The answer to that question requires that one see a down-the-line view of the end-takeaway position.
Consider this down-the-line view of the end-takeaway position.
End-takeaway position - from reference number [1]
First of all, and most importantly, note that the clubshaft is not only parallel to the ground at the end of the takeaway - it is also parallel to the ball-target line and directly over the toe line. That's a perfect end-takeaway position.Note that the clubhead's toe is pointing up, but that the clubface appears slightly closed to the clubhead arc (tilted marginally towards the ground). A neutral or slightly closed clubface at this end-takeaway position indicates that Aaron Baddeley has not actively manipulated the club with his hands while rotating his shoulders around the spinal axis. If the clubface is too closed in this position, then it either means that the golfer has tilted his upper spine to the left, and/or he has actively manipulated the club with his hands and/or he has a grip problem that severely limits clockwise rotation of the left forearm during the takeaway (eg. very weak grip or "deep" interlocking grip). Many beginner golfers have the opposite problem, and they allow the left forearm to over-rotate clockwise during the takeaway and this causes the clubhead to move inside too quick, and it ends up behind the toe line by the time the hands reach the 8 o'clock position. From a down-the-line view, the clubhead would be superimposed over the thighs, or even worse, be behind the thighs. A "bad" clubhead position (behind the thighs) is often associated with a flaring open of the clubface, due to over-rotation of the left forearm, and the clubface will appear to be open at the end-takeaway position. It is important to ensure that the clubshaft is parallel, or near-parallel, to the ball-target line, and in line with the toes, at this point in the backswing.
Most importantly, note (on the face-on view) that the right forearm is higher than the left forearm. If any part of the right forearm is visible below the left forearm at this point in the backswing, then it suggests that the takeaway was either too-inside the line, and/or that the left forearm was allowed to over-rotate during the takeaway.
Note that Aaron Baddeley's hands are outside his right foot, and in line with his toes. In the address position, the hands were a few inches in front of the toe-line. So, did he pull his hands inwards during the takeaway to get to this position? The answer is "no". The hands get to this marginally inside position (relative to their position at address) as a result of the shoulder rotation. Note that the left shoulder has moved down towards the ball-target line, while the right shoulder has moved back (towards the tush-line). That small degree of rotation of the shoulders around the bent-over spine causes the hands to move slightly inwards. There should be no deliberate attempt to move the hands inwards in the initial takeaway by rotating the left forearm clockwise. The key move, in the takeaway, is to rotate the shoulders (turn the shoulders perpendicularly around the spine) while thinking of moving the back of the right hand straight back. A golfer should imagine that there is a baseball catcher standing directly behind him, and he should think that he is trying to place the clubhead in the catcher's mitt - by simultaneously i) rotating, and not tilting, the shoulders and ii) moving the hands straight back. Of course, the hands do not actually move straight back, because of the rotation of the shoulders around the bent-over spine, and the hands should end up over the toe-line at the end of the takeaway.
When taking the hands straight back, it is often very advantageous to think of pushing back with the left hand, rather than pulling back with the right hand. If one pulls back with the right hand, there is a greater likelihood of pulling the hands too inside, and/or seperating the arms from the body. If one thinks of pushing back with the left hand, it is more likely that the clubshaft will remain in the correct plane, and it is more likely that the left shoulder will move at the same speed as the arms, so that one maintains an one piece takeaway.
Also, note that the left upper arm is still lightly connected to the pectoral area of the left chest wall without being tightly connected to the chest wall. If the left arm is tightly connected to the chest wall during the takeaway move so that the chest and left arm move as a single unit, then this will cause the left arm to move inwards and the hands could end up behind the toe-line, and be closer to the tush-line, at the end of the takeaway. That inside hand position is undesirable, and should be avoided. Likewise, if the left upper arm completely loses its connection to the chest wall (and one can see "air" between the left upper arm and the chest wall), then it means that the arms have moved away from the rotating upper torso, and the left arm-body seperation will cause the hands to end up outside the toe-line and closer to the ball-target line (by the time the left arm reaches the 8 o'clock position). That outside hand position is also undesirable, and should be avoided.
Addendum added February 2009:
I have completely changed my approach regarding the optimum method of performing the backswing takeaway action. I no longer believe that the best method of performing the takeaway action is to perform a one-piece takeaway - where both arms are kept rigidly straight during the early backswing action. I now believe that the best method of performing the backswing action is to perform the right forearm takeaway action.
To understand the fundamental biomechanical philosophy that underpins the right forearm takeaway action, one needs to understand that the primary purpose of the backswing is to get the hands to an end-backswing position opposite the right shoulder, or behind the right shoulder. If the hands end up opposite the right shoulder, that is called the top-of-the-backswing position. If the hands end up behind the right shoulder and the clubshaft is parallel to the ball-target line, that is called the end-backswing position. A key biomechanical phenomenon that must occur during the backswing (in order to get the hands to their appropriate end-of-the-backswing position) is that the right elbow must bend during the backswing so that the right elbow is bent at approximately a right angle by the end of the backswing action. In other words, the distance between the hands and the right shoulder must progressively decrease during the backswing - thereby shortening the right side of the one-piece triangle - and the right forearm takeaway solves this particular problem in a biomechanically natural manner, that is easily and consistently repeatable.
Another advantage of performing the right forearm takeaway movement is that it allows a golfer to more easily keep the clubshaft "on-plane" throughout the entire backswing.
I have described the right forearm takeaway action in great detail in my review paper called "How to Move the Arms, Wrists and Hands in the Golf Swing" and in the associated 13-segment swing video lesson.
The three-quarter (9 o'clock) backswing position
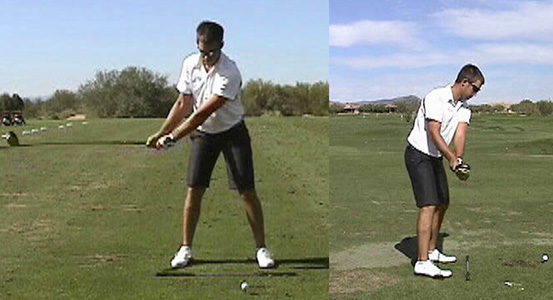
If a golfer has successfully passed through the correct end-takeaway position, then the next important backswing position that must be correctly achieved is demonstrated in the following photo.
Three quarter (9 o'clock) backswing position - from reference number [1]
I have arbitrarily labelled this face-on backswing position - where the left arm is parallel to the ground - the three quarter backswing position. If one thinks of the left arm movement as starting at the 6:30 o'clock position at address, then this left arm position is at 9 o'clock. The final left arm position, at the end of the backswing, is usually at approximately 11 o'clock, so one can estimate that the left arm has travelled about three quarter of the way to its final position.
Starting with the face-on view, note that the clubshaft is at right angles to the left forearm. Most advanced golfers limit the cocking of the left wrist to a 90 degree angle, because an over-cocking of the left wrist may decrease the stability of the left wrist position at the top of the backswing. A professional golfer wants to feel that he is in total control of the clubshaft and an over-cocked left wrist allows the clubshaft to swing too far back at the end of the backswing, thus creating an end position of potential "looseness". This cocking-up of the left wrist during the mid-portion of the backswing is often referred to as "setting the wrists". Setting of the wrists should begin when the hands reach the right trouser pocket in the takeaway, and many golf instructors believe that it is advantageous to complete the setting of the wrists by the time the left arm has reached the horizontal position in the backswing (9 o'clock position), although a few golf instructors favor a slightly delayed setting of the wrists. At the three quarter position, when the clubshaft is set upright, it should feel "light" in the hands. A golfer should avoid hinging the right wrist too much during the takeaway stage of the backswing, because this may cause the backswing to become too steep, and too narrow (too cramped). Remember that setting of the wrists mainly occurs during the mid-stage of the backswing - from the end-takeaway position to the three quarter backswing position.
There are a few things to note about the down-the-line view. Most importantly, note that the butt end of the club points to a position on the ground that is just inside the ball-target line. That is an excellent position, and golf instructors often refer to this position as being "on-plane" - if the butt end of the club points at the ball-target line when the left arm is parallel to the ground. Secondly, note that the hands appear to be opposite the middle of the chest (or opposite the right upper chest) and that the left arm is angled slightly backwards (towards the tush line) from the left shoulder. This recommended hand position (opposite the center of the chest, or opposite the right upper chest) is referrred to as "keeping the hands in front of the body". If a golfer always keeps the hands in front of the body while the shoulders are rotating in the backswing, and if he ends up being "on-plane" at this point in the backswing, then that's perfect evidence of synchronous movement between the shoulder turn motion and the arm movement.
Jim McLean and David Leadbetter, two highly regarded golf instructors, both advocate getting the clubshaft "on-plane" by setting the wrists during the mid-portion of the backswing. The acceptable inner-outer limits to the corridor of success for being "on-plane" is demonstrated in the following photo.
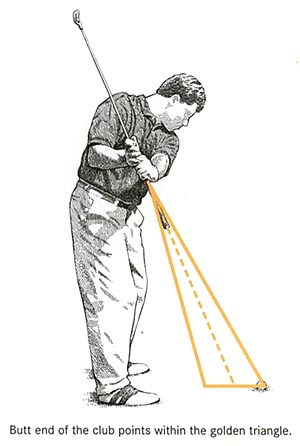
Golden triangle - from reference number [4]
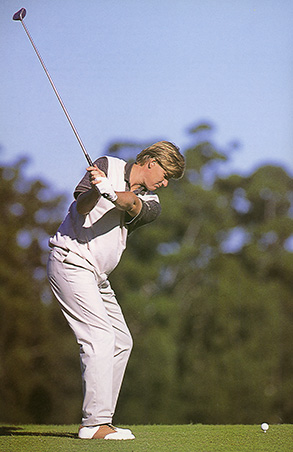
Note that the base of the golden triangle along the ground extends from the ball to a point about halfway between the toes and the ball. As long as the butt end of the club points in that zone, then it fulfills David Leadbetter's and Jim McLean's criteria of being "on-plane". If the butt end the club points beyond the ball, then the backswing clubshaft angle is too flat. If the butt end of the club points inside the inner limit of the base of the triangle, then the backswing clubshaft angle is too steep. The corridor for a successful backswing clubshaft angle lies within the golden triangle.Here is a photo of Ernie Els at this same three quarter backswing position - from his book [5].
Els at the three-quarter position - from reference number [5]
Note that the butt end of the club is pointing to a point on the ground that is about halfway between the ball and the toes - at the inner limit of the golden triangle. According to Leadbetter/McLean, one shouldn't adopt a backswing clubshaft angle that is steeper than this clubshaft angle at this point in the backswing. Also, note that Ernie Els' hands are opposite his right upper chest.
The clubshaft angle at this point in the backswing is not absolutely critical, and the really critical clubshaft angle is the clubshaft angle when the left arm reaches the same point in the downswing (when the left arm is parallel to the ground). At that point in the downswing, the butt end of the clubshaft must point directly at the ball-target line when viewed from a down-the-line viewpoint. Ernie Els will have to shallow his clubshaft angle slightly in the early downswing to achieve that precise downswing clubshaft angle.
Nick Faldo is another golfer who has a steep clubshaft angle at the three quarter position in his backswing, and he also has to shallow his clubshaft angle in the downswing.
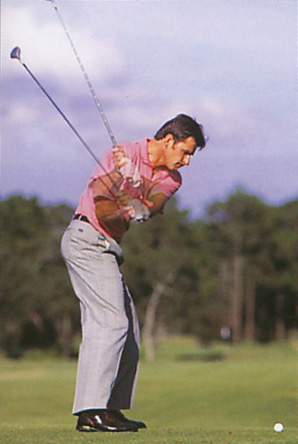
Consider this photographic image of Nick Faldo at the three quarter position - from his book [6].
Faldo's clubshaft angle - from reference number [6]
In this composite image, I have blended two photos - one from the backswing (fainter image) and one from the dowswing - where the left arm is approximately parallel to the ground. You can see that Faldo's clubshaft angle is slightly too steep in the backswing and that it falls inside the inner limit of the golden triangle's base, but that he has a perfect downswing clubshaft angle (butt end of the club points at the ball-target line).As long as a golfer can consistently shallow his downswing plane to achieve the perfect downswing clubshaft angle when the left arm is parallel to the ground (butt end of the club must point directly at the ball-target line), then it doesn't matter that the backswing's clubshaft plane angle is slightly different to the downswing's clubshaft plane angle. The major advantage of Aaron Baddeleys' slightly flatter backswing clubshaft plane (the butt end of his clubshaft points just inside the ball-target line at the three quarter backswing position) is the fact that it is easier for him to get onto the correct downswing clubshaft plane without having to deliberately adopt a shallowing downswing action (see the relevant section of the downswing section of this review for much greater detail). I strongly favor a golf swing where the backswing clubhead swingpath is roughly along the same path as the downswing clubhead swingpath (other than being narrower and slightly steeper), and where there is no need for a compensatory shallowing move during the downswing. A simple swing (like Aaron Baddeley's) is better than a swing that has many loops!
Addendum added February 2009:
I have totally revised my opinion on what is meant by the term "on-plane". I now prefer to use Homer Kelley's definition of being on-plane as the "correct" definition. Homer Kellley stated that a clubshaft can be deemed to be on-plane when the end of the clubshaft, that is nearest the ground, points at the base of the inclined plane - and the base of the inclined plane is usually the ball-target line if the stance is square to the ball-target line. Below the first parallel position (end of the takeaway position), the clubhead end of the clubshaft must point at the ball-target line. When the clubshaft passes beyond the first parallel position (end of the takeaway position), then the butt end of the clubshaft must point at the ball-target line. One of the great advantages of the right forearm takeaway action is that it allows a golfer to fulfill Homer Kelley's "on-plane" requirement in a biomechanically natural manner.
I have described an easy-to-learn method of learning how to keep the clubshaft continuously on-plane during the backswing in my new review paper called "How to Move the Arms, Wrists and Hands in the Golf Swing".
Top of the backswing position
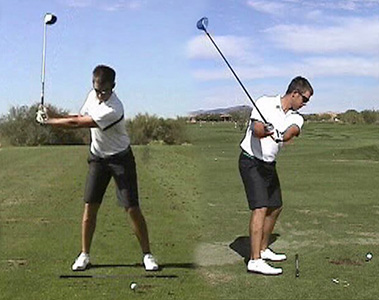
Getting from the three quarter backswing position to the end of the backswing should theoretically be the easiest part of the backswing for golfers who mimic Aaron Baddeley's backswing, because the only parts of the body that are still moving a lot are the shoulders, as they complete their rotation around the spine.Consider this photo of Aaron Baddeley at the end of his backswing.
Completing the backswing - from reference number [1]
Notice the small differences between the three quarter backswing position and the end-backswing position. Note that the clubshaft is still at right angles to the left arm, and note that the left arm is still straight, in the end-backswing position. The major difference between the two photos is the degree of shoulder turn - Aaron Baddeley completes the shoulder turn in this part of the backswing, and this causes the left arm to reach the 11 o'clock position. There is no need for Aaron Baddeley to lift his left arm from the 9 o'clock position to the 11 o'clock position during the last part of the backswing - it simply happens automatically if the shoulders continue to rotate at right angles to the bent-over spine. Note that shoulder rotation can only be deemed to be complete when the left shoulder gets behind the ball. Many beginner golfers stop their shoulder rotation when the left shoulder reaches the chin, and they complete the backswing by lifting the arms. This is a false-turn, and it predisposes to an over-the-top move in the early downswing.Many beginner golfers also have imperfect coordination between i) the arms going up-and-back during the backswing and ii) the shoulders turning at right angles to the bent-over spine during the backswing, and they end the shoulder turn long before the hands are at the top of the swing. They then complete the backswing by lifting their arms up above the right shoulder, and they often end up in an imperfect backswing position. That is why it is critically important for a golfer to have perfect timing during the backswing - perfect synchrony between the lifting arms and turning shoulders, so that the sequence of movements can occur in such a manner that the hands only reach their top of the backswing position as the shoulder turn is completed. When the shoulders stop turning, the hands should stop moving!
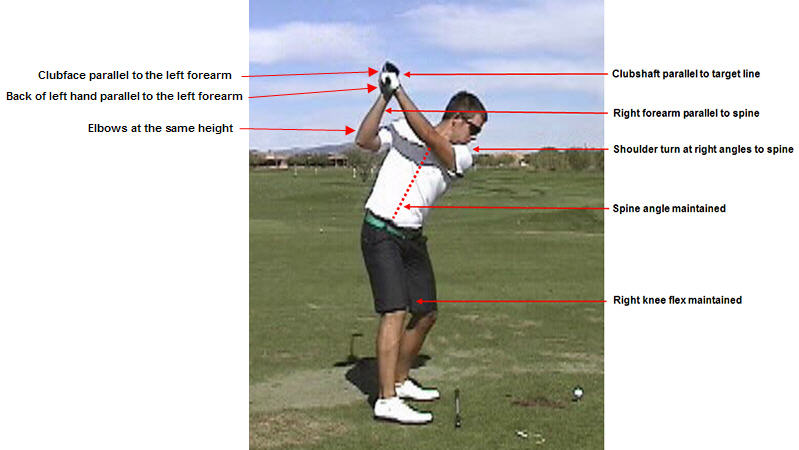
Consider Aaron Baddeley's end-backswing position from a down-the-line view.
End of the backswing position (down-the-line view) - from reference number [1]
I have pointed out all the excellent features of Aaron Baddeley's end backswing position in the above photo.Aaron Baddeley is also in a state of perfect balance at the top of his backswing and he is perfectly poised to start the downswing. His weight is primarily on the right heel, with less weight on the left forefoot (chiefly left great toe area).
Note that Aaron Baddeley has maintained his spine angle intact, and that he hasn't lifted-up his spine during the backswing. The spine angle should remain constant throughout the entire backswing. Many beginner golfers lift-up their spine when the left shoulder reaches the chin. One reason for that error, is the fact that they have kept their head too flexed at the neck. A beginner golfer must remember to lift up the chin and slightly straighten the neck in the address position, so that there is room under the chin for the turning left shoulder.
Note that the clubface is roughly parallel to the left forearm and the back of the left hand, which is flat, and not cupped or bowed (see the glossary of wrist movements to understand the terms "cupped" and "bowed"), thus indicating a nearly neutral clubface (the clubface is actually slightly closed at the top because it is facing slightly skywards relative to the back of the left hand and left forearm). The clubface should be roughly parallel to the left forearm, which is roughly parallel to the line that the clubshaft originally adopted at address (clubshaft line at address should be between the ball and the belt buckle).
Note that Aaron Baddeley's shoulders have rotated about 90 degrees around the bent-over spine, and that an extended line drawn across the top of the shoulders would hit the ground further than ~2-4 feet beyond the ball-target line. That indicates that Aaron Baddeley has correctly rotated his shoulders perpendicularly around the bent-over spine. Many beginner golfers tilt the spine, instead of rotating the spine, and this causes the shoulder angle turn to be too steep - an extended line drawn across the top of the shoulders would point inside, at, or just outside, the ball-target line.
Note (from the face-on view photo) that Aaron Baddeley's belt is roughly horizontal to the ground, which indicates that he has rotated his pelvis horizontally. Many beginner golfers tilt the spine and pelvis during the backswing, instead of rotating them, and this causes the upper body to tilt towards the target, instead of being angled away from the target (see reverse pivot).
Note (from the face-on view photo) that Aaron Baddeley's upper body is centered over a point that is just inside the right knee, thus indicating that his upper body has rotated around the spine without any tilting. Many beginner golfers don't rotate their torso around the bent-over spine, but rather tilt the upper body to the left during the backswing causing their upper body to lean towards the target at the end of the backswing (see reverse pivot).
Note (from the face-on view photo) that Aaron Baddeley's hands are outside the right shoulder and the right foot, and that they are in a perfect position for starting their downswing move. Many beginner golfers over-rotate their shoulders, and/or over-lift their arms, and/or overcock their left wrist thus causing the hands to get too far back - behind the head, and inside the right foot. That means that the hands have to move sideways (away from the target) before they can move down, and this may cause swingarc faults or an uncoordinated downswing movement. The problem is compounded if the golfer allows the clubshaft to cross-the-line at the top of the backswing, and point to the right of the target.
Note (from the face-on view photo) that Aaron Baddeley has completed his shoulder turn, and that the left shoulder is behind the ball at the end of the backswing.
Note (from the face-on view photo) that Aaron Baddeley has maintained a flexed right knee throughout the entire backswing, and that there has been no swaying of the torso to the right during the backswing.
Note (from the face-on view photo) that although the shoulders have turned fully (at least 90 degress) by the end of the backswing, that the hips have only partially rotated (about 45 degrees). Note that the left knee has only bent inwards slightly (towards the right knee), and is not kicked forwards towards the ball, thus signifying that the hips have not over-rotated. Note that the left heel is still on the ground. A flexible golfer simply allows the left foot to roll passively inwards as the hips rotate to the right. It is acceptable for a golfer to allow the left heel to lift slightly off the ground during the second half of the backswing if a golfer has less flexibility than Aaron Baddeley. The left heel is passively pulled off the ground as the pelvis rotates, and it should not be actively lifted off the ground.
Note (from the face-on view photo) that there is a very slight bend in the left elbow and that the left arm is not rigidly straight. That signifies a lack of tension, and a golfer should avoid keeping the left arm rigidly straight throughout the backswing.
Addendum added February 2009:
I now have a totally different method of understanding what represents the "correct" end-of-the-backswing position. It is far too complicated to explain this complex problem-issue in a brief addendum section, and I have described the "correct" end-of-the-backswing position in great detail in my review paper called "How to Move the Arms, Wrists and Hands in the Golf Swing".
Backswing movements and positions that enable a golfer to generate swing power
One of the most important features of the modern, total body swing is the fact that most of the swing power is generated by the large muscles of the central body, rather than being secondary to any active arm/hand movements. In fact, the arms/hands should be nearly totally passive during the downswing and they should be whipped around the body by centrifugal forces that are unleashed by the uncoiling of the coiled-up torso. Therefore, it is important to ensure that the torso becomes properly coiled-up during the backswing, so that the clubhead can be flung along the optimum downswing path with sufficient velocity when the torso subsequently uncoils during the early downswing.Right knee
A key element that allows the torso to coil efficiently during the backswing is the right knee. The right knee must be slightly flexed at address, because a flexed right knee limits rotation of the hips without limiting rotation of the shoulders - as long as it remains fixedly flexed throughout the backswing. Coiling of the torso increases in proportion to the difference in the degree of rotation of the shoulders relative to the hips. It is not practical to turn the shoulders much more than 90 degrees during the backswing (unless you are Tiger Woods who can turn his shoulders 100-110 degrees). Therefore, limiting hip rotation is the optimum method of increasing one's coiling power.
The right knee should be perceived to be a "post" around which the torso pivots during the backswing. The right knee can only function well as a "post" if the right knee remains slightly flexed throughout the entire backswing. Under no circumstances, should the right knee be allowed to straighten, or sway sideways, during the backswing. If the right knee straightens, then the pelvis over-rotates and one's ability to coil up the torso may be lost. A beginner golfer should actively tighten the right inner thigh muscles at the start of the takeaway to prevent the right knee from straightening during the backswing. With time, the beginner golfer will learn how to do this unconsciously, and he will learn how to maintain a slightly flexed right knee throughout the entire backswing.
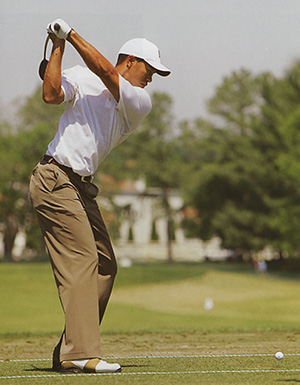
Look at this photo of Tiger Woods at the end of his backswing.
Tiger Woods coiled up at the end of the backswing - from reference number [7]
Note that Tiger Woods has maintained a slightly flexed right knee, and that he has not allowed the right knee to straighten.
Note that Tiger Woods has rotated his shoulders >90 degrees, but his hips have only turned <45 degrees (his belt buckle is still facing the ball-target line). That differential amount of rotation between the shoulders and hips is a remarkable physical achievement and is a reflection of Tiger's amazing body flexibility. The greater the difference in the degree of rotation of the shoulders relative to the hips, the greater the coiling of the torso. Jim McClean calls this the X-factor, and the greater the X-factor, the greater the amount of coiled-up power that can be unleashed during the downwsing.
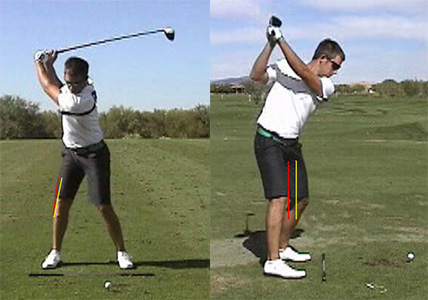
Although it is important to keep the right knee flexed throughout the backswing to prevent any right lateral shift (sway) of the body during the backswing, it is acceptable to allow the right knee to move slightly backwards during the backswing.
End of the backswing - from reference number [1]
The yellow line is the address position, and the red line is the end-backswing position. Note that Aaron Baddeley's right knee does not move laterally (away from the target) during the backswing, but that it does move slightly backwards (towards the tush line) by 1-2". If one looks at the right knee cap, it may seem to rotate about 10 degrees to the right, which reflects the small amount of internal knee rotation that can occur within a constantly flexed knee joint. Notice that the left knee doesn't flex forward much as the hips rotate, and it shouldn't jut forward of the toe line (note that a minimal amount of "air" can be seen between the left and right knees in the down-the-line view).Finally, many professional golfers enhance their right knee's ability to limit hip rotation by placing the right foot perpendicular to the ball-target line at address (instead of flaring the right foot outwards), plus/minus angling the right knee inwards towards the left knee at the same time.
Rotation and shift of the upper torso
I have previously mentioned that the mid-upper torso must feel coiled during the backswing as the golfer rotates his torso around the bent-over spine, but the golfer must also feel that his upper torso has moved to the right during the backswing (and that his upper shirt buttons are vertically over a point just inside the right leg).
Consider this photo of Aaron Baddeley at the end-backswing position.
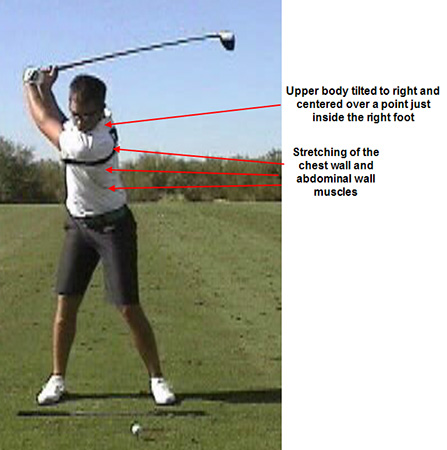
Right upper torso rotation and shift - from reference number [1]
Note that Aaron Baddeley's torso is tilted to the right at the end of the backswing, and that his upper torso is centered over a point just inside the right leg. In this position, the weight of the upper torso has moved to the right, and there is slightly more weight on the right foot compared to the left foot. Note that there is a sense that Aaron Baddeley has stretched the muscles of the left lateral chest wall and the left lateral abdominal wall as he rotates his torso around the spine. If a beginner golfer doesn't feel a significant stretch of the left lateral chest wall/abdominal muscles at the end of the backswing, then it suggests that he has not rotated his shoulders fully, and/or that he has tilted his upper spine to the left instead of rotating his upper torso around a rightwards tilted spine. A golfer should have a distinct feeling that he has rotated his upper torso to the right, and he should feel that the left side of his upper back is stretched and angled upwards to the right.
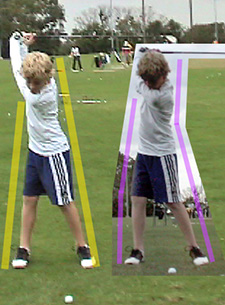
Brian Manzella, a golf instructor, has a very instructive website (http://brianmanzella.com) and he believes that it is imperative to have a good backswing pivot. In the following photo from his website, he demonstrates a correct backswing pivot using one of his young students as an example.
Backswing pivot - from the brianmanzella.com website
On the left, the yellow lines denote a correct backswing pivot. Note how the boy golfer's upper left back slopes upwards to the right giving the entire left side of the body a convex appearance. In the insert, the boy golfer has an incorrect backswing pivot. Note that his upper body is tilted slightly towards the target, causing a slight concave appearance of the left side of the body (slight reverse pivot). A beginner should mimic the backswing pivot action recommended by Brian Manzella (as demonstrated in this photo).Many beginner golfers do not rotate their left shoulder fully down-and-around to the right during the backswing, so that the left shoulder gets well behind the ball, and a common reason for that error is that they have been previously indoctrinated not to move their heads in the backswing. Keeping the head fixedly in place during the backswing is a mistake that has to be avoided if a golfer wants to ensure that he has a complete shoulder rotation. Many PGA tour players allow their heads to rotate slightly to the right +/- shift slightly to the right (1-4") during the backswing, and this minor rotation of the head is an excellent move that beginner golfers should mimic.
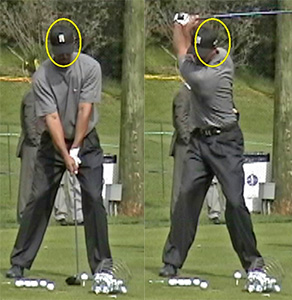
Tiger Woods' head movement during the backswing - from reference number [8]
Note that Tiger Woods eases his head to the right during the backswing, and this slight rotation of the head encourages a complete rotation of the shoulders around a rightwards tilted spine. Note the stretched shirt marks at the back of his torso, which signify a complete shoulder turn, and note that he has turned his shoulders >90 degrees. Note that his left shoulder is well behind the ball at the end of the backswing.Finally, note that the shoulders turn at right angles to his rightwards-tilted spine, while the hips turn horizontally. Depending on the degree of bend at the waist, a line drawn across the shoulders should intersect with the ground >2-4 feet beyond the ball-target line. If the line across the shoulders intersects with the ground at the ball, or <2" feet outside the ball-target line, then it suggests that the golfer has tilted, rather than rotated, the shoulders. Another shoulder turn error is a too-flat shoulder turn, where the shoulders turn excessively horizontally, rather than turning at right angles to the bent-over spine.
Addendum added February 2009:
My understanding of how a golfer can optimally generate swing power has completely changed since I started to study Homer Kelley's "The Golfing Machine" book, and I now also no longer believe in Jim McLean's X-factor theory. I have described my latest thinking on how a golfer should optimally generate swing power in the full golf swing in great detail in my review paper called "How to Power the Golf Swing".
Golf backswing tips (presented in a question-and-answer format)
Question number 1:What causes a reverse pivot, and how can it be prevented?
Answer:
A reverse pivot exists when a golfer leans over to the left side during the backswing, instead of rotating the upper torso to the right side. It is a frequent finding in beginner golfers and it is one of the most destructive backswing faults.
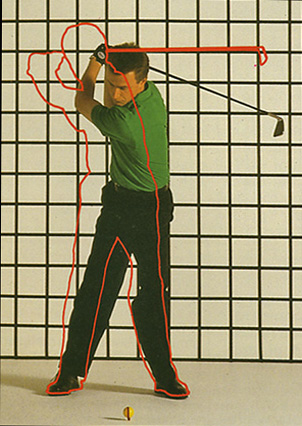
Reverse pivot - from reference number [9]
Notice that the golfer is leaning towards the target (especially the hips and shoulders) and that his body weight has shifted to the left, instead of the right (the outline in red is the desired backswing body position). This end-backswing position is potentially very problematic, because it is difficult to generate a powerful downswing when one is leaning towards the target. The reverse pivoting golfer first has to lean back towards the right, and away from the target, before he can swing down and forwards towards the target. It is not surprising that a reverse pivoting golfer cannot generate much downswing power if his first downswing move is to sway his upper torso away from the target. That motion will also produce a steep descending clubhead swingpath that is too narrow, and the reverse pivoting golfer may have a tendency to hit the ground behind the ball (fat shot) or hit weak slices.The cause of a reverse pivot is multifactorial and the main causes often work in concert. The chief causes of a reverse pivot are i) keeping the head too fixedly still, which prevents the torso from rotating adequately over to the right side; ii) starting with a centralised spinal posture at address, instead of pre-tilting the spine to the right; iii) fixedly keeping the spine centralised during the backswing and pivoting around a centralised spine axis, instead of pivoting around an imaginary axis that is located just inside the right leg; iv) tilting the spine and pelvis during the backswing while trying to keep the body weight centralised, instead of rotating the torso more horizontally around a rightwards tilted spinal axis so that the upper torso's center of gravity becomes located just inside the right leg.
The major problem with a reverse pivoting golfer is his fixation on keeping centralised during the backswing - keeping his head fixedly still and tilting his body stiffly around a centralised spinal axis. Instead of actually shifting-rotating his hips and shoulders around to the right during the backswing, the reverse pivoting golfer actually tilts his upper spine towards the target. The following diagram may help a reverse pivoting golfer correct this problem.
Two axis - from reference number [10]
The reverse pivoting golfer often tends to think of the golf swing as a pivoting motion around a single axis that is centralised between the two feet. He therefore stands too centralised in his address posture, and he then attempts to rotate his body around this central axis. David Leadbetter suggests that a golfer should think of two different axis - a backswing axis situated just inside the right leg (in line with the right armpit), and a downswing axis situated just inside the left leg (in line with the left armpit).
Rotating around two seperate axis - from reference number [10]
During the backswing, the reverse pivoting golfer must think of rotating around a backswing axis, which is situated just inside the right leg. To accomplish that feat, the golfer must have a distinct feeling of rotating his torso around his rightwards-tilted spine. He must also have a distinct feeling that he is stretching the muscles of his left upper back and that his left upper back is angling to the right at the end of the backswing, and that his upper shirt buttons are located vertically over a point that is just inside the right leg (as previously described). A golfer must have the distinct feeling that his upper body weight has shifted to the right and that most of his weight is situated over the right heel, and not the right outer foot, at the end of the backswing. The reverse pivoting golfer must eliminate any feeling of tilting the spine (left upper back leaning towards the target) or tilting the pelvis (right pelvis becoming higher than the left pelvis). The upper torso should rotate around a spine that is pre-tilted to the right, and the pelvis must rotate horizontally (belt buckle should move sideways to the right, and not tilt upwards). A reverse pivoting golfer should also check to see that his head is turning horizontally during the backswing (front bill of his baseball cap should rotate slightly to the right), and he should feel that his eyes-axis (imaginary line joining the eyes) is turning roughly parallel to the ground during the backswing. If a reverse pivoting golfer feels that his eye-axis is tilting up-and-down (left eye down, and right eye up) during the backswing, then he is probably still reverse pivoting, and he must continue to work on drills that can correct his reverse pivoting problem.Click on this link - http://video.google.com/videoplay?docid=-8106381649616692383&hl=en - to access a terrific video on the backswing pivot that can help you understand, and eliminate, the problem of reverse pivoting, due to having a centralised spine at address and a pivoting motion around that centralised spine.
Another type of reverse pivoting occurs if a golfer sways the hips to the right during the backswing, so that the right knee and right hip slide too far to the right, and they both end up far outside the right foot. This causes the lower body to slide out beneath the golfer, who then leans the upper body to the left in order to maintain his balance. To avoid this type of reverse pivoting, the golfer needs to "lock" the slightly flexed right knee to avoid any swaying to the right, and he needs to correctly pivot his right hip within the inner boundary of his right foot.
See the following video by Brady Riggs showing this type of reverse pivot problem - http://www.youtube.com/watch?v=WvOr5nNqYEw&mode=related&search=
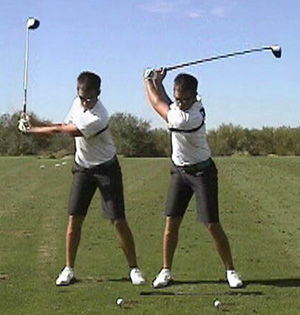
I have reproduced three swing capture images from that video to emphasise certain points.
Capture images from Brady Rigg's swing video (see above)
A yellow line was drawn along the outer border of the right thigh/hip at address. In image 1, one can see that the golfer has allowed his right hip to slide to the right in the early backswing. That causes his spine to tilt to the left into a reverse pivot position. Image 2 shows what happens at the start of the downswing when one starts the downswing from a reverse pivot position. Because the arms are cramped and there is no space under the right shoulder for the arms to move down to the ball, the golfer tends to throw his right shoulder and arms forwards over the toe line in an over-the-top move. Image 3 shows the correct backswing pivot movement. Note that the golfer has rotated his upper torso around his rightwards-tilted spine, which is pre-tilted to the right at address. Note that "air" appears between the right pelvis and the yellow line, which is a sign of a correct right hip pivot movement. Note that there is a large amount of space under the right shoulder for the arms/club to move down to the ball, and that there is no sense of arm restriction. One can also sense, that when the downswing starts with a hip shift-rotation movement to the left, that the right elbow can be actively driven down into that "space" under the right shoulder, and alongside the right hip area, as result of an active right upper arm adduction movement that occurs at the same time as the pelvis shift-rotation movement.Addendum added January 2010:
There are certain golf instructors who promote a left-leaning posture at the end-backswing position. Bennett/Plummer recommend a left-leaning posture in their book on the S&T swing [15].
Consider this photo-diagram from their book.
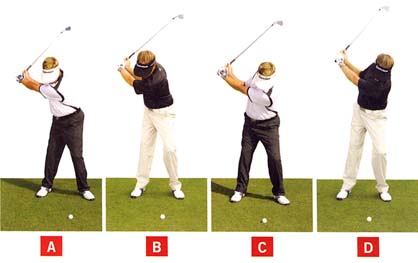
Different end-backswing postural aligments - from reference number [11]
Bennett/Plummer recommend a left-leaning posture as exemplified by photo C, which is not as extremely left-leaning as photo D. Although the degree of reverse pivoting is not extreme, a S&T golfer still has the problem of converting a leftwards-tilted spine (at the end-backswing position) into a rightwards-tilted spine (by impact). Bennett/Plummer do not recommend "correcting" the leftwards spinal tilt by encouraging their S&T student-golfers to sway their upper torso to the right on the downswing. Rather, they recommend that their S&T student-golfers aggressively thrust-slide their pelvis in a left-lateral direction at the start of the downswing.
Lower body and spine movements in the S&T downswing - adapted from reference number [15]
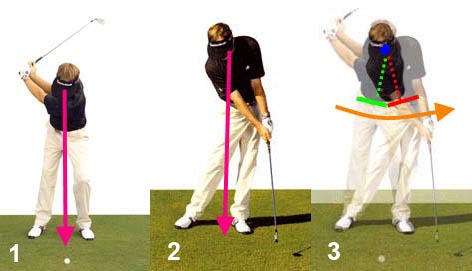
Consider the movements of the lower body and spine in the S&T swing.Image 1 shows a S&T golfer at the end-backswing position. The pink arrowed line shows that the shoulder center (upper swing center) is vertically over the ball. Note that the upper torso has leftwards-tilt and note that the right pelvis is higher than the left pelvis.
Image 2 shows a S&T golfer in the early followthrough (immediately post-impact). Note that he has kept the shoulder center (upper swing center) stationary - the pink arrowed line hasn't moved (relative to the left foot and ball position). Note that the pelvis has shifted far to the left - note that the outer border of the left pelvis is a few inches outside the outer border of the left foot. Also, note that the left pelvis is now a few inches higher than the right pelvis.
Image 3 - I used the Adobe Photoshop program to make image 2 proportionately smaller in size, so that I could superimpose image 2 over image 1 to produce a composite image (consisting of image 1 and image 2). This composite image gives one a good impression of how much the lower body moves in a S&T downswing. The blue dot represents the shoulder center (upper swing center) and one can see that it essentially remains stationary during the downswing. The green dotted line shows the spine tilt at the end-backswing position, and the red dotted line shows the spine tilt immediately post-impact. The change in spine tilt angle (as seen from face-on) is due to the aggressive left-lateral pelvic shift motion - represented by the curved orange arrowed line. I made the orange arrowed line curved to show that the pelvis not only moves left-laterally - the pelvis also changes its tilt-angle from being right-uptilted at the start of the downswing (solid green line) to being left-uptilted (solid red line) at impact.
The key point that a golfer needs to understand about the S&T downswing is that the majority of the left-laterally directed spine movement occurs at the level of the lower spine (lumbar spine) and not at the level of the mid-upper thoracic spine (as occurs in the traditional/conventional swing). That biomechanical fact is the major reason why I would never recommend the S&T swing to a young golfer. There is no doubt in my mind that the S&T swing can work well from a geometrical/mechanical perspective, but I believe that the required biomechanical movements occurring at the level of the lumbar spine are not natural, and I believe that they are likely to predispose to chronic back problems over the long-term (40-60 year time period).
I have discussed the S&T swing in great depth in a new review paper called "Book Review: The Stack and Tilt Swing - Michael Bennett and Andy Plummer".
Question number 2:Different golf instruction books recommend different amounts of weight shift to the right during the backswing. How much weight should be on the right foot, relative to left foot, by the end of the backswing eg. 60:40, 70:30, 80:20 weight distribution?
Answer:
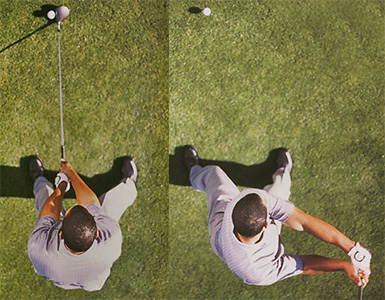
There is no set figure for the amount of weight that should be transferred to the right side during the backswing. Obviously, there must be more weight on the right side because both arms and the clubshaft move over to the right side in the backswing, but the amount of weight shift is not necessarily large. Consider this photo of Tiger Woods - taken from above.
Tiger Woods backswing - from reference number [11]
The first half of the composite photo is the address position, and the second half of the composite photo is near the end-backswing position. Note that Tiger Woods' torso is still situated between his feet, and one does not get an impression that most of his body weight has shifted onto the right heel area. Also, note that only the upper body has shifted to the right, while the lower body (pelvis area) hasn't moved much. Therefore, there is not that much total body weight transfer to the right. Beginner golfers shouldn't become fixated on the idea of transferring most of their body weight to the right during the backswing. Rather they should concentrate their efforts on getting into the correct end-backswing position by ensuring that they have a good backswing pivot action.It is important that beginner golfers avoid allowing their body weight to transfer outside the inner limits of their right foot, because they would become very unbalanced if they allowed their upper body to slide too far over to the right side. There must be a definite sense that the body weight is still located between the feet at the end of the backswing.
Note a few interesting points regarding Tiger Woods' address posture. Note that his right foot is perpendicular to the ball-target line and that his right knee is angled inwards slightly. Those two postural choices help Tiger limit right hip rotation during the backswing and thereby increase the torso's coiling power (X-factor). Finally, note that Tiger has maintained his flexed right knee throughout the backswing, and that he has not allowed the right knee to straighten.
Consider this composite photo of Ben Hogan, which also demonstrates why there is not necessarily as much total body weight transfer to the right side during the backswing (as many golfers may anticipate).
Ben Hogan backswing - from reference number [8]
The yellow line was placed on the outside of Ben Hogan's right thigh at address. Note, at the end of the backswing, that Ben Hogan's right hip has moved closer to the target as he pivots around his right knee. That means that his lower body weight is moving to the left while his upper body weight has moved to the right. Therefore, the degree of total body weight transfer to the right side is not as great as one might anticipate.I have discussed weight transfer in the backswing in a review paper called "Optimal Weight Shift in the Full Golf Swing".
Question number 3:Some golf instructors state that a golfer should keep the clubhead outside the hands during the takeaway. What does that mean?
Answer:
The clubhead should always be outside the hands (closer to the ball-target line than the hands) during the takeaway - see the following photo (composite of three seperate down-the-line photographic images showing the sequence of clubhead movements during the takeaway). The clubhead remains outside the hands because the golfer maintains a neutral wrist position and avoids over-rotating the left forearm during the takeaway. If the left forearm is allowed to over-rotate during the takeaway, the clubhead would move inside the hands (and be behind the hands and closer to the tush-line) by the end of the takeaway. Also, note that an imginary extension line drawn from the butt end of the club should remain roughly centralised between the arms during the entire one-piece takeaway if one keeps the wrists neutral and avoids any wrist over-rotation of the left forearm.
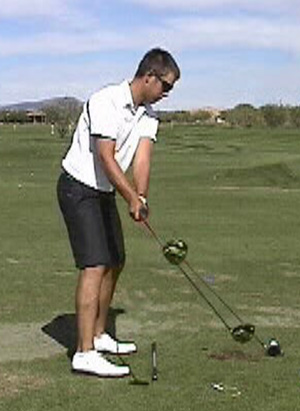
Composite image of clubhead movement during the takeaway - from reference number [1]
Note that the clubface always appears to be facing the ball during the takeaway, which indicates clubface neutrality and an absence of any over-rotation (excessive pronation) of the left forearm.Note the intermediate clubhead position - it is a few inches inside the ball-target line and about 12" behind the ball. That is a good checkpoint - and a beginner golfer should note that the clubhead is just inside the ball-target line when it has moved back about 12" in the early takeaway. If the clubhead is further than a few inches away from the ball-target line, then it suggests a takeaway that is too-inside. If the clubhead remains on the ball-target line, then it suggests a takeaway that is too-outside.
Question number 4:Your takeaway recommendation is to take the hands straight back (away from the target) in the early backswing while simultaneously turning the shoulders. Does that mean that the clubshaft will stay more-or-less on the same clubshaft plane during the early takeaway?
Answer:
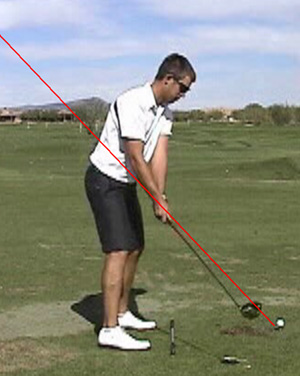
Yes, that is a correct assumption. See this down-the-line photo of Aaron Baddeley's early takeaway.
Early takeaway - from reference number [1]
The red line represents the clubshaft line at address. Notice that the clubshaft remains very close to that red line during the early takeaway, and it is acceptable to be slightly above, or slightly below, that red clubshaft line.In the following composite photograph of Ernie Els in the early takeaway and end-takeaway position, one can see that Ernie Els also takes his clubshaft back below the clubhshaft line (due to an excessive clockwise rotation of the left forearm) and that causes his clubshaft to be slightly behind the toe-line at the end of the takeaway. This is still an acceptable end-takeaway position. However, it would be very unacceptable if the clubhead was too far back, and behind the thigh, in the down-the-line view.
Ernie Els takeaway - from reference number [8]
The clubshaft should also not be far above the red clubshaft line during the early takeaway - that suggests that the golfer is moving his arms totally independently of the body during the takeaway, and that he is seperating his left arm too much from the chest wall during the takeaway. That fault commonly occurs when the golfer starts the backswing with an arm movement, rather than a combined arm-shoulder movement (one piece takeaway). The unwanted end-result will be a too steep backswing swingpath +/- reverse pivoting.The following online video offers very good advice about taking the clubshaft away on the correct plane.
See - http://www.youtube.com/watch?v=7WtzWAoZ6Zk
I think that Bender's "planeboard" is very useful in giving a beginner golfer a mental image of how to take the clubshaft back along the correct swing path. In fact, the planeboard idea allows a golfer to envision the entire clubshaft swingpath as a continuum - where the clubshaft will be on the correct clubshaft plane during the takeaway, during the immediate pre-impact phase of the downswing, and during the immediate post-impact followthrough period. If a golfer has a "complete" mental image of this inclined swingarc plane in his mind prior to starting the swing, it may allow him to more readily swing along the correct swingpath during both both the backswing and downswing.
References:
1. V1 Home Swing Analyser website. http://v2.v1home.com
2. Swing Like a Pro. Ralph Mann and Fred Griffin.
3. 100% Golf: Unlocking Your True Golf Potential. David Leadbetter.
4. The Fundamentals of Hogan. David Leadbetter.
5. How to Build a Classic Swing. Ernie Els.
6. A Swing for Life. Nick Faldo.
7. Tigers' New Swing. John Andrisani.
8. Redgoat at smugmug.com. Available at http://redgoat.smugmug.com
9. The Complete Encyclopedia of Golf Techniques. Edited by Paul Foston.
10. The Golf Swing. David Leadbetter.
11. The Stack and Tilt Swing. Michael Bennett and Andy Plummer.
.